
This document covers the following topics:
The map conversion process reads a map extract file
created by the Map Extractor or the INPUT Extractor and
transforms it into a corresponding Natural for Ajax page layout file. The
conversion process is controlled by rules and templates.
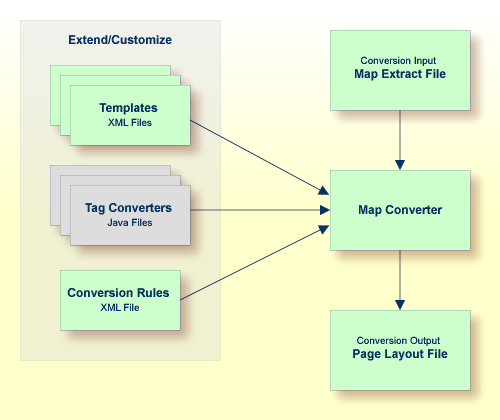
The Map Converter ships with a default set of conversion rules and corresponding template files. This set allows for default map conversions without changing rules or templates. In most cases, you will add or modify some conversion rules and/or templates to customize the conversion according to the requirements of your application.
For advanced customization, there is also the possibility to plug own Java-written conversion classes (the so-called "tag converters") into the conversion processing. But you should only do this in very rare cases.
The following topics are covered below:
By default, for each row and column in a map, a corresponding row and column is generated in the layout. By default, the Map Converter inserts the converted rows and columns at a defined position within a corresponding page template. Template and insert position can be defined by the user. Skipping or different handling of specific rows and columns can be defined via corresponding conversion rules.
The following sections describe the default processing for rows and columns in case no specific rules for different insert positions are specified:
For each row in a map, the Map Converter generates an ITR (independent table row) control with the default settings. For empty rows, an ITR control containing the control defined in the EMPTYROW_TEMPLATE is generated.
The fields and literals within a row are aligned to columns according to the following rules:
Column Start Position
If an absolute column start position is defined for a
field or literal in the map, the corresponding control in the page layout is
aligned so that it starts exactly with the specified column. This is done by
inserting a HDIST (horizontal distance) control with a corresponding width as a
filler.
Note:
A precise vertical alignment of fields is only possible
if absolute column start positions are defined for the fields.
Conversion Rules
If no absolute column start position is defined for a
field or literal in the map, a HDIST control is not added as a filler by
default. In this case, the field or literal is simply appended as the last
subnode of the current ITR control. In many cases, this would result in a
layout that requires additional manual adding of fillers. This is because
appending two field controls without adding any HDIST control often does not
look as intended. Therefore, the Map Converter includes default conversion
rules for filler settings. You can modify the default conversion rules or add
your own conversion rules to fine-tune this behavior. For more information, see
Conversion
Rules.
Column Width
A character map has a fixed number of rows and columns.
For the literal "ABCD", this means that it uses
exactly 4 columns. Calculating the correct width and height of field on a web
page is more complex. The width of "ABCD" will most
likely be greater than the width of "llll". Very
short fields (with a length of one or two characters) should have a minimum
width so that the content is fully visible. You can fine-tune the width by
adapting the predefined conversion rule variable
$$widthfactor$$ or by adding your own conversion
rules. For more information, see Conversion
Rules.
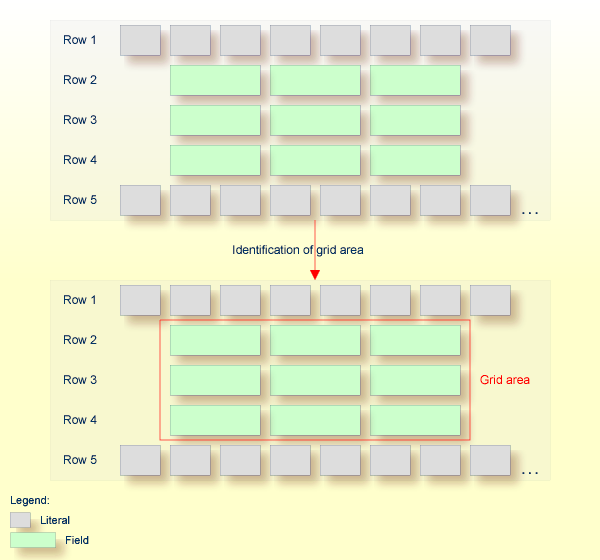
The map extract file also contains information about arrays. With Application Designer, arrays are usually rendered as grid controls. Application Designer provides a couple of grid controls:
TEXTGRID2 - a grid containing text.
TEXTGRIDSSS2 - a text grid with server-side scrolling.
ROWTABLEAREA2 - a grid containing other controls.
MGDGRID - a managed grid.
The Map Converter tries to convert arrays into suitable grid controls. Before the real conversion of arrays to grid controls can be done, the Map Converter must first identify the sequence and grid areas on the map. During this process of area identification, the Map Converter groups literals and fields together into sequences and areas. Whether the corresponding fields or literals are actually converted into a grid depends on the conversion rules that are executed after this area identification step.
This process of area identification is simply a kind of marking. The corresponding sequence and area objects can be used as source in the conversion rules to define the actual controls.
The conversion is done in several steps:
The map extract file is loaded and the corresponding rows and columns are collected.
The sequence and grid areas are identified.
For each row, the list of items in this row is processed, according to the column order. An item can be one of the following: a simple literal, a field or an area. For each found item, the corresponding conversion rules are executed.
Different conversion projects have different requirements to the conversion process. The Map Converter is driven by conversion rules and thus allows for flexible control of the conversion process. Conversion rules define how source items (items from a given map extract file) are mapped to target items (items in the page layout to be created) and under which conditions a certain source item shall be converted to a certain target item. The Map Converter is delivered with a default set of conversion rules contained in the file convrulesDefault.xml in the subdirectory convrules in the Application Designer project njxmapconverter. A more application-specific conversion can be achieved by copying and modifying the default set of rules or by adding own rules.
Each set of conversion rules is defined in an XML file according to the XML schema convrules.xsd in the subdirectory convrules in the Application Designer project njxmapconverter. Each individual conversion rule consists of a name, a description, a source and a target. The source identifies an element in the map extract file. The target identifies controls and attributes to be generated in the page layout.
The conversion rules make often use of regular expressions and so-called capture groups. For more information about regular expressions, see for instance the web site http://www.regular-expressions.info.
The following topics are covered below:
The following examples are provided:
The following example rule (contained in the default
conversion rules file) defines that fields in the map extract file with the
qualification AD=O shall be converted to field controls with the
property displayonly="true".
<convrule rulename="Ofield_rule">
  <description>Defines the control template to be used for input fields
  which are specified as output only.</description>
  <source>
    <sourceitem>ifField</sourceitem>
    <sourcecond>
      <condattr>//ifAD</condattr>
      <condvalue>.*O.*</condvalue>
    </sourcecond>
  </source>
  <target>
    <targetitem>$OFIELD_TEMPLATE</targetitem>
  </target>
</convrule>
The source element specifies that this rule applies to fields
(element ifField) that have an AD parameter
(element ifAD) that contains a letter
"O" (matching the regular expression
.*O.*). The target element specifies that these fields are to be
converted to whatever is contained in the template file
OFIELD_TEMPLATE.xml. This template file must be contained
in the same directory as the conversion rules file.
The template file contains the detailed specification of the field to be generated. The file OFIELD_TEMPLATE.xml delivered with the map converter contains, for instance, the following:
<?xml version="1.0" encoding="UTF-8"?>
<field valueprop="$$" width="$$" noborder="true" displayonly="true"/>
That is, the resulting field is generated without a border
(noborder="true") and as a display-only field
(displayonly="true"). The valueprop and
width to be assigned ($$) are not determined by this
rule, but are left under the control of other rules.
The following example rule (contained in the default
conversion rules file) defines that for all fields that are defined with the
format An in the map extract file, an attribute
datatype="string n" shall be added to the element that is
generated into the page layout.
<convrule rulename="AfixType_rule">
  <description>All Natural "An" dfFields are converted to the
  Application Designer datatype "string n". Example: "A10" is
  converted to "string n".</description>
  <source>
    <sourceitem>dfField</sourceitem>
      <selection>
        <selectattr>dfFormat</selectattr>
        <selectval>A([0-9]+)</selectval>
      </selection>
    </source>
    <target>
      <targetitem>$$</targetitem>
      <targetattr>
        <attrname>datatype</attrname>
        <attrvalue>string $1</attrvalue>
      </targetattr>
    </target>
</convrule>
The source element specifies that this rule applies to fields
that have in the field definition (element dfField) a format
(element dfFormat) of An (matching the
regular expression A([0-9]+)). The target element specifies that
for whatever element is generated into the page layout for this kind of fields,
an attribute datatype="string $1" shall be added. In terms of
regular expressions, $1 refers to the contents of the first
"capture group" of the regular expression A([0-9]+).
In case of a format A20, $1 will evaluate to 20 and thus an
attribute datatype="string 20" will be generated.
The control to be generated into the page layout
(<targetitem>$$</targetitem>) is not determined by
this rule, but is left under the control of other rules.
Summary: The combination of the two rules in example 1 and 2
makes sure that output fields, for example, of format A20 are converted to
field controls with displayonly="true" and datatype="string
20".
The following more advanced rule was created for the use of a specific conversion project. The following task had to be achieved: A literal of the format "F10 Change" shall be converted to a button that is named "F10", is labeled "Change" and raises an event named "PF10". With the explanations from the examples above, the rule should be nearly self-explanatory.
Note that according to the rules of regular expressions, the
variable $1 refers to the string matched by the expression part in
the first pair of parentheses (the first "capture group"), that is
for instance "F10", and the variable $3
refers to the string matched by the expression part in the third pair of
parentheses (the third "capture group"), that is for instance
"Change".
<convrule rulename="Function_rule" lone="true">
<description>Generates a button from specific literals.</description>
  <source>
    <sourceitem>ltLiteral</sourceitem>
    <selection>
      <selectattr>ltName</selectattr>
      <selectval>(F[0-9]+)(\p{Space})(.*)</selectval>
    </selection>
  </source>
  <target>
    <targetitem>$BUTTON_TEMPLATE</targetitem>
    <targetattr>
      <attrname>name</attrname>
      <attrvalue>$1</attrvalue>
    </targetattr>
    <targetattr>
      <attrname>method</attrname>
      <attrvalue>P$1</attrvalue>
    </targetattr>
  </target>
  <target>
    <targetitem>hdist</targetitem>
    <targetattr>
      <attrname>width</attrname>
      <attrvalue>4</attrvalue>
    </targetattr>
  </target>
  <target>
    <targetitem>label</targetitem>
    <targetattr>
      <attrname>name</attrname>
      <attrvalue>$3</attrvalue>
    </targetattr>
  </target>
</convrule>
The Map Converter is delivered with a default set of conversion rules contained in the file convrulesDefault.xml in the subdirectory convrules in the Application Designer project njxmapconverter. A more application-specific conversion can be achieved by copying and modifying the default set of rules or by adding own rules.
The following topics are covered below:
Like every conversion rules file, the file contains exactly one "Root_rule". The root rule specifies the template file to be used for the overall page layout. In this template file, the application-specific page layout can be defined, using company logos, colors, fonts, etc. The root rule must always have "map" as the source item and must refer to some variable defined in the page template file as the target item. The place of that variable specifies where in the page template the converted map items are placed. See for instance the root rule from the default conversion rules:
<convrule rulename="Root_rule">
  <description>Exactly one rule with the sourceitem "map" is required.
  This rule must define the natpage template and insert position of
  the conversion result.</description>
  <source>
    <sourceitem>map</sourceitem>
  </source>
  <target>
    <targetitem>$NATPAGE_TEMPLATE.$MAPROOT</targetitem>
  </target>
</convrule>
The rule refers to a page layout template NATPAGE_TEMPLATE.xml and refers to a variable defined in that template where the converted map elements shall be placed. Here is the corresponding content of the page layout template NATPAGE_TEMPLATE.xml:
<?xml version="1.0" encoding="UTF-8"?>
<natpage xmlns:njx=http://www.softwareag.com/njx/njxMapConverter
  natsource="$$NATSOURCE$$" natsinglebyte="true">
  <titlebar name="$$TITLEVAR$$" align="center">
  </titlebar>
  <pagebody>
    <njx:njxvariable name="MAPROOT"/>
  </pagebody>
  <statusbar withdistance="false"/>
</natpage>
This template specifies the following:
The overall page layout shall consist of the elements
titlebar, pagebody and statusbar.
The converted map elements shall be placed into the
pagebody.
The name of the Natural adapter to be generated from that
page layout shall be determined by a rule
(natsource="$$NATSOURCE$$"). There must be a corresponding rule
that yields a value for the variable
$$NATSOURCE$$, for instance derived from the map
name. We shall see later how to define such a rule.
All strings in the page layout shall be mapped to Natural
variables of type A in the adapter interface
(natsinglebyte="true").
The text displayed in the title bar shall be determined by
a rule (name="$$TITLEVAR$$"). There must be a corresponding rule
that yields a value for the variable $$TITLEVAR$$,
for instance derived from a literal in the first row in the map. We shall see
later how to define such a rule.
The default conversion rules file contains a set of rules that control the conversion of data types: from Natural data types in the map to corresponding Application Designer data types in the page layout. An example was given above in Example 2. Usually, these rules need not be adapted. They have been chosen in such a way that the process of extracting maps, converting them to layouts and generating Natural adapters for these usually yields the same data types in the adapter interface as in the map interface.
Other default conversion rules define a default mapping for literals, modifiable fields, output fields, modifiable grids, output grids, system variables and fields with special characters like "#" in their names. These rules need only be adapted in special cases.
Some conversion rules need to be adapted in nearly all conversion projects. These rules are contained in the section "APPLICATION SPECIFIC RULES" in the default conversion rules file.
The following topics are covered below:
Each application has a different naming convention for Natural
objects. There is a rule (it is named
"Natsource_rule" in the default conversion rules
file) that controls how adapter names are derived from map names. The rule
replaces the first letter "M" in the map name with
an "A" and places the resulting string into the
variable NATSOURCE. Remember that in the default
page template, the natsource property of NATPAGE
(which defines the adapter name to generated) is preset with the variable
reference $$NATSOURCE$$. Thus, a map with the name
TESTM1 results in an adapter named TESTA1. Other
naming conventions for maps will require a more sophisticated adapter naming
rule.
Each application has a different way of showing titles in a
map. Often, the title string shall be placed into the title bar of the
resulting page layout during conversion. There is a rule (in the default
conversion rules file, it is named "Titlevar_rule")
that controls how the title string in a map is recognized. The rule searches in
the first row of a map for a literal enclosed in
"***" and places the resulting string into the
variable TITLEVAR. Remember that in the default
page template, the name property of the
titlebar element (which defines the string to be
shown in the title bar) is preset with the variable reference
$$TITLEBAR$$. So this rule takes care that the found literal is
placed into the titlebar element of the page. Other
conventions for map titles will require a more sophisticated rule.
When writing your own conversion rules, you can use the default rules as examples. In order to write rules from scratch, you need to know the elements of the map that can be referred to as source items and the full syntax of the rule definition.
The XML schema of the map extract files is contained in the file naturalmap.xsd in the subdirectory convrules in the Application Designer project njxmapconverter.
As described in Processing of Sequence and Grid Areas, one step in the map conversion is the detection of sequence and grid areas in the map. Conversion rules can also refer to the detected sequence and grid areas. The XML schema of the map extract files after the detection of sequence and grid areas is described in the extended XML schema naturalmapxml_extended.xsd in the same directory.
The syntax of the conversion rules is described by the XML schema convrules.xsd in the same directory.
The basic structure of a conversion rule is as follows:
<convrule rulename="...">
  <description>...</description>
  <source>...</source>
  <target>...</target>
  <target>...</target>
  ...
</convrule>
This means, a conversion rule consists of one
source element and (optionally) one or several
target elements. The
source element identifies an item from the map. The
target elements specify the conversion output. If no
target elements are specified, nothing is generated
from the identified source element.
The basic structure of a source
element is as follows (example):
<source>
  <sourceitem>ltLiteral</sourceitem>
    <selection>
      <selectattr>ltName</selectattr>
      <selectval>\*\*\*(.*)\*\*\*</selectval>
    </selection>
    <sourcecond>
      <condattr>ltRow</condattr>
      <condvalue>1</condvalue>
    </sourcecond>
</source>
The sourceitem element refers to a
specific kind of item on a map, such as a literal (ltLiteral), a
defined field (dfField), an input field (ifField) or
the identifier of the map (identity). The elements that can be
used here are specified by the XML schema that describes the map extract after
the detection of sequence and grid areas
(naturalmapxml_extended.xsd). Therefore, the elements
sequenceArea and
gridArea, which are only known after this
processing, can also be used here.
The selectattr and
selectval elements are used to match an element of a
specific kind by its attribute values. The selectval
element uses regular expressions to perform a match. Capturing groups such as
(.*) can be used here, so that the target part of the conversion
rule can later refer to parts of the matched value.
The selectattr element not only
accepts single attributes but also XPATH expressions. You can find an example
for the usage of XPATH expressions in the file
convrulesSNoGrids.xml:
<source>
<sourceitem>ifField</sourceitem>
	<selection>
		<selectattr>ifIndex/ifOffset</selectattr>
		<selectval>([1-9]*)</selectval>
	</selection>
</source>
In the above example all
ifIndex/ifOffset values, which are subnodes of
the currently processed ifField are found. For each
value found it is checked whether it matches the regular expression specified
in the selectval element. Only if all values found
match the regular expression, the capturing is done on the concatenated found
values. If any values found do not match the regular expression, the rule is
not applied to the ifField.
When you are using XPATH expressions, it is important to keep the two-step process in mind:
matching for each single value and
capturing on the concatenated values.
Finally, there can be zero, one or several
sourcecond elements, which allow to define further
to which map items the rule applies. If several
sourcecond elements are specified, the rule is
triggered only if all conditions match (logical AND).
The basic structure of a target
element is as follows:
<target>
  <targetitem>...</targetitem>
  <targetattr>
    <attrname>...</attrname>
    <attrvalue>...</attrvalue>
  </targetattr>
  <targetattr>
    ...
  </targetattr>
  ...
</target>
In detail, there are several different options to specify a target item:
Specify the root element name of an Application Designer control, along
with its attributes and attribute values. The attribute value can be a
constant, a variable or a reference to a capturing group from a regular
expression in a sourcecond element of the same rule.
In this case, the corresponding control is generated during conversion.
<target>
  <targetitem>label</targetitem>
  <targetattr>
    <attrname>height</attrname>
    <attrvalue>10</attrvalue>
  </targetattr>
  <targetattr>
    <attrname>width</attrname>
    <attrvalue>$$width$$</attrvalue>
  </targetattr>
  <targetattr>
    <attrname>name</attrname>
    <attrvalue>$1</attrvalue>
  </targetattr>
</target>
Specify the name of a variable that is defined in the
conversion rules file in a convvariable element.
<target>
  <targetitem>$$name$$</targetitem>
</target>
Refer to the name of a template file, optionally along with attribute names and values. In this case, whatever is contained in the template file will be generated. Attribute definitions in the template file are replaced.
<target>
  <targetitem>$BUTTON_TEMPLATE</targetitem>
  <targetattr>
    <attrname>name</attrname>
    <attrvalue>$1</attrvalue>
  </targetattr>
  <targetattr>
    <attrname>method</attrname>
    <attrvalue>P$1</attrvalue>
  </targetattr>
</target>
Refer to the name of a template variable and the name of a template file, separated by a dot. In this case, the template variable is replaced with whatever is contained in the template file.
<target>
  <targetitem>$GRIDITEM.$GRIDITEM_TEMPLATE</targetitem>
</target>
Only in the root rule: Specify the name of a template file and the name of a template variable that is contained in this file, separated by a dot. In this case, the template variable is replaced with the entire result of the map conversion.
<target>
  <targetitem>$NATPAGE_TEMPLATE.$MAPROOT</targetitem>
</target>
Specify "$$" as the target item. This is useful when writing a more general rule that is to apply after another more specific rule has already created a target item. The attributes specified along with the target item "$$" are applied to the already created target item, whatever this target item was.
<target>
  <targetitem>$$</targetitem>
  <targetattr>
    <attrname>datatype</attrname>
    <attrvalue>xs:double</attrvalue>
  </targetattr>
</target>
Specify "$." as the target item. This refers to the template that is currently being processed. The attributes specified along with the target item "$." are applied to the current template.
<target>
  <targetitem>$.</targetitem>
  <targetattr>
    <attrname>$$NATSOURCE$$</attrname>
    <attrvalue>$1-A</attrvalue>
  </targetattr>
</target>
The Map Converter assembles page layouts from templates. Which templates are used, how they are assembled and how variables in templates are filled is controlled by the conversion rules.
A template file describes the general layout of an entire Application Designer page layout or of an individual Application Designer control. A template can contain variables and references to other templates. During conversion, the Map Converter resolves the structure of the templates and fills the variables with specific values, depending on the contents of the map.
A template file can describe a simple control such as a FIELD control or a more complex control such as a TEXTGRIDSSS2 control. For the same control, multiple templates may exist. For example, an ofield_TEMPLATE and an ifield_TEMPLATE may both be templates for the FIELD control. The ofield_TEMPLATE would be used for output fields, the ifield_TEMPLATE for modifiable fields. Which template is used for which subset of fields of the map is specified in the conversion rules.
Template files are well-formed XML files which contain control definitions. They are placed in the folder convrules of your Application Designer project directory. The file name must end with "_TEMPLATE.xml". The Map Converter ships with a set of default template files.
The following topics are covered below:
As already seen in the examples above, templates can contain variables. Variables can be freely defined by the user. Example:
<?xml version="1.0" encoding="UTF-8"?>
<natpage xmlns:njx=http://www.softwareag.com/njx/njxMapConverter
  natsource="$$NATSOURCE$$" natsinglebyte="true">
  <titlebar name="$$TITLEVAR$$" align="center">
  </titlebar>
  <pagebody>
    <njx:njxvariable name="MAPROOT"/>
  </pagebody>
  <statusbar withdistance="false"/>
</natpage>
Variables as placeholders for the property values of
controls
An example is the variable
$$TITLEVAR$$ in the template above. If a template
contains a variable such as name="$$TITLEVAR$$", there must be a
corresponding rule that yields a value for the variable
$$TITLEVAR$$. The Map Converter replaces the
variable with this value.
The built-in variable $$ has a
specific meaning. If it occurs as a property value, there is no specific rule
needed to produce the value. Instead, the Map Converter receives the value from
a so-called tag converter. Tag converters are Java classes that are delivered
with the Map Converter. Exchanging or writing your own tag converters is an
advanced way of extending the Map Converter and is usually not required. See
Tag
Converters for further information.
Variables as placeholders for controls and
containers
An example is the variable
MAPROOT in the template above. Such a variable is
defined by inserting an NJX:NJXVARIABLE control (from the controls palette of
the Layout Painter) into a template. As long as the XML of the template is
well-formed, an NJX:NJXVARIABLE control can be inserted at any place in the
template. Conversion rules refer to this variable as $MAPROOT.
Notice that the value in the name property of an
NJX:NJXVARIABLE control does not start with $. Instead, the NJX:NJXVARIABLE
control itself defines that it is a variable. The NJX:NJXVARIABLE control is a
special control in the Natural Extensions section of the
Layout Painter's controls palette.
Templates can refer to other templates. This can be done via adding variables. The variable can serve as a placeholder for another template. The template name is defined via a corresponding rule.
Example (GRID_TEMPLATE.xml):
<?xml version="1.0" encoding="UTF-8"?>
<rowtablearea2 withborder="false" griddataprop="$$gridname$$" rowcount="$$" >
  <tr>
    <hdist></hdist>
    <njx:njxvariable name="GRIDHEADER" />
  </tr>
  <repeat>
    <tr>
      <hdist></hdist>
      <njx:njxvariable name="GRIDITEM" />
    </tr>
  </repeat>
</rowtablearea2>
This means: A conversion rule like the following maps a grid area detected in the map to a ROWTABLEAREA2 control and formats the header and rows as specified in the templates GRIDHEADER_TEMPLATE.xml and GRIDITEM_TEMPLATE.xml.
<convrule rulename="Griditem_rule">
    <description>Mapping rule for the items of grid.</description>
    <source>
      <sourceitem>gridArea//ifField</sourceitem>
    </source>
    <target>
      <targetitem>$GRIDITEM.$GRIDITEM_TEMPLATE</targetitem>
    </target>
    <target>
      <targetitem>$GRIDHEADER.$GRIDHEADER_TEMPLATE</targetitem>
    </target>
</convrule>
Only NATPAGE templates (like the default NATPAGE template NATPAGE_TEMPLATE.xml) can be edited with the Layout Painter. Templates for individual controls must currently be edited using a text editor.
A template must be a valid XML document. The root element must
correspond to the root element of a valid Application Designer control. Templates can contain
variables. A special variable is the variable $$.
Example:
<?xml version="1.0" encoding="UTF-8"?>
<button name="$$" method="$$"></button>
Each template is processed by a so-called tag converter. Tag
converters are in charge of resolving the variable
$$. A tag converter is a Java class that must
support a specific interface and be available in the class path of the Map
Converter. Which tag converter is used depends on the root element of the
template.
In the above example, the root element is the BUTTON control. The following rule applies:
If a Java class with the name
com.softwareag.natural.mapconverter.converters.BUTTONConverter
is found in the Java class path, this Java class is used as the tag converter.
Otherwise, the class
com.softwareag.natural.mapconverter.converters.DEFAULTConverter
is used as the tag converter.
In the above example, the Map Converter tries to find the class
BUTTONConverter first. Since a specific tag converter
for the BUTTON control is not delivered with the Map Converter, the class
DEFAULTConverter is used as the tag converter.
In order to supply a custom tag converter for the BUTTON control,
for instance, you would have to create a Java class
BUTTONConverter that belongs to the package
com.softwareag.natural.mapconverter.converters and make
it available in the Java class path of the Map Converter.
Detailed information on how to write your own tag converters is provided in the Application Designer development workplace as Javadoc; see Map Converter Extension API in the Natural Tools node of the navigation frame (under ).