This document covers the following topics:
After the Map
Extractor or the INPUT Extractor has been used to
create extract files from maps, the Map Converter is the next tool used in the
process of converting a map-based application into a Natural for Ajax
application. The Map Converter processes the map extract files that were
created by the Map Extractor or the INPUT Extractor. It analyzes
the map extract files and creates a Natural for Ajax page layout from each map
extract file. Controls on the map are converted to controls on the page. Many
features of the original map are converted to features of the page.
By default, the Map Converter uses a predefined set of page templates and conversion rules that control the conversion process. The templates and the conversion rules can be modified or extended to adapt the converter to the requirements of a specific conversion project. With the advanced option to program own conversion handlers, the Map Converter provides additional flexibility and extensibility.
The Application Designer development workplace contained in Natural for Ajax provides additional Natural tools for map conversion:
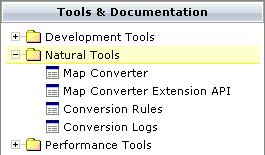
The following Natural tools can be invoked from the navigation frame:
Map Converter
This tool is used for mass generation of layouts.
For quick start with this tool, see
First
Steps below. For detailed information on all options of
this tool, see Using the
Map Converter.
You can also generate a single layout while designing a page in the Layout Painter. An editor extension is available for this purpose. See Using the Editor Extension for further information.
Conversion Rules
You can use this tool to copy the conversion rules from other
projects to the current project. See Using the Conversion Rules
Tool for further information.
Conversion Logs
You can use this tool to view or delete the log files that
have been created during the conversion. See
Using the Conversion Logs
Tool for further information.
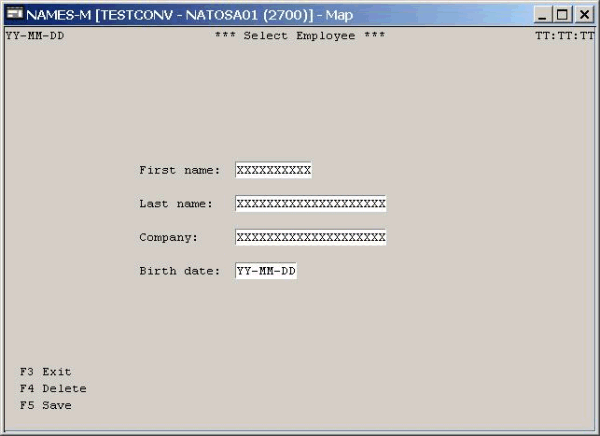
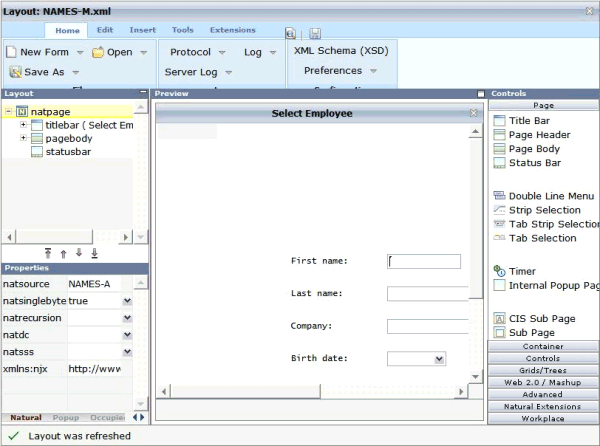
We start with a simple map like the one below and we suppose that
you have already created a map extract file with the Map Extractor. The map is
contained in a Natural library named TESTCONV. The map extract
file has been stored in the nat subdirectory of an Application Designer
project with the corresponding name testconv.
 To create a Natural for Ajax page layout from an extract
file
To create a Natural for Ajax page layout from an extract
file
Open the Application Designer development workplace.
In the Natural Tools node of the navigation frame (which is visible when the button has previously been chosen), choose Map Converter.
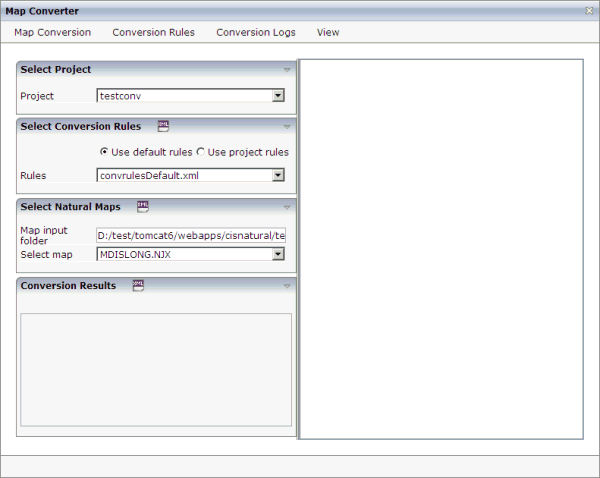
The Map Converter is opened.
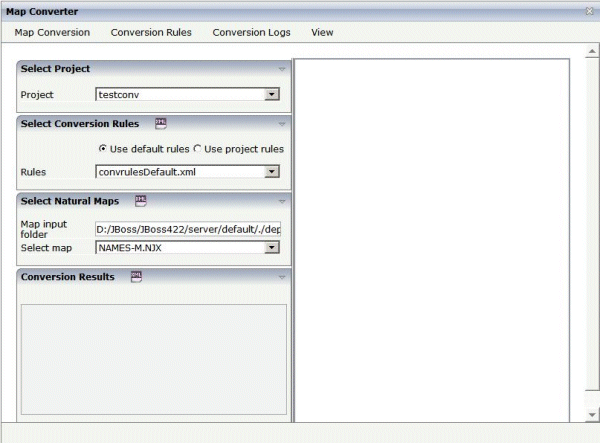
Select the project in which you want to store the page layouts that are to be generated. That is, select your project testconv.
Select the conversion rules file to be used. That is, stick with the rules file convrulesDefault.xml to begin with.
Select the map input folder, that is, the folder in which your map extract files are stored.
Select a map extract file.
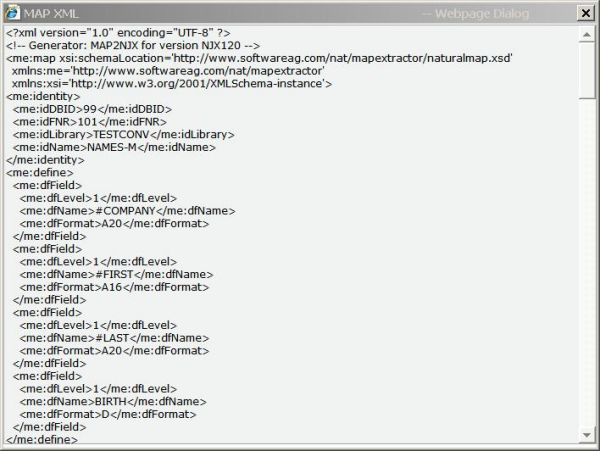
From the menu, choose to display the content of the map extract file in XML format.
Or:
Choose the icon that is shown in the Select
Natural Maps header.
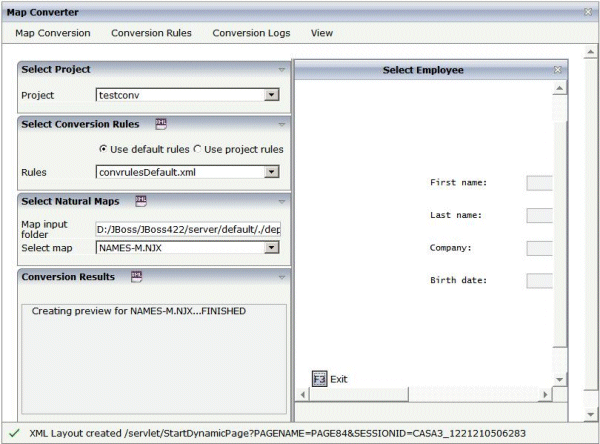
From the menu, choose to display the resulting page layout as it would turn out using the selected conversion rules file.
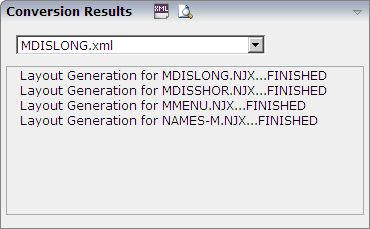
The right side shows a preview of the generated page layout. The Conversion Results area shows a status message which informs either about successful conversion or an error that has occurred.
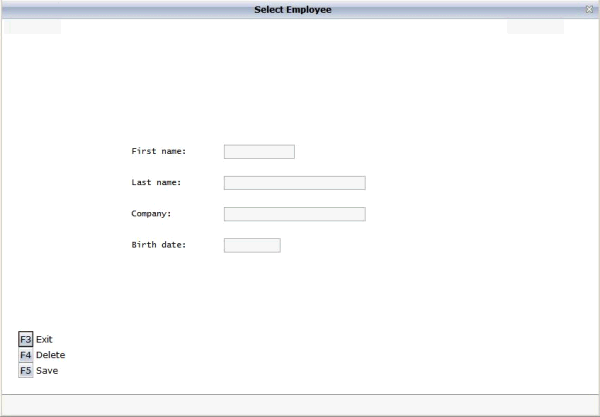
From the menu, choose to display the resulting page layout in a separate browser window.
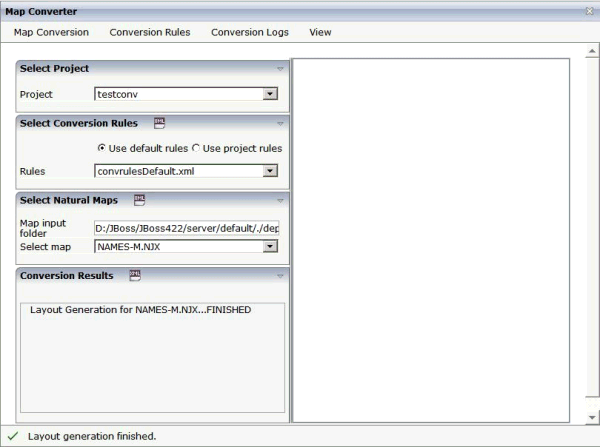
After having previewed the conversion result for one or several maps in your project, choose from the menu to generate page layouts for all map extract files contained in the selected folder.
For now close the Map Converter and switch to the project testconv to continue working on the generated page layout.
You might wish to assign a different name for the adapter to be generated for the page, change other properties or modify the layout in any other way. Then save the layout and generate the adapter as usual.
When you import the adapter into your Natural library, you will notice that the parameter data area is the same as in the original map. This is the case even though the map uses system variables and variables with special characters. The necessary translation is done inside the generated adapter code and does not influence the application code.
Now create a main program for the adapter and run it in the browser.
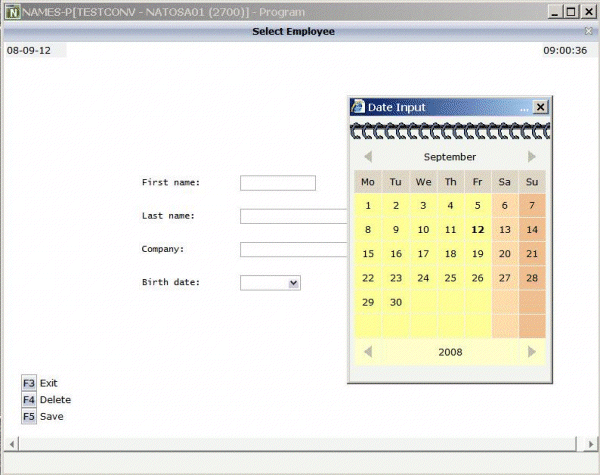
You may have noticed the following effects of the applied conversion rules:
The title in the first row of the map has been placed into the caption of the page and the asterisks have been stripped off. Your application will quite surely have a different layout of the map titles. The conversion rules can therefore be adapted to accommodate the needs of your application, and the rule that identifies the title and places it into the caption is just a simple application of customizing the conversion rules.
The literals such as "F4 Delete" on the map have each been turned into a button control and a label. This is also due to a sample conversion rule contained in the default conversion rules.
The date field has been converted to a field control with the data type "date". This enables the user to select the date with the Date Input dialog box.
The full concept of customizing the Map Converter is described in Customizing the Conversion Process.
The Map Converter is used for mass generation of layouts.
In the First Steps, you have already learned how to use the Map Converter. The topics below provide detailed descriptions of the different options and menu commands that are available in the Map Converter:
When you invoke the Map Converter, the following dialog appears.
To invoke the Map Converter
In the Natural Tools node of the navigation frame (which is visible when the button has previously been chosen), choose Map Converter.
In order to start the generation, you have to select a project, a conversion rules file and the folder containing your map extract files. The following options are available for this purpose:
- Project
This drop-down list box provides for selection all Application Designer projects that are currently defined.
Select the project in which you want to store the page layouts that are to be generated.
- Use default rules
When this option button is selected, the default conversion rules and related templates are used. These rules are stored in the subdirectory convrules of the project directory njxmapconverter.
- Use project rules
When this option button is selected, the project-specific conversion rules are used. These rules are contained in the subdirectory convrules of your project directory.
When your project does not yet have any project rules and you select this option button, the Conversion Tool is automatically shown in a dialog. You can then copy the default conversion rules and templates to the currently selected project. It is recommended that you copy all or part of the default rules and related templates into your project and adapt the copies to the requirements of your application. See Using the Conversion Rules Tool for further information.
You can also invoke the Conversion Tool manually. To do so, you choose from the menu.
- Rules
This drop-down list box provides for selection all available conversion rules files. When the Use default rules option button is selected, the default rules files are shown. When the Use project rules option button is selected, the rules files in the project directory are shown.
Select the conversion rules file that is to be used.
You can display the XML code of the selected conversion rules file in a dialog. To do so, you either choose the icon that is shown in the Select Conversion Rules header or you choose from the menu.
- Map input folder
Specify the folder which contains the map extract files that are to be processed.
- Select map
Optional. This drop-down list box provides for selection all map extract files that are stored in the currently selected map input folder.
For mass generation, it is not required that you select a map. However, you can select a map, for example, if you want preview the layout of the resulting Application Designer page as it would turn out using the selected conversion rules file.
You can display the XML code of the selected map extract file in a dialog. To do so, you either choose the icon that is shown in the Select Natural Maps header or you choose from the menu.
When you choose one of the following commands from the menu, the currently selected conversion rules file and the currently selected map extract file are used for preview or generation of a single layout from a single map extract file:
- Preview Page Layout
Shows a single page layout in the preview area of the Map Converter (on the right side).
- Preview in Browser
Shows a preview of a single page layout in a separate browser window.
- Generate Selected Layout
Generates a single page layout. The resulting file is stored in the currently selected project.
When you choose the following command from the menu, the currently selected conversion rules file and all map extract files in the selected map input folder are used as input for the mass generation:
- Generate All Layouts
Generates all page layouts (mass generation). The resulting files are stored in the currently selected project.
After a preview or generation, you can either choose the icon that is shown in the Conversion Results header or you choose the following command from the menu:
- Show Layout XML Definition
Shows the XML layout definition for the page which was last generated or previewed in a dialog.
When the last generation was a mass generation, an additional drop-down list box is shown under Conversion Results. This drop-down list box provides for selection the names of all generated page layouts. When you choose the command (or the corresponding icon), the XML layout definition for the page which is currently selected in the drop-down list box is shown in a dialog.
After a mass generation, an additional icon for previewing a generated page layout is shown in the Conversion Results header. When you choose this icon, the layout for the page which is currently selected in the drop-down list box is shown in the preview area of the Map Converter (on the right side).
When you choose the command from the menu, the Conversion Logs tool is shown in a dialog. For further information on the options in this dialog, see Using the Conversion Logs Tool.
For example, when you have created a new project which is not yet visible in the Map Converter, you can choose the command from the menu of the Map Converter. This reloads all projects, conversion rules and map extract files and resets the contents of the dialog.
An editor extension, the Map Conversion Assistant, is used to generate a single layout while designing a page in the Layout Painter. In this case, you fill an empty layout with the information from a map extract file.
To add a map to an empty layout using the editor extension
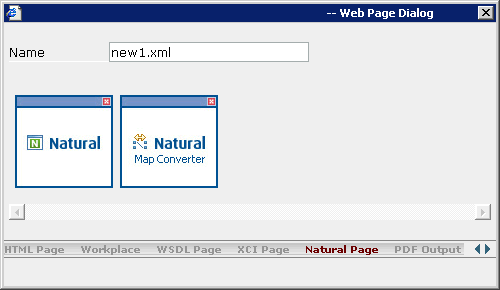
Create a new layout using the Natural Map Converter template.
From the Extensions tab of the Layout Painter, choose Map Conversion Assistant.
The following area is now shown in the Layout Painter.

Select either the Use default rules option button or the Use project rules option button. See Setting the Conversion Options for information on these option buttons.
Optional. When you choose the button, you can copy the default conversion rules and templates to the current project. In this case, the Conversion Rules tool is shown in a dialog. For further information on the options in this dialog, see Using the Conversion Rules Tool.
From the Rules drop-down list box, select the conversion rules file that is to be used. The rules files that are provided for selection in this drop-down list box depend on the setting of the option buttons (either the default rules or the project rules are shown).
Optional. When you choose the button, the XML code of the selected conversion rules file is shown in a dialog.
In the Map input folder text box, specify the folder which contains the map extract files.
From the Select map drop-down list box, select the map that is to be used.
The XML layout definition of the selected map is now shown at the bottom of the Map Conversion Assistant.
Choose the button.
The map description is converted to the corresponding layout elements and these elements are added to the current layout, which is now shown in the preview area.
The button is now dimmed. If you want to remove the elements you have added to the page, you can choose the button.
Optional. When you choose the button, the Conversion Logs tool is shown in a dialog. For further information on the options in this dialog, see Using the Conversion Logs Tool.
Modify the layout as usual.
Using this tool you can copy the default conversion rules and templates to a selected project for modification.
To invoke the Conversion Rules tool
In the Natural Tools node of the navigation frame (which is visible when the button has previously been chosen), choose Conversion Rules.
Or:
When the Map
Converter is currently shown, choose from the menu.
Or:
When the editor
extension is currently shown, choose the button.
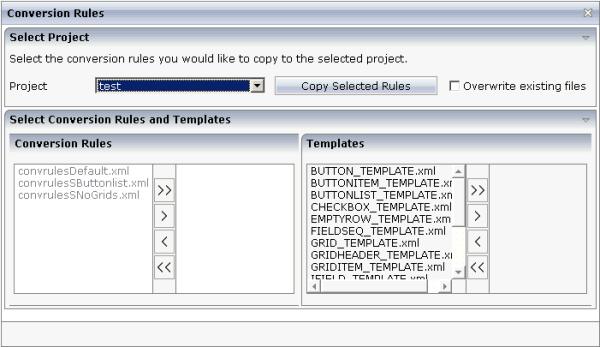
To copy the conversion rules
From the Project drop-down list box, select the project into which you want to copy the conversion rules.
In the Conversion Rules box, select the rules file(s) that you want to copy and choose the button.
Or:
If you want to copy all files, choose the
button.
The selected files are shown on the right side of the Conversion Rules box.
To deselect one or more files, you can use the or button.
For each selected rules file, the templates that are used in the rules file are automatically selected in the Templates box, so that always a consistent set of rules and templates is selected for copying.
Optional. If you want to overwrite any existing rules and templates files with the same names in the selected project, activate the Overwrite existing files check box.
Choose the button to copy the rules and templates files to the selected project.
For the most common conversions the following sample conversion rules files exists:
| File | Description |
|---|---|
| convrulesDefault.xml | Basic conversion rules for FIELD, TEXTGRIDSSS2 and ROWTABLEAREA2 controls. |
| convrulesFieldlist.xml | Example rules for NJX:FIELDLIST and NJX:FIELDVALUE controls. |
| convrulesFieldlist2.xml | Example rules for NJX:FIELDLIST and NJX:FIELDITEM controls. |
| convrulesMultidimensionalArrays.xml | Example rules for ROWTABLEAREA3. |
| convrulesSButtonrow.xml | Example rules for arranging all identified functions as buttons in a row at the bottom of the page layout. |
| convrulesSNoGrids.xml | Arrays are also mapped to simple FIELD controls. No grid controls are generated. |
| convrulesTextids.xml | Example rules for using a conversion listener to generate TEXTIDs (= multilanguage support). |
| convrulesCVVariables.xml | Example rules to generate the corresponding attributes and data controls for CV variables in the page layout. |
See also the comments on top of each conversion rules file for further details.
Using this tool you can view the log files that have been created during the conversion of Natural maps to Natural for Ajax layouts. You can also delete these log files.
To invoke the Conversion Logs tool
In the Natural Tools node of the navigation frame (which is visible when the button has previously been chosen), choose Conversion Logs.
Or:
When the Map
Converter is currently shown, choose from the menu.
Or:
When the editor
extension is currently shown, choose the button.
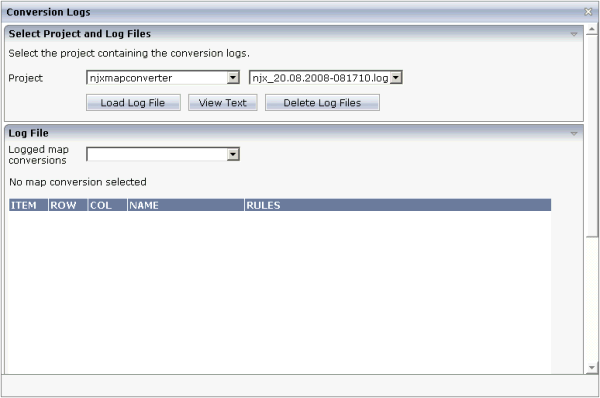
To view a log file
From the Project drop-down list box, select the project for which you want to view a log file.
The log files contained in this project are shown in the drop-down list box to the right.
Select the log file that you want to view.
Choose the button.
Log lines for the selected log file are now shown at the bottom of the tool. Each log file contains the conversion results of one or several maps. The log lines that are shown belong to an individual map; this is the map that is selected in the Logged map conversions drop-down list box.
Optional. Select a different map from the Logged map conversions drop-down list box.
The conversion result of the newly selected map is immediately shown at the bottom of the tool.
Optional. Choose the button to display the content of the selected log file as a CSV file in a dialog. This shows the conversion results for all maps.
To delete log files
Select the project for which you want to delete the log files.
Choose the button.
A dialog appears asking to confirm the deletion.
Choose the button to delete all log files in the selected project.