
This section describes the attributes which are part of a report definition:
Default values for report attributes can be set by the system administrator in Report Defaults.
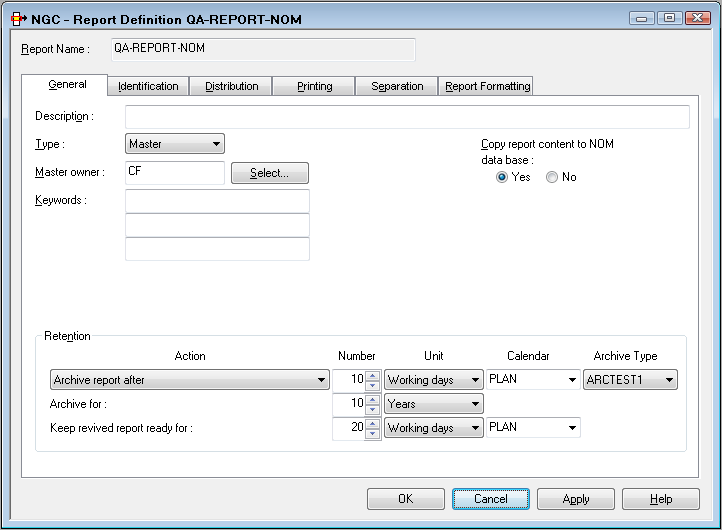
On this screen you define the general attributes of the report.
| Field | Explanation | |||
|---|---|---|---|---|
| Report Name | Enter a report name before any other data when creating a new report. This field is protected when modifying an existing report. | |||
| Description | Enter a short description for the report. | |||
| Type | Created | A definition created automatically during processing of a master report or default definition or copied from another created definition. You cannot define a report as type "Created". | ||
| Default | A definition containing
identification and processing rules used to process spool data not identified
by a suitable master report definition.
For example: |
|||
| Master | A definition containing
identification and processing rules used to process one or more spool files.For
example: ADAREP20 - all ADAREP20 jobs.
|
|||
| Suspended | A definition that is not currently being used. | |||
| Master Owner | The monitor takes the user ID of the master owner to submit print jobs for reports to be scheduled for automatic printing. This field is initialized with the ID of the user adding the report. | |||
| Keywords | Enter up to 3 keywords which will later help you select reports. | |||
| Copy report content to NOM database | Select Yes
to take the report contents from the spool and store them in the Entire Output
Management active-data file for later viewing or archiving. Otherwise, select
No.
If you do not specify a storage location (Entire Output Management / Con-nect), the report stays in the spool. |
|||
|
Retention
|
||||
| Action | Purge report after | The report will be purged when the retention period expires. It will not be archived. | ||
| Archive report after | The report will be archived when the retention period expires. | |||
| Archive report directly and keep online for | The report will be archived the next time the archive job runs, but its contents are still available for online viewing until the retention period expires. | |||
| Archive report directly, purge online immediately | The report will be archived the next time the archive job runs, and purged when its processing is completed. | |||
| When an active report is archived, its contents are no longer available online. After this, the report contents exist only in the archive data set. The active report has to be revived before it can be viewed or printed again. | ||||
| Number / Unit / Calendar | The retention period determines
how long the active report is available online for viewing and printing. When
this retention period expires, the active report is archived/purged depending
on the selected Action.
Specify the length of time (a number and a unit of time) for the selected Action. The unit of time can be: absolute days, working days, weeks or months. If you choose "working days", you also have to choose a calendar. For more information on calendars, see Calendars in the System Administration documentation. With the unit Generations you can specify the number of instances of the active report to be kept. If this number is exceeded, older active reports will be archived/purged depending on the selected Action. |
|||
| Archive Type | If the report is to be archived in a user-defined archive, select the desired archive type. Select "none" to archive the report in a standard Entire Output Management archive file. | |||
| Archive for | Specify the length of time (a number and a unit of time: days, weeks, months or years) the active report is to be kept in the archive. When this period expires, the active report is deleted from the archive data set. An active report can be archived no matter where it is stored. | |||
| Keep revived report ready for | Specify the length of time (a
number and a unit of time) the contents of a revived active report are to be
available online for viewing and printing. When this period expires, this
"copy" of the archived report is deleted automatically.
The unit of time can be: absolute days, working days, weeks or months. If you choose "working days", you also have to choose a calendar. For more information on calendars, see Calendars in the System Administration documentation. |
|||
A report can be identified by one of the following:
The following attribute fields determine how a report is identified in the POWER spool.
| Field | Explanation |
|---|---|
| You must enter a value for at least one of the following three attributes. They attributes are the primary selection criteria for report definitions. A report definition is considered identified if at least one primary selection criterion is found. Note that the number of the identified definitions is limited by the primary selection criteria. Use the file names to make a secondary selection. | |
| Jobname | If you want to identify the report by the name of the originating job, enter a job name here. You can also use an asterisk (*) to enter selection criteria for the job name. For example, for all jobs beginning with IEE, enter IEE*. You can select the spool data sets in this job to be assigned to the report by filling in the "and Data Sets" fields. |
| Destination | If you want to identify the report by the DEST parameter of the originating job, enter the destination here. |
| Form | If you want to identify the report by the FORM parameter of the originating job, enter the form here. |
| and Data Sets |
To specify the spool data sets in the selected jobs which identify the report(s), fill in these fields as follows:
The following special characters are supported as placeholders:
Note: |
Note:
Processing of sequential files is also triggered by spool queue
entries. The corresponding spool file does not contain print data, but points
to the sequential file. The pointer can be created with any utility (for
example, a Natural program) and must have the following attributes:
NOM DSN=<data-set-name> VOL=<volser>
NOM RECFM=<recform> RECSIZE=<record-length>
NOM BLKSIZE=<block-size> CC=<carriage-control>
Maximum length of the DSN pattern to identify the data set is 22.
Maximum length of the input data set name is 26.
Carriage control = ASA, MACHINE or NONE.
Data set is renamed before processing.
The following attribute fields determine how a report is identified in the BS2000/OSD spool.
| Field | Explanation |
|---|---|
|
The report can be identified by the PNAME option of the BS2000/OSD print command, by the BS2000/OSD user ID or the FORM option of the print command and by the completely or partially qualified file name. You must enter a value for at least one of the following three attributes. These attributes are the primary selection criteria for report definitions. A report definition is considered identified if at least one primary selection criterion is found. The number of the identified definitions is limited by the primary selection criteria. Use the Files field to make a secondary selection. |
|
| Pname | If you want to identify the report by the PNAME option of the BS2000/OSD print command (/Print ...,PNAME=ADAREP), enter the PNAME here. You can also use an asterisk (*) to enter selection criteria for the job name. For example, for all jobs beginning with ADA, enter ADA*. |
| User ID | The BS2000/OSD user ID under which the print command was entered. If you want to identify the report with this ID, enter it here (for example: PROD01). |
| Form | If you want to identify the report by the FORM
parameter of the originating job, enter the form here.
|
| Files | Enter a completely or partially qualified file name which
identifies the report (secondary selection). A report definition is considered
identified if, in addition to one of the primary selection criteria, one of the
files from the file list is selected.
Note: |
If you enter the value ADA* for
Pname and the value *L.ADAREP.* for
and File, all files are identified whose PNAME begins with
ADA and whose file name contains the string
L.ADAREP..
The following special characters are supported as placeholders:
| Special Character | Meaning |
|---|---|
| ? (question mark) | Indicates a single position that is not to be checked. |
| _ (underscore) | Same as question mark. |
| * (asterisk) | Indicates any number of positions not to be checked. Example: *EMPL_YEE* |
The RECFORM parameter of the file allows you to
determine whether the print file contains carriage control characters and which
ones:
(F,A),(V,A),... contains ASA carriage control characters.
(F,M),(V,M),... contains ENDIC carriage control characters.
(F,N),(V,N),... contains no carriage control characters.
It is recommended that files with a fixed record length be used, because positioning within them is easier than within files with a variable record length.
| Warning: Files with fixed record length that were expanded with OPEN-EXTENT are not supported. |
| Field | Explanation |
|---|---|
|
The report can be identified by job name, destination, writer or form and a spool data set qualification. You must enter a value for at least one of the first four attributes. These attributes are the primary selection criteria for report definitions. A report definition is considered identified if at least one primary selection criterion is found. The number of the identified definitions is limited by the primary selection criteria. Use the Data Sets field to make a secondary selection. |
|
| Jobname |
To identify the report by the name of the originating job, enter a job name here. You can also use an asterisk( *) to enter selection criteria for
the job name. For example, for all jobs beginning with IEE, enter
|
| Destination | To identify the spool data set by the
Destination parameter of the originating job, enter the
destination here.
|
| Writer | To identify the spool data set by the External
Writer parameter of the data set, enter the writer name. This links the
report to the spool data set assigned to this writer name. If you use an
external writer similar to the report name, it makes identification
easier.
|
| Form | To identify the report by the FORMS parameter of
the originating job, enter the form here.
|
| Data Sets | See Spool Data Sets below.
Note: |
![]() To specify the spool data sets in the selected jobs which identify
the report(s)
To specify the spool data sets in the selected jobs which identify
the report(s)
Either enter: <file-type>
<file-sequence-number>
file-type can be: JL = JCL
statements, SI = system input, SM = system messages,
SO = system output.
For example, enter SO 1 for the first SYSOUT data set
or SO 1:2 for the first and second SYSOUT data sets.
Or:
Enter a list of full DDNAME qualifiers in the format:
<PROCNAME>.<STEPNAME>.<DDNAME>
For example: PROC1.STEP1.DDN1
PROCNAME and
STEPNAME are not mandatory, and when
missing are assumed to be * (any). You can use an asterisk (*) to enter
selection criteria for the data set names, for example:
*.STEP1.DDN1
This refers to a spool data set with STEPNAME=STEP1,
DDNAME=DDN1 and any procedure name.
*.*.DDN1, *.DDN1 or DDN1,
for example, are equivalent and they refer to a spool data set with
DDNAME=DDN1 in any procedure name or step name in the job.
Or:
Enter TYPE=AL to create an active report containing
all System Message and SYSOUT data sets for a job matching the specified JES
attributes. The job must have at least one spool file in one of Entire Output
Management's managed classes. TYPE=AL must be the only data set
criterion.
Note:
If more than one JES2 spool data set of a job is to be processed
by Entire Output Management, then the job's spool data sets, which are to be
processed, must all have the same group ID and all be together in a class
reserved for Entire Output Management. If this is not achieved by the DD
statements, but by a program via Entire System Server functions, for example,
then the view SPOOL-UPDATE should be used as follows:
PROCESS SPOOL-UPDATE
        USING  FUNCTION   = 'CHANGE'
        USING  JOB-NAME   = #JOB-NAME
        USING  JOB-NUMBER = #JOB-NUMBER
        USING  GROUP-ID   = #GROUP-ID
        USING  CLASS      = #NOM-CLASS
        USING  NODE       = #NODE
        GIVING ERROR-CODE
ERROR-TEXTIf spool data reside in a sequential file, enter the data set name. The data set name is preceded by "DSN=". The following special characters are supported as placeholders:
| Character | Explanation |
|---|---|
| ? (question mark) | Indicates a single position that is not to be checked. |
| _ (underline) | Same as question mark. |
| * (asterisk) | Indicates any number of positions not to be
checked. Example: DSN=*EMPL_YEE* |
Note:
Processing of sequential files is also triggered by spool queue
entries. The corresponding spool file does not contain print data, but points
to the sequential file. The pointer can be created with any utility and must
have the following attributes:
NOM DSN=<data-set-name>
The maximum length of the DSN pattern to identify the data set is 22.
The maximum length of the input data set name is 26. The STEPNAME to create the
spool data set must be NOMDSN.
//JOB 1         JOB...
......
//NOMDSN       EXEC       PGM=IEBGENER
//SYSPRINT      DD          SYSOUT=*
//SYSUT2         DD          SYSOUT=3
//SYSIN            DD          DUMMY
//SYSUT1         DD *
NOM  DSN=OUTPUT.LISTING
/*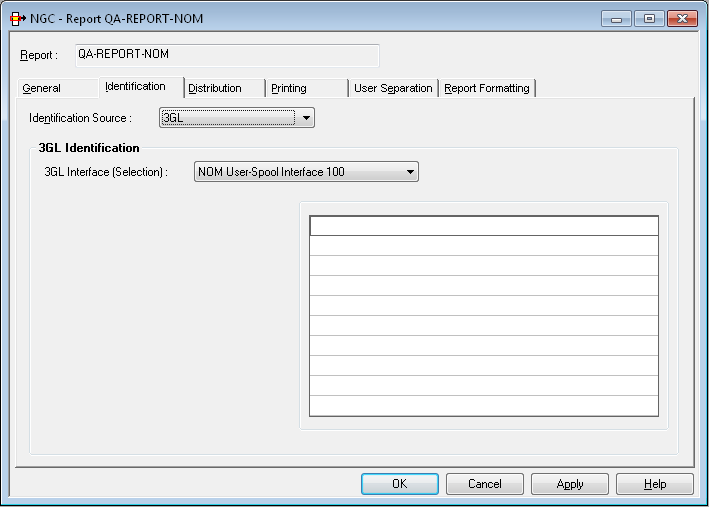
On this screen you can define reports that rely on a general, user-defined 3GL interface. All identifying attributes can be freely chosen.
| Field | Explanation |
|---|---|
| Destination or User ID |
If the report is to be identified by its destination, enter the destination. If the report is to be identified by the user ID, enter the user ID. You must enter a value for at least one of these fields. These attributes are the primary selection criteria for report definitions. A report definition is considered identified if at least one primary selection criterion is met. The number of the identified definitions is limited by the primary selection criteria. Use the List IDs field to make a secondary selection. |
| List IDs | To make a secondary selection, enter a fully or partially qualified list name that identifies the report. A report definition is considered identified if a list ID from this group is found in addition to one of the primary selection criteria. |
The report can be identified by one of the following attributes.
| Field | Explanation |
|---|---|
| File name |
To identify the report by the file name, enter the file name here as it appears on the CA screen (Display Files panel). The file name can contain the user ID of the file creator, the job name or a parameter entered in the OWN field in an OPEN request. See the CA Spool documentation for more details. |
| User ID | The user ID which created the list. If you want to identify the report with this ID, enter it here (UID field in OPEN request). |
| Writer | To identify the report by the Writer parameter,
enter the writer name here (WTR field in OPEN request).
|
| Form |
To identify the report by the Note: |
You can also use wildcard notation (*). For example, to identify all
files whose names begin with "ADA", enter ADA*. Or, to identify
all files which were either created by the user "XYZ" or whose names begin with
"ADA", enter the value ADA* for File name and
the value XYZ for User ID.
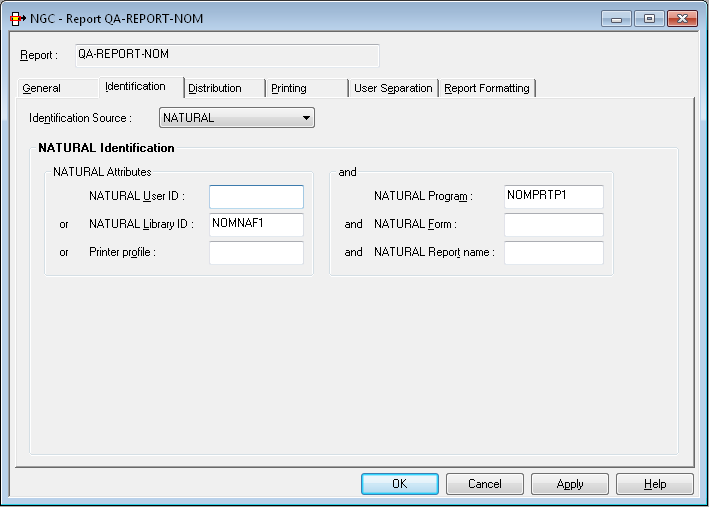
On this screen, you define how a report is identified which is created by Natural or its related products like Natural Advanced Facilities or Open Print Option.
Output from Natural is produced during the processing of a specific
program. This program is stored in a Natural library and executed by a Natural
user. The output can have various attributes defined in the DEFINE
PRINTER statement. To identify this output, specify one or more
identification attributes:
| Field | Explanation | ||
|---|---|---|---|
| Natural Attributes | One of the following three attributes must be specified: | ||
| Natural User ID | Enter a Natural user ID. | ||
| Natural Library ID | Enter a Natural library ID. | ||
| Printer Profile | Enter the name as defined in the
OUTPUT option of the DEFINE PRINTER
statement.
|
||
| and | In addition, you can specify the following attributes (optional): | ||
| Natural Program | Enter a Natural program. | ||
| Natural Form | Enter the form as defined in the
DEFINE
                            PRINTER
statement.
|
||
| Natural Report Name | Enter the name as defined in
the DEFINE PRINTER statement.
|
||
The first three attributes are used as primary selection criteria. The remaining parameters are used to make a secondary selection. The number of definitions is considerably reduced by the primary selection criteria. A definition is applied to the print file if at least one primary selection criterion is met. In addition, all secondary selection criteria must be met if you have entered values for them.
You can use wildcard notation (*) for all fields, except
Printer Profile. For example, if you enter the user ID
value ABC and the library ID value SYSNOM, all print
files are identified which were created either by the user ABC or in the
library SYSNOM.
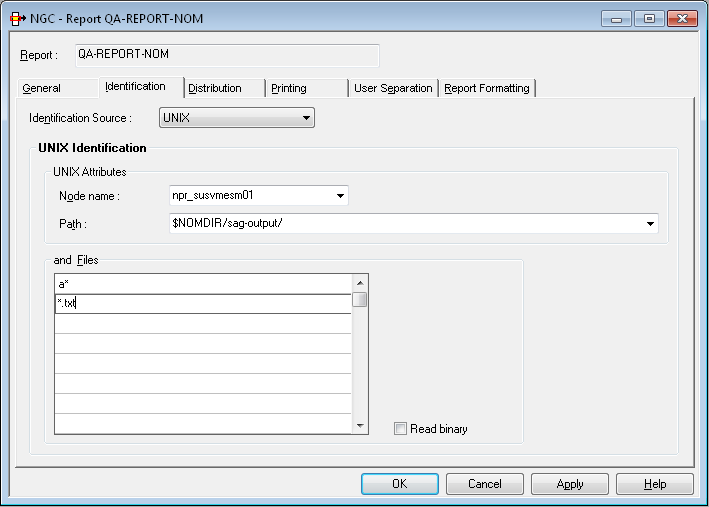
On this screen, you define how a report is identified on UNIX or Windows nodes.
Identification is done using node name, path, and file pattern. ASCII files are scanned in the specified directory and matched to the file pattern specified here. These files are moved to an Entire Output Management container file and can be processed as usual. An ASCII file can contain line feeds, form feeds and tabulators; any other kind of control character will be ignored and set to blank.
Binary files can be of any format. Their format is converted to Base64 format and stored in a container file. At the time of printing, the file is re-converted to binary format.
In addition to the files residing in the file system under UNIX or
Windows, the Entire Output Management identification process can process meta
data. If a pair of files such as
file-name.extension and
file-name.extension.nomxml is found,
the nomxml file is treated as a meta-data file in XML format. This
format corresponds to the meta-data files processed by the Open Print
Option. This requires that the Monitor has to be
enabled to process XML files.
Output from a UNIX or Windows application is stored as a sequential ASCII file in a directory defined here. The monitor will move (not copy!) this file to an Entire Output Management container file and create active reports. If no report definition matches the file name pattern and no default report was found, the file cannot be processed and will be moved to a temp directory that has been defined for this node by the administrator function UNIX Defaults. File and path names are case-sensitive; node name and path have to be defined in UNIX Defaults first, as well as logon data for this node.
| Field | Explanation |
|---|---|
| Node Name | Select a node name that has been predefined by the administrator using function UNIX Defaults. |
| Path | Select a path from the default definition entered with administrator using function UNIX Defaults. The defined path is owned by Entire Output Management. The monitor will process any file found in this path. Directories are not processed. If a file is found in this directory which cannot be processed, it will be moved to the temp directory (see explanation above). |
| and Files | Enter up to 10 files or file patterns without path entries. Use an asterisk (*) as placeholder for many characters and a question mark (?) for a single character in the file name. For each file matching the pattern, an active report will be created. However, the file contents will be copied to the container file for each path only once. After the file has been processed, it will be deleted on the UNIX or Windows node. File names are case-sensitive. |

On this screen you can define the recipients of a report and the facilities used for distribution.
You can select up to 10 users or distribution lists. When the report is created, it is distributed to the Inbasket of the selected users. All users connected to IDs or lists entered here can browse and print the report.
![]() To select a user or distribution list for receiving a report:
To select a user or distribution list for receiving a report:
Choose the button under .
The window is displayed in the content pane:
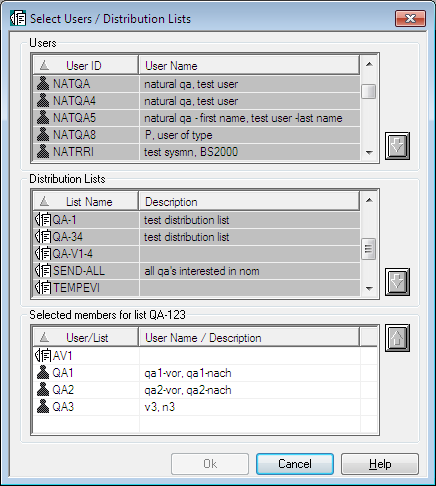
Select a user/list from the list of Users or list of Distribution Lists.
Choose the down arrow on the right.
The selected user/list appears in the section at the bottom of the dialog:
Choose .
The selected user ID or list name now appears in the section of the Distribution Attributes.
![]() To remove a user or distribution list from the
list:
To remove a user or distribution list from the
list:
Select an entry on the list.
Choose the Delete button below the list.
The selected user/distribution list is removed from the list.
You can restrict a user's view of the report by defining a user-specific report layout. In this layout, you specify the parts of the layout which are to be visible to the user.
You can define a different layout for each addressee of the report. If the addressee is a distribution list, the specified layout is visible to all members of the list.
Note:
These layouts are only for addressees in Entire Output Management.
Addressees in Con-nect see the entire report.
![]() To define a layout for a user or distribution list:
To define a layout for a user or distribution list:
Select the desired user/list.
Choose the button.
The Layout for User window is displayed:
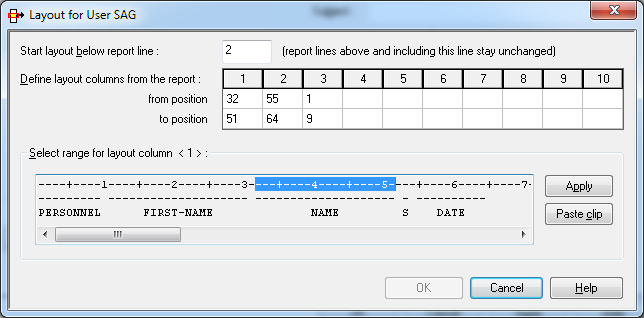
You can define up to 10 columns of the report which are to be displayed to the selected user/list. The fields available to do this are described below. The user(s) will see only the specified columns.
In the field Start layout below report line, enter the line number (counting from the top of the page) below which the layout definition is to take effect.
Lines above and including this line remain in their original format.
For each column to be displayed, you specify the first and the last position to be displayed in the from position and to position fields.
The positions are counted from the beginning of a report line (not including ASA/machine codes).
The specified positions will be shown in the Select range for layout column field.
Or:
Click on a column number (1 to 10). Then mark the desired range of
positions in the field Select range for layout column with
the cursor, and select .
The positions thus selected will be shown in the from/to position fields for the column.
For easier orientation, you can copy text lines from the original report to the clipboard, and then select to paste them into the display area. You can copy several lines, but only line by line.
When you have specified all columns to be displayed, choose .
If a report is to be automatically printed with a special layout,
define AUTOPRNT as an addressee and attach the special layout to
that addressee (the report will not be distributed to AUTOPRNT).
To use this facility, you must also define a user AUTOPRNT.
![]() To create a report as a document in a Con-nect cabinet:
To create a report as a document in a Con-nect cabinet:
In the Cabinet field in the Distribution via Con-nect section of the dialog, enter the name of a cabinet.
In the Subject field, enter a description to appear with the Con-nect document.
Choose .
If you do not want to create a document in a user cabinet, but wish to distribute it to Con-nect users directly, leave this field empty and fill in only the Mail To fields, as described below.
![]() To distibute a report directly to Con-nect users:
To distibute a report directly to Con-nect users:
In the field at the bottom of the Mail To list, enter a Con-nect user ID.
Choose the button.
The user ID is written to the Mail To list.
You can enter up to 10 Con-nect user IDs. One copy of the report is created in the Con-nect stand-alone cabinet named SYSNOMC. Entire Output Management uses Con-nect to send the report to all Con-nect users defined in these fields.
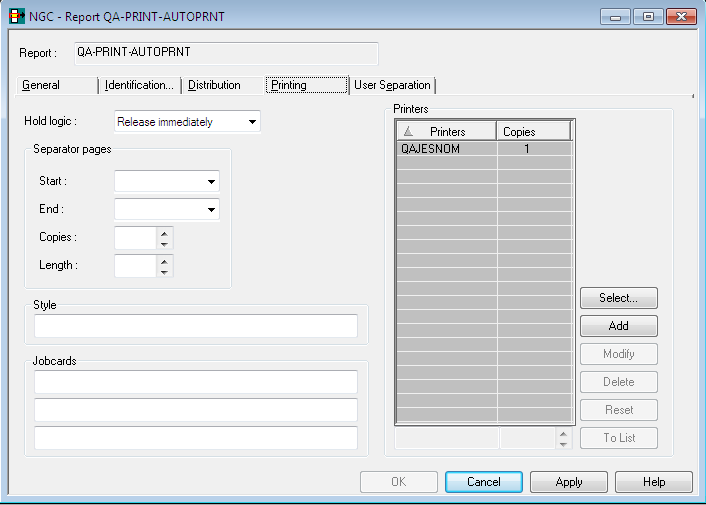
On this screen you can define how reports are printed automatically.
| Field | Explanation | |
|---|---|---|
| Hold Logic | This field controls how the report is queued for printing. Choose one of the following values from the drop-down list box: | |
| (none) | ||
| Release manually | The report is held in the printout queue until released manually. | |
| All users confirm | The report is held in the printout queue until manually confirmed by all recipients. A message requesting printing confirmation is displayed to each user in the distribution list. When all users have confirmed, the report is automatically released for printing. | |
| Release immediately | The report is printed immediately. | |
| Separator Pages | Start | Enter the name of the separator page to be printed at the beginning of the report. |
| End | Enter the name of the separator page to be printed at the end of the report. | |
| Copies | Specify how many times each separator page is to be printed. | |
| Length | Enter a separator line length, if your separator line length is greater than your report length. The default length is the report length. | |
| See Separator Pages for further information. | ||
| Jobcards | Enter the job cards for printing
with batch jobs. The following substitution variables can be used:
§USER, §REPORT and §JOBNAME.
If you leave this field blank, the Jobcards specifications from the logical printer definition are used. |
|
| Printers | See Selecting Printers for a Report below. | |
![]() To select one or more printers for a report:
To select one or more printers for a report:
In the Printers section of the Printing Attributes screen, choose the button.
The window is displayed:

In the Printers section at the top, select a printer ID.
Choose the down arrow on the right.
The printer ID is written to the list of Selected Printers in the bottom section of the window.
Choose .
The selected printer now appears in the Printers section of the Printing Attributes screen.
Note:
The functionality described in this section is not yet available. It
will be made available with the next version.
A report which has one of the formats text, PDF or PostScript can be converted to a common multimedia file when it is loaded. The target format is the one in which the data will be stored in Entire Output Management.
For general information on report conversion, see Converting the Report Format in the Concepts and Facilities documentation.
For this report conversion, you define formatting attributes.
![]() To define formatting attributes:
To define formatting attributes:
Press PF11 on the Report Definition > General Attributes screen.
The Report Definition > Formatting Attributes screen is displayed.
On this screen, you specify the formatting attributes for the file conversion. The first three attributes are mandatory, the others are optional. The attribute fields are:
| Field | Explanation | |
|---|---|---|
| Report Format | The desired output format. Predefined formats are available, which correspond to the following Ghostscript devices: | |
|
Format
|
Ghostscript device
|
|
BMP |
bmp16m | |
EPS |
epswrite | |
FAX |
faxg3 | |
HTML |
html | |
JPEG |
jpeg | |
PCL |
pxlcolor | |
PDF |
pdfwrite | |
PNG |
png16m | |
PS |
ps2write | |
RTF |
rtf | |
TIFF |
tiff32nc | |
|
Any other value in this field will be interpreted as the name of a Ghostscript device which may be present in the specific user environment. See the Ghostscript documentation for details. If this field is empty, no file conversion will be performed. |
||
| Conversion Node | The Entire System Server node name (as defined in the UNIX Defaults) to be used to convert the file to the desired format. | |
| Conversion Path | The path to be used for temporary files during file conversion on the conversion node. | |
|
Enscript Attributes
(optional)
|
||
| Header | The name of the Enscript
"fancy-header". If this field is empty, no header will be generated. If this
field contains DEFAULT, the Enscript default fancy-header will be
used.
|
|
| Header Font | The font name and font size of the header and footer. | |
| Footer | The footer definition. | |
| Font | The font name and font size of the text report. | |
| Lines | The number of lines per page for a text report. | |
| Landscape | If this field is empty, the pages will be created in portrait orientation. If you want landscape orientation, enter any character in this field. | |
| Media | The paper size to be printed. | |
| Mask File |
The name of a PDF file which can overlay all pages of a report that is in PDF format. This file is treated as a "stamp" on each page: Only the parts of the mask file which are transparent will show the original report. In this way, logos can be integrated in a report. If the mask file contains more than one page, the corresponding pages of the report will be overlaid. The use of mask files requires that the package "pdftk (PDF Toolkit) is installed on the conversion node. A PDF file with transparent parts cannot be created with a Windows PDF printer; instead, you have to use the "export to PDF" function of a graphic application (e.g. Photoshop or Gimp). |
|
| Code Page | Specify the code page in which the text report is to be stored. If this field is empty, the code page "latin1" (ISO-8859-1) will be used by default. | |
| Additional | In this field, you can specify any additional parameters. | |
| For details on the above Enscript attributes, see the Enscript documentation (man page). | ||
For separation you can use one of the following:
The routines for standard separation are supplied by Software AG.
If no user routine or standard routine is specified, the whole identified spool data set is contained in the report.
| Field | Explanation | |
|---|---|---|
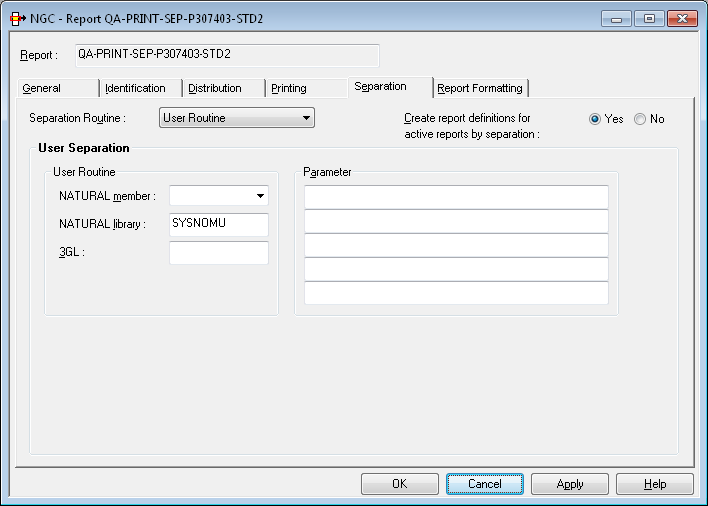
| Separation Routine | Select the routine to be used. | |
| Create report definitions for active reports by separation. | By default, when active reports
are created dynamically during a separation process, the corresponding report
definitions are created automatically.
To suppress this automatic creation, select No. This may be useful if you create unique active reports. |
|
The spool data set records can be filtered on a record-to-record basis by a supplied user routine. With various action codes, the user routine can control the separation process and positioning within the output and can determine the contents of the created reports.
For more information, see User Separation Routines in the System Administration documentation.
| Field | Explanation | |
|---|---|---|
| User Routine | These three fields define the user routine which determines the report contents: | |
| Natural Member | Enter the name of the Natural member containing the user routine. | |
| Natural Library | The user routine can be a Natural subprogram.
You can enter the Natural library name containing the user routine or leave
this field blank. The library name must not begin with SYS, except
SYSNOMU.
|
|
| 3GL | If the user routine is written in a language
other than Natural, enter the name of the routine. This user routine is invoked
by a CALL statement.
|
|
| Parameter | You can enter up to 5 parameters which are passed to the user routine at the start of report processing. | |
Standard Separation 1 separates spool data into several reports depending on the break of the specified suffix. The suffix need not appear in sorted order. This separation searches for a defined string in a defined line or anywhere on a page. If the string appears on a page, a suffix is evaluated (at break of the suffix value, a new report is opened). If the string is not found, the page is added to the currently open report. If no report is open, the page is rejected.
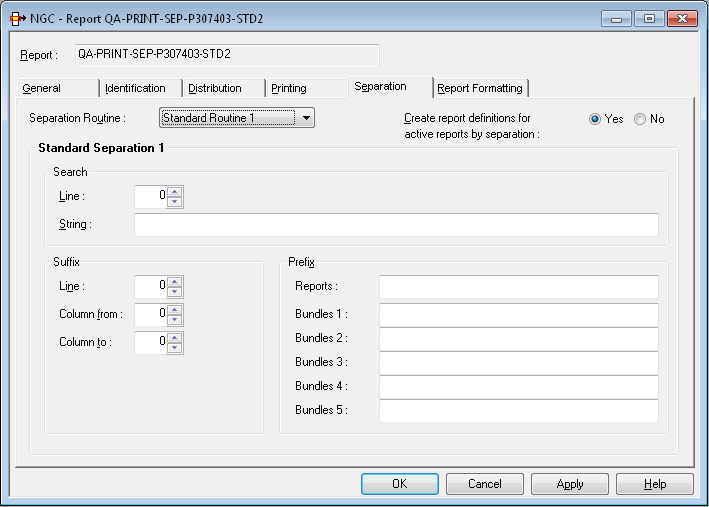
| Item | Explanation | |
|---|---|---|
| Search | Line |
Enter the line number, starting from the top of the page, where the string must appear. To determine this line number, you must also count lines containing only carriage control characters. If you do not specify a line number, the search string can appear anywhere on the page. |
| String |
Enter the string to be searched for. If this string appears on a page, the suffix is evaluated (at break of the suffix value, a new report is opened). If the string is not found, the page is added to the currently open report. If no report is open, the page is rejected. You can specify a search pattern like: *STRING1*STRING2*
or: *STRING1%STRING2*
where * stands for any string and % stands for any character. Note: |
|
| Suffix | Line |
Enter the line number, starting from the top of the page, where the report suffix appears. To determine this line number, you must also count lines containing only carriage control characters. If you leave this field empty, Entire Output Management assumes that the suffix is located in the Search Line. |
| Column from | Enter the position in the line where the report suffix starts (value from 1 to 251). To determine the position, you must also count carriage control codes and/or table reference characters. | |
| Column to | Enter the position in the line where the report suffix ends (value from 1 to 251). To determine the position, you must also count carriage control codes and/or table reference characters. | |
| Prefix | Reports | Enter the report prefix which is concatenated to the suffix to determine the report name. The suffix is concatenated suppressing leading and trailing blanks. |
| Bundles 1 to 5 |
(Optional) Enter the bundle prefix which is concatenated to the suffix to determine the bundle name. The suffix is concatenated suppressing leading and trailing blanks. Up to 5 bundles can be specified. To generate bundles with fixed names, fill in this field completely. No suffix is then appended. |
|
We have a salary report sorted by department number and want to separate it into the various departments. A standard routine could be defined as follows to perform an automatic separation:
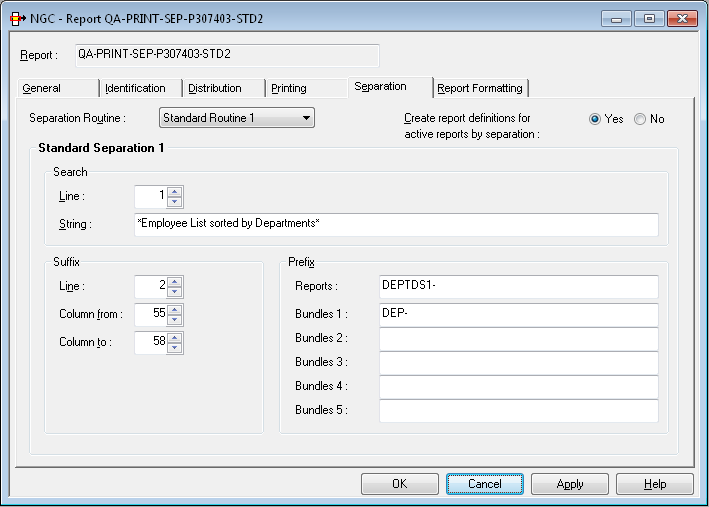
This standard routine separates the spool data set on a page basis
and creates reports whose names begin with DEPTS1-. The report
name is created by adding the prefix DEPTS1- to the suffix found
in the spool data set in the positions defined in the example above, for
example: DEPTS1-FINA.
Optionally, the report can be directed to a bundle with the prefix
DEP-. The bundle name is created by adding the prefix
DEP- to the suffix found in the spool data set, for example:
DEP-FINA.
Note:
When the suffix and the identifier string are not on the same
line, the line parameters must be used. Enter the line numbers where the
identifier string and suffix are found. This must be the absolute line
number as counted from the top of the page.
Standard Separation 2 separates spool data into several reports depending on up to 5 break conditions. It searches for a defined string in a defined line or anywhere on a page. If the string appears on a page, up to 5 suffixes are evaluated (at the break of a suffix value, a new report is opened for that suffix). If no string is found, the page is added to the currently opened reports. If no report is opened, the page is rejected.
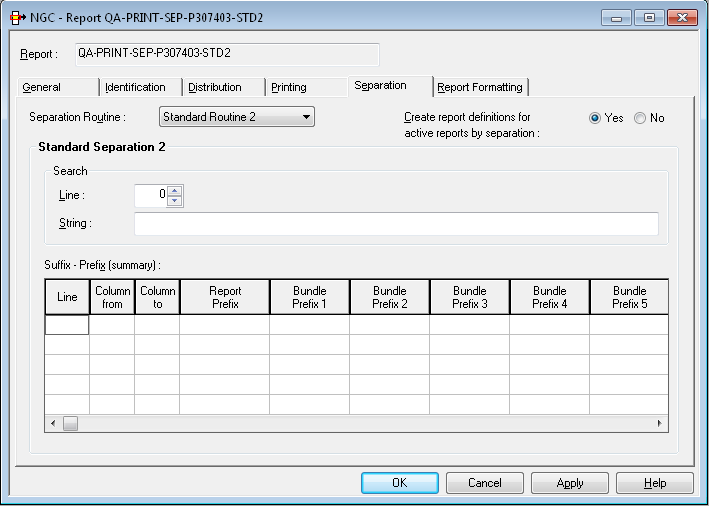
| Field | Explanation | |
|---|---|---|
| Search | ||
| Line | Same as described for Standard Separation 1. | |
| String | ||
| Suffix - Prefix (summary) - You can define parameters for up to 5 suffixes in these fields | ||
| Line |
Enter the line number, starting from the top of the page, where the report suffix appears. To determine this line number, you must also count lines containing only carriage control characters. If you leave this field empty, Entire Output Management assumes that the suffix is located in the Search Line. |
|
| Column from | Enter the position in the line where the report suffix starts (value from 1 to 251). To determine position, you must also count carriage control codes and/or table reference characters. | |
| Column to | Enter the position in the line where the report suffix ends (value from 1 to 251). To determine position, you must also count carriage control codes and/or table reference characters. | |
| Report Prefix | Enter the report prefix which is concatenated to the suffix to determine the report name. The suffix is concatenated suppressing leading and trailing blanks. | |
| Bundle Prefix 1 to 5 |
(Optional) Enter the bundle prefix which is concatenated to the suffix to determine the bundle name. The suffix is concatenated suppressing leading and trailing blanks. Up to 5 bundle prefixes can be specified for each suffix. To generate bundles with fixed names, fill in this field completely. No suffix is then appended. The number of the currently displayed prefix appears after the title Bundle Prefix. |
|
We have a salary report sorted by department number and want to separate it into the various main departments and sub-departments. A standard routine could be defined as follows to perform an automatic separation:
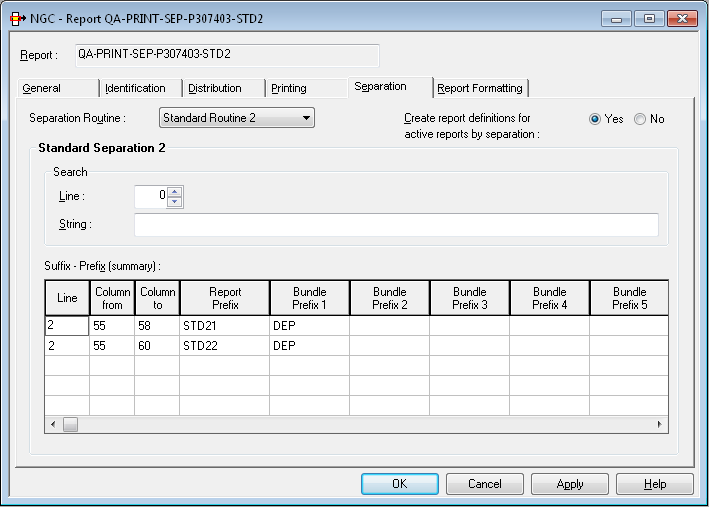
This standard routine separates the spool data set on a page basis
and creates reports whose names begin with STD21- for the main
departments and STD22- for the sub-departments. The report name is
created by adding the prefix STD21- to the department name
(columns 55-58 in line 2) or by adding the prefix STD22- to the
sub-department name (columns 55-60 in line 2) found in the spool data.
Optionally, the report can be directed to a bundle with the prefix
DEP-. The bundle name is created by adding the prefix
DEP- to the department or sub-department name.
Note:
When the suffix and the identifier string are not on the same
line, the line parameters must be used. Enter the line numbers where the
identifier string and suffix are found. This must be the absolute line
number as counted from the top of the page.
Standard Separation 3 searches for a defined string in a defined line. If the string appears on a page, the lines of the page are analyzed regarding the defined logical expression. If not, the whole page is rejected.
From the Start line until end of page, the lines are added to the report, if they match the defined logical expression. Lines before the Start line are also rejected unless they are defined as Header lines.

| Field | Explanation | ||
|---|---|---|---|
| Search | Line | Same as described for Standard Separation 1. | |
| String | |||
| Header lines |
Enter the number of lines (0-20), starting from the top of the page, which are used as header lines. To determine this line number, you must also count lines containing only carriage control. If Header lines = 0, no header lines are added. Otherwise, if there is at least one line on a page which matches the separation's logical expression, the header lines are added. |
||
| Start line | Enter the line, starting from the top of the page, from which filter processing starts. The lines preceding the Start line are automatically excluded from the report, unless they are defined as Header lines. To determine this line number, you must also count lines containing only carriage control characters. | ||
| AND/OR | Concatenates two conditions. Possible values: | ||
| Operator | Meaning | ||
AND |
Concatenates with logical AND. | ||
OR |
Concatenates with logical OR. | ||
| (blank) | Concatenates the same variable with OR=. | ||
| Column from | Indicate the position of the operand. Enter positions in column from which to start and at which to end filter processing (value from 1 to 251). | ||
| Column to | |||
| Format | Variable type:
|
||
| Relational Expression | Possible values: | ||
| Operator | Meaning | ||
EQ or
= |
Equal to. | ||
GE or
>= |
Greater than or equal to. | ||
GT or
> |
Greater than. | ||
LE or
<= |
Less than or equal to. | ||
LT or
< |
Less than. | ||
NE or
! |
Not equal to. | ||
| Value | Enter a numeric or alphanumeric
value or a mask definition.
Note: |
||
We have a salary report sorted by department number and want to extract all employees with sex = M, personnel ID number >= 6000000 and birthday <= 50/01/01 (sub-department COMP12):
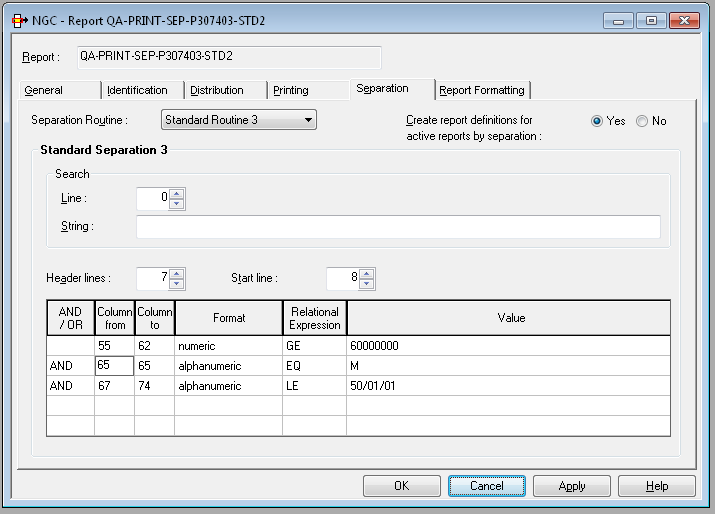
Lines 1 to 7 are taken as header lines. The filter starts in line 8.
We have a CATALL list and want to extract all lines with error number unequal to 0:
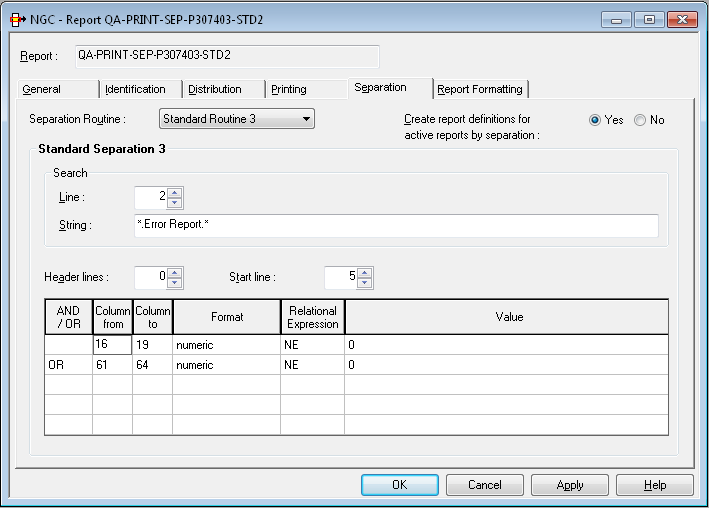
No header lines are added. The filter starts in line 5 on pages with
the string .Error Report. in line 2.