This section describes distribution lists and how to create and maintain them. It covers the following topics:
A distribution list is a list of users who are to receive a particular report. It allows easier report distribution.
A distribution list can contain individual users or other distribution lists.
Users and lists can be grouped into a distribution list to create a distribution hierarchy that reflects your organization's structure. You can then use a distribution list as an addressee when defining report processing by entering the list name in the Distribute To field.
Any modifications in the contents of a distribution list are automatically reflected in all reports using this list.
A distribution list can also be used to grant authorization to a group of users. For more information on authorization, see the section Authorizing User Access to Objects.
![]() To list all available commands for distribution lists:
To list all available commands for distribution lists:
In the object workspace, expand the Distribution Lists folder.
Select a list and invoke the context menu.
A list of available commands is displayed.
These are:
| Command | Shortcut | Explanation |
|---|---|---|
| Add member | --- | Add a new member to a distribution list. |
| Authorization | F9 | Authorize a user to access a distribution list. |
| Delete | Del | Delete a distribution list. |
| Display | Ctrl+D | Display a distribution list. |
| Display Log | F10 | Display log information for a distribution list. |
| Filter | F3 | List selected distribution lists. |
| List | F8 | List all distribution lists. |
| List members | --- | List members of a distribution list. |
| New | Ctrl+N | Add a new distribution list. |
| Open | Ctrl+O | Modify a distribution list. |
| Rename | F2 | Rename a distribution list. |
| XREF | Ctrl+Alt+X | Display cross-reference information for a distribution list. |
![]() To list all distribution lists:
To list all distribution lists:
In the object workspace, select the folder.
Invoke the context menu and choose .
All existing distribution lists are listed in the content pane.
For each distribution list, the following information is displayed:
| Field | Explanation | |
|---|---|---|
| List | Name of the distribution list. | |
| Authorization | Authorization used to access the distribution list. Possible values: | |
| ADMIN | Indicates that you are defined as administrator with owner authorization. | |
| PUBLIC | All users are authorized for the distribution list. | |
| (User ID or name of distribution list) | This user or the members of the distribution list are authorized for the list. | |
| Members | Number of members in the distribution list. | |
| Part of | Indicates whether the destribution list is part of another distribution list. | |
| Description | A short description of the distribution list. | |
![]() To list distribution lists according to selection criteria:
To list distribution lists according to selection criteria:
In the object workspace, select the Distribution Lists folder.
Invoke the context menu and choose .
The Filter Distribution Lists window is displayed in the content pane.
Enter your selection criteria, and choose .
Now only distribution lists which satisfy the selection criteria appear in the expanded Distribution Lists folder in the object workspace.
![]() To create a new distribution list:
To create a new distribution list:
Select the folder in the object workspace and invoke the context menu.
Choose .
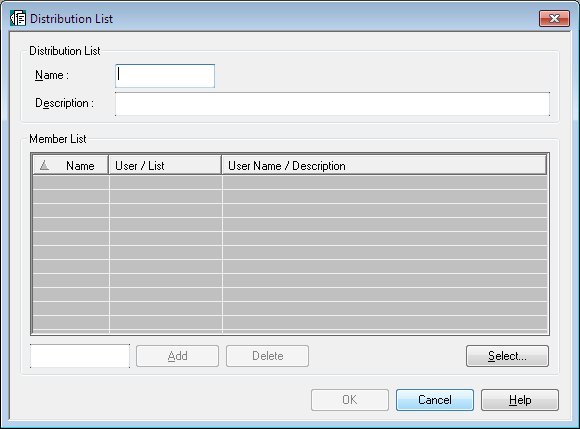
The Distribution List window is displayed in the content pane:

Enter a name and short description for the distribution list.
Then choose .
To add/remove members to/from the distribution list, proceed as described under Maintaining the Members of a Distribution List.
A member in a distribution list can be either an individual user or another distribution list.
The following function are available:
![]() To list members of a distribution list:
To list members of a distribution list:
In the object workspace or in the list of distribution lists, select the desired list.
Invoke the context menu and choose .
A list of the members of the distribution list is displayed.
For a list of available command, select a member and invoke the context menu.
![]() To add a member to a distribution list:
To add a member to a distribution list:
Select the appropriate distribution list in the object workspace or in the list of distribution lists.
Invoke the context menu and choose .
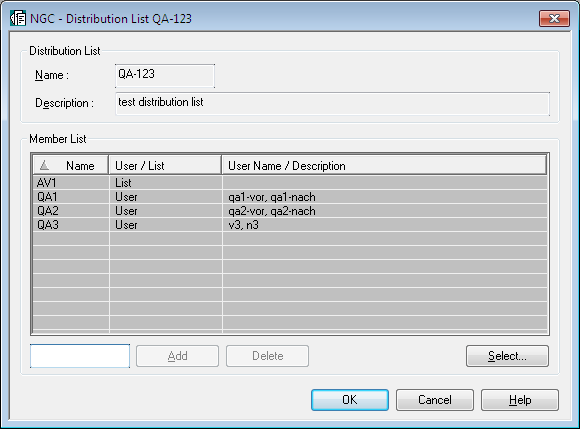
The Distribution List window is displayed:

Choose the button below the .
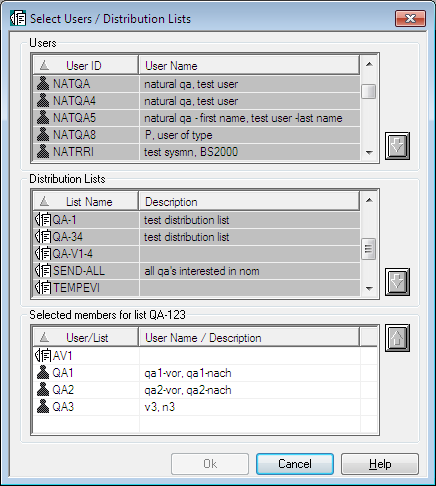
The window is displayed in the content pane.

Select a user from the list of Users or a list from the list of Distibution Lists.
Choose the down arrow on the right.
The selected user/list appears in the section at the bottom of the window.
Choose .
The selected user/list now appears in the Member List of the distribution list.
![]() To remove a member list from a distribution list:
To remove a member list from a distribution list:
In the section at the bottom of the window, select the user/list to be removed.
Choose the up arrow on the right.
The selected user or list is removed from the section and the Member List.
![]() To display cross-reference information for a distribution list:
To display cross-reference information for a distribution list:
In the object workspace or in the list of distribution lists, select the desired list.
Invoke the context menu and choose .
The XREF of Distribution List window is displayed, showing which and how many object types the distribution list is related to.
To display more information on one of these relation types, check the box preceding it.
More information on objects of this type is displayed in the bottom half of the window.
![]() To modify a distribution list:
To modify a distribution list:
Select the desired list in the object workspace or in the list of distribution lists.
Invoke the context menu and choose .
The distribution list is displayed, and you can modify it. The fields are described under Creating a Distribution List.
Choose to save your modifications.
![]() To rename a distribution list:
To rename a distribution list:
In the object workspace or in the list of distribution lists, select the desired list.
Invoke the context menu and choose .
Change the name of the selected list, and press ENTER.
![]() To delete a distribution list:
To delete a distribution list:
Select the desired list in the object workspace or in the list of distribution lists.
Invoke the context menu and choose .
A window is displayed, asking you to confirm the deletion.
Choose to delete the list, or to cancel the operation.
![]() To display a distribution list:
To display a distribution list:
Select the desired list in the object workspace or in the list of distribution lists.
Invoke the context menu and choose .
The distribution list is displayed. For an explanation of the fields, see Creating a Distribution List.
![]() To display log information for a distribution list:
To display log information for a distribution list:
In the object workspace or in the list of distribution lists, select the desired list.
Invoke the context menu and choose .
A dialog is displayed.
To display more detailed log information, select an entry from the log information dialog.
Invoke the context menu and choose .
Detailed log information on the selected entry is displayed.
![]() To authorize user access to a distribution list:
To authorize user access to a distribution list:
In the object workspace or in the list of distribution lists, select the desired list.
Invoke the context menu and choose .
The Authorization List is displayed. It lists all users and user groups on distribution lists who are authorized for the distribution list, and shows their authorization levels.
Invoke the context menu for the dialog and select .
The Authorization Definition is displayed.
Enter the data for the authorization. The fields are described under Authorization Options.
Choose to save your data.
If in your organization large numbers of reports are sent to a large number of users, this may cause performance problems. In this case, "virtual" users can be used instead of distribution lists, as outlined in this section.
When Entire Output Management creates an active report, it sends it to
the #Inbasket folders of all users specified in the report's
distribution attributes. With a large number of users, this may cause a
considerable CPU workload for the Entire Output Management monitor and also
require considerable space in the Adabas database containing the Entire Output
Management system file, because a so-called "mail record" is created for every
user. The same is true if an active report is not sent to a large number of
individual users, but to a distribution list containing a large number of
users.
If this causes performance problems in your environment, you may consider using a "virtual" user instead of a distribution list.
Imagine the following scenario:
A distribution list FINANCE is defined, which contains
as users all staff members of the Finance department (defined users
USER01 to USER50).
A report is defined with the distribution list FINANCE
specified as the recipient of the report (in the Distribution
Attributes).
As a result, the active report will be sent to every
#Inbasket folder of every single user (USER01 to
USER50).
Another aspect is that a new employee joining the Finance department
and added to the distribution list FINANCE can only see the active
reports sent to the distribution list after he/she was added to the
distribution list. However, it may be desirable that all employees in the
department see all active reports, including older ones.
The alternative scenario with a "virtual" user instead of a distribution list would be this:
You define a user UFINANCE.
In the Authorization Definition of this user,
you specify PUBLIC as Granted User ID.
In the Distribution Attributes of the report,
you specify UFINANCE as the recipient of the report.
You link all users to the #Inbasket folder of
UFINANCE:
For the user USER01, you create a folder, and in its
Folder Definition you specify as Linked
Folder User ID UFINANCE and
Folder Name #Inbasket.
Repeat this for the users USER02 to
USER50.
As a result, the active report will be sent only to the
#Inbasket folder of UFINANCE (with only one "mail
record" being created), and all users USER01 to
USER50 can see it.
If a new employee joining the Finance department is later defined as
USER51 in the same manner, he/she can see also all active reports
contained in#Inbasket folder of UFINANCE