
This section describes the components of a bundle definition:
Default values for bundle attributes can be set by the system administrator in Bundle Defaults.
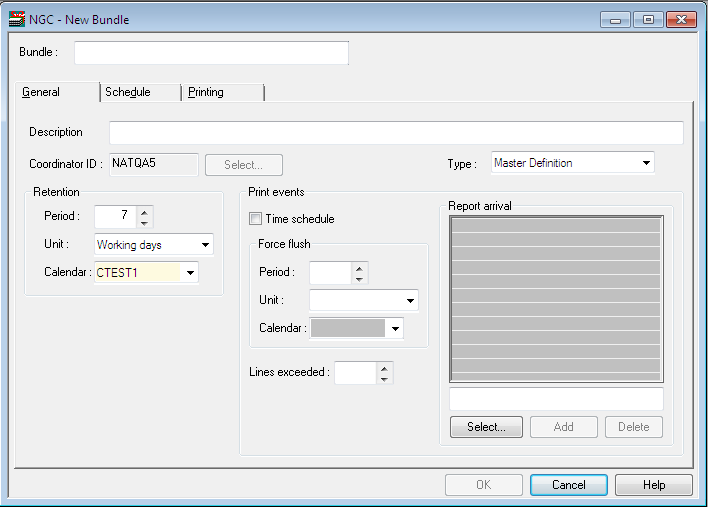
| Field | Explanation | ||
|---|---|---|---|
| Bundle | You have to enter a unique name for the bundle when you are creating a new bundle. This field is protected when you modify an existing bundle. | ||
| Description | Enter a short description for the bundle. | ||
| Coordinator ID |
You can enter the user ID of the person who is responsible for this bundle. See Selecting a Bundle Coordinator below. If you make no entry here, your user ID is automatically written into this field. The coordinator's name, address and telephone number can be printed at the top of the front page of the bundle separator, if desired. The coordinator's name, address and telephone number can be used as substitution variables for separator pages. To select a coordinator from a list of users, you can use the button next to this field. |
||
| Type | The type of bundle:
|
||
| Retention |
A closed bundle is kept in the Entire Output Management database until its retention period has expired. A closed bundle can accept no more reports and a new version of the bundle is opened for additional reports. See also Retention Period in Components of Bundle Defaults in the System Administration documentation. |
||
| Period | Enter the number of working days, absolute days, weeks or months the bundle should be kept in the Entire Output Management database, after it has been closed. | ||
| Unit | Possible values:
If you select "working days", you have to select a calendar which distinguishes between working and non-working days. |
||
| Calendar | Select a calendar, if "working
days" is the unit for the retention period.
For more information on calendars, see Calendars in the System Administration documentation. |
||
|
Example: You have defined a calendar in which Saturday and Sunday are marked as holidays. If have specified "2" as the Period, and "working days" as the Unit and the bundle is created on Friday evening, it will be retained until Tuesday evening. |
|||
| Print events | Time schedule | The bundle can be printed at
specified times on specified days.
Check this box to activate the time schedule, which you can define in the Schedule Attributes. |
|
| Force flush | If none of the other print events occurs before the period entered here has expired, bundle closing and printing is forced. | ||
| Period | Enter the number of working days, absolute days, weeks or months the bundle should remain open. | ||
| Unit | Same as for Unit under Retention, above. | ||
| Calendar | Same as for Calendar under Retention, above. | ||
| Lines exceeded | When the report that causes this line number to be exceeded has been written to the bundle, the bundle is closed and scheduled for printing. | ||
| Report arrival |
Enter the names of up to 10 reports which trigger the printing of the bundle. The bundle is printed when all these reports arrive. |
||
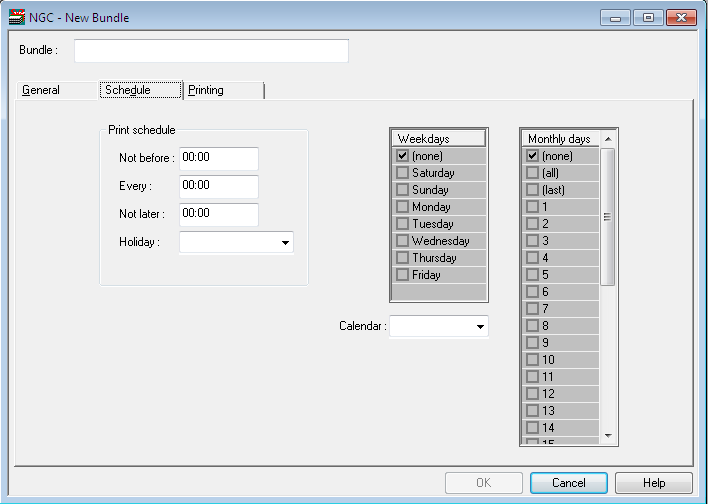
| Field | Explanation | |
|---|---|---|
| Print schedule | Not before | The bundle will not be printed before the time you enter here. |
| Every | Enter a time interval here. | |
| Not later | The bundle will not be printed after the time you enter here. | |
| Holiday |
Should a printing date fall on a calendar holiday, you can select "After holiday" from the list box to print on the first working day after the holiday, or "Before holiday" to print on the last working day before the holiday. |
|
| Weekdays |
Select the appropriate checkboxes to print the bundle on the same days every week. Note: |
|
| Monthly days |
Select the appropriate checkboxes to print the bundle on the same days every month. Select "all" to print every day, or "last" for the last day of the month. |
|
| Calendar |
You can select a calendar from the list box. The bundle is then only printed on days defined as working days in the calendar, but not on days defined as holidays. For more information on calendars, see Calendars in the System Administration documentation. |
|
See also Print Schedule Examples below.
Example 1 - Print at a fixed time on fixed weekdays - also on holidays
Example 2 - Print at a fixed time on fixed monthly dates - on day before holiday
Example 3 - Print daily between fixed times - on day after holiday
Example 4 - Print on workdays at fixed times - on day after holiday
To print a bundle at 2 p.m. on all Mondays, Wednesdays and Fridays whether or not they are holidays, you define these fields as follows:
| Not before | 14:00 |
| Every | 00:00 |
| Not later | 14:00 |
| Weekdays | Monday, Wednesday, Friday |
To print a bundle at 7 p.m. on the 15th and on the last day of the month or, if these days are holidays, on the last workday before the holiday, you define these fields as follows:
| Not before | 19:00 |
| Every | 00:00 |
| Not later | 19:00 |
| Monthly | 15, last |
| Calendar | MRS |
| Holiday | Before holiday |
To print a bundle daily when it arrives between 8 a.m. and 7 p.m. or, if the day is a holiday, on the first workday after the holiday, you define these fields as follows:
| Not before | 08:00 |
| Every | 00:00 |
| Not later | 19:00 |
| Monthly | all |
| Calendar | MRS |
| Holiday | After holiday |
To print a bundle at 7 a.m., 1 p.m. and 7 p.m. from Monday to Friday or, if the day is a holiday, on the first workday after the holiday, define these fields as follows:
| Not before | 07:00 |
| Every | 06:00 |
| Not later | 19:00 |
| Weekdays | Monday; Tuesday; Wednesday, Thursday; Friday |
| Calendar | MRS |
| Holiday | After holiday |
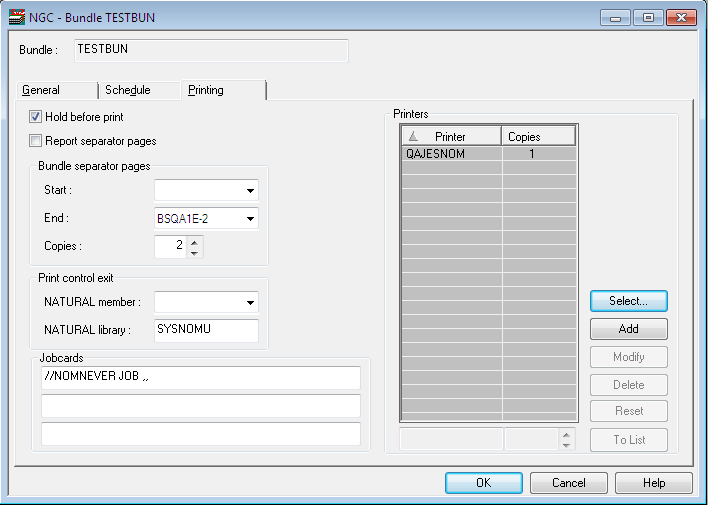
| Field | Explanation | |
|---|---|---|
| Hold before print |
Mark the checkbox to hold bundle printing until released manually. Otherwise the bundle is printed immediately. |
|
| Report separator pages |
Mark the checkbox to print the separator page(s). The number of separator pages can be defined for each report in the bundle; see Adding a Report to a Bundle. |
|
| Bundle separator pages | Start | Enter the name of the separator page to be printed at the beginning of the bundle. |
| End | Enter the name of the separator page to be printed at the end of the bundle. | |
| Copies | Specify how many times each separator page is to be printed for the bundle. | |
| See Separator Pages for further information. | ||
| Print control exit | A printer control exit can be used
to decide whether or not a bundle is actually printed after it has been sent to
the printout queue. For example, you may not want to print bundles which only
contain one report.
A sample exit is supplied in |
|
| Natural member | The name of the user exit. | |
| Natural library | The name of the library containing the user exit. | |
| Jobcards | Enter the job cards used when
bundle printing is performed with batch jobs. The following substitution
variables can be used: §USER, §BUNDLE.
If you leave this field blank, the jobcards specified for the logical printer are used instead. See the field in the General Attributes of the logical printer. |
|
| Printers | Printer |
Use the button on the right to select a logical printer. See Selecting Printers for a Bundle below. |
| Copies | Specify the number of copies of the bundle to be
printed on the respective printer.
See Setting the Number of Copies for a Printer below. |
|
![]() To select a logical printer from a list of defined printers:
To select a logical printer from a list of defined printers:
Choose the button to the right of the list.
The Select Printers window is displayed.
Select a printer from the list in the upper part of the window and choose the down arrow on the right.
The selected printer is written to the list in the lower part of the dialog. (To remove a printer from the list, select the printer and choose the up arrow on the right.)
When you have finished selecting printers, choose .
The selected printers now appear in the list.
![]() To set the number of copies for a printer:
To set the number of copies for a printer:
In the list, select the desired printer, and choose .
The selected printer appears in the box at the bottom of the list.
In the box next to the printer name, enter the desired number of copies.
Choose .
The changed number of copies is displayed in the list.