
This section describes the steps to deploy the Business Service Administration subsystem in development and production environments. The following topics are covered:
Deploying a business service is similar to distributing a traditional Natural application. However, the Natural Business Services runtime environment must be installed on each machine. This installation includes:
All modules related to the Administration subsystem.
All modules related to the Natural Business Services dispatch, security, and attach servers.
One or more copies of the system files.
At least one dispatch, security, and attach server.
Each runtime environment accesses the same centrally-located data by means of direct calls through one of the following:
Entire Net-Work
EntireX configured to use TCP/IP as the network transport protocol
Natural Business Services security server (in the case of secure data)
The following diagram shows a scenario with one development and two production environments, one of which is on a remote machine. The Administration subsystem is installed on both machines, and Production environment 1 contains a copy of the Natural Business Services system files. In this scenario, Entire Net-Work is installed on both machines. EntireX is installed on the machine with both the Development environment and Production environment 1.
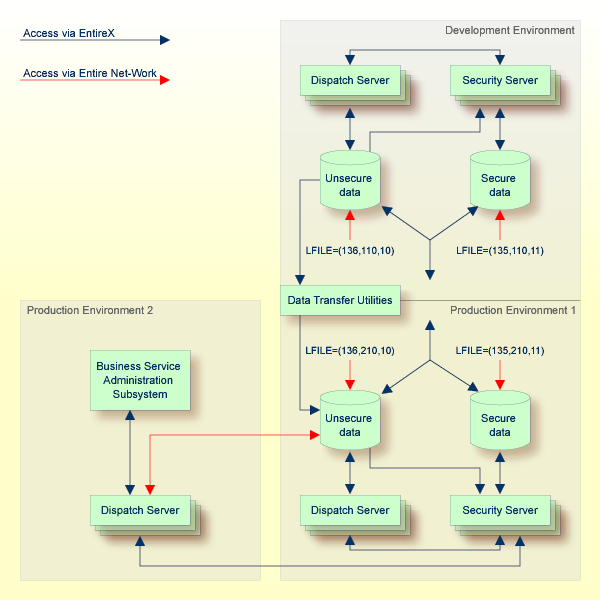
The sample scenario shows the option of having Natural Security installed on the machine that houses the Development environment and Production environment 1 to control user access to secure data. To use Natural Security on the remote machine, another copy of Natural Security must be installed on that machine, a security server is required, and both copies of the Natural Security software must be configured to update the Natural Business Services system files with security information.
This section describes the prerequisites and tasks involved in setting up the sample scenario shown in the previous section. Refer to the following steps when planning your own deployment strategy:
Ensure that the following software is installed in the production environments:
EntireX must be installed on one or more machine. In the sample scenario, it is installed on the machine containing both development and production environments.
Either Entire Net-Work must be installed on every PC that will use the business service, or EntireX must be installed and configured to use TCP/IP as the network transport protocol.
If you are not using EntireX configured for TCP/IP, Entire Net-Work must be installed on each server machine.
Natural must be installed on each server machine.
Adabas must be installed on each server machine.
Notes:
The Business Service Administration subsystem defines and manages Natural Business Services servers and maintains Administration subsystem data. You can access a full set of queries and log data in the subsystem.
Natural Business Services must be installed on each computer. The sample scenario in Sample Deployment Scenario shows the Administration subsystem installed on the machine that hosts the Development environment and Production environment 1 and on the remote computer that houses Production environment 2.
For information on installing Natural Business Services, see either Installation on Mainframes or Installation on UNIX, depending on your operating system.
In the example scenario, Production environment 1 shares the Administration subsystem with the Development environment. While it is possible to share the Natural Business Services system files between development and production environments, most organizations will want to create separate copies of these files to better ensure the integrity of their production data.
The files are accessed through logical file numbers, and they can be installed using any available physical file numbers. You can assign the logical file settings dynamically using the LFILE parameter, or you can link them into the Natural nucleus using the NTFILE parameter. Both files must be accessible from the Natural Business Services dispatch server, security server, and Administration subsystem.
Logical file 135 contains all information concerning users, their security privileges, and the security cache. This information is stored separately from other dispatch server information to allow this sensitive data to be enciphered, if desired.
Logical file 136 contains all information used by Natural Business Services, except the user and security information stored on logical file 135.
If the environment uses Entire Net-Work for its network transport protocol, ensure that the network administrator has set up the Natural Business Services system file database so that it is accessible to all appropriate clients.
At runtime, an attach server launches other servers as they are needed. If possible, configure your system so that an attach server is started as part of the operating system activation process.
Tip:
The attach server can automatically initiate multiple dispatchers
during startup. For information, see
Initiate
Multiple Dispatchers During
Startup.
Typically, you start attach servers in an online environment, which is resource intensive. If desired, you can start an attach server as a started task. Although you will be starting the server from the console, as opposed to from within Natural Business Services, you can continue to use all other features in the Business Service Administration system.
 To run an attach server as a started task
Set up the appropriate JCL. For example:
//*********************************************************************
//*
//ADA148   EXEC PGM=ADA148,REGION=2000K,PARM='922'
//STEPLIB  DD   DISP=SHR,DSN=OPS.COMN.LOAD
//         DD   DISP=SHR,DSN=RZDBA.DB922.NEWLOAD
//         DD   DISP=SHR,DSN=RZDBA.DB922.LOAD
//SYSUDUMP DD   SYSOUT=X
//DDCARD DD *
ADARUN  PROGRAM=USER,DATABASE=13001,MODE=MULTI,SVC=249
//DDPRINT  DD   SYSOUT=*
//DDDRUCK  DD   SYSOUT=*
//*
//ATTCHPRD EXEC PGM=NATSPE31,REGION=7000K,
//         PARM='IM=D,PROFILE=NBS511'
//STEPLIB  DD DSN=PPEX.NATURAL.LOAD,DISP=SHR
//         DD DSN=RZDBA.DB922.NEWLOAD,DISP=SHR
//         DD DSN=RZDBA.DB922.LOAD,DISP=SHR
//SORTLIB   DD DUMMY
//SORTOUT   DD DUMMY,DCB=BLKSIZE=80
//DDSORTIN  DD DISP=(,PASS),DSN=&&SORT,UNIT=SYSDA,
//             DCB=RECFM=FB,SPACE=(CYL,(5,5))
//DDSORTUT  DD DISP=(OLD,DELETE),DSN=*.DDSORTIN,VOL=REF=*.DDSORTIN
//SORTWK01  DD UNIT=SYSDA,SPACE=(CYL,5)
//SORTWK02  DD UNIT=SYSDA,SPACE=(CYL,5)
//SORTWK03  DD UNIT=SYSDA,SPACE=(CYL,5)
//SORTWK04  DD UNIT=SYSDA,SPACE=(CYL,5)
//SORTMSG   DD SYSOUT=X
//CMPRINT   DD SYSOUT=X,DCB=BLKSIZE=132
//CMPRT01   DD SYSOUT=X
//CMWKF01   DD SYSOUT=X
//CMWKF07   DD DSN=&&TEMP,UNIT=SYSDA,SPACE=(CYL,(1,1)),DISP=(,DELETE)
//CMPRT02   DD SYSOUT=X
//CMPRT03   DD SYSOUT=X
//CMEDIT31  DD DSN=DAEFEDT.V31.CMEDIT,DISP=SHR
//CMSYNIN   DD DISP=SHR,DSN=NBS511.JCL(business service input data)
//DDCARD DD *
ADARUN  PROGRAM=USER,DATABASE=13001,MODE=MULTI,SVC=249
Initiate the attach server from the Business Service Administration main menu.
Enter "%%" to display the JCL submitted to the editor.
In the example, the JCL is contained in business service
input data.
Scroll to the information following the LOGON. For example:
LOGON SYSBIZ
SPSSTART
ATTACH-QA,%
CNDSHE,%
%*
,%
0,%
0,%
 ,%
 ,%
 ,%
0000000000000000000000000000000000000000000000000000000000000000,%


FIN
Use this information to supply the required information in the JCL for the started task.
At runtime, the dispatch server is responsible for invoking the Natural business services requested by the client. This server accesses the Natural Business Services system files for self-configuration on startup and for writing messages. It also uses the Natural Business Services security server (defined as one of its remote services) to determine the validity and location of the requested target service.
The dispatch server communicates with the security server to validate users and verify their privileges and requests for business services. At least one Natural Business Services security server must be available to an environment. It can be installed on any machine that has access to the Business Service Administration subsystem data. However, to minimize network traffic, the Natural Business Services security server should run in the same location as the Administration subsystem data.
Normally, dispatch and security servers are started up automatically on demand by an attach server.
Note:
For information on defining servers, see
Defining and Managing
Servers.
Natural Business Services security servers can be configured to work with Natural Security so that you can use Natural Security users and groups instead of Natural Business Services tables. If you are using Natural Security, the dispatch and security servers must have access to Natural Security data. When Natural Security is operating, the dispatch server makes calls to Natural Security to help determine client authorizations, and the dispatch server impersonates the client when executing business service requests.
Decide which business services you want to make available in the production environments and identify their domains. To export and import domains, use the Domain Transfer utilities in the Business Service Administration subsystem. When you use the utilities to copy the table data from one environment to another, the domains, business service definitions and, optionally, the step library chains are also copied.
Note:
For information on importing and exporting domains, see
Transfer Domains,
Business Services, and Step Library Chains.
If users and groups have already been defined in the production environments, you can omit this step. Otherwise, use the Export Groups and Import Groups utilities to copy this data to your production environments.
If you use the Export and Import Groups utilities, the permissions that grant access between groups and domains are not transferred. You must define security definitions in the Business Service Administration subsystem for the business services you are distributing.
Tip:
To make a mirror image copy of the Natural Business
Services system files, use ADAULD to unload and ADALOD to
reload.
Notes:
The data transfer utilities allow you to copy domains (which include business services and step library chains) and groups (which include associated users) between one Natural Business Services system file and another. These utilities copy data to and from either a work file or a PC file, depending on the definition of the WORK parameter in your NATPARM.
This section describes how to use the data transfer utilities in the Business Service Administration subsystem. The following topics are covered:
Use the Export Domains and Import Domains utilities to transfer domains, business services, their associated Natural subprograms, and step library chains from one Administration subsystem file to another. These utilities copy the following:
Domain definitions
Definitions for all business services with which the domain is associated, such as the service descriptions or methods
Natural subprograms associated with the business services (optional)
Step library chains associated with the domain (optional when importing domains)
This section covers the following topics:
To access the domain transfer utilities
Enter "AA" in Function on the Business Service Administration Subsystem main menu.
The Application Administration main menu is displayed.
Enter "MM" in Function.
The Application Administration Maintenance menu is displayed.
Enter "DT" in Function.
The Transfer Domains menu is displayed. For example:
BS_XFER2    ***** Business Service Administration Subsystem *****     CDLAYMN1
Feb 14                    - Transfer Domains Menu -                   09:39 PM

                    Functions
                    -------------------------------------------------
                    XD   Export Domains
                    ID   Import Domains


                    ?   Help
                    .   Terminate
                    -------------------------------------------------
Function .......... __


Command ........... _________________________________________________________
Enter-PF1---PF2---PF3---PF4---PF5---PF6---PF7---PF8---PF9---PF10--PF11--PF12---
help retrn quit flip main |
Enter the code for the utility you want to access in Function.
The window for that utility is displayed.
To export domains, business services, and step library chains
Enter "XD" in Function on the Transfer Domains menu.
The Export Domains window is displayed. For example:
BS_EXDOM                                                      BSEXDOM0
  Domains.............   From........ ________
                         Thru........ ________
* Business Service....   ________________________________
  Latest version......   _
  Associated Subprograms _   Dest. Library ________   XREF _
Enter-PF1---PF2---PF3---PF4---PF5---PF6---PF7---PF8---PF9---PF10--PF11
help retrn quit flip |
Tip:
You can invoke the Export utility in batch mode by entering
"BS_EXDOM" at the Next prompt.
Specify the following options:
| Field | Description |
|---|---|
| Domains
From Thru |
Domain(s) from which to export data.
|
| Business service | Business service to export, along with the
associated domain and step library chains.
Note: Tip: |
| Latest version | To only export the business service(s) with
the highest version number, select this field.
Note: |
| Associated Subprograms | To export the Natural subprograms that
implement the selected business services, select this field.
Note: |
| Dest. Library | To override the name of the destination library, type the new name in this field (by default, the source library name is used). |
| XREF | To export XREF information for each Natural object associated with the services, select this field. |
Press Enter to export the selected data.
If you are exporting to a PC file, the Download window is displayed to specify the file in which to load the data. You can repeat steps 2 and 3 as many times as required. The selected services are exported one after the other to work file 2 and the associated subprograms are exported to work file 1 (when Associated Subprograms is selected). A report will be routed to your logical printer 1.
A report listing the unloaded associated subprograms is saved as a text member named NBSDPLOY in the WORKPLAN library in the FUSER file (in batch mode, the report is printed in SYSOUT or the console).
Enter "." in From or press PF2 (retrn) to terminate the export operation and return to the Transfer Domains menu.
Note:
After the data has been successfully exported, a confirmation
message is displayed. If the operation was not successful, a message describing
the problem is displayed.
You can import any domain that has been exported using the Export Domains utility.
To import domains, business services, and step library chains
Enter "ID" in Function on the Transfer Domains menu.
The Import Domains window is displayed. For example:
 BS_IMDOM                                                           BSIMDOM0


  Import Domains........ _     <OR>     Scan input file....... _


  Domain......... ________

* Bus. Service... ___________________________________


  Replace steplib chains _
  Associated Subprograms _  Replace option _  XREF _  Dest. Library ________
 Enter-PF1---PF2---PF3---PF4---PF5---PF6---PF7---PF8---PF9---PF10--PF11--PF1
help retrn quit flip mai |
Tip:
You can invoke the Import utility in batch mode by entering
"BS_IMDOM" at the prompt.
Specify the following options:
| Field | Description |
|---|---|
| Import Domains | To import domain data to the current library, select this field. |
| Scan input file | To only create a report of the data to be imported, select this field. The report lists the steplib chains, domains, and interfaces (business service definitions) and is written to the default device for Report 1 as set up by your system administrator. |
| Domain | To import a single business service, enter
the name of the domain containing the service in this field and the name of the
business service in the Bus. Service field. Wildcard characters are not
supported.
The domain name is combined with the name in the Bus. Service field to create a filter that uniquely identifies a business service in the input workfile. The resulting filter can be used by either the Import Domains or Scan input file function. Note: |
| Bus. Service | Name of the business service to import or
scan from the specified domain. Wildcard characters are not supported.
Note: |
| Replace steplib chains | To not replace step library chains in the target environment if they have the same names as those being imported, select this field. |
| Associated Subprograms | To import the Natural subprograms that
implement the selected business services, select this field.
Notes:
|
| Replace option | To replace existing data with imported data,
select this field.
Note: |
| XREF | To import XREF information for each Natural
object associated with the services, select this field.
Note: |
| Dest. Library | To override the name of the destination library, type the new name in this field (by default, the source library name is used). |
Press Enter.
If your NATPARM specifies a PC file, the Upload Data window is displayed to specify the file to be uploaded or scanned. If your NATPARM specifies a work file, the import utility uses that work file. Business services are imported from work file 2 and the associated subprograms are imported from work file 1 (when Associated Subprograms is selected). A report will be routed to your logical printer 1.
A report listing the associated Natural subprograms (previously unloaded using the Export utility) is saved as a text member named NBSDPLOY in the WORKPLAN library in the FUSER file (in batch mode, the report is printed in SYSOUT or the console).
Notes:
Use the Export Groups and Import Groups utilities to copy groups and their associated users from one Business Service Administration subsystem file to another. This section covers the following topics:
To access the group transfer utilities
Enter "SA" in Function on the Business Service Administration Subsystem main menu.
The System Administration main menu is displayed.
Enter "MM" in Function.
The System Administration Maintenance menu is displayed.
Enter "DT" in Function.
The Transfer Groups menu is displayed. For example:
BS_XFER    ***** Business Service Administration Subsystem *****      CDLAYMN1
Feb 14                     - Transfer Groups Menu -                   09:42 PM

                    Functions
                    -------------------------------------------------
                    XG   Export Groups
                    IG   Import Groups


                    ?   Help
                    .   Terminate
                    -------------------------------------------------
Function .......... __


Command ........... _________________________________________________________
Enter-PF1---PF2---PF3---PF4---PF5---PF6---PF7---PF8---PF9---PF10--PF11--PF12---
help retrn quit flip main |
Enter the code for the utility you want to access in Function.
The window for that utility is displayed.
To export groups and associated users
Enter "XG" in Function on the Transfer Groups menu.
The Export Groups window is displayed. For example:
                         Export Groups
  BS_EXGRP                                BSEXGRP0

              Groups
                From........ ________________________________
                Thru........ ________________________________
  Enter-PF1---PF2---PF3---PF4---PF5---PF6---PF7---PF8---PF9--
help retrn quit flip |
Specify the following options:
| Field | Description |
|---|---|
| Groups
From Thru |
Group(s) from which to export data. Wildcard
characters are supported.
|
Press Enter to start the export process.
If you are exporting to a PC file, the Download window is displayed to specify the file into which the data is to be transferred.
After the data is exported, a confirmation message is displayed. If the operation was not successful, a message describing the problem is displayed.
You can import any group that has been exported using the Export Groups utility.
To import groups and associated users
Log onto the library to which you want to import the groups.
Invoke the Administration subsystem.
Access the Transfer Groups menu.
Enter "IG" in Function on the Transfer Groups menu.
The Import Groups window is displayed. For example:
                         Import Groups
  BS_IMGRP                                            BSIMGRP0

         Import groups............................: _

         Scan input file..........................: _
  Enter-PF1---PF2---PF3---PF4---PF5---PF6---PF7---PF8---PF9---
help retrn quit flip |
Specify the following options:
| Field | Description |
|---|---|
| Import groups | To import group data to the current library, select this field. |
| Scan input file | To only create a report of the data to be imported, select this field. The report lists the groups and users in the data file and is written to the default device for Report 1 as set up by your system administrator. |
Press Enter.
If your NATPARM specifies a PC file, the Upload Data window is displayed to locate and select the file to be imported or scanned. If your NATPARM specifies a work file, the import utility uses the data from that work file.
After the data is imported or scanned, a confirmation message is displayed. If the operation was not successful, a message describing the problem is displayed.
To invoke a data transfer utility in batch mode
Enter one of the following commands at the Next prompt:
| Utility | Command |
|---|---|
| Export Domains | BS_EXDOM |
| Import Domains | BS_IMDOM |
| Export Groups | BS_EXGRP |
| Import Groups | BS_IMGRP |
The following JCL examples call the data transfer utilities in batch mode:
. . .
//CMPRT01 DD SYSOUT=X
//CMWKF01 DD DSN=DEV.DOMAINS.TEMP,DISP=(,CATLG),UNIT=SYSDA,
//           DCB=(RECFM=VB,LRECL=4624,BLKSIZE=4628),
//           SPACE=(CYL,(5,2),RLSE)
//SYSIN     DD *
GLOBALS IM=D
LOGON SYSBIZ
BS_EXDOM <from domain> <to domain>
. . .
//DDCARD DD *
ADARUN MODE=MULTI,DBID=019,PROG=USER,SVC=247
//CMPRT01 DD SYSOUT=X
//CMWKF01 DD DSN=DEV.DOMAINS.TEMP,DISP=SHR
//CMSYNIN DD *
//SYSIN   DD *
GLOBALS IM=D
LOGON SYSBIZ
BS_IMDOM X,,X  << --- use this to replace steplibs
BS_IMDOM X,,,  << --- use this to not replace steplibs
BS_IMDOM X,X,  << --- use this to only scan the import file
Note:
If you mark the Replace Steplibs and Scan Import file options, the
report indicates which steplibs were replaced.
//SYSOUT    DD SYSOUT=&SYSOUT
//*
//CMWKF01  DD DSN=EXPRT.SUBPGM,DISP=SHR
//CMWKF02  DD DSN=EXPRT.DOMAINS,DISP=SHR
//*
//CMPRINT   DD SYSOUT=X
//CMPRT01   DD SYSOUT=X
//*
//CMSYNIN   DD *
LOGON SYSBIZ
BS_IMDOM
X,,MYDOMAIN,MYSERVICE,X,,,Y
.
FIN
/*
. . .
//CMPRT01 DD SYSOUT=X
//CMWKF01 DD DSN=DEV.DOMAINS.TEMP,DISP=(,CATLG),UNIT=SYSDA,
//           DCB=(RECFM=VB,LRECL=4624,BLKSIZE=4628),
//           SPACE=(CYL,(5,2),RLSE)
//SYSIN     DD *
GLOBALS IM=D
LOGON SYSBIZ
BS_EXGRP <from group> <to group>
. . .
//DDCARD DD *
ADARUN MODE=MULTI,DBID=019,PROG=USER,SVC=247
//CMPRT01 DD SYSOUT=X
//CMWKF01 DD DSN=DEV.GROUPS.TEMP,DISP=SHR
//CMSYNIN DD *
//SYSIN   DD *
GLOBALS IM=D
LOGON SYSBIZ
BS_IMGRP X,, << --- use this to import groups
BS_IMGRP,X,  << --- use this to only scan the import file
To import table data from external systems, such as an in-house security system, you can create your own export utility. This utility will copy your data into a transfer file that conforms to the import file specifications expected by the Business Service Import Groups utility. To help create this module, Natural Business Services supplies the BSSI_EX1 module in the SYSBIZ library as a sample template for a program that uses the work file definitions.
The work file is configured into variable length record types, with each record consisting of a line in an ASCII file. Lines are separated by CR+LF characters. The following types of records are supported:
Header record
Group record
User record
Each record is identified by a record ID. The information contained in each record must strictly follow the guidelines outlined in the following tables with regard to data values and relative positioning within the record.
This record must be the first record in the work file. It identifies the version of the utility that created the file and the version of the Natural Business Services system file from which data was exported. The Header record fields are:
| Field | Value | Length | Start Position | End Position | Description |
|---|---|---|---|---|---|
| Record Type | <H | 2 | 1 | 2 | Start of Header record |
| Utility Version | 5.5.1 | 10 | 3 | 12 | Version of export utility |
| Data Version | 0551 | 4 | 13 | 16 | Version of Natural Business Services system file |
| Reserved | 139 | 17 | 155 | Reserved for future use | |
| Record Type | H> | 2 | 156 | 157 | End of Header record |
Group records contain the information found in the Natural Business Services Groups table. The Group record fields are:
| Field | Value | Length | Start Position | End Position | Description |
|---|---|---|---|---|---|
| Record Type | <G | 2 | 1 | 2 | Start of Group record |
| Group ID | 8 | 3 | 10 | Unique Group ID | |
| Group Name | 50 | 11 | 60 | Descriptive group name | |
| Record Type | G> | 2 | 61 | 62 | End of Group record |
User records contain the information found in the Natural Business Services Users table. When creating an export file for both groups and users, ensure that Group records are copied to the work file before User records.
Note:
The Groups Export utility copies User records to the work file in an
encrypted format. If you write your own export utility to create an export work
file, passwords cannot be encrypted because the Import Groups utility cannot
decrypt the password before updating the User table.
The User record fields are:
| Field | Value | Length | Start Position | End Position | Description |
|---|---|---|---|---|---|
| Record type | <U | 2 | 1 | 2 | Start of User record |
| User ID | 8 | 3 | 10 | Unique user ID | |
| Password | 40 | 11 | 50 | User password | |
| User name | 50 | 51 | 100 | User name | |
| Debug library | 8 | 101 | 108 | Name of valid Natural library | |
| Debug module derive method | T or U | 1 | 109 | 110 | Derive method for debug text members: timestamp (T) or user ID (U) |
| User language | 1-60 | 3 | 111 | 113 | Valid Natural *Language value, zero-filled, right-justified |
| Linked group count | 1-10 | 3 | 114 | 116 | Number of groups user is linked to, zero-filled, right-justified (must correspond to the number of entries in the following field) |
| Linked group IDs | 80 | 117 | 196 | Each Group ID written to the work file in a previous group record, redefined into 10 occurrences of eight bytes each, left-justified within eight bytes | |
| Record type | U> | 2 | 197 | 198 | End of User record |