
This section describes how to define users and how to define groups, which represent a collection of users and provide security options for domains, business services, and/or methods. These definitions allow you to set up a secure environment for your business services. With one setting, you can grant or deny a group of users access to one or more domains, or set privileges for individual services and methods.
 To set up a secure environment for your business services
Define groups to represent collections of users.
Define users in the Business Service Administration subsystem.
Associate users with the appropriate groups.
Define domains to represent collections of services associated with related business functions.
Note:
You can define users and groups in either Natural
Business Services or Natural Security.
For more information , see Setting Business Service
Security Options.
This section covers the following topics:
The following table describes the components to create a secure environment for a business service:
| Component | Description |
|---|---|
| Group | Represents multiple users with the same need and authority to access particular business services and their methods. For example, an organization may have separate groups for Quality Assurance, Sales, and Administration. |
| User | Represents individual users in the Business Service Administration subsystem. User profiles define the groups to which each user belongs. |
| Domains, services, and methods | Domains represent a collection of several
business services related to a business function. Each business service has
access to one or more methods.
Note: |
The following diagram shows the relationships between a user and the associated group, domains, services, and methods:
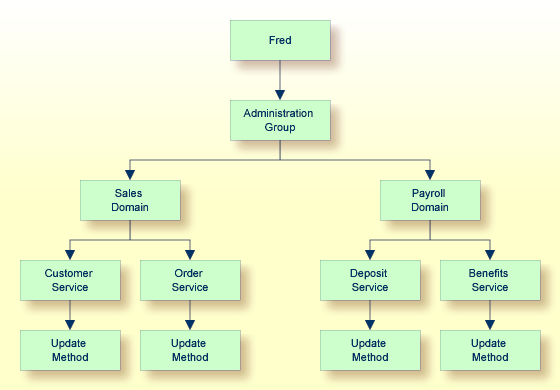
Because the user, Fred, is a member of the Administration group, he potentially has access to all domains, services, and service methods associated with that group. But in this example, Fred has only been granted access to two domains, four services, and one method.
When the CSRLOAD program is run during installation, the following groups and sample users are loaded into the Business Service repository:
| Group | Sample User | Function | Security Access |
|---|---|---|---|
| ADMIN | PWRUSR | Administration activities, such as:
|
Full access to the ADMIN, INTERNAL, and DEMO domains. |
| DEVS | PWRUSR
DEVnn |
Development activities, such as:
Note: |
Full access to the INTERNAL and DEMO domains, as
well as access to the following methods in the ADMIN domain:
|
| USERS | PWRUSR
DEVnn BUSER |
Execute Web services developed using the services supplied in the DEMO domain. | Full access to the DEMO domain. |
| DEMOUSRS | USER01
USER02 USER03 USER04 USER05 |
Training activities.
Notes:
|
Full access to the DEMO01-DEMO05 domains.
Tip: |
Note:
The PWRUSR user also has access to the CST domain.
If Natural Security (NSC) is being used, you must add the following groups to Natural Security and assign the appropriate user IDs to each group:
ADMIN
DEVS
USERS
Users in these groups must belong to the appropriate groups. For example:
To perform administration functions (for example, to view audit trails), the user must belong to the ADMIN group.
To develop a Natural business service, the user must belong to the DEVS group.
To use the demo application, the user must belong to the USERS group.
The remainder of this section describes how to define groups and users, using only Natural Security or Natural Business Services security.
Note:
For information on the queries and logs available to view information
about groups and users, see Auditing Business
Services.
All users of a business service that employs servers must be known to the Business Service Administration subsystem through their associations with groups. To access the business service services, a user must be a member of at least one group that is linked to a domain containing the service. A user can belong to a maximum of 10 groups.
Groups are used to collect users into larger entities so that security settings can be defined and verified at a higher level. This eliminates the need to define security settings for each user.
Tip:
To define security privileges for a single user, create a group
containing that user alone.
Natural Business Services allows users and groups to be defined either within the business service system files or by linking to the Natural Security user and group definitions.
Note:
For more information, see Use Natural Security with Natural
Business Services.
This section covers the following topics:
Use the Maintain Group Table panel in the Business Service Administration subsystem to define groups. Each user can belong to one or more of these groups.
To define a group under Natural Business Services security
Enter "SA" in Function on the Business Service Administration Subsystem main menu.
The System Administration main menu is displayed.
Enter "MM" in Function on the System Administration main menu.
The System Administration Maintenance menu is displayed.
Enter "GR" in Function on the System Administration Maintenance menu.
The Maintain Group Table panel is displayed. For example:
BSGR__MP   ***** Business Service Administration Subsystem *****      BSGR__11
Feb 14                     - Maintain Group Table -                   9:02 PM

 Action (A,B,C,D,M,N,P)    _

 Group ID................: ________________________________
 Group Name..............: __________________________________________________


Command: ____________________________________________________________
Enter-PF1---PF2---PF3---PF4---PF5---PF6---PF7---PF8---PF9---PF10--PF11--PF12---
confm help retrn quit flip pref main |
Type "A" in Action.
Type the group identifier in Group ID.
Type the name of the group in Group Name.
Press Enter to confirm the information.
After adding all required groups, you can use the group identifiers when defining users.
When Natural Security is enabled in the Business Service Administration subsystem, use the Maintain Group Profile window instead of the Maintain Group Table panel supplied with Natural Business Services to define groups.
To define a group under Natural Security
Enter "SA" in Function on the Business Service Administration Subsystem main menu.
The System Administration main menu is displayed.
Enter "MM" in Function on the System Administration main menu.
The System Administration Maintenance menu is displayed.
Enter "GR" in Function on the System Administration Maintenance menu.
The Maintain Group Profile window is displayed. For example:
         Maintain Group Profile (Natural Security)

  Function ........................... __
  User ID ............................ ________
  User Type .......................... G
  Library ID or copied from user ..... ________


              Press any PF-key to stop
|
Type "AD" in Function.
AD is the code for the Add action. Other codes for this field are:
| Code | Description |
|---|---|
| CO | Performs the Copy action. |
| DI | Performs the Display action. |
| MO | Performs the Modify action. |
Type the name of the new group in User ID.
Each group ID must be unique among all user IDs and library IDs defined to Natural Security.
Type "G" in User Type.
Press Enter.
The Add User panel is displayed. For example:
15:35:15                    *** NATURAL SECURITY ***                 2006-03-06
                                  - Add User -

                                             Modified ..            by
User ID ...... NEWUSER
User Name .... ________________________________
User Type .... G (Group)

Members            Libraries           Batch User ID ..... ________
--------      -------------------
________      Default .. ________      Time   Differential . + __ h  30 min
________                               Zone   ________________________________
________
________                               Language .......... _0
________                               Logon recorded .... N

No. members


Additional Options ... N

Enter-PF1---PF2---PF3---PF4---PF5---PF6---PF7---PF8---PF9---PF10--PF11--PF12---
Help PrevM Exit AddOp Flip Canc |
Use this panel to add the group.
A group is distinguished from an individual user by its User Type value: G.
Notes:
Business service administrators define users so that their passwords can be verified when they attempt to perform actions in the business services supported by the Business Service Administration subsystem.
If Natural Security is not enabled, use the Maintain User Table panel to identify each user, specify the debug library and file for the user, specify the preferred language for the user, and list the groups to which the user belongs.
If Natural Security is enabled, use the Maintain User Profile window and Add User panel to define users. To associate users with groups, use the Maintain User's Groups window. You can also link users to protected libraries using the Library Maintenance/Link Users window. If you are using Natural Security, the user's debug library and file name default to the user ID. By default, the preferred language is English.
To define a user using Natural Business Services security
Enter "SA" in Function on the Business Service Administration Subsystem main menu.
The System Administration main menu is displayed.
Enter "MM" in Function.
The System Administration Maintenance menu is displayed.
Enter "US" in Function.
The Maintain User Table panel is displayed. For example:
BSUS__MP    ***** Business Service Administration Subsystem *****     BSUS__11
Feb 14                     - Maintain User Table -                     9:08 PM

 Action (A,B,C,D,M,N,P)    _

 Userid/Passw must be in upper case and <= 8 chars for Mainframe and/or NSC___
 User ID.................: ________________________________
 Password................:
 Name....................: __________________________________________________

 Debug Library...........: ________
 Debug Filename..........: _ ('T'imestamp; 'U'ser ID)

 Preferred Language......: __
 Groups...: ________________________________  ________________________________
            ________________________________  ________________________________
            ________________________________  ________________________________
            ________________________________  ________________________________
            ________________________________  ________________________________
Direct Command: ____________________________________________________________
Add        Browse     Clear      Display    Modify     Next       Purge
Enter-PF1---PF2---PF3---PF4---PF5---PF6---PF7---PF8---PF9---PF10--PF11--PF12---
confm help retrn quit flip pref main |
Use this panel to specify a user's debug library and file. The Debug Library value defaults to your user ID.
Note:
Using Trace-Option(1), you can store data transmitted between the
client and server in the debug file.
Type the code for how the debug file is named in Debug Filename.
Valid codes are:
| Code | Option | Description |
|---|---|---|
| T | Timestamp | Current time value is the file name. This
allows multiple copies of debug data to exist; later copies do not overwrite
earlier ones. Each file is assigned a name of "T"
followed by a time value of HHMMSST. For example, files generated
at 12:23:54.7 and 18:12:51.9 have the names
"T1223547" and
"T1812519", respectively.
|
| U | User | User ID is the file name. This option is the default. Each request from the client overwrites the contents of the debug file. |
Type the name of at least one group in Groups.
Each user must be associated with at least one group. If a user does not belong to a group, Natural Business Services rejects all access requests made by the user. When defining security settings, associate groups and domains to specify which users have access to which services. Each user must belong a group that has been associated with the domain containing the services the user needs to use. You can specify group(s) when adding a new user or modifying the profile of an existing user.
Press Enter to define the user.
When Natural Security is enabled in the Business Service Administration subsystem, use the Maintain User Profile window instead of the Maintain User Table panel supplied with Natural Business Services to define users. To associate users with groups, use the Maintain User's Groups window. You can also link users to protected libraries using the Library Maintenance / Link Users window.
To define a user using Natural Security
Enter "SA" in Function on the Business Service Administration Subsystem main menu.
The System Administration main menu is displayed.
Enter "MM" in Function.
The System Administration Maintenance menu is displayed.
Enter "US" in Function.
The Maintain User Profile window is displayed. For example:
        Maintain User Profile (Natural Security)

 Function ........................... __
 User ID ............................ ________
 User Type .......................... _
 Library ID or copied from user ..... ________

 Copy with links (CO function only).. N ('Y' or 'N')


             Press any PF-key to stop
|
Type "AD" in Function.
AD is the code for the Add action. Other codes for this field are:
| Code | Description |
|---|---|
| CO | Performs the Copy action. |
| DI | Performs the Display action. |
| MO | Performs the Modify action. |
Type the name of the new user in User ID.
Each user ID must be unique among all user IDs and library IDs defined to Natural Security.
Type the code for the type of user in User Type.
Valid codes for this field are:
| Code | Description |
|---|---|
| A | User is an administrator. |
| M | User is a member of a group. |
| P | User is a person who is not an administrator or a member of a group. |
Press Enter.
The Add User panel is displayed. For example:
14:29:10                    *** Natural Security ***                2006-03-13
                      - Add User -

                                               Modified .. 13-10-21 by DEVEX
User ID ...... NEWUSER
User Name .... ________________________________
User Type .... P (A=Administrator, P=Person, M=Member)

Privil. Groups           Libraries                 Password
--------------      -------------------      ----------------------
________            Default .. ________      New Password
________            Last ..... ________      Change after ___ days
________
________                   ETID              Batch User ID ..... ________
________            -------------------      Language .......... _0
                    Default .. _9993  G      Private Library ... Y
No. groups 3        Last ..... ________      Logon recorded .... N


Additional Options ... N

Enter-PF1---PF2---PF3---PF4---PF5---PF6---PF7---PF8---PF9---PF10--PF11--PF12---
Help Exit AddOp Flip Canc |
Use this panel to specify information about the user.
Note:
For a description of this panel, refer to the
Natural Security documentation for
mainframes.
Each user must be associated with at least one group. If a user does not belong to a group, Natural Business Services rejects all access requests made by the user. When defining security settings, associate groups and domains to specify which users have access to which services. Each user must belong to a group that has been associated with the domain containing the services the user needs to use.
To associate a user with a group
Enter "SA" in Function on the Business Service Administration Subsystem main menu.
The System Administration main menu is displayed.
Enter "MM" in Function.
The System Administration Maintenance menu is displayed.
Enter "UG" in Function.
The Maintain User's Groups window is displayed. For example:
         Maintain User's Groups (Natural Security)

  Group ID ........................... ________
  ADd / DElete / LIst members ........
  Start value for list function ...... ________

  Members

   1 ________  2 ________  3 ________  4 ________
   5 ________  6 ________  7 ________  8 ________
   9 ________ 10 ________ 11 ________ 12 ________
  13 ________ 14 ________ 15 ________ 16 ________
  17 ________ 18 ________ 19 ________ 20 ________
  21 ________ 22 ________ 23 ________ 24 ________
  25 ________ 26 ________ 27 ________ 28 ________
  29 ________ 30 ________

Press any PF-key to stop |
Type the group name in Group ID.
Type "LI" in ADd / DElete / LIst members.
Press Enter.
The group's members are listed in the Members columns.
Type "AD" in ADd / DElete / LIst members.
Type the user ID you want to add in an empty field in Members.
Press Enter.
The user is added to the group.
Use the library Link function to associate users with protected libraries. The Business Service Administration subsystem uses the link definitions found in Natural Security to determine whether or not a user can access a Natural library. Each library must be linked to the user in Natural Security. The libraries include:
Each protected library in a steplib
The current execution library, if protected
The SYSTEM (or *STEPLIB library), if protected
To link a user to a protected library
Enter "SA" in Function on the Business Service Administration Subsystem main menu.
The System Administration main menu is displayed.
Enter "MM" in Function.
The System Administration Maintenance menu is displayed.
Enter "LI" in Function.
The Library Maintenance/Link Users window is displayed. For example:
    Library Maintenance / Link Users (Natural Security)

  Function ........................... LK
  Library ID ......................... ________
  Library/private library ............ L

  User ID (for link functions)........ ________

Press any PF-key to stop |
Type the library name in Library ID.
Type the user ID in User ID.
Press Enter.
The link is created.