
This document describes the steps for installing the Natural IMS TM Interface (product code NII) on z/OS.
Prepare, Convert, Assemble and Link the License File for Natural for IMS for zIIP
Installing the Natural Development/Natural Web I/O Interface Server
For information on how to operate Natural in an IMS TM environment, see Using Natural with TP Monitors and Natural under IMS TM in the TP Monitor Interfaces documentation.
When used in this document, the notation
vrs or
vr represents the relevant product
version (see also Version in the
Glossary).
The following software must be installed before you can install the Natural IMS TM Interface:
Natural global buffer pool if you are using the MPP environment (strongly recommended).
Natural Roll Server if the
ROLLSRV
parameter of the Natural IMS TM Interface is set to YES.
Natural Authorized Services Manager with the SIP server function if the Non-Conversational MPP Interface, the monitoring or the broadcasting function of the Natural IMS TM Interface is used.
Natural Authorized Services Manager if the Accounting to SMF function of the Natural IMS TM Interface is used.
Adabas IMS/TM Interface (product code AII), version as specified under Software AG Product Versions Supported by Natural in the current Natural Release Notes for Mainframes.
For further information on the functions mentioned above, see the relevant sections in the TP Monitor Interfaces and Operations documentation.
See also General Prerequisites and System Support in the section Overview of the Installation Process.
The installation medium contains the following data sets required for product installation:
| Data Set Name | Contents |
|---|---|
NIIvrs.LOAD |
Load modules |
NIIvrs.SRCE |
Source modules and macros |
NIIvrs.LICS |
Only applies if Natural IMS TM Interface Version 8.3.4
is installed
Product license file for Natural for IMS for zIIP For information on the license file and product licensing, see Software AG Mainframe Product Licensing. |
Copy the data sets into your environment as described in Copying Data Sets to a z/OS Disk in the section Installing Natural.
Sample installation jobs are contained in the NATvrs.JOBS data set
and are prefixed with the product code. The data set is provided on the
installation medium supplied for base Natural.
Be sure to read Installation Process and Major Natural Features before you start the installation procedure.
The installation procedure comprises the following:
Prepare, Convert, Assemble and Link the License File for Natural for IMS for zIIP
Installing the Natural Development/Natural Web I/O Interface
(Job I007, Steps 2501, 2502, 2504)
Anmerkung:
This step is optional. It is only required if you want to install
Natural for IMS for zIIP, and if Natural IMS TM Interface
Version 8.3.4 is installed in your
environment.
You must install a valid Natural license file. An additional license file is required if you want to install Natural for IMS for zIIP to enable support of the IBM z/IIP (IBM System z Integrated Information Processor).
For detailed information on the license file and product licensing, see Software AG Mainframe Product Licensing.
Copy the license file from the supplied installation medium to disk or transfer it from the PC as described in Transferring a License File from PC to a z/OS Host Using FTP in Software AG Mainframe Product Licensing.
Check, convert, assemble and link the license file supplied for Natural for IMS for zIIP:
| Step 2501 | Check license file
NIIvrs.LICS. This job runs the
CHECK
function of the LICUTIL license utility (see below).
|
| Step 2502 | Convert license file into an assembler source. This job runs the MAKE function of the LICUTIL license utility (see below). |
| Step 2504 | Assemble and link the assembler
source to generate load module NIILIC.
This module is then linked to all relevant front-ends in the Jobs I070 and I080. |
The functions and option settings provided by LICUTIL are described in Using the License Utility: LICUTIL in Software AG Mainframe Product Licensing.
- Note for LE Options:
If you want Natural to run in the IBM Language Environment (LE), set the System Maintenance Aid (SMA) parameter
NAT-LEtoY(Yes). The default setting isN(No). Additionally, if you want to modify the LE options in theNATLEOPTsource module or if you use non-Natural programs running in 24-bit mode, set the appropriate SMA parameter as described in Build the Natural-Specific IBM Language Environment Options in Installing Natural.
The following is an overview of the installation jobs/steps required to install the Natural IMS TM Interface in a BMP, an NTRD an MPP and/or a server environment:
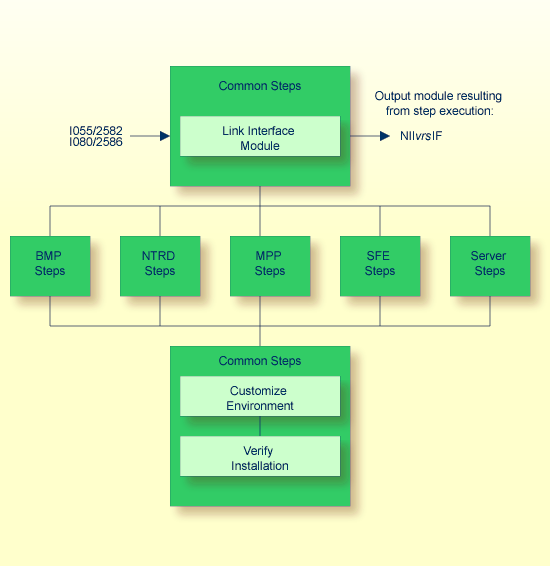
(Job I055, Step 2582)
Link the Natural IMS TM Interface module.
The same interface module can be used in a BMP, an NTRD, an MPP and/or a server environment.
The name of the interface module must be specified with the
NIINAME
keyword subparameter of the
NTIMSP
macro contained in the Natural parameter module. For details, see the
Parameter Reference documentation.
The following is an overview of the installation jobs/steps required to install the Natural IMS TM Interface for the BMP environment:
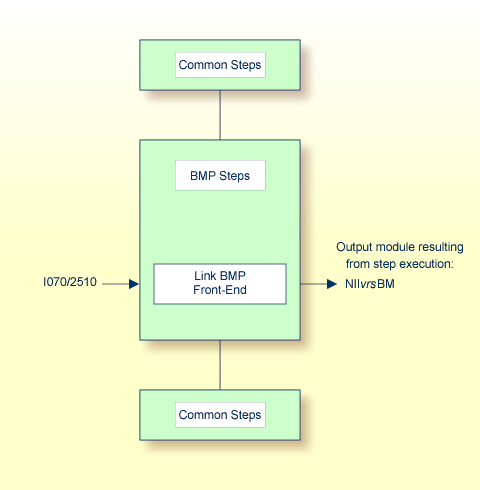
(Job I070, Step 2510)
The front-end consists of the load module NIIBMP
contained in the NIIvrs.LOAD data set,
the Natural parameter module created in
Build the Natural Parameter
Module (see Installing Natural) and
additional optional modules (see the list of module names supplied with Step
2510).
Link the front-end for the BMP environment.
Wichtig:
The name of the linked BMP front-end must also be
specified in your BMP region job as the application program name (parameter
MBR of the IMSBATCH procedure
invocation).
You can specify the parameter settings for your BMP environment by
using the parameter macros NTIMSP and
NTIMSPE of the
Natural parameter module (see the Parameter Reference
documentation).
The following is an overview of the installation jobs/steps required to install the Natural IMS TM Interface for the NTRD environment:
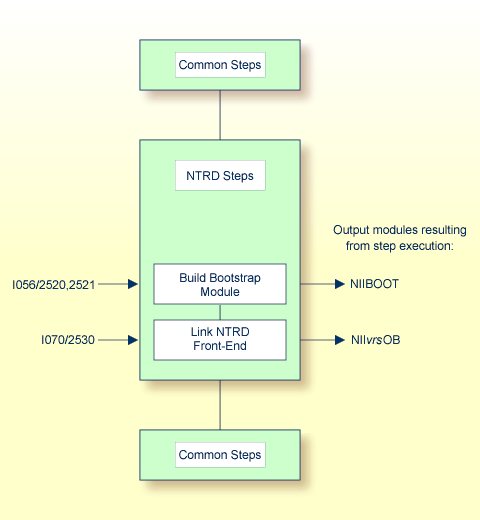
(Job I056, Steps 2520, 2521)
This step is only required if you want to invoke the NTRD front-end by a bootstrap module and not directly by a transaction code.
Create the NIIBOOT source module which contains
a call to the NIMBOOT macro. For the
DRIVERN parameter, specify the name of the front-end
module to be linked in Step 2.
Assemble and link the bootstrap module.
(Job I070, Step 2530)
The front-end consists of the NIINTRD load module
contained in the NIIvrs.LOAD data set,
the Natural parameter module created in
Build the Natural Parameter
Module (see Installing Natural) and
additional optional modules (see the list of module names supplied with Step
2530).
Link the front-end for the NTRD environment.
If you invoke the NTRD front-end by a bootstrap module, you
must additionally specify the name of the linked NTRD front-end as the driver
name (DRIVERN parameter) in the NIMBOOT
macro. The NIMBOOT
macro is described in the TP Monitor Interfaces
documentation.
If you invoke the NTRD front-end directly by a transaction
code, you must additionally specify the name of the linked NTRD front-end as
the application program name (parameter PSB) in the
APPLCNT macro.
You can specify the parameter settings for your NTRD environment
by using the parameter macros NTIMSP and
NTIMSPE of the
Natural parameter module (see the Parameter Reference
documentation).
The following is an overview of the installation jobs/steps required to install the Natural IMS TM Interface for the MPP environment:
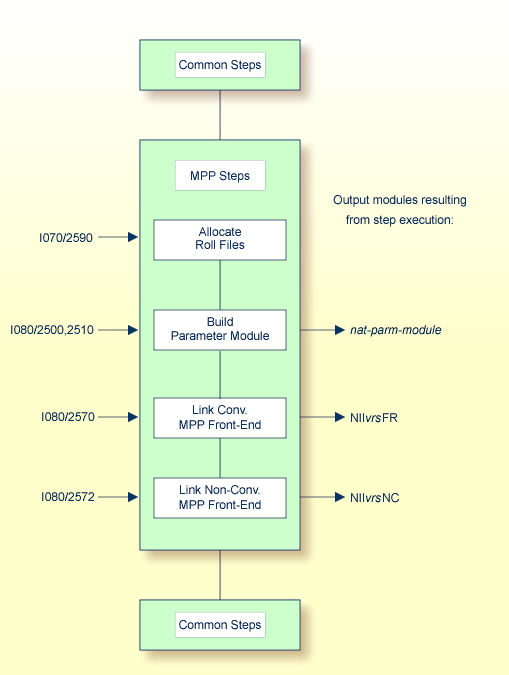
(Job I070, Step 2590)
This step is only required if you do not use the Natural Roll Server.
If you do not want to use the Natural Roll Server, you have to allocate and format the roll files to be used by the Natural IMS TM Interface.
You can allocate up to 5 sequential data sets with a fixed-record format for use as roll files.
Allocate the roll files.
Format the roll files by using the module
NATRSRFI described in
Formatting the
Roll File in the Operations
documentation.
The roll file initialization program produces a WTO message indicating the number of concurrent users which can be serviced by the roll file. For information on the roll file facility, see Natural Roll Server Functionality in the Operations documentation.
(Job I080, Steps 2500, 2510)
Set the profile parameters FNAT and
FUSER (see
the Parameter Reference documentation) in the Natural
parameter module:
FNAT=(database-id,file-number)
FUSER=(database-id,file-number)
where database-id and
file-number are the values you
specified when loading the system files during the
Installation
Procedure for base Natural.
If you want to use a Natural global buffer pool, specify the
macro NTBPI
in the Natural parameter module with the name of the global Natural buffer pool
and set the profile parameter SUBSID in the parameter
module.
If you want to use any other buffer pool, specify the macro
NTBPI in the parameter module for each required buffer
pool type.
We strongly recommend that you use a global buffer pool for each buffer pool type.
If an editor buffer pool is required, you must use a global editor buffer pool.
Modify any other parameters in the parameter module whose default values do not meet your requirements. For further information on the parameters contained in the parameter module, see Building a Natural Parameter Module in the Operations documentation.
Assemble and link the Natural parameter module for the dialog-oriented environments.
(Job I080, Step 2570)
The front-end consists of the NIICONV load module
contained in the NIIvrs.LOAD data set,
the Natural parameter module created in
Step 2: Build the
Natural Parameter Module and additional optional modules
(see the list of module names supplied with Step 2570).
Link the front-end for the conversational MPP environment.
Wichtig:
The name of the linked MPP front-end must also be
specified in the APPLCNT macro as the application program name
(parameter PSB).
You can specify the parameter settings for your conversational MPP
environment by using the parameter macros NTIMSP and
NTIMSPE of the
Natural parameter module (see the Parameter Reference
documentation).
(Job I080, Step 2572)
The front-end consists of the NIINONC load module
contained in the NIIvrs.LOAD data set,
the Natural parameter module created in
Step 2: Build the
Natural Parameter Module and additional optional modules
(see the list of module names supplied with Step 2572).
Link the front-end for the non-conversational MPP environment.
Wichtig:
The name of the Non-Conversational MPP front-end must
also be specified in the APPLCNT macro as the application program
name (parameter PSB).
You can specify the parameter settings for your non-conversational
MPP environment by using the parameter macros NTIMSP and
NTIMSPE of the
Natural parameter module (see the Parameter Reference
documentation).
The following steps are required to implement the Natural Development Server (NDV) and the Natural Web I/O Interface (NWO) server in your IMS TM environment.

Anmerkung:
You are recommended to also read the information contained in the
sections Installing the Natural Development Server IMS
Adapter of the Natural Development Server for z/OS
(Batch) documentation and
Installing
the Natural Web I/O Interface Server IMS Adapter under
z/OS in the Natural Web I/O
Interface documentation.
(Job I080, Step 2586)
The front-end consists of the NIISFE load module
contained in the NIIvrs.LOAD data set,
the Natural parameter module created in
Step 2: Build the
Natural Parameter Module and additional optional modules
(see the list of module names supplied with Step 2586).
Link the front-end for the Natural Development Server/Natural Web I/O Interface server.
Wichtig:
The name of the linked Natural Development
Server/Natural Web I/O Interface server front-end must also be specified in the
APPLCNT macro as the application program name (parameter
PSB).
You can specify the parameter settings for your Natural
Development Server/Natural Web I/O Interface server environment by using the
parameter macros NTIMSP and
NTIMSPE of the
Natural parameter module (see the Parameter Reference
documentation).
The following is an overview of the installation jobs/steps required to install the Natural IMS TM Interface for the sever environment:
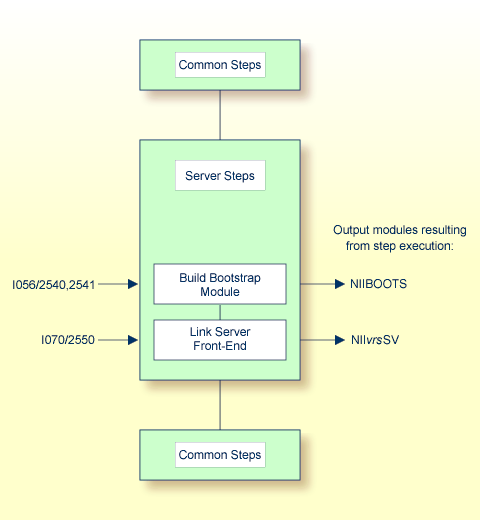
(Job I056, Steps 2540, 2541)
Create the NIIBOOTS source module which contains
a call to the NIMBOOT macro with the SERVER
parameter set to YES. For the DRIVERN
parameter, specify the name of the front-end module to be linked in
Step
2.
Assemble and link the bootstrap module.
(Job I070, Step 2550)
The front-end consists of the NIISRVD load module
contained in the NIIvrs.LOAD data set,
the Natural parameter module created in
Build the Natural Parameter
Module (see Installing Natural) and
additional optional modules (see the list of module names supplied with Step
2550).
Link the front-end for the server environment.
Wichtig:
The name of the server front-end must also be
specified in the NIMBOOT
macro as the driver name (parameter DRIVERN) described
in the TP Monitor Interfaces documentation.
You can specify the parameter settings for your server environment
by using the parameter macros NTIMSP and
NTIMSPE of the
Natural parameter module (see the Parameter Reference
documentation).
The following steps require system modifications to your IMS TM environment.
Create the APPLCTN table definitions for MPP, BMP and
NTRD according to the following examples:
Example for MPP:
APPLCTN PSB=NIIvrsFR,PGMTYPE=TP
      TRANSACT CODE=NATvrs,MODE=SNGL,SPA=512,                          *
          MSGTYPE=(SNLGSEG,RESPONSE,4)
Example for BMP (message-driven or specific for Natural Advanced Facilities):
APPLCTN PSB=NIIvrsBM,PGMTYPE=BATCH
      TRANSACT CODE=NATvrsBM,MODE=SNGL,                                *
          MSGTYPE=(SNLGSEG,RESPONSE,4)
This APPLCTN definition is required if you use
the CMGETMSG feature.
Example for BMP (without message queue processing):
APPLCTN PSB=NIIvrsBM,PGMTYPE=BATCH
Example for NTRD:
APPLCTN PSP=NIIvrsOB,PGMTYPE=TP
        TRANSACT CODE=NATvrsOB,MODE=SNGL,                              *
          MSGTYPE=(MULTSEG,NONRESPONSE,4)
Example for SFE:
APPLCTN PSB=NIIvrsAD,PGMTYPE=TP,SCHDTYP=PARALLEL
      TRANSACT CODE=NATvrsAD,MODE=SNGL,                                *
         MSGTYPE=(SNGLSEG,NONRESPONSE,4)
Create the PSB for MPP according to the following example for conversational Natural:
PCB TYPE=TP,MODIFY=YES
PCB TYPE=TP,MODIFY=YES
PCB TYPE=TP,MODIFY=YES
PCB TYPE=DB,DBDNAME=NATEXPL,PROCOPT=A,KEYLEN=15
SENSEG NAME=COURSE
SENSEG NAME=PREREQ,PARENT=COURSE
SENSEG NAME=OFFERING,PARENT=COURSE
SENSEG NAME=TEACHER,PARENT=OFFERING
SENSEG NAME=STUDENT,PARENT=OFFERING

PSBGEN PSBNAME=NIIvrsFR,LANG=ASSEM,MAXQ=3,IOASIZE=132
The DB-PCB NATEXPL refers to the name used for
the DBD in a Natural for DL/I installation.
At least one modifiable TP-PCB must be defined for default use
of hardcopy, sending messages and transaction switching. The value of the
WRKPCBS
keyword subparameter (NTIMSPT macro in the Natural parameter
module) in the current environment table must be less than or equal to the
number of PCBs minus 1 to avoid a Natural initialization error.
Create the PSB for BMP according to the following example:
PCB TYPE=TP,MODIFY=YES
PCB TYPE=TP,MODIFY=YES
PCB TYPE=DB,DBDNAME=NATEXPL,PROCOPT=A,KEYLEN=15
SENSEG NAME=COURSE
SENSEG NAME=PREREQ,PARENT=COURSE
SENSEG NAME=OFFERING,PARENT=COURSE
SENSEG NAME=TEACHER,PARENT=OFFERING
SENSEG NAME=STUDENT,PARENT=OFFERING

PSBGEN PSBNAME=NIIvrsBM,LANG=ASSEM,MAXQ=3,IOASIZE=132
The DB-PCB NATEXPL refers to the name used for
the DBD in a Natural for DL/I installation.
At least one modifiable TP-PCB must be defined for default use
of hardcopy and sending messages. The value of the
WRKPCBS keyword subparameter in the current environment
table must be less than or equal to the number of PCBs minus 1 to avoid a
Natural initialization error.
After creating the required APPLCTNs for the BMP
and MPP environments, generate the PSB, DBD and ACB.
After generating the ACB, activate the new definitions by issuing the following commands :
/MODIFY PREP ACBLIB
/MODIFY COMMIT
(Job I200, Steps 2500, 2504)
Create the BMP region (Step 2500) according to the
BMPJOB sample member.
Create the MPP region (Step 2504) according to the
MPPJOB sample member.
Update the PRELOAD list by using a
PRELOAD member DFSMPL xx
with the names of the following modules:
the nucleus,
the interface module,
the front-end, and
the Adabas link module.
NATvrsSH,NIIvrsIF,NIIvrsFR,ADALNI
NATvrsSH,NIIvrsIF,NIIvrsBM,ADALNK
If alias names are used for any members in the
PRELOAD list, these names should be added to the
PRELOAD list as well. Failure to do so leads to performance
degradation.
The region size must be large enough to hold the nucleus, the interface module, the front-end, the Natural thread and about 20 KB of working storage below the line.
Include the load libraries used by the Natural IMS TM Interface.
Include the DD statement for the roll file created in Step 1: Allocate and Format the Roll Files:
//ROLLFn DD DSN=....DISP=SHR
where n is a value
from 1 - 5.
Include the DD statement for NATRJE:
//NIIRJEDD DD SYSOUT=(X,INTRDR)
In the JCL of the MPP region, add the SYSTPCD DD
statement if the Natural Development Server or Natural Web I/O Interface server
is used. See IBM's z/OS V1Rx.0 Communications Server IP Configuration
Guide, Chapter 1.5.2, Configuring TCPIP.DATA.
You can verify the successful installation of the Natural IMS TM Interface by following the instructions in this section.
From an IMS TM session, start a BMP with the following IMS TM command:
/STA REG BMPJOB
Check the output. The output results from the Natural system
command TECH described
in the System Commands documentation. Verify the output in
your environment.
From an IMS TM session, issue the following IMS TM commands:
/STA REG MPPJOB
/STA TRAN NATvrs
/STA PROG NIIvrsFR
The Natural IMS TM Interface is available.
From an IMS TM session, type in the following transaction name:
NATvrsA Natural session is started.
Proceed with the steps described in the section Test Online Natural.