
This document provides information on the commands that are available in the menu. The following commands are available:
Note:
A separate application, the Configuration Utility, is also
available. See the Configuration
Utility documentation for further information.
You can set options that are to be evaluated when a Natural object is compiled.
Note:
See the description of the system command
COMPOPT for
further possibilities of specifying compiler parameters.
 To set the compiler options
In the library workspace, select either the local environment or the remote environment.
From the menu, choose .
The compiler options that can be set are shown in a dialog box. The content of this dialog box depends on the environment that is currently active.
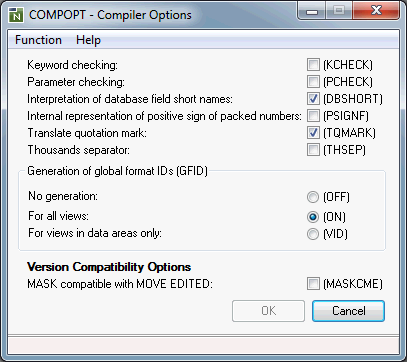
Set the required compiler options.
See the description of the system command
COMPOPT for
information on the options in this dialog box.
Optional: select one of the following commands in the menu:
: applies your changes without closing the dialog box.
: reset the compiler options to the default values.
When Predict has been installed, you can specify whether active cross-reference (XRef) data is to be stored or not. See the Predict documentation for further information on active cross-references.
To control the generation of XRef data
From the menu, choose .
A dialog box appears.
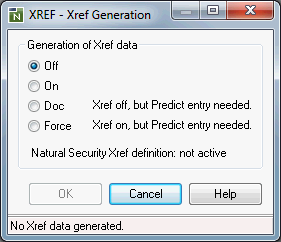
Set the required option.
See the description of the system command
XREF
for information on the options in this dialog box.
Starts the SYSRPC utility which is used to maintain
remote procedure calls. See SYSRPC Utility in
the Tools and Utilities documentation for detailed
information.
The Natural Studio user interface is extensible by plug-ins. Part of the Natural Studio functionality itself is delivered in the form of plug-ins.
A plug-in needs not to be active and available in every Natural session and for every user. Which plug-ins are actually active and visible is configurable on a per user basis. The information which plug-ins are active for you is stored in your user profile in the registry. You activate and deactivate plug-ins using the Plug-in Manager.
The following topics are covered below:
Note:
If you want to create your own plug-ins, see
Quick
Start in the documentation Extending Natural
Studio with Plug-ins. This documentation also contains information
on the plug-in example which
can be activated in the Plug-in Manager.
The activation of plug-ins can be entirely disabled and enabled on a per user basis. In order to work with plug-ins, you must make sure that plug-in activation has been enabled in the workspace options.
When plug-in activation has been enabled, you can invoke the Plug-in Manager as described below.
To invoke the Plug-in Manager
From the menu, choose .
Or:
When the Tools toolbar is shown, choose the following
toolbar button.
![]()
The Plug-in Manager window appears. For example:
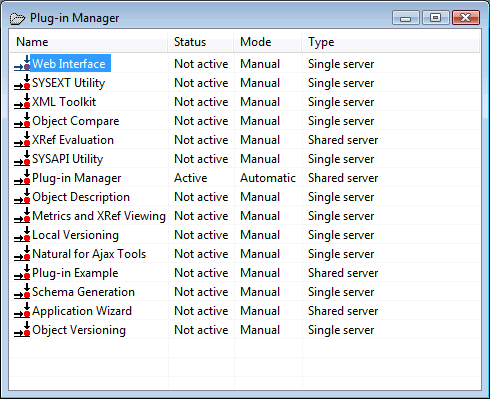
The Plug-in Manager (which is shown in a list view window) lists all installed plug-ins and shows their name, activation status, activation mode and type. It enables you to activate and deactivate installed plug-ins in order to configure your personal development environment.
Note:
The type (single server or shared server) is defined when
the plug-in is created. It cannot be
modified here.
The following plug-ins are documented in this Natural for Windows documentation:
Plug-in Manager (see the information below in Activating and Deactivating a Plug-in)
Other plug-ins listed in the Plug-in Manager window are documented separately (that is, they are not part of this Natural for Windows documentation). In these cases, you have to refer to the corresponding product documentation for further information.
The activation status of a plug-in is changed using a context menu. A plug-in which is not active can be activated, and a plug-in which is active can be deactivated.
The Plug-in Manager itself is implemented as a plug-in written in Natural. By definition, the Plug-in Manager itself cannot be dynamically activated. If plug-in activation is enabled in the workspace options, the command for invoking the Plug-in Manager is always available in Natural Studio. The Plug-in Manager is included in the list of plug-ins, where it can be deactivated like any other plug-in. But, of course, it can then not be reactivated manually in the same Natural Studio session, because in order to do so, you would need an active Plug-in Manager. However, as its activation mode is always "Automatic" (it cannot be changed to "Manual"), it will be activated again at the start of the next Natural Studio session if plug-in activation is enabled in the workspace options.
Note:
The plug-ins for the utilities
SYSAPI and
SYSEXT are
automatically activated when you invoke them with the corresponding command;
therefore, you need not activate them manually using the Plug-in
Manager.
To activate a plug-in
Select the plug-in in the Plug-in Manager window.
Invoke the context menu and choose .
To deactivate a plug-in
Select the plug-in in the Plug-in Manager window.
Invoke the context menu and choose .
The activation mode of a plug-in is changed using a context menu. Automatic activation means that the plug-in is started each time you start Natural Studio. Manual activation means that the plug-in stays inactive when you start Natural Studio; if you want to work with the plug-in, you have to activate it as described above.
To cause the plug-in to be activated each time you start
Natural Studio
Select the plug-in in the Plug-in Manager window.
Invoke the context menu and choose .
To cause the plug-in to stay inactivate when you start Natural
Studio
Select the plug-in in the Plug-in Manager window.
Invoke the context menu and choose .