
This document covers the following topics:
Note:
For information on the output window, which appears in the local
environment when a Natural program writes output to the screen, see
Output
Window in the Operations
documentation.
The following topics are covered below:
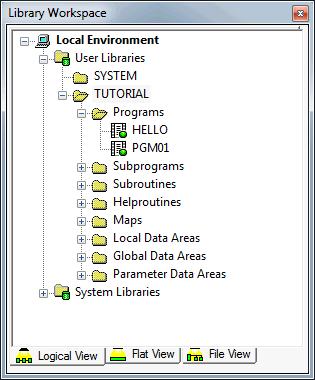
You can open a list view window for each group node in a tree view window.
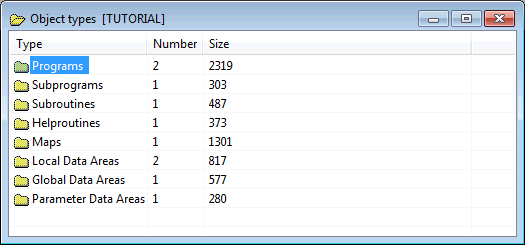
A list view window always reflects the view from which it was opened. For example, when you open a library node in the logical view, the following information is shown:
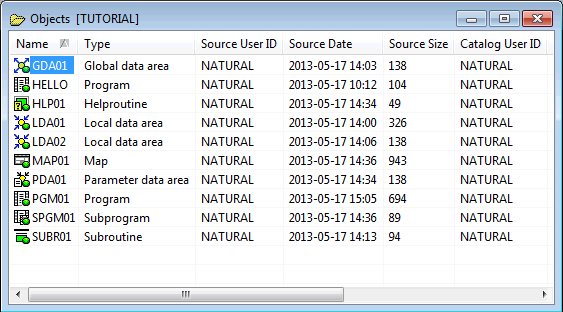
When you open the same node in the flat view, the following is shown:
When a list view window does not show all defined objects, a filter has been applied. See Filtering Libraries and Objects for further information.
 To open a list view window
Select a group node in the tree view window.
Or:
In an already open list view window, select a node for which
a folder icon is shown.
From the menu, choose .
Or:
Invoke the context menu and choose
.
Or:
Press CTRL+O.
Or:
Press ENTER.
In a list view window, it is possible to select several nodes at the same time (which is not possible in a tree view window). This is helpful, for example, if you want to delete several objects at the same time.
To select several nodes in a row
Select the first node.
Press SHIFT.
Use the mouse to select the last node that is to be part of the selection.
Or:
Use the UP-ARROW or DOWN-ARROW key to
select all nodes that are to be part of the selection.
To select individual nodes
Select the first node.
Press CTRL.
Use the mouse to select each node that is to be part of the selection.
Or:
Use the UP-ARROW or DOWN-ARROW key to
move to the node that is to be part of the selection and then press the
SPACEBAR. Repeat this until all required nodes are selected.
To select all nodes
Invoke the context menu and choose .
Make sure that the mouse pointer is not positioned on the name of an entry in the list. Otherwise, a different context menu appears.
Or:
Press CTRL+A.
Or:
When the Edit toolbar is shown, choose the following toolbar
button.
![]()
By default, the content of a list view window is shown in details view. You can also define another view (for example, large icons).
To define another view
Activate the list view window.
Invoke the context menu and choose one of the following commands from the menu: , , or .
Make sure that the mouse pointer is not positioned on the name of an entry in the list. Otherwise, a different context menu appears.
The current type of view is always indicated by a check mark.
In details view, you can use the mouse to change the width of each column. This change is only valid as long as the list view window is open.
You can also resize a column in such a way that it is not longer visible. If you want to redisplay the column, close the list view window and then open it once more. Or if you still know at which position the column is hidden, move the mouse pointer to this position in the header and resize it as described below.
To resize or hide a column
Move the mouse pointer to the line in the header which separates two columns.
The pointer changes, showing two arrows pointing into opposite directions.
Use the mouse to drag the column until it has the desired width or until it is no longer visible.
In details view, you can use the mouse to move a column to a different position in the list view window. This change is only valid as long as the list view window is open.
To reposition a column
Drag the header of a specific column and drop it onto a different header.
In details view, you can use the mouse to sort the columns in ascending or descending order.
It is, for example, possible to click on the Extension column header to sort the column in ascending order and then hold the CTRL key down and click on the Name column to sort it in descending order (inside the sort sequence of the column first sorted).
To sort a column
Click the header of a column.
An arrow in the header indicates the sort direction. With each click on the same header, the column in sorted in the opposite direction.
Using the Configuration
Utility, you can change the Natural profile parameter
DTFORM
which determines the format in which the dates are represented in details view.
When at least one list view window or editor window is open, the menu is available.
Note:
How to open an editor window is explained in the section
Invoking
Editors.
Using the commands in the menu, you can arrange or activate the list view windows and editor windows in the workspace. The following commands are available:
| Command | Shortcut key | Description |
|---|---|---|
| CTRL+TAB | Activate the next inactive window. | |
| CTRL+SHIFT+TAB | Activate the previous inactive window. | |
| Close all open windows. When the changes in an editor window have not yet been saved, a dialog box appears, asking whether you want to save the changes. | ||
| Arrange all windows so that they overlap. | ||
| Arrange all windows horizontally so that they do not overlap. | ||
| Arrange all windows vertically so that they do not overlap. | ||
| Arrange the icons of minimized windows in a row at the bottom of the visible workspace. | ||
| Name of open window | Commands for the open windows are shown at the bottom of the menu. The window which is currently active is indicated by a check mark. To activate a window, choose the corresponding command. |
You can also use the following shortcut keys:
| Shortcut key | Description |
|---|---|
| CTRL+D | Toggle between the command line and the active list view or editor window. |
| CTRL+L | Toggle between the application workspace and the active list view or editor window. |
| CTRL+U | Toggle between the result window and the active list view or editor window. |
| CTRL+W | Toggle between the library workspace and the active list view or editor window. |
In addition to the standard Windows techniques for closing a window, you can also close the active list view window or editor window as described below.
To close the active window
From the menu, choose .
Or:
Press CTRL+F4.
Or:
When the Object toolbar is shown, choose the following toolbar
button.
![]()
The following elements of the Natural Studio window are dockable windows:
menu bar
toolbars
library workspace
application workspace
results window
command line
debugger windows
Note:
The commands in the menu do not apply
to dockable windows.
Using the mouse, you can drag a dockable window to another position so that it is shown
at another position within the Natural Studio window, or
in a window of its own. For example:
You can move the window freely on your screen. You can move it back to the Natural Studio window (for example, back to its original position) so that it is no longer shown in a window. This process is called "docking".
To enable/disable docking for a window
When the library workspace, application workspace or results window is currently docked, move the mouse pointer to title bar of the window.
When the command line, menu bar or a toolbar is currently docked, move the mouse pointer to the two lines which are shown with the docked window. For example, when docked horizontally, the two lines are shown as follows to the left of the docked window:
![]()
Or:
When the window is currently undocked, move the mouse pointer
to the title bar of the window.
Invoke the context menu.
When a check mark is shown next to , the window can be docked. When a check mark is not shown, the window cannot be docked.
If you want to toggle the docking status, choose .
Note:
When you disable docking for a window which is currently
docked, the window is undocked.
To undock/dock a window using the mouse
This requires that docking is enabled (see above).
Double-click the title bar of a docked window, or double-click the two lines which are shown for specific types of docked windows (see above).
Or:
Double-click the title bar of an undocked window.
When the window is currently docked, it is undocked. When the window is currently undocked, it is docked at its previous position.
To drag a docked window to another position
This requires that docking is enabled (see above).
Move the mouse pointer to the title bar of a docked window or to the two lines which are shown for specific types of docked windows (see above).
Press the mouse button and drag the window to another position.
An outline of the window is shown. The outline indicates the position at which the window can be docked.
If you want to prevent docking (that is, if you want to undock the window), press CTRL while dragging the window.
Release the mouse button.
To drag an undocked window back to the Natural Studio window
This requires that docking is enabled (see above).
Move the mouse pointer to title bar of an undocked window.
Press the mouse button and drag the window to the position at which you want to dock it.
An outline of the window is shown. The outline indicates the position at which the window can be docked.
Release the mouse button.
To expand a docked window
Applies only to the library workspace, application workspace, results window and debugger window. This feature is only functional when two of these elements are docked next to each other, either horizontally or vertically.
In the title bar of the docked window, choose the button which contains an arrow.
The arrow on the button points either upwards or to the left, depending on the type of window. When you move the mouse over this button, the tooltip "Expand docked window" appears.
The docked window is expanded so that it hides the other window. It now occupies the space which both windows together have previously occupied. You can see that a window is hidden because the title bar of the hidden window is still visible.
The arrow which is shown on the button now points to the opposite direction. When you move the mouse over this button, the tooltip "Contract docked window" appears now.
To contract the window so that both windows are shown again, choose the above button once more.