
This document covers the following topics:
When Natural is installed, an entry for starting Natural is automatically added to the Windows menu.
 To invoke Natural Studio
From the Windows menu, choose .
Note:
The Start menu group name (by default, this is "Software AG") can be changed during the installation.
The Natural Studio window appears.
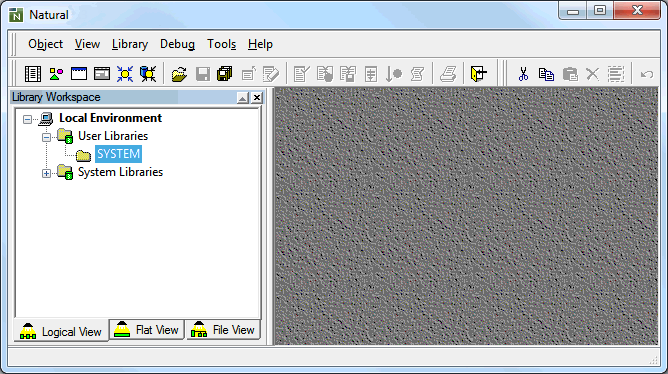
When you start Natural Studio for the very first time, only your local environment containing the library workspace is shown in the window.
All Natural objects required for creating an application are stored in
Natural libraries in Natural system files. There is a system file for system
programs (FNAT) and a system file for user-written programs
(FUSER).
Natural thus distinguishes system libraries and user libraries. The system libraries, which start with the letters "SYS", are reserved for Software AG purposes only. A user library contains all user-defined objects (for example, programs and maps) which make up an application. The name of a user library must not start with the letters "SYS".
Different views are available in the library workspace. The exercises in this tutorial require that you work in logical view. In logical view, different nodes are provided for the libraries. The objects in a library are grouped into different folders, according to their types.
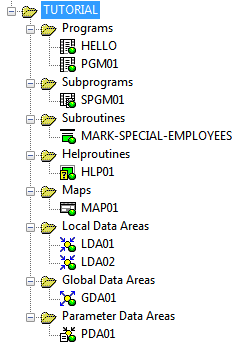
When you have completed all exercises of this tutorial, the node for your user library TUTORIAL will contain the following folders and objects:
As with other Windows applications, most commands in Natural Studio can be issued in a number of different ways: they can be chosen from the menu bar or from a context menu, or by choosing a toolbar button or pressing a key combination. This tutorial, however, does not mention all alternatives for issuing the same command. It just mentions commonly-used methods (in most cases: context menus and toolbar buttons).
To invoke a context menu (for example, for an object in the library workspace), you select the object and then click the right mouse button or press SHIFT+F10.
Several menus or toolbars are only shown in a specific context. For example, the menu is only shown in the menu bar when you are working with the program editor and the program editor window is active.
You will now create a user library with the name TUTORIAL.
This library is to contain all Natural objects that you will create in the
course of this tutorial.
To create a user library
In logical view, select the node named User Libraries which is located directly below the top node .
From the context menu and choose .
A new library with the default name USRNEW is now shown in the tree.
Specify "TUTORIAL" as the name of the library and press ENTER.
Natural provides two different programming modes:
Structured Mode
Structured mode is intended for the implementation of complex
applications with a clear and well-defined program structure. It is recommended
to use structured mode exclusively.
Reporting Mode
Reporting mode is only useful for the creation of adhoc reports and
small programs which do not involve complex data and/or programming
constructs.
Important:
This tutorial requires that structured mode is active. If you
try to run your program in reporting mode, END-IF,
END-READ and END-REPEAT will cause
errors.
To check whether structured mode is active
From the menu, choose .
The Natural Session Parameters dialog box appears.
At the installation of Natural, the Natural administrator sets these parameters to default values which are then valid for all users of Natural. When you change them, they are only valid for current session.
In the tree on the left, select Compiler Options.
The compiler options are now shown on the right.
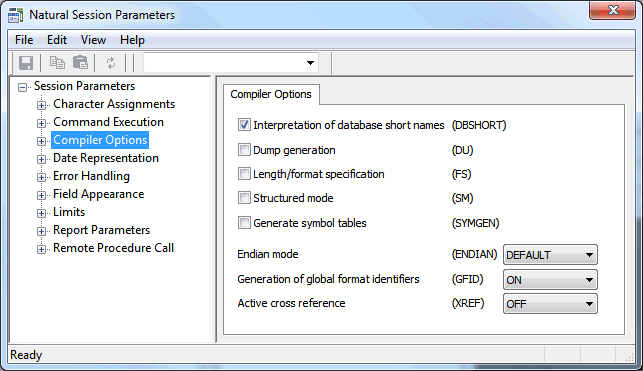
When the Structured mode check box is already selected, no further steps are required and you can close the dialog box. When it is not selected, proceed as described below.
Activate the Structured mode check box.
From the menu, choose .
Close the dialog box.
You can now proceed with your first program: Hello World!