
This document contains the following exercises:
You will now write your first short program which displays "Hello World!". It will be stored in the library you have created previously.
 To create a new program
In the library workspace, select the library named
TUTORIAL.
From the context menu, choose .
Or:
Choose the following toolbar button:
![]()
The program editor appears. It is currently empty.
Enter the following code in the program editor:
* The "Hello world!" example in Natural.
*
DISPLAY "Hello world!"
END /* End of program
Comment lines start with an asterisk (*) followed by at least one blank or a second asterisk. When you forget to enter the blank or second asterisk, Natural assumes that you have specified a system variable; this will result in an error.
If you want to insert empty lines in your program, you should define them as comment lines. This is helpful, if you want to access your program from different platforms (Windows, mainframe, UNIX or OpenVMS). With the mainframe version of Natural, for example, the default is that empty lines are automatically deleted when you press ENTER.
You can also insert comments at the end of a statement line. In this case, the comment starts with a slash followed by an asterisk (/*).
The text that is to be shown in the output is defined with the
DISPLAY statement. It is enclosed in quotation marks.
The END statement is used to mark the physical end of a
Natural program. Each program must end with END.
The system command RUN automatically invokes
the system command CHECK which checks the program
code for errors. If no error is found, the program is compiled on the fly and
then executed.
Notes:
CHECK is also available as a separate
command in the
menu.
EXECUTE which uses the stowed version of your
program (stowing a program is explained later in this tutorial). In contrast to
this, the RUN command always uses your latest
modifications to the program.
To run a program
From the menu, choose .
Or:
Choose the following toolbar button:
![]()
When your code is syntactically correct, the output contains the text you have defined.
Page      1                                                  13-05-16  13:27:42


Hello world!
Press ENTER to return to the program editor.
You will now create an error in your Hello World program and then run the program once more.
To correct an error
Delete the second quotation mark in the line containing the
DISPLAY statement.
Run the program once more as described above.
When the error is found, a dialog box appears, providing information on the error.
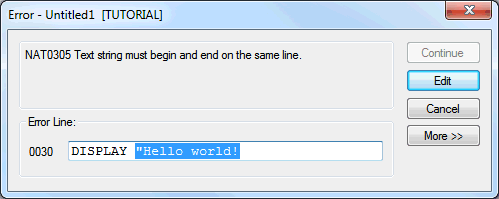
Correct the error in the dialog box, that is: insert the missing quotation mark at the end of the line.
Choose the button to find the next error.
In this case, no more errors are found and the output is shown.
Press ENTER to return to the program editor.
Note:
Instead of choosing the
button, it is also possible to choose the button.
The dialog box is then closed and you can correct the error directly in the
program editor.
When you stow a program, it is compiled and both source code and a generated program are stored in the Natural system file.
Like the RUN command, the system command
STOW automatically invokes the
CHECK command. A program is only stowed when it is
syntactically correct.
Note:
If you want to save the changes to your program, even if the program
contains a syntactical error (for example, if you want to suspend your work
until the next day), you can use the system command
SAVE which can be invoked from the
menu.
To stow a program
From the menu, choose .
Or:
Choose the following toolbar button:
![]()
Since your program has not yet been saved, the Stow As dialog box appears.
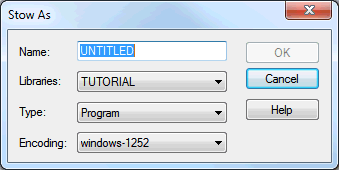
The name of the currently selected library is automatically provided in the corresponding drop-down list box.
Specify the name "HELLO" in the Name text box.
Choose the button.
A message is now shown, informing you that stowing was successful. This message is shown in the status bar and/or in a dialog box, depending on the setting of a specific workspace option (see below).
In the library workspace, a new node named Programs appears below the TUTORIAL node. This node contains the program you have just stowed.
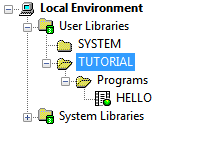
The green dot on the program icon indicates that both source code and a generated program are available for the object.
You will now check the settings of your workspace options.
To check the workspace options
From the menu, choose .
In the resulting Options dialog box, display the Workspace page.
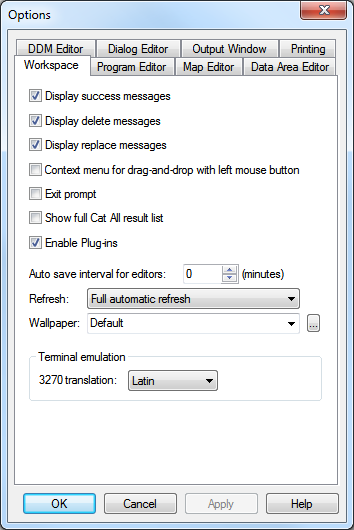
When success messages are to be shown in a dialog box, make sure that the corresponding check box is selected.
Note:
Whether line numbers are shown in the program editor is controlled
by an option on the Program Editor page.
Choose the button to save your changes and to close the dialog box.
You can now proceed with the next exercises: Database Access.