Natural for Ajax consists of a J2EE enterprise application (njx111.ear) and a J2EE resource adapter (njx111ra.rar). Both components are to be deployed on a J2EE server. Natural for Ajax receives data from Natural applications running on a Windows, UNIX or mainframe host and delivers web pages to the user's web browser.
This document describes the installation of Natural for Ajax on application servers on Windows or UNIX. It does not describe the installation of the additionally required Natural components on a Windows, UNIX or mainframe host, but refers to the corresponding installation documents.
This document covers the following topics:
The following topics are covered below:
The following application servers are supported. The application servers are not delivered with Natural for Ajax. They can be obtained from the locations indicated below, according to their respective license terms.
JBoss Application Server 4.0.5 (see http://www.jboss.org/).
Sun Java System Application Server 8.2 (see http://www.sun.com/).
Apache Ant 1.6.5 or above is required to perform the deployment on JBoss Application Server. This tool is freely available on http://ant.apache.org/.
If you want to use Natural for Ajax with Natural for Windows, the following must be installed:
Natural for Windows Version 6.3.3 or above, and
the Web I/O Interface service.
For detailed information, see the following documentation which is provided for Natural for Windows:
Setting Up the Web I/O Interface Service in the Operations documentation.
If you want to use Natural for Ajax with Natural for UNIX, the following must be installed:
Natural for UNIX Version 6.3.1 or above, and
the Web I/O Interface daemon.
For detailed information, see the Installation documentation which is provided for Natural for UNIX, especially the following sections:
Installing and Setting Up Natural on UNIX
Installing the Web I/O Interface Daemon on UNIX
Activating the Web I/O Interface Daemon on UNIX
If you want to use Natural for Ajax with Natural for Mainframes, the following must be installed:
Natural for Mainframes Version 4.2.3 or above, and
the Natural Web I/O Interface Server.
For detailed information, see the following documentation which is provided for Natural for Mainframes:
Installation (describes how to install Natural for Mainframes)
Natural Web I/O Interface Server (describes how to install the Natural Web I/O Interface server)
The following development servers support the remote development of Natural for Ajax applications:
Natural Development Server for Windows Version 2.2.4 or above.
Natural Development Server for UNIX Version 2.2.3 or above.
Natural Development Server for Mainframes Version 2.2.3 or above.
The following development clients support the remote development of Natural for Ajax applications:
Natural for Windows (Natural Studio) Version 6.3.1 or above.
Natural for Eclipse Version 3.1.2 or above.
A valid license key file is required during the installation. The license key file is an XML file which is usually supplied along with the product. Alternatively, you can obtain a license key file from Software AG via your local distributor.
It is assumed that <jboss> is the directory of your JBoss Application Server installation.
The following topics are covered below:
![]() To install Natural for Ajax
To install Natural for Ajax
Edit the file <jboss>/server/default/deploy/jbossjca-service.xml and change the setting
<!-- Enable connection close debug monitoring -->
<attribute name="Debug">true</attribute>
to
<!-- Enable connection close debug monitoring -->
<attribute name="Debug">false</attribute>
Install Apache Ant (you need Apache Ant to deploy Natural for Ajax to the JBoss Application Server; see the Prerequisities above for the required version number):
Download and unzip Apache Ant (from http://ant.apache.org/) into an installation directory of your choice. Avoid a directory name that contains blanks.
Let the environment variable
ANT_HOME point to the directory
<ant> (where
<ant> is the directory of
your Ant installation).
Add
<ant>/bin to your
PATH environment variable.
Deploy Natural for Ajax to JBoss Application Server:
Copy the Natural for Ajax distributables to a directory on a disk drive.
In the directory that contains the Natural for Ajax distributables, there is an Ant script named jbossdeploy.xml. Edit this script and change the setting
<property name="jbosshome" value=""/>
to
<property name="jbosshome" value="<jboss>"/>
where <jboss> is your JBoss Application Server installation directory.
Important:
Take care to use forward slashes (also on Windows) when
specifying the directory path.
Execute the script jbossdeploy.xml by entering the following command:
ant -f jbossdeploy.xml
Wait for the message "BUILD SUCCESSFUL". This indicates that the deployment was successful.
Copy the license file into the directory <jboss>/server/default/deploy/njx111.ear/cisnatural.war/cis/licensekey.
Start JBoss Application Server.
![]() To update Natural for Ajax
To update Natural for Ajax
Shut down JBoss Application Server.
Deploy Natural for Ajax to JBoss Application Server:
Copy the Natural for Ajax distributables to a directory on a disk drive.
In the directory that contains the Natural for Ajax distributables, there is an Ant script named jbossdeploy.xml. Edit this script and change the setting
<property name="jbosshome" value=""/>
to
<property name="jbosshome" value="<jboss>"/>
where <jboss> is your JBoss Application Server installation directory.
Important:
Take care to use forward slashes (also on Windows) when
specifying the directory path.
Execute the script jbossdeploy.xml by entering the following command:
ant -f jbossdeploy.xml redeploy
Wait for the message "BUILD SUCCESSFUL". This indicates that the deployment was successful.
Regenerate the HTML pages of the projects that you have created with an earlier release of Natural for Ajax. For each project to regenerate, execute the script jbossdeploy.xml by entering the following command:
ant -f jbossdeploy.xml regenerate -Dnjxproj=<projectname>
Wait for the message "BUILD SUCCESSFUL". This indicates that the generation was successful.
Start JBoss Application Server.
Natural for Ajax is installed using the Adminstration Console of Sun Java System Application Server.
The following is assumed:
<host> is the name of the machine on which the application server is installed.
<port> is the name of the port where the application server is installed. In a default installation, this is port 8080.
<adminport> is the name of the port where the Adminstration Console is installed. In a default installation, this is port 4848.
<sunas> is the path to the directory in which the application server is installed. In a default installation on Windows, this is C:/Sun/AppServer.
The following topics are covered below:
![]() To install Natural for Ajax
To install Natural for Ajax
Start the application server.
Open your web browser and enter the following URL:
http://<host>:<adminport>
This opens the Adminstration Console.
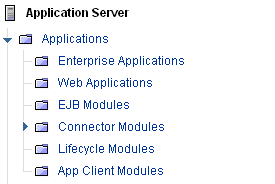
Deploy the resource adapter njx111ra.rar:
Open the tree node Applications > Connector Modules.
Choose Deploy.
Select njx111ra.rar as the package file to be uploaded to the application server.
Choose Next. "njx111ra" is automatically included as the application name.
Choose Finish.
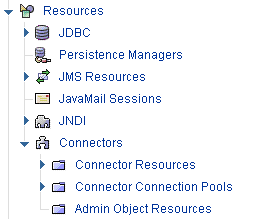
Define the JNDI name for the resource adapter:
Open the tree node Resources> Connectors >Connector Connection Pools.
Choose New.
Enter "NatPool" (the name is arbitrary) as the name.
Select njx111ra as the resource adapter.
Choose Next.
Choose Next.
Choose Finish.
Open the tree node Resources> Connectors >Connector Resources.
Choose New.
Enter "eis/NaturalUnicodeRA" as the JNDI name.
Select NatPool (or whatever name you specified previously) as the pool name.
Choose OK.
Deploy the enterprise application njx111.ear:
Open the tree node Applications > Enterprise Applications.
Choose Deploy.
Select njx111.ear as the file to upload.
Choose Next.
Choose OK. The deployment may take several minutes.
Copy the license file into the directory <sunas>/domains/domain1/applications/j2ee-apps/njx111/cisnatural_war/cis/licensekey.
Edit the file <sunas>/domains/domain1/config/server.policy and add the followings settings:
// Allow Application Designer to create an own class loader
grant {
permission java.lang.RuntimePermission "createClassLoader";
};

// Allow Application Designer to modify its own project directories
grant {
permission java.io.FilePermission
"${com.sun.aas.instanceRoot}${/}applications${/}j2ee-apps${/}njx111${/}cisnatural_war${/}-",
"read,write,delete";
};
Restart the application server.
![]() To update Natural for Ajax
To update Natural for Ajax
Shut down the application server.
Create a backup copy of your sessions.xml file, which is located in <sunas>/domains/domain1/applications/j2ee-apps/njx111/cisnatural_war/WEB-INF.
Create a backup copy of your license file, which is located in <sunas>/domains/domain1/applications/j2ee-apps/njx111/cisnatural_war/cis/licensekey.
Create backup copies of previously created projects, which are located in <sunas>/domains/domain1/applications/j2ee-apps/njx111/cisnatural_war.
Start the application server.
Start a web browser and enter the following URL:
http://<host>:<adminport>
This opens the Adminstration Console.
Undeploy the resource adapter njx111ra.rar.
Undeploy the enterprise application njx111.ear.
Deploy the new version of Natural for Ajax as in a first-time installation.
Shut down the application server.
Restore the files that you have backed up in steps 2, 3 and 4.
Start the application server.
Start a web browser and enter the following URL:
http://<host>:<port>/cisnatural
This opens the Application Designer development workplace.
In the Development Tools node of the navigation frame, choose Layout Manager.
For each application project that you have created with an earlier release of Natural for Ajax, select the layout definitions and from the menu, choose .
It is assumed that http://<host>:<port> is the URL of your application server.
![]() To verify the installation
To verify the installation
Enter the following URL in your web browser:
http://<host>:<port>/cisnatural
This opens Application Designer's development workplace.
Enter the following URL in your web browser:
http://<host>:<port>/cisnatural/servlet/StartCISPage?PAGEURL=/cisnatural/NatLogon.html
This opens the Natural logon page. The installation is now complete.