The outline editor is used to define boxes for screens created with the
Natural map editor. This is achieved by setting box codes for the fields around
which you want to draw a box. Box codes represent values of the
BX parameter.
In principle, the outline editor is used for creating boxes and not for defining fields. Field definitions are made with the map editor.
This section covers the following topics:
The following prerequisites are required for using the outline editor:
The terminal or terminal emulation used must support viewing boxes. This is usually a terminal or terminal emulation that supports DBCS (Double Byte Character Set) characters. Otherwise, the boxes generated for a map will not be displayed at execution time.
For information on the features implemented in Natural to support DBCS, see also Double-Byte Character Sets in the Operations documentation.
Maps created with Natural Version 3.1 and KAPRI must be converted into maps that are suitable for compilation and execution with Natural for MBCS. See Handling of Maps Converted Using Natural for MBCS in the current Natural Release Notes for Mainframes.
| Warning: KAPRI remembers the screen position of DBCS (Double Byte Character Set) characters and boxes to display them correctly. Unlike KAPRI, Natural for MBCS uses the real display length and Natural language extensions to determine the correct display position. Therefore, it is essential that maps created with KAPRI are converted before they are executed with Natural and Natural for MBCS. Executing a map that has not been converted may lead to unpredictable results when such a map is displayed. |
For the migration of KAPRI maps, we recommend that you keep backup copies and verify the proper layout of the new maps after the migration by using the function of the map editor or the outline editor.
Because it is not possible to edit converted KAPRI maps with a Natural version that does not support Natural for MBCS, we strongly recommend that you store the converted maps in a different library (or in a different FUSER system file) than the maps created with Natural Version 3.1 and KAPRI.
![]() To convert single maps created with KAPRI
To convert single maps created with KAPRI
Invoke the Edit Map menu of the map editor.
In the Edit Map menu, enter function code
X for and the name of the map to be converted.
Press ENTER.
A message appears confirming that the map has been successfully converted.
![]() To convert multiple maps created with KAPRI
To convert multiple maps created with KAPRI
Use the CATALL
system command as described in the System Commands
documentation.
The CATALL command also invokes and
executes the migration function if the CATALOG, STOW or CHECK option is
selected on the CATALL screen or specified in a
CATALL direct command. No migration is performed if
the SAVE option is specified.
Delimiter class D must be defined in the map settings of
each map to be edited with the outline editor. If this delimiter class is
missing, you cannot open the outline editor but will receive an appropriate
error message instead.
Delimiter class D is usually added automatically when you
read in the map definition of a map created with KAPRI or when you create a new
map with Natural as described in
Delimiter Class
D in the Map Editor documentation.
However, for an existing map created with Natural, you must add the delimiter
class as described in the following instructions.
Invoke the map editor for a map that is stored as a source object in a library in a Natural system file.
The editing area of the map editor appears, which contains the specified map.
Press PF2 (Mset) to change the default settings for the map.
The Define Map Settings screen appears.
In the Delimiters section, add delimiter class
D (or replace an existing delimiter) similar to the
example shown below:
Delimiters ----------------- Cls Att CD Del T D BLANK T I ? A D _ A I ) A N ^ M D & M I : O D + O I ( D I # |
Invoke the Edit Map menu of the map editor and save the map.
For detailed information on delimiters, see the relevant section in the Map Editor documentation.
This section provides instructions for invoking the outline editor.
![]() To invoke the outline editor
To invoke the outline editor
Open the Edit Map menu of the map editor.
Enter function code O for Outline
Editor and the name of the map to be edited with the outline editor.
The map must either be contained in the current source work area of the editor
or stored as a source object in a library in a Natural system file.
An Outline Editor screen similar to the example below appears in split-screen mode for the specified map:
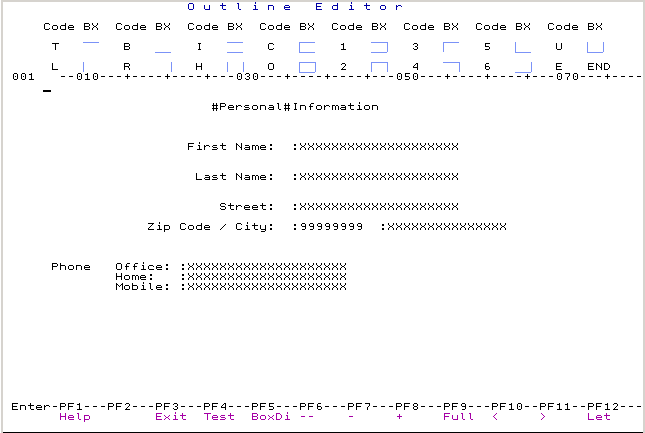
The upper part of the outline editor screen shows all valid box codes
(for example, O), symbols for the type of box they create
(for example, a square
![]() for
O) and the end marker E
(END). This chart is not displayed in full-screen
mode.
for
O) and the end marker E
(END). This chart is not displayed in full-screen
mode.
The lower part contains the editing area with the map definition of
the specified map. The characters indicating data fields (such as
X or 9) are identical to the characters used in the
editing area of the map editor. For details, see
Defining
Map Fields in the Map Editor
documentation.
A box code is a single character which represents a value of the
BX session parameter or a combination of values. For
example, the box code O represents a BX
setting of TBLR. For a description of possible parameter values,
see List of Box Codes and BX
Parameter Values.
The rules and conditions that apply when using box codes are described in the following section. The examples mentioned refer to Example of Box Coding.
A box code is not case-sensitive. You can enter a box code for any of the following:
A data field.
A text field created with delimiter class D
(delimiter
class T is not allowed).
A blank character or a sequence of blank characters.
This section covers the following topics:
For a data field or a text field of delimiter class D,
enter a box code in the attribute position of the field for which you want to
create a box. The attribute position is immediately in front of the field and
is denoted by one of the following:
The delimiter character as assigned to the field with the map editor.
Example: The text field Information.
A box code that has already been entered for the field. The outline
editor then hides the delimiter character and shows the box code instead.
Example:
The text field Personal.
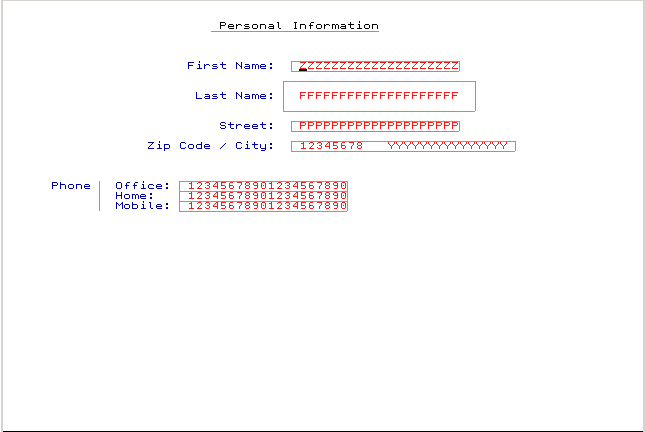
For a data field that has been defined as an array, you can enter a box
code for each occurrence of this array. Example:
Office:,
Home: and
Mobile: are three
occurrences of a one-dimensional array (A20/1:3). If you want the
box code to be valid for all occurrences of this array, you can modify the
BX parameter with the
extended
field editing function of the map editor.
You can create a box for a blank character or a sequence of blank characters. This provides the option to use blank map areas for the box design.
For a blank character or a sequence of blank characters, enter a box code in an empty line position.
The length of the box is determined by the number of blank characters to which the used box code applies and the end marker (described in Using the End Marker):
If the end marker is set, the box is drawn around the number of
characters from the box code to the end marker.
Examples:
The
box codes 2 and U in the blank area
next to the data field Last
Name:.
If no end marker is set, the box is drawn around either the number of
characters from the box code to the next field or to the end of the line.
Exceptions:
The box codes L and R only create
boxes for a single blank character, regardless of whether or not the end marker
is used. Example: The box code L between the text fields
Phone and
Office:.
A box created for a sequence of blank characters is indicated by a
number of periods (.) as shown in Example of Box Coding after
ENTER. No periods are displayed for a box created with a
box code that is immediately followed by the end marker (for example:
OE) or the box codes L and
R.
A box created for a blank character or a sequence of blank characters
is generated as a blank text field of delimiter class D into the
map definition.
You can reduce the length of a box by replacing any of the periods (.) with the end marker (see also To place the end marker) or a box code. The field then ends at the period you replaced.
You can edit a blank text field with the extended field editing function of the map editor.
A box code that has a top and/or bottom line but no right vertical line
(the box codes T, B,
I, C, 3 and
5) remains valid for subsequent fields in this line. The
box then ends either at the next box code, the next text field of delimiter
class T or at the end of the line. Examples: The text fields
Personal and
Information and
the data fields next to City:.
When you enter one of the above box codes, the outline editor places automatically generated box codes in front of all subsequent fields to which this box code applies. The sequence of automatically generated box codes is listed under Auto-Generated Box Codes in List of Box Codes and BX Parameter Values. Box codes are only generated automatically when you initially enter a box code. You can replace automatically generated box codes.
You can change single or multiple box codes by replacing each box code with another box code.
You can delete single or multiple box codes either by replacing each box code with a blank character or by using one of the line commands described in Line Commands and PF Keys.
In general, you can only delete the box code of a field and not the field itself. A field definition can only be deleted with the map editor. Exception: When you delete the box code of a blank field, you also delete the respective field in the map definition.
The end marker
() determines the length of a box created for a
single blank character or a sequence of blank characters.
Exceptions:
The box codes L and R always create
boxes for a single blank character only. They can be entered without the end
marker. Example: The box code L between the text fields
Phone and
Office:.
The end marker is not case-sensitive.
The end marker is not generated as a BX
parameter value into the map source.
The end marker is valid for the box code and the line where it is placed. You cannot enter a box code in one line and the end marker in another line to extend a box over multiple lines.
In an empty line position, enter a box code where you want the box to
start and an E where you want the box to end.
Example:
The columns 035 and
059 in the empty line above Last Name: in
Example of Box Code
Settings.
Press ENTER to confirm your entries.
The blank characters delimited by box code and end marker (in the example, between the columns 035 and 059) are replaced by periods (.).
The end marker is no longer indicated on the screen.
You can reduce the length of a box by overwriting any of the periods
(.) with the end marker. Example: U..........E.....
The box then ends at the period you overwrote.
The box codes listed in the editing area of the outline editor are
explained in the following table. The table also indicates the sequence of
automatically generated box codes (if relevant for a box code) and the
equivalent BX parameter values (in any order).
This section provides an example of box coding, which is based on the map definition shown in Invoking the Outline Editor. This example is not intended to provide guidance for designing maps with boxes, but rather demonstrates how box codes can be used.
The example below shows how box codes can be entered in the outline editor:
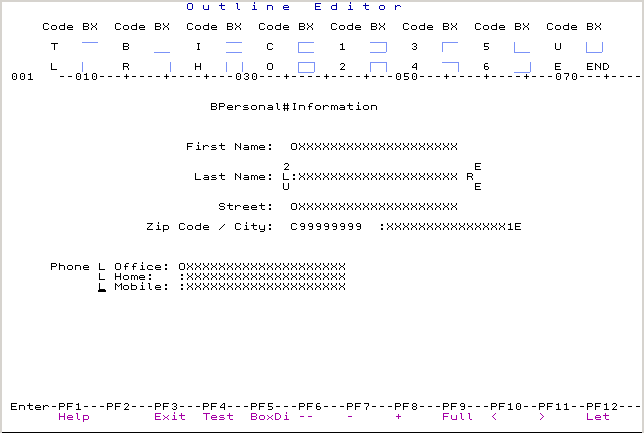
The example below shows how box coding can look after you confirm your box-code entries with ENTER:
The example below shows the box layout of a map when invoked by a program or with the PF4 test function.
The example is based on Example of Box Code Setting.
The line commands and PF keys provided by the outline editor can be used to delete box codes and blank text fields, navigate in the editing area of the outline editor, switch editing areas (outline editor/map editor), change display modes or terminate the outline editor.
You enter a line command in the first position of a line. Line commands are not case-sensitive.
| Line Command | PF Key | Explanation |
|---|---|---|
..D |
Deletes all box codes and blank text fields in the line where the command is entered. | |
..Dnn |
Deletes all box codes and blank text fields in the line where the command is entered and nn lines below that line where nn denotes a range from 1 to 99. | |
..D* |
Deletes all box codes and blank text fields in the line where the command is entered and all lines below that line. | |
..X |
PF13 | Switches between the editing area of the outline editor and the map editor. |
| PF1 | Help. Invokes help information about the outline editor and the map editor. |
|
..Q |
PF3 | Exit. Terminates the outline editor and returns to the Edit Map menu. If pressed on the Box-Code Display or the test screen, returns to the editing area of the outline editor. |
| PF4 | Test. Tests the map definition with the box layout. This function can also be executed from the map editor. Press PF3 or ENTER to return to the editing area. |
|
| PF5 | Box Display. Displays the box-code settings of a map: see Box-Code Display below. Press PF3 or ENTER to return to the editing area. |
|
| PF7 | Scrolls up one page in the screen. | |
| PF8 | Scrolls down one page in the screen. | |
| PF9 | Switches between full-screen mode and split-screen mode. | |
| PF10 | Moves to the left half of the screen if the map is wider than the screen. | |
| PF11 | Moves to the right half of the screen if the map is wider than the screen. | |
| PF12 | Undoes the last action performed in the editing area before ENTER is pressed. |
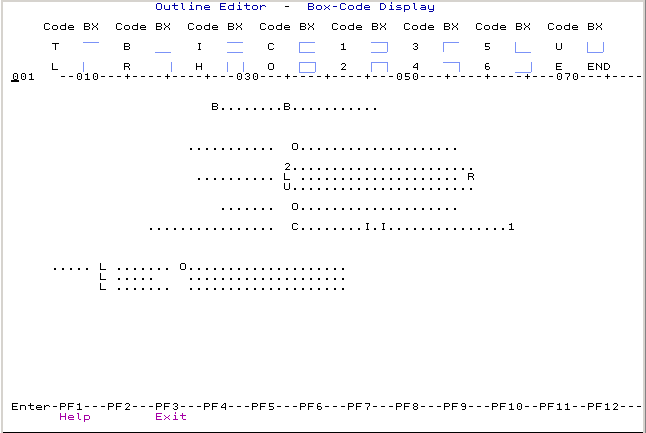
The box-code display function invokes the Box-Code Display screen, which is intended for orientation and helps distinguish box codes from text with identical characters.
The Box-Code Display screen shows the box codes
set and indicates the field positions by a number of periods (.). The screen
does not show the E entered for the end marker.
The box-code display screen cannot be used for editing.
The following example shows the box code settings of a map after PF4 is pressed. The example is based on Example of Box Code Setting.