This document covers the following topics:
In addition to a jagged edge (see .FI - Filling) or a left and right justification (see .JU - Justification) you can also center or right-adjust your text.
.CE number
.CE ON
.CE OFF
This instruction is used to center a line of text between the left and right margins. As long as centering is in effect, the instructions for filling (.FI) and justification (.JU) are not carried out.
Centering can be combined with, for example, underlining (see .UL - Underline) or boldface printing (see .BF - Boldface).
There are two different ways to use the .CE instruction.
You can specify the number of lines to be centered. For example, to center the next two lines, you specify:
.CE 2
You can also center a block of text. To do so, you must enclose the text to be centered between the following two instructions:
.CE ON
.CE OFF
This example illustrates how to center text. Furthermore, it introduces the instructions .BP and.UL.
.LM 0;.RM 60
.FI ON;.JU ON
.CE 3
This is centered text. Since filling
and justification do not apply, each line of the
source text is output in a separate line.
.SL 1
In the above example, three lines of the source text have been
centered. All following text is adjusted between the left and
right margins as specified with the .LM and .RM instructions.
.SL 1
.CE ON
.** This is an example for using bold print with centered text.
.BP
You can also center a block of text.
To do so, the text must be enclosed between
the instructions .CE ON and .CE OFF.
.SL 1
You must always take care
that each line to be centered
fits between the specified left and right margins.
.** This is an example for underlining centered text. The
.** following line is to be underlined. Note that the .UL
.** instruction must be entered AFTER the text to be underlined.
Otherwise the line cannot be centered correctly.
.UL *
.CE OFF
.SL 1
This is text which follows the centered text block. It is
adjusted between the left and right margins as specified with
the .LM and .RM instructions.
            This is centered text. Since filling
      and justification do not apply, each line of the
         source text is output in a separate line.

In  the  above example, three lines of the source text  have
been  centered.  All following text is adjusted between  the
left  and  right margins as specified with the .LM  and  .RM
instructions.

            You can also center a block of text.
        To do so, the text must be enclosed between
            the instructions .CE ON and .CE OFF.

                 You must always take care
               that each line to be centered
     fits between the specified left and right margins.
      Otherwise the line cannot be centered correctly.
      ************************************************

This  is  text which follows the centered text block. It  is
adjusted  between  the left and right margins  as  specified
with the .LM and .RM instructions.
.RA number
.RA ON
.RA OFF
This instruction is used to align text lines with a straight right margin; the left margin will appear ragged. As long as right-adjustment is in effect, the instructions for filling (.FI) and justification (.JU) are not carried out.
Right-adjustment can be combined with, for example, underlining (see .UL - Underline) or boldface printing (see .BF - Boldface).
There are two different ways to use the .RA instruction.
You can right-adjust your text so that it is moved to the right margin which has been defined with the .RM instuction. To do so, you must enclose the text to be right-adjusted between the following two instructions:
.RA ON
.RA OFF
You can also specify a different right margin for the right-adjusted text. For example, if the right margin is to fall in column 50, you must enclose the text to be right-adjusted between the following two instructions:
.RA 50
.RA OFF
This example illustrates how to right-adjust text. Furthermore, it introduces the instructions .BFand .US. When you compare this example with the previous example for centering text, you will see that different instructions have been used there (.BP and .UL).
.LM 0;.RM 60
.FI ON;.JU ON
.RA ON
.** This is an example for using bold print with right-adjusted text.
.BF 1
This is right-adjusted text.
.BF
Since filling and justification do not apply,
each line of the source text is output
in a separate line.
.RA OFF
.SL 1
All text following the above text is adjusted between the left and
right margins as specified with the .LM and .RM instructions.
.SL 1
.RA 40
The right margin for this part
of the right-adjusted text
has been defined in
.** This is an example for underscoring right-adjusted text.
.** Unlike, the .UL instruction, the .US instruction which has been
.** used in this example, must be entered BEFORE the text to be
.** right-adjusted.
.US
column 40.
.RA OFF
.SL 1
All text following the above instruction will again be adjusted
between the defined left and right margins.
                                This is right-adjusted text.
               Since filling and justification do not apply,
                      each line of the source text is output
                                         in a separate line.

All  text  following the above text is adjusted between  the
left  and  right margins as specified with the .LM  and  .RM
instructions.

          The right margin for this part
              of the right-adjusted text
                     has been defined in
                              column 40.

All  text  following  the above instruction  will  again  be
adjusted between the defined left and right margins.
You can indent the first line of a paragraph so that the left margin of the first line is at a different position than the left margin of the remainder of the paragraph.
You must not use both the .TI instruction and the .OF instruction in the same paragraph.
.TI number
.TI +number
.TI -number
The .TI instruction sets the left margin for the first line. All following lines use the left margin which has been defined with the .LM instruction. The .TI instruction causes a break in filling.
The current indentation is stored in the variable $IN (see Modifiable System Variables).
There are three different ways to use the .TI instruction.
You can define the column in which the first line is to start. For example, if the first line is to start in column 5 (and all other lines start in column 0), you must specify:
.TI 5
For example, the current left margin is in column 10 - if you want to move the first line 3 columns to the right so that it starts in column 13, you must specify:
.TI +3
For example, the current left margin is in column 10 - if you want to move the first line 4 columns to the left so that it starts in column 6, you must specify:
.TI -4
You cannot define a negative left margin. Therefore, you must take care not to specify a column smaller than 0.
This example illustrates the .TI instruction which is used to indent the first line of a paragraph.
.LM 5;.RM 60
.FI ON;.JU ON
.TI 20
The first line of this paragraph starts in column 20. All following lines
start at the left margin. Since the left margin starts in column 5,
the first line is indented 15 characters to the right so that it starts
in column 20.
.IL 1
.TI +15
This first line in this example starts in the same column as the first
line in the previous example.
.IL 1
.TI -3
When the left margin is greater than 0, you can also indent the first line
to the left. However, the value must not be greater than the left margin
value, since you cannot indent text further left than the left margin.
                    The  first line of this paragraph starts
     in  column  20. All following lines start at  the  left
     margin.  Since the left margin starts in column 5,  the
     first  line  is indented 15 characters to the right  so
     that it starts in column 20.

                    This  first line in this example  starts
     in  the  same column as the first line in the  previous
     example.

  When  the  left  margin is greater than 0,  you  can  also
     indent  the first line to the left. However, the  value
     must  not be greater than the left margin value,  since
     you  cannot  indent  text further left  than  the  left
     margin.
.OF number
.OF +number
.OF -number
.OF
The first line of the paragraph uses the left margin which has been defined with the .LM instruction. The .OF instruction sets the left margin for all following lines; this instruction causes a break in filling.
The current indentation is stored in the variable $IN (see Modifiable System Variables).
There are four different ways to use the .OF instruction.
You can define the column in which all lines after the first line are to start. For example, if the first line starts in column 0 and all following lines are to start in column 5, you must specify:
.OF 5
For example, the first line starts in column 10 - if you want to move all following lines 6 columns to the right so that they start in column 16, you must specify:
.OF +6
For example, the first line starts in column 10 - if you want to move all following lines 4 columns to the left so that they start in column 6, you must specify:
.OF -4
You cannot define a negative left margin. Therefore, you must take care not to specify a column smaller than 0.
Each .OF instruction (as described above) defines a new setting. Thus, the previous .OF instruction is automatically canceled.
If you want to cancel the effects of the .OF instruction so that the left margin which has been defined with the .LM instruction will be in effect again, you must specify .OF without a parameter:
.OF
You can also cancel the effects of the .OF instruction by defining a new left margin using the .LM instruction.
This example illustrates the .OF instruction which is used to indent all lines of a paragraph, except for the first line.
.LM 5;.RM 60
.FI ON;.JU ON
.OF 9
1.  You can use the .OF instruction, for example, to create a
numbered list.
.SL 1;.OF 9
2.  In contrast to the .TI instruction, the .OF instruction applies to all
lines after the first line.
.SL 1;.OF 9
3.  The first line is not affected by the .OF instruction.
It starts at the left margin.
.SL 1;.OF +4
4.  The lines in this paragraph (except for the first line) start in the
same column as the lines in the previous example.
.SL 1;.OF -5
5.  You can also specify negative offset values. In this example, the
first line starts at the left margin (which is in column 5), and the
remaining lines start in column 0.
.SL 1;.OF
Issuing .OF without a parameter switches offsetting off and all lines
begin at the left margin which has been defined with the .LM instruction.
     1.  You  can  use the .OF instruction, for example,  to
         create a numbered list.

     2.  In   contrast  to  the  .TI  instruction,  the  .OF
         instruction  applies  to all lines after the  first
         line.

     3.  The   first  line  is  not  affected  by  the   .OF
         instruction. It starts at the left margin.

     4.  The  lines in this paragraph (except for the  first
         line)  start in the same column as the lines in the
         previous example.

     5.   You  can also specify negative offset  values.  In
this  example,  the  first line starts at  the  left  margin
(which  is  in column 5), and the remaining lines  start  in
column 0.

     Issuing .OF without a parameter switches offsetting off
     and  all lines begin at the left margin which has  been
     defined with the .LM instruction.
.PS
The .PS instruction can be used for creating paragraphs. The first line of each paragraph is automatically indented three columns to the right.
The .PS instruction automatically executes the following four instructions:
- .BR
Causes a break in filling.
- .NL 4
If less than 4 lines are available on the current page, the new paragraph starts on a new page. See .NL - Need Lines for further information.
- .SL
The .SL instruction interacts with line spacing.
When you use single line spacing, one blank line is inserted between the previous and the next paragraphs (unless a page break occurs).
When you use double line spacing, three blank lines are inserted (unless a page break occurs).
- .TI +3
The first line of the new paragraph is indented three columns to the right.
This example illustrates the .PS instruction and shows how it interacts with double line spacing.
.LM 5;.RM 55
.FI ON;.JU ON
.LS D;.PS
For this paragraph double line spacing has been specified. With double
line spacing, one blank line is inserted between the text lines.
.PS
When you use the .PS instruction with double line spacing,
three blank lines (instead of one blank line as with single line
spacing) will be inserted between the paragraphs.
        For this paragraph double line spacing has been

     specified.  With  double line spacing,  one  blank

     line is inserted between the text lines.


        When  you  use the .PS instruction with  double

     line  spacing,  three blank lines (instead of  one

     blank  line  as with single line spacing) will  be

     inserted between the paragraphs.
You can use the following instructions to control the page breaks. If you do not specify page breaks, the initial values for the document layout apply and the form feed occurs after the bottom title. Or, if no bottom title has been defined, the form feed occurs after the footer space (i.e. the blank line which has initially been reserved for the bottom title).
.NP number
.NP
The following instruction causes a form feed.
.NP
Before the form feed occurs, Con-form prints the defined bottom title and footnotes. All text after the .NP instruction starts on the next page.
A form feed does not occur, when the text to be printed has already been positioned at the top of a page. For example, when you specify .NP at the very beginning of your text, a form feed does not occur.
You can also specify a new page number for the next page. For example, if you want to assign the number 6 to the next page, you must specify:
.NP 6
You cannot produce more than one form feed using this instruction. If you want to insert several blank pages in your text, you must use the .IP instruction.
The current page number is stored in the variable $PN (see Modifiable System Variables).
.IP number
.IP
This instruction inserts the specified number of blank pages in the output text. If top and bottom titles and a page header have been defined, this information is also printed on the "blank" pages.
For example, if you want to insert 3 blank pages, you must specify:
.IP 3
If the above instruction is processed in the middle of a page, the remainder of the page is left blank, and the specified number of blank pages is inserted. The text which has been defined after the .IP instruction is printed at the top of the page which is output after the defined number of blank pages.
When you use this instruction without a parameter, one blank page is inserted.
.OP PGF=ON
.OP PGF=OFF
You can switch page formatting off, so that page breaks are not considered. In this case, only the body of the document is printed. Instead of starting text on a new page, it is started in a new line. This can be useful, for example, when you only want to print the pure text for proofreading.
When page formatting is switched off, top and bottom titles, page headers and footnotes are not printed. Furthermore, entries in the table of contents, index entries and text blocks which have been defined with .NL KEEP and .NL FLOAT are not considered.
However, when page formatting is switched off, the document layout is still influenced by the instructions which have been defined, for example, for the left and right margins, filling and justification, centered text and blank lines.
To switch page formatting off for the whole document, you must specify the following instruction at the beginning of the document:
.OP PGF=OFF
Initially, page formatting is switched on. This corresponds to the following:
.OP PGF=ON
.NL number
.NL
.NL KEEP
.NL FLOAT
.NL OFF
The .NL instruction is useful if you want to ensure that a paragraph does not start close to the bottom of a page. It is also useful if you want to leave space for a figure to be inserted, without running the risk that the space is split between two successive pages.
This instruction finds out whether the required number of lines is available on the current output page. If less than the required number of lines is available, the text is output on a new page. If the required number of lines is available, this instruction merely causes a break in filling, i.e. the text starts on a new line.
The number of the remaining lines on the page is stored in the variable $LC (see Modifiable System Variables).
The different forms of the .NL instruction are described below.
For example, if you want to make sure that there are still 8 lines left on the current page, so that your information will fit as a whole on the page, you must specify:
.NL 8
If 8 lines are available, the text starts on a new line of the current page. If 8 lines are not available, the text is output on the next page.
If you want to reserve blank lines for a diagram that will be added later to the printed page, you must also specify the .IL instruction as in the following example:
.NL 10;.IL 10
Using the .NL instruction without a parameter is equivalent to .NL 7.
This instruction is only used with the instructions .NL KEEP and .NL FLOAT which are explained on the following pages. It defines the end of the text block.
It is not possible to conditionally suppress the processing of the .NL OFF instruction by using it in an .IF construction.
You can enclose a text block between the following two instructions:
.NL KEEP
.NL OFF
Con-form then checks automatically whether the required number of lines for this text block is available on the current page. If the required number of lines is available, the text block is printed on the current page. If not, it is printed on the next page.
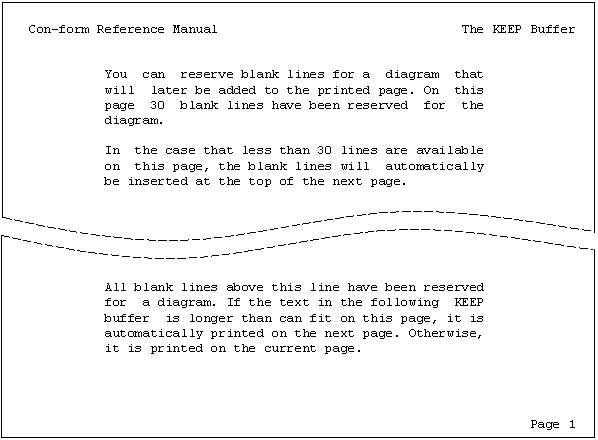
This example illustrates how to reserve blank lines for a diagram, and it shows the results of the .NL KEEP instruction.
.TT Con-form Reference Manual//The KEEP Buffer
.BT //Page #
.LM 10;.RM 60
.FI ON;.JU ON
You can reserve blank lines for a diagram that will later be added
to the printed page. On this page 30 blank lines have been
reserved for the diagram.
.IL 1
In the case that less than 30 lines are available on this page,
the blank lines will automatically be inserted at the top of the
next page.
.NL 30;.IL 30
All blank lines above this line have been reserved for a diagram.
If the text in the following KEEP buffer is longer than can fit on
this page, it is automatically printed on the next page. Otherwise,
it is printed on the current page.
.IL 2
.NL KEEP
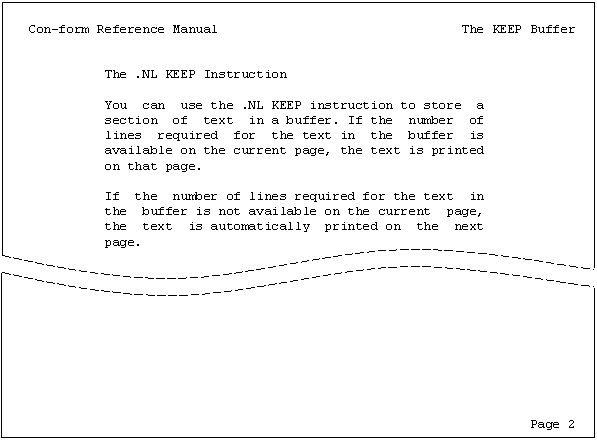
The .NL KEEP Instruction
.SL 1
You can use the .NL KEEP instruction to store a section of text in a
buffer. If the number of lines required for the text in the buffer is
available on the current page, the text is printed on that page.
.SL 1
If the number of lines required for the text in the buffer is not
available on the current page, the text is automatically printed
on the next page.
.NL OFF


You can enclose a text block between the following two instructions:
.NL FLOAT
.NL OFF
Con-form then checks automatically whether the required number of lines for this text block is available on the current page.
When the lines are available, the text block is printed immediately.
When the required number of lines is not available on the current page, .NL FLOAT, unlike the .NL KEEP instruction, processes text which follows the .NL OFF instruction until the current page is full. The defined text block is then printed on the next page.
The .NL FLOAT instruction is appropriate, when it does not matter whether the text block which has been enclosed between the above instructions is placed on the current or on the next page.
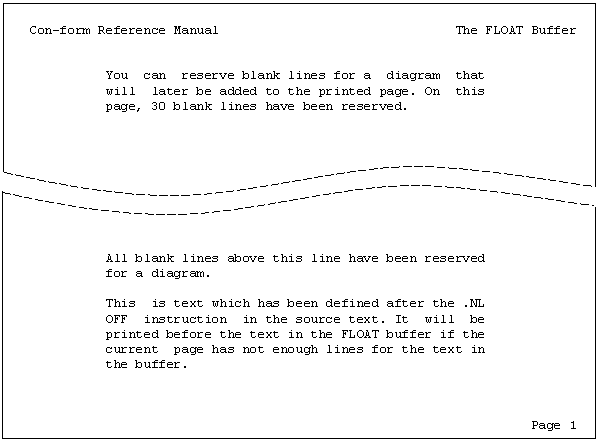
This example illustrates how to reserve blank lines for a diagram, and it shows the results of the .NL FLOAT instruction.
.TT Con-form Reference Manual//The FLOAT Buffer
.BT //Page #
.LM 10;.RM 60
.FI ON;.JU ON
You can reserve blank lines for a diagram that will later be added
to the printed page. On this page, 30 blank lines have been reserved.
.NL 30;.IL 30
All blank lines above this line have been reserved for a diagram.
.IL 2
.NL FLOAT
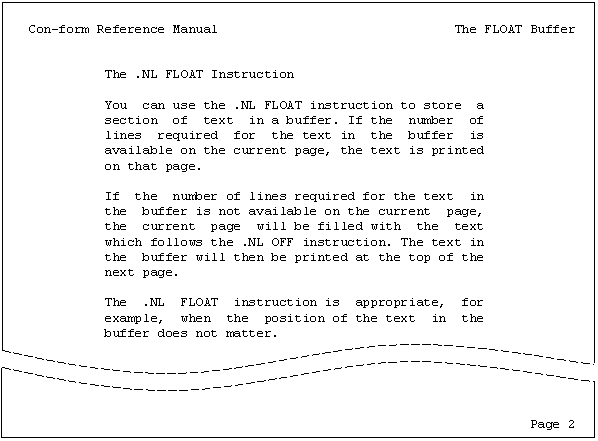
The .NL FLOAT Instruction
.SL 1
You can use the .NL FLOAT instruction to store a section of text in a
buffer. If the number of lines required for the text in the buffer is
available on the current page, the text is printed on that page.
.SL 1
If the number of lines required for the text in the buffer is not
available on the current page, the current page will be filled with
the text which follows the .NL OFF instruction. The text in the
buffer will then be printed at the top of the next page.
.SL 1
The .NL FLOAT instruction is appropriate, for example, when the
position of the text in the buffer does not matter.
.SL 1
.NL OFF
This is text which has been defined after the .NL FLOAT instruction
in the source text. It will be printed before the text in the FLOAT
buffer if the current page has not enough lines for the text in the
buffer.


.OP BRN=ON
.OP BRN=OFF
As a rule, the .NL instruction causes a break in line filling when the required number of lines is available on the current page. However, you can switch this feature off, so that the filling process is not interrupted.
To suppress the breaks in line filling, you must specify:
.OP BRN=OFF
The initial value of the option is:
.OP BRN=ON
This example illustrates the results of the .OP BRN=OFF instruction.
.LM 0;.RM 60
.FI ON;.JU ON
.OP BRN=OFF
As a rule, the .NL instruction causes a break in line filling.
However, you can switch this feature off.
.SL 1
In this example, the BRN option has been switched off. You can
check whether the required number of lines is available on the
current page.
.NL 8
If the required number of lines is available, the filling process
is NOT interrupted.
As  a  rule,  the  .NL instruction causes a  break  in  line
filling. However, you can switch this feature off.

In  this example, the BRN option has been switched off.  You
can  check whether the required number of lines is available
on  the  current  page. If the required number of  lines  is
available, the filling process is NOT interrupted.