
This document explains how you can define your individual document layout. When you do not specify otherwise, the initial Con-form values apply to your document layout.
The following topics are covered below:
You can create a formatting profile that is to be processed before each of your source documents (see Formatting Profiles). The formatting profile can contain, for example, your default settings for the page layout.
The following diagram gives an overview of the different parts of a formatted page.
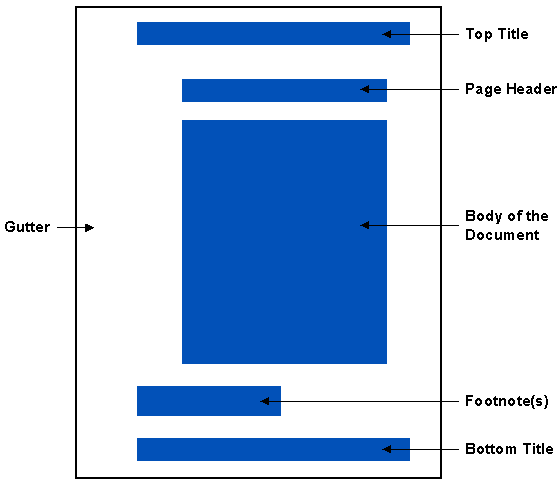
- Gutter
The gutter is the white space on the left of each page. You can define different gutter values for even- and odd-numbered pages.
- Top Title
The top title appears at the head of each page. For example, when you are writing a book, you can print the book title and chapter name at the top of each page. You can also print the number of the current page at the top of each page. You can define different top titles for even- and odd-numbered pages.
- Page Header
The page header appears at the head of each page, between the top title and the body of the document. You can also print the header within the body of the document.
- Body of the Document
The body of the document contains the pure text.
- Footnote(s)
A footnote is additional information below the text. It refers to a text passage on the currently printed page.
- Bottom Title
The bottom title appears at the foot of each page. For example, you can print the number of the current page at the bottom of each page. In contrast to the top title, you can also define that the number of the next page is to be printed in the bottom title. You can define different bottom titles for even- and odd-numbered pages.
The following diagram shows the instructions that are used to define the document layout.
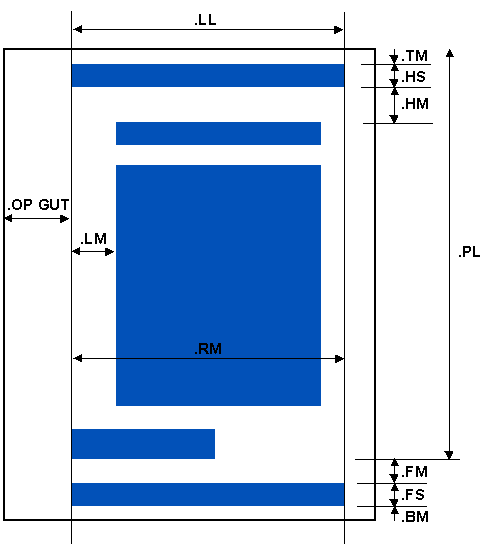
- .LM and .RM
These instructions define the columns of the left and right margins.
- .OP GUT
This instruction defines the number of characters for the gutter on all pages. To define the gutter for odd- and even-numbered pages, you must use the instructions .OP GOD and .OP GEV.
- .TM, .HM, .BM and .FM
These instructions define the number of blank lines between the different parts of the page.
- .HS and .FS
These instructions define the number of lines reserved for the top and bottom titles.
- .LL
This instruction defines the line length (i.e. the number of characters) for the top and bottom titles.
- .PL
This instruction defines the page length, i.e. the number of lines on the page including top margin, top title, page header, text and footnotes.
The left and right margins define the line length for the page header and the body of the document. They do not affect the top and bottom titles (see .LL - Line Length).
.LM number
.LM +number
.LM -number
.LM
The initial setting of the left margin is in column 0. It is not possible to define a negative column for the left margin, i.e. you must not specify a column smaller than 0.
The text always starts after the column which has been defined for the left margin. For example, if column 10 has been defined for the left margin, the text starts in column 11.
The current value is stored in the variable $IN (see Modifiable System Variables).
There are several ways to define another position for the left margin with the .LM instruction. The following examples illustrate how to use this instruction.
You define the number of a column. If column 10 is to be the position of the left margin, you must specify:
.LM 10
If the current position of the left margin is in column 10 and you want to move it 5 columns to the right so that it starts in column 15, you must specify:
.LM +5
If the current position of the left margin is in column 15 and you want to move it 10 columns to the left so that it starts in column 5, you must specify:
.LM -10
When you do not specify a parameter, this instruction is equivalent to .LM 0 which is the initial setting of this instruction.
.RM number
.RM +number
.RM -number
.RM
The initial setting of the right margin is in column 72. The maximum value is 190.
The right margin is placed behind the text. For example, if column 60 has been defined for the right margin, the last character of the text line is printed in column 59.
The current value is stored in the variable $RM (see Modifiable System Variables).
There are several ways to define another position for the right margin with the .RM instruction. The following examples illustrate how to use this instruction.
You define the number of a column. If column 60 is to be the position of the right margin, you must specify:
.RM 60
If the current position of the right margin is in column 60 and you want to move it 5 columns to the right so that it starts in column 65, you must specify:
.RM +5
If the current position of the right margin is in column 65 and you want to move it 10 columns to the left so that it starts in column 55, you must specify:
.RM -10
When you do not specify a parameter, this instruction is equivalent to .RM 72 which is the initial setting of this instruction.
This example illustrates the different ways to enter the .LM and .RM instructions which are used to set the left and right margins.
.FI ON;.JU ON
No left and right margins have been defined for this part
of the text. Therefore, the defaults apply, i.e. the initial
values for the margins are .LM 0 and .RM 72.
.SL 1
.LM 10;.RM 60
Now column 10 has been defined for the left margin and column
60 has been defined for the right margin.
.SL 1
.LM +5;.RM -5
Now the left margin has been moved 5 columns to the right
so that it starts in column 15, and the right margin has been
moved 5 columns to the left so that it starts in column 55.
.SL 1
.LM -5;.RM +5
Now the left and right margins have been moved back to their
previous positions.
No  left and right margins have been defined for this part of the  text.
Therefore,  the defaults apply, i.e. the initial values for the  margins
are .LM 0 and .RM 72.

          Now column 10 has been defined for the left margin
          and  column  60  has been defined  for  the  right
          margin.

               Now  the  left margin has been  moved  5
               columns  to the right so that it  starts
               in  column 15, and the right margin  has
               been moved 5 columns to the left so that
               it starts in column 55.

          Now  the  left and right margins have  been  moved
          back to their previous positions.
The white space formed by the inside margins of two facing pages (as of a book) is referred to as "gutter".
In Con-form you define the gutter by specifying the number of blank spaces before the left margin. For example, when you define a larger gutter value, the whole text is shifted to the right.
The initial setting for the gutter is 10 spaces before the left margin; this value applies to all pages, no matter whether they are even- or odd-numbered pages.
Note:
When your environment allows you to modify the character spacing (see
.CS - Character
Spacing), Con-form interprets the number of blank spaces
in tenths of inches. In this case, it is possible that the character spacing
used in the gutter differs from the character spacing used in the text.
In addition to the gutter value which applies to all pages, you can also define different gutter values for even- and odd-numbered pages. This is useful if you are producing a document which is to be bound in book format. In this case, it is recommended that you use a smaller value for the even-numbered pages to shift the text to the left, and a larger value for the odd-numbered pages to shift the text to the right.
The gutter determines the position of the left margin on the printed page. However, the gutter does not affect the column number of the left margin (defined with .LM). For example, when the left margin starts in column 10 and you define a larger value for the gutter, the left margin still starts in column 10, although the gutter space has been increased.
The gutter is defined with the .OP instruction, as described on the following pages. When you format the document, you can only see the gutter in the printed version (the gutter is not shown when you display the formatted version on the screen).
.OP GUT=number
This instruction affects both even- and odd-numbered pages.
If you want to define a different value for all even- and odd-numbered pages, you must define the number of spaces that are to be left blank before the left margin.
For example, if 15 spaces are to be left blank before the left margin, you must specify:
.OP GUT=15
Since this instruction is not processed in the middle of a printed page, it becomes effective only at the beginning of the next page.
.OP GEV=number
This instruction affects the even-numbered pages which are usually the left-hand pages in a book.
If you want to define a different value for the even-numbered pages, you must define the number of spaces that are to be left blank before the left margin.
For example, if 9 spaces are to be left blank before the left margin of each even-numbered page, you must specify:
.OP GEV=9
Since this instruction is not processed in the middle of a printed page, it becomes effective only at the beginning of the next even-numbered page.
.OP GOD=number
This instruction affects the odd-numbered pages which are usually the right-hand pages in a book.
If you want to define a different value for the odd-numbered pages, you must define the number of spaces that are to be left blank before the left margin.
For example, if 21 spaces are to be left blank before the left margin of each odd-numbered page, you must specify:
.OP GOD=21
Since this instruction is not processed in the middle of a printed page, it becomes effective only at the beginning of the next odd-numbered page.
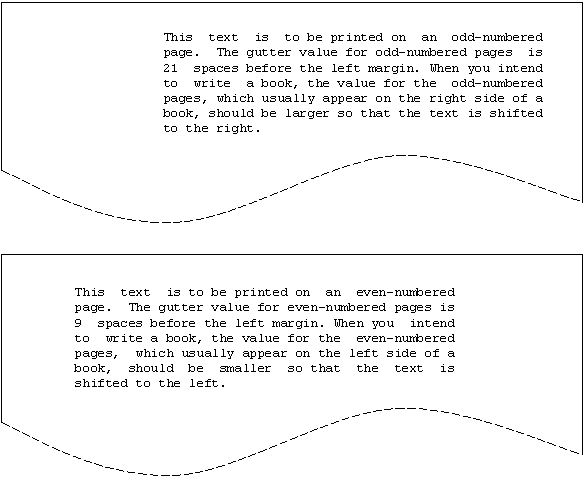
This example illustrates .OP instructions which are necessary to define the gutter for even- and odd-numbered pages. Note that the position of the left margin on the printed page is determined by the values which have been defined for the gutter. Furthermore, the .NP instruction which is used to print text on the next page is introduced (see .NP - New Page).
.** The gutter value for odd pages is 21:
.OP GOD=21
.** The gutter value for even pages is 9:
.OP GEV=9
.LM 0;.RM 50
.FI ON;.JU ON
This text is to be printed on an odd-numbered page. The gutter value for
odd-numbered pages is 21 spaces before the left margin.
When you intend to write a book, the value for the odd-numbered pages,
which usually appear on the right side of a book, should be larger
so that the text is shifted to the right.
.NP
This text is to be printed on an even-numbered page. The gutter value for
even-numbered pages is 9 spaces before the left margin.
When you intend to write a book, the value for the even-numbered pages,
which usually appear on the left side of a book, should be smaller
so that the text is shifted to the left.
.TM number
This instruction defines the number of blank lines above the top title of every page. The initial setting is .TM 0.
For example, if 2 blank lines are to appear above the top title, you must specify:
.TM 2
The current value is stored in the variable $TM (see Modifiable System Variables).
.HM number
This instruction defines the number of blank lines between the top title and the header. If a header has not been specified, it is the number of blank lines between the top title and the text. The initial setting is .HM 2.
For example, if 3 blank lines are to appear between the top title and the header, you must specify:
.HM 3
Note:
Initially, one line is reserved for the top title (.HS 1; see
.HS - Header
Space), and there are two blank lines between the top
title and the header (.HM 2). This accounts for the 3 blank lines which always
appear at the beginning of a formatted text when you specify neither a top
title nor a header.
The current value is stored in the variable $HM (see Modifiable System Variables).
.BM number
This instruction defines the number of blank lines below the bottom title of every page.
This instruction is redundant in any case, since the bottom title is always followed by a form feed. However, if you want to define, for example, 4 blank lines at the bottom of a page, you must specify:
.BM 4
The current value is stored in the variable $BM (see Modifiable System Variables).
.FM number
This instruction defines the number of blank lines between the text (or the last footnote if there are any) and the bottom title of every page. The initial setting is .FM 2.
For example, if 3 blank lines are to appear between the footnotes and the bottom title, you must specify:
.FM 3
The current value is stored in the variable $FM (see Modifiable System Variables).
The top title is printed at the head of each page and can consist of several lines. Initially, one line is reserved for the top title (.HS 1; see .HS - Header Space).
The information in the top title can be printed in three different text areas, as illustrated in the following diagram:

The bottom title is printed at the foot of each page and can consist of several lines. Initially, one line is reserved for the bottom title (.FS 1; see .FS - Footer Space).
In analogy to the top title, the information in the bottom title can also be printed in three different text areas, as illustrated in the following diagram:

Both the top and bottom title are not affected by the left and right margins which have been defined with .LM and .RM. Instead, they are controlled by the .LL instruction (see .LL - Line Length).
You must take care not to specify a longer text than can fit in the top or bottom title; otherwise the information in the three different areas is automatically truncated in order to avoid overlapping.
There are several restrictions for the top and bottom title:
The text must not include the slash (/), since the slash is used as the separator character between the parameters for the three different text areas.
The parameter for the first text area must not start with a number, since numbers are used for multi-line top and bottom titles.
Initially, the semicolon is used to separate several instructions in the same line. Therefore, you must repeat the instruction separator character (";;") if it is to appear in the top or bottom title.
A parameter must not exceed 79 characters. This also applies when the parameter includes variables. After the substitution of the variables, the parameter must not exceed 79 characters.
If the page number is to be printed in the top or bottom title, you must include a hash (#) in the parameter for the relevant text area (see Page Numbering).
See also: Line Spacing and Character Spacing at the Top and Bottom of a Page.
You can either define a top and bottom title which applies to all pages, or you can define different top and bottom titles for even- and odd-numbered pages. The latter is useful, if you are producing a document which is to be bound in book format.
All instructions for the top and bottom titles which are described on the following pages use the same parameter format; therefore, the parameter format has only been explained with the .TT (top title for all pages) and .BT (bottom title for all pages) instructions.
If the following instructions are specified before any text is entered, the top title appears on the first page of the printout. If they are specified after text is entered, the top title does not appear on the first page but on all following pages. This feature does not apply to bottom titles.
.TT text/text/text
.TT
.TT number text/text/text
.TT number
This instruction defines the text strings which are to be printed in the top title of all even- and odd-numbered pages.
To specify your actual top title, you must replace the parameters of the .TT instruction with the actual top title. For example, to show the manual title on the left, the page number in the center and the chapter name on the right, you specify the following instruction:
.TT Con-form Reference Manual/#/Document Layout
The above instruction causes the following formatted output:

The three text areas must be separated by slashes (see the above instruction). You must not omit one of the slashes; otherwise the information is not printed as intended. This is particularly important when you specify only one text area, as in the following example:
.TT //Page #
If the currently printed page has page number 15, the above instruction causes the following formatted output:

If the top title is to consist of more than one line, you must first reserve the required number of lines (see .HS - Header Space).
To define a multi-line top title, each line of text for the top title must be preceded by a line number between 1 and 9. You must not leave a blank between the line number and the text. For example:
.TT 1//This is the first line of the top title
.TT 2//This is the second line of the top title
The lines of text can be defined in any order. You must not define more than 9 lines for each top title.
To clear the top title so that it is no longer printed on the following pages, you must use the instruction without a parameter:
.TT
To clear a specific line of the top title, you must use the instruction with the number of that line. For example, to clear the second line of the top title, you must specify:
.TT 2
.ET text/text/text
.ET
.ET number text/text/text
.ET number
This instruction defines the text strings which are to be printed in the top title of all even-numbered pages.
See the description of the .TT instruction for further information.
To clear the top title so that it is no longer printed on the following even-numbered pages, you must use the instruction without a parameter:
.ET
To clear a specific line of the top title, you must use the instruction with the number of that line. For example, to clear the second line of the top title, you must specify:
.ET 2
.OT text/text/text
.OT
.OT number text/text/text
.OT number
This instruction defines the text strings which are to be printed in the top title of all odd-numbered pages.
See the description of the .TT instruction for further information.
To clear the top title so that it is no longer printed on the following odd-numbered pages, you must use the instruction without a parameter:
.OT
To clear a specific line of the top title, you must use the instruction with the number of that line. For example, to clear the second line of the top title, you must specify:
.OT 2
.BT text/text/text
.BT
.BT number text/text/text
.BT number
This instruction defines the text strings which are to be printed in the bottom title of all even- and odd-numbered pages.
To specify your actual bottom title, you must replace the parameters of the .BT instruction with the actual bottom title. For example, to show the company name on the left and the page number on the right, you specify the following instruction:
.BT Software AG//#
The above instruction causes the following formatted output:
In analogy to the top title, the three text areas of the bottom title must also be separated by slashes (see the above instruction). You must not omit one of the slashes; otherwise the information is not printed as intended. This is particularly important when you specify only one text area, as in the following example:
.BT //Page #
If the currently printed page has page number 15, the above instruction causes the following formatted output:
If the bottom title is to consist of more than one line, you must first reserve the required number of lines (see .FS - Footer Space).
To define a multi-line bottom title, each line of text for the bottom title must be preceded by a line number between 1 and 9. You must not leave a blank between the line number and the text. For example:
.BT 1//This is the first line of the bottom title
.BT 2//This is the second line of the bottom title
The lines of text can be defined in any order. You must not define more than 9 lines for each bottom title.
To clear the bottom title so that it is no longer printed on the following pages, you must use the instruction without a parameter:
.BT
To clear a specific line of the bottom title, you must use the instruction with the number of that line. For example, to clear the second line of the bottom title, you must specify:
.BT 2
.EB text/text/text
.EB
.EB number text/text/text
.EB number
This instruction defines the text strings which are to be printed in the bottom title of all even-numbered pages.
See the description of the .BT instruction for further information.
To clear the bottom title so that it is no longer printed on the following even-numbered pages, you must use the instruction without a parameter:
.EB
To clear a specific line of the bottom title, you must use the instruction with the number of that line. For example, to clear the second line of the bottom title, you must specify:
.EB 2
.OB text/text/text
.OB
.OB number text/text/text
.OB number
This instruction defines the text strings which are to be printed in the bottom title of all odd-numbered pages.
See the description of the .BT instruction for further information.
To clear the bottom title so that it is no longer printed on the following odd-numbered pages, you must use the instruction without a parameter:
.OB
To clear a specific line of the bottom title, you must use the instruction with the number of that line. For example, to clear the second line of the bottom title, you must specify:
.OB 2
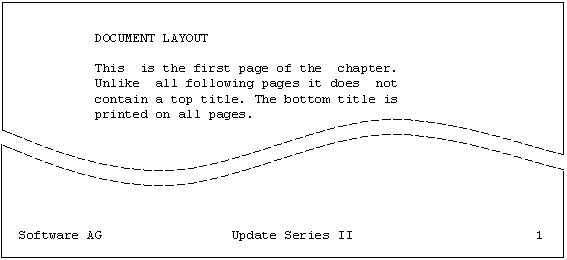
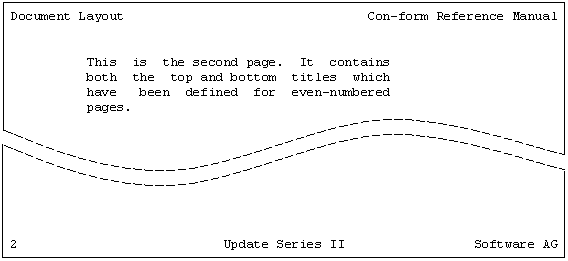
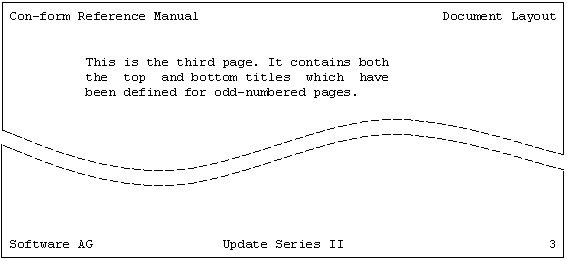
This example illustrates the different instructions that are used to create top and bottom titles on odd- and even-numbered pages. Note that the first page does not contain a top title.
.LM 10;.RM 50
DOCUMENT LAYOUT
.** The top title is defined AFTER the chapter name has been specified.
.** Thus, the first page of the chapter has a different appearance.
.** The top title will be printed on all following pages.
.** This description does NOT apply to the bottom title; it will be
.** printed on all pages.
.OT Con-form Reference Manual//Document Layout
.ET Document Layout//Con-form Reference Manual
.OB Software AG/Update Series II/#
.EB #/Update Series II/Software AG
.SL 1
.FI ON;.JU ON
This is the first page of the chapter. Unlike all following pages
it does not contain a top title. The bottom title is printed on
all pages.
.NP
This is the second page. It contains both the top and bottom titles
which have been defined for even-numbered pages.
.NP
This is the third page. It contains both the top and bottom titles
which have been defined for odd-numbered pages.
If the top or bottom title is to consist of more than one line, you must first reserve the required number of lines using the instructions .HS or .FS.
To define a multi-line top and bottom title, you use the instructions as explained in section Top Titles and Bottom Titles. Each line of text for the title must be preceded by a line number between 1 and 9.
.HS number
This instruction defines the number of lines that is to be reserved for the top title. The initial setting is .HS 1.
The current value is stored in the variable $HS (see Modifiable System Variables).
Since one line is initially reserved, you need not use this instruction when the top title consists of only one line.
For example, if you want to reserve 3 lines for the top title, you must specify:
.HS 3
If the parameter you specify is greater than the number of lines in the top title, the excess will appear as blank lines between the top title and the body of the document.
The length of the header space influences the length of the body of the document: the longer the header space, the shorter is the body of the document.
.FS number
This instruction defines the number of lines that is to be reserved for the bottom title. The initial setting is .FS 1.
The current value is stored in the variable $FS (see Modifiable System Variables).
Since one line is initially reserved, you need not use this instruction when the bottom title consists of only one line.
For example, if you want to reserve 2 lines for the bottom title, you must specify:
.FS 2
If the parameter you specify is greater than the number of lines in the bottom title, the excess will appear as blank lines between the body of the document and the bottom title.
The length of the footer space does not influence the length of the body of the document.
This example illustrates how to create multi-line top and bottom titles on odd- and even-numbered pages. This example introduces the .LL instruction which is used to define the line length for top and bottom titles and the .NP instruction which causes a form feed.
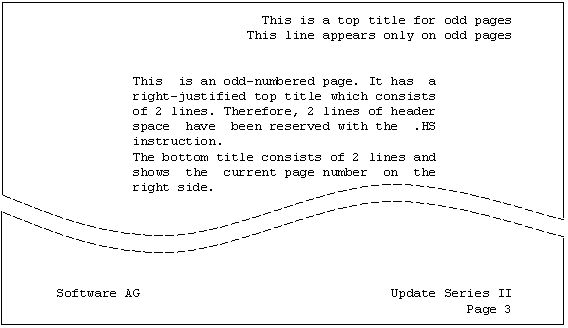
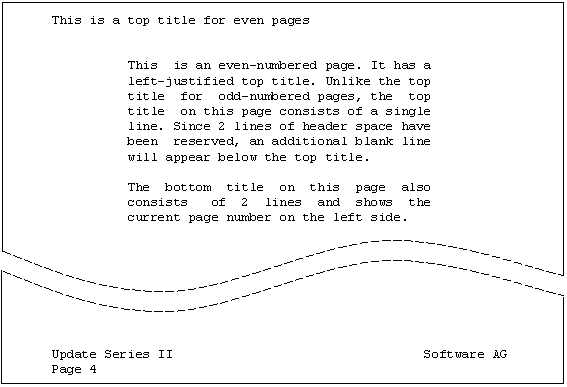
.** 2 lines will be reserved for header and footer space
.HS 2;.FS 2
.** The line length for top and bottom titles:
.LL 60
.OT 1//This is a top title for odd pages
.OT 2//This line appears only on odd pages
.ET This is a top title for even pages//
.OB 1Software AG//Update Series II
.OB 2//Page #
.EB 1Update Series II//Software AG
.EB 2Page #//
.SL 1
.LM 10;.RM 50
.FI ON;.JU ON
.** Assign page number 3 to this page
.NP 3
This is an odd-numbered page. It has a right-justified top title
which consists of 2 lines. Therefore, 2 lines of header space have
been reserved with the .HS instruction.
.SL 1
The bottom title consists of 2 lines and shows the current page
number on the right side.
.NP
This is an even-numbered page. It has a left-justified top title.
Unlike the top title for odd-numbered pages, the top title on this
page consists of a single line. Since 2 lines of header space have
been reserved, an additional blank line will appear below the top
title.
.SL 1
The bottom title on this page also consists of 2 lines and shows
the current page number on the left side.
The top and bottom titles start immediately after the gutter.
Both the top and bottom title are not affected by the left and right margins which have been defined with .LM and .RM. Instead, they are controlled by the .LL instruction.
.LL number
This instruction defines the maximum number of characters to be printed in the top and bottom titles.
The initial setting is .LL 72. The maximum value is 190.
The current value is stored in the variable $LL (see Modifiable System Variables).
To define a different line length, you must specify the number of characters in the line. For example, to specify a line length of 60 characters, you must specify:
.LL 60
You will receive an error message if the output text line is longer than the limit specified with this instruction.
This example illustrates how to define the line length for the top and bottom titles. Furthermore, this example introduces the .PL instruction which is used to define the page length. These instructions are of importance when you want to produce a book in a smaller format. The second page is automatically printed on a new sheet of paper. When binding the document in book format, you just have to cut off the excess paper to obtain the required page format.
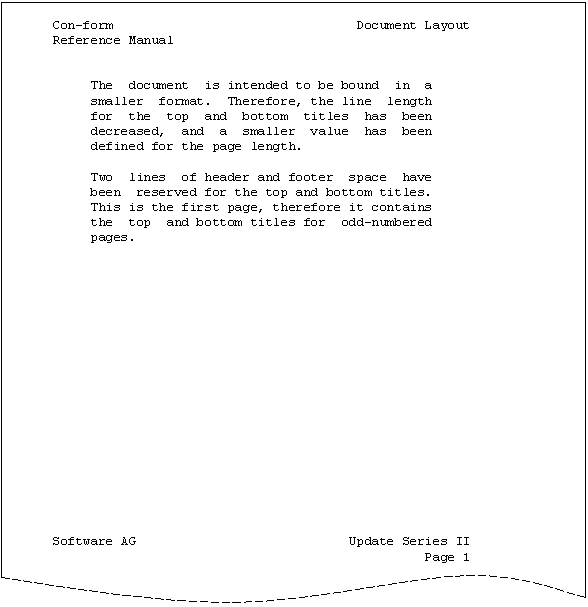
.LL 55;.PL 30
.HS 2;.FS 2
.OT 1Con-form//Document Layout
.OT 2Reference Manual//
.ET 1Document Layout//Con-form
.ET 2//Reference Manual
.OB 1Software AG//Update Series II
.OB 2//Page #
.EB 1Update Series II//Software AG
.EB 2Page #//
.SL 1
.LM 5;.RM 50
.FI ON;.JU ON
The document is intended to be bound in a smaller format.
Therefore, the line length for the top and bottom titles has been
decreased, and a smaller value has been defined for the page length.
.SL 1
Two lines of header and footer space have been reserved for the
top and bottom titles.
This is the first page, therefore it contains the top and bottom
titles for odd-numbered pages.
.NP
.** All text for the following pages would be entered after this
.** comment.
Initially, the page-number character is the hash sign (#). You can use it in the top and bottom titles, and with the .SV instruction. When used in the bottom title, the page-number character represents either the number of the current page or the number of the next page (see .OP PAG - Number of the Current or Next Page). Otherwise, it always represents the number of the current page.
The current page number is stored in the variable $PN (see Modifiable System Variables).
.OP PNS=character
You can define a different page-number character, if you want to use a sign other than the hash. For example, if you want to define the exclamation mark (!) as the new page-number character, you must specify:
.OP PNS=!
Now you must use the exclamation mark instead of the hash when you want to print the page number in the top or bottom title.
When you use the page-number character within the body of the document, it is interpreted as normal text (i.e. the page-number character is printed in the formatted version, not the page number).
.OP PAG=EQU
.OP PAG=DIF
This instruction only affects the page number in the bottom title. The initial setting of this option is EQU.
The following instruction defines that the number of the current page is to be printed in the bottom title:
.OP PAG=EQU
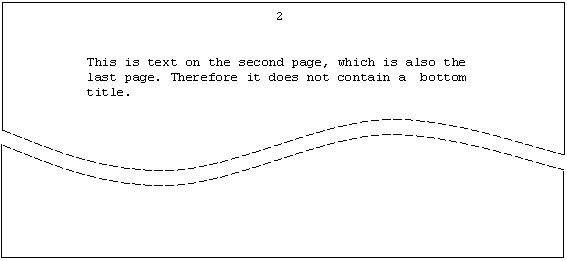
The following instruction defines that the number of the next page is to be printed in the bottom title - the last page does not contain a bottom title:
.OP PAG=DIF
This example illustrates how you can use the .OP PAG instruction to print the number of the next page in the bottom title. This is useful as an indicator that there are still pages which follow.
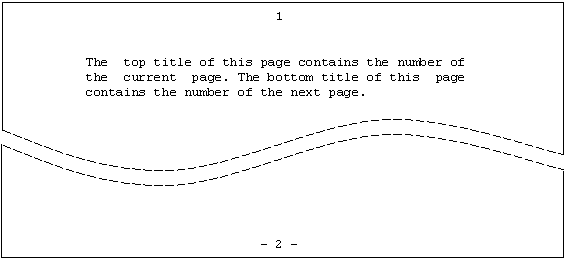
.OP PAG=DIF
.TT /#/
.BT /- # -/
.LM 10;.RM 60
.FI ON;.JU ON
The top title of this page contains the number of the current page.
The bottom title of this page contains the number of the next page.
.NP
This is text on the second page, which is also the last page.
Therefore it does not contain a bottom title.
.PM A
.PM R
.PM r
The page numbers can be printed either in Arabic or Roman numerals. The initial setting is Arabic.
To define Arabic page numbers, you must specify:
.PM A
The following is an example of the resulting output:

To define upper-case Roman page numbers, you can specify:
.PM R
It is important that you specify the parameter in upper-case.
The following is an example of the resulting output:
To define lower-case Roman page numbers, you can specify:
.PM r
It is important that you specify the parameter in lower-case.
The following is an example of the resulting output:
.OP ROM=UPPER
.OP ROM=LOWER
The initial setting of this option is UPPER (i.e. Roman page numbers are printed in upper-case).
Instead of the .PM R instruction, you can also specify the following instruction to define upper-case Roman page numbers:
.OP ROM=UPPER
Instead of the .PM r instruction, you can also specify the following instruction to define lower-case Roman page numbers:
.OP ROM=LOWER
The page header appears at the head of each page, between the top title and the body of the document. You can also specify that the page header is printed within the body of the document.
The number of blank lines between the top title and the page header is determined by the header margin (initially .HM 2; see .HM - Header Margin).
Unlike the top and bottom titles, the page header is affected by the values which have been defined for the body of the document (such as left and right margins). The body of the document, however, is not affected by the values which have been defined for the page header.
See also: Line Spacing and Character Spacing in Header Lines.
.HL instruction
.HL text
There are two different uses of the .HL instruction. You can either define the text which appears in the page header or an instruction which applies to the page header. However, you must not mix text and instructions in one .HL instruction.
For example, to define the header text, you specify the following:
.HL This is the header line
To specify an instruction which applies to the page header, for example, to center the page header, you specify the following:
.HL .CE ON
If you want to define a new page header, you must first clear the current page header using the .HC instruction, and then define the new page header using the .HL instruction once more.
.HC
This instruction clears the page header which has been defined with the .HL instruction. To clear the current page header, you must specify the following:
.HC
The .HC instruction does not have a parameter.
.PH
This instruction prints the page header which has been defined with the .HL instruction at the current position of the running text. The instructions which have been defined for the page header are also considered. For example, if the header at the top of the page has been centered with the .HL .CE ON instruction, it is also centered within the body of the document.
To print the page header at the current text position, you must specify the following:
.PH
The .PH instruction does not have a parameter.
You can also define a page header at some point within your text, and then issue the .PH instruction so that the header is output immediately. The header will then appear automatically at the top of all following pages (unless it is cleared with the .HC instruction).
Since the page header is automatically printed at the head of each page, the .PH instruction is only required, when you want to print the page header within the body of the document.
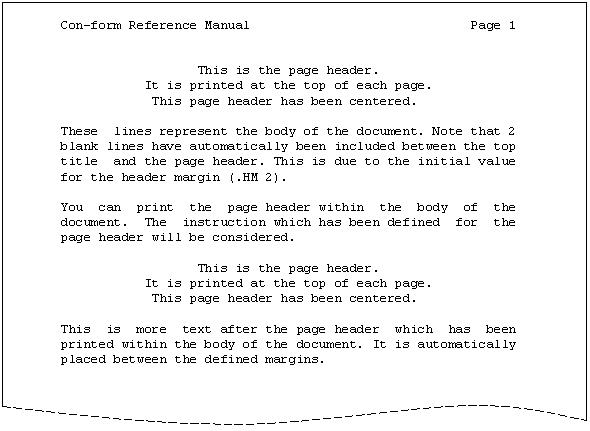
This example illustrates how to define a page header and how to print it within the body of the document. Furthermore, this example introduces the .CE instruction which is used to center text.
.LL 60
.TT Con-form Reference Manual//Page #
.FI ON;.JU ON
.LM 0;.RM 60
.HL .CE ON
.HL This is the page header.
.HL It is printed at the top of each page.
.HL This page header has been centered.
.HL .SL 1
.** You should always define a blank line with the .HL instruction.
.** so that the page header and the body of the document are always
.** separated.
These lines represent the body of the document.
Note that 2 blank lines have automatically been included between the
top title and the page header.
This is due to the initial value for the header margin (.HM 2).
.SL 1
You can print the page header within the body of the document.
The instruction which has been defined for the page header will be
considered.
.SL 1
.PH
.** You need not define a blank line here, since one blank line
.** has been defined for the header with the .HL instruction.
This is more text after the page header which has been printed within
the body of the document. It is automatically placed between the
defined margins.
.FN text
.FN ON
.FN OFF
You can define text which is to be printed as a footnote at the bottom of the current page - between the body of the document and the bottom title. Con-form automatically prints a short horizontal line before the first footnote on a page.
The number of blank lines between the footnotes and the bottom title is determined by the footer margin (initially .FM 2; see .FM - Footer Margin).
See also: Line Spacing and Character Spacing in Footnotes.
There are two different ways to use the .FN instruction.
To define a single line of footnote text, you specify the .FN instruction followed by the line of text which is to be printed as the footnote. For example:
.FN This is the footnote.
If several of these instructions are issued, each instruction contains one line of text.
Unlike the page header, the footnotes are not affected by the values which have been defined for the body of the document (such as left and right margins). The footnote always starts in column 0 and you must take care, that you do not define a longer footnote text than can fit on the page. However, you can also output a footnote as a block of text as described below. In this case, you can also define the layout for a footnote.
You can output the footnote as a block of text. To do so, you must enclose the footnote text and all instructions which apply to the footnote between the following two instructions:
.FN ON
.FN OFF
When you use these instructions, you can define left and right margins for a specific footnote as well as filling and justification.
Initially, filling is switched on for the footnote. If you do not define the left and right margins, the initial values apply (.LM 0 and .RM 72).
When you do not define justification for the footnote, its use is dependent on the settings for the body of the document. If justification is used in the body of the document, it is also used for the footnote.
The layout you have defined for a footnote always applies to this specific footnote. If you want the next footnote to appear in the same way, you must define the layout once more.
It is not possible to conditionally suppress the processing of the .FN OFF instruction by using it in an .IF construction.
Footnotes are not automatically numbered by Con-form. If you want a number to appear before a footnote, you must explicitly define it.
When you specify each footnote note number by yourself, this has the disadvantage that you have to renumber all footnotes, if you insert additional footnotes at the beginning of the document.
In the example below, "/1/" has been included in the document text, so that it is clear to which passage in the text the footnote refers.
This belongs to the body of the document /1/
.FN /1/ This is the first footnote.
and this is the body of the document continued.
The document text is formatted as follows (within the defined margins):
This belongs to the body of the document /1/ and this is the body
of the document continued.
The footnote is formatted as follows:
/1/ This is the first footnote.
You can leave the responsibility for numbering the footnote to Con-form. The number of the current footnote is stored in the variable $FN (see Modifiable System Variables). Each time, the variable $FN is processed in the text, its current value is increased by one.
To number the footnotes consecutively, you must assign the value of $FN to another variable using the .SV instruction. You must repeat the .SV instruction for each footnote that you want to define. For example:
.SV number=&$FN
This belongs to the body of the document /&number/
.FN /&number/ This is the first footnote.
and this is the body of the document continued.
.SL 1
.SV number=&$FN
You must not forget to update the "number" variable
.FN /&number/ This is the second footnote.
 /&number/, otherwise the footnote number is not increased.
The document text is formatted as follows (within the defined margins):
This belongs to the body of the document /1/ and this is the body
of the document continued.

You must not forget to update the "number" variable /2/, otherwise
the footnote number is not increased.
The footnote is formatted as follows:
/1/ This is the first footnote.
/2/ This is the second footnote.
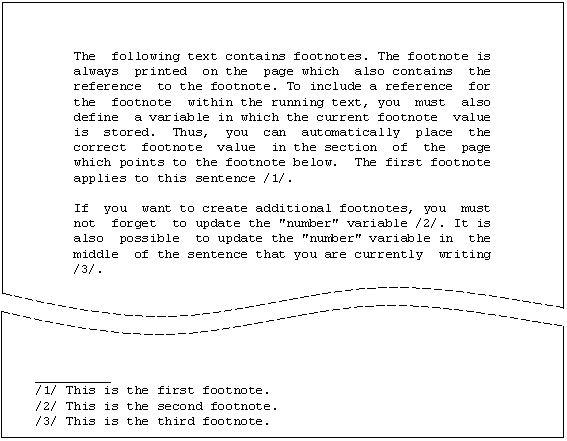
This example illustrates the several different ways in which footnotes can be defined. It shows how to number footnotes automatically, and how to define the layout for a footnote which has been defined as a block of text.
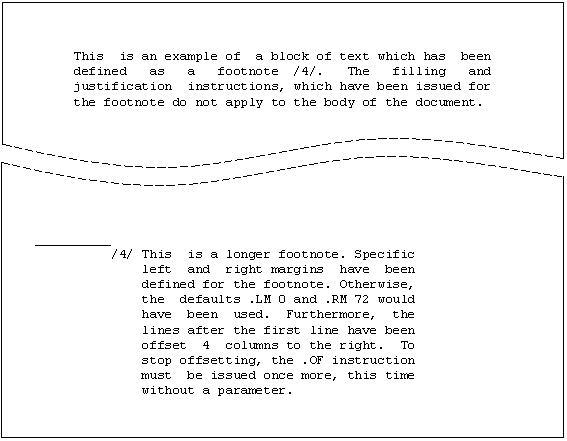
.LM 5;.RM 60
.FI ON;.JU ON
The following text contains footnotes. The footnote is always
printed on the page which also contains the reference to
the footnote.
.** &$FN is a special variable which is incremented each time it is
.** used. You use it for consecutive numbering of footnotes within a
.** document.
To include a reference for the footnote within the running text,
you must also define a variable in which the current footnote value is
stored. Thus, you can automatically place the correct footnote value
in the section of the page which points to the footnote below.
.SV number=&$FN
.** You must repeat the above instruction for each footnote which you
.** include in your text.
The first footnote applies to this sentence
.FN /&number/ This is the first footnote.
.** The following line contains the remainder of the sentence, namely
.** the footnote indicator and the full stop.
/&number/.
.IL 1
.** The following paragraph will contain another footnote, therefore
.** the "number" variable must be updated:
.SV number=&$FN
If you want to create additional footnotes, you must not forget to update
the "number" variable /&number/.
.FN /&number/ This is the second footnote.
It is also possible to update the "number" variable in the middle
.SV number=&$FN
.FN /&number/ This is the third footnote.
of the sentence that you are currently writing /&number/.
.NP
.SV number=&$FN
This is an example of a block of text which has been defined
as a footnote /&number/.
.FN ON
.** You can define the left and right margins for the footnote.
.** You can also specify filling and justification. This settings
.** apply only to this one footnote.
.LM 10;.RM 50
.FI ON;.JU ON
.OF +4
/&number/ This is a longer footnote. Specific left and right margins
have been defined for the footnote. Otherwise, the defaults .LM 0
and .RM 72 would have been used.
Furthermore, the lines after the first line have been offset
4 columns to the right.
To stop offsetting, the .OF instruction must be issued
once more, this time without a parameter.
.OF
.FN OFF
The filling and justification instructions, which have been issued
for the footnote do not apply to the body of the document.
.PL number
This instruction defines the number of lines to be printed on a page. The initial setting is .PL 57.
The page length includes the top margin (.TM), top title (i.e. the number of lines which have been reserved with .HS), the header margin (.HM), the text and the footnotes.
The footer margin (.FM), bottom margin (.BM), and the number of lines which have been reserved for the bottom title (.FS) are not included in this number.
The current value for the page length is stored in the variable $PL (see Modifiable System Variables).
To define a different page length, you must specify the number of lines on a page. For example, if you print on shorter paper and want to specify a page length of 40 lines, you must specify:
.PL 40
Definitions for the page length are only considered at the top of a page. Thus, a modified page length does not become active at the position where the .PL instruction occurs in the source text. The new page length is only activated after the actual page break has occurred. If you want to define the page length for the whole document, you must define it before the document text.
.LS S
.LS D
.LS number
You can define the amount of space between the text lines in the formatted output.
Initially, single line spacing is active. This corresponds to the following instruction:
.LS S
To activate double line spacing, you must specify:
.LS D
This feature must be used in conjunction with a Con-nect printer profile (see the Con-nect User's Guide, section Printer Profiles). You must include your line spacing definitions in the printer profile, so that the .LS instruction results in the desired output. For example, for the instruction .LS 060 you must specify the following symbol in your printer profile:
LI060
You can define the number of lines per inch that are to be printed. The initial setting for the .LS number instruction is 6 lines per inch which corresponds to the following:
.LS 060
The parameter must be exactly 3 digits long. Leading zeros as in .LS 060 must always be specified.
The following example illustrates how to define the number of lines per inch:
.LS 030
Here, the line spacing is 3 lines per inch.
This has been achieved with the .LS 030 instruction.
.SL 1
.LS 040
Here, the line spacing is 4 lines per inch.
This has been achieved with the .LS 040 instruction.
.SL 1
.LS 060
Here, the line spacing is 6 lines per inch.
This has been achieved with the .LS 060 instruction.
.SL 1
.LS 080
Here, the line spacing is 8 lines per inch.
This has been achieved with the .LS 080 instruction.
.SL 1
.LS 120
Here, the line spacing is 12 lines per inch.
This has been achieved with the .LS 120 instruction.
This example illustrates the instructions for single and double line spacing. It also shows how these instructions interact with the .SL instruction.
.LM 5;.RM 55
.FI ON;.JU ON
By default, single line space is active (.LS S). You can also specify
double line spacing (.LS D).
.SL 1
.LS D
For this paragraph double line spacing has been specified. With double
line spacing, one blank line is inserted between the text lines.
.SL 1
When you use the .SL instruction with double line spacing,
the space between the two paragraphs is increased, i.e. 3 blank lines
are inserted.
.LS S
.SL 1
Now single line spacing has been defined BEFORE the .SL instruction.
Therefore, a single blank line is inserted before this paragraph.
     By  default, single line space is active (.LS  S).
     You can also specify double line spacing (.LS D).

     For  this  paragraph double line spacing has  been

     specified.  With  double line spacing,  one  blank

     line is inserted between the text lines.


     When  you use the .SL instruction with double line

     spacing,  the space between the two paragraphs  is

     increased, i.e. 3 blank lines are inserted.

     Now  single  line spacing has been defined  BEFORE
     the  .SL  instruction. Therefore, a  single  blank
     line is inserted before this paragraph.
.CS number
This feature must be used in conjunction with a Con-nect printer profile (see the Con-nect User's Guide, section Printer Profiles). You must include your pitch definitions in your printer profile, so that the .CS instruction results in the desired output. For example, for the instruction .CS 100 you must specify the following symbol in your printer profile:
CI100
You can define the number of characters per inch (referred to as "pitch") that are to be printed in a line. The initial setting for the .CS instruction is 10 characters per inch which corresponds to the following:
.CS 100
The parameter must be exactly 3 digits long. Leading zeros as in .CS 060 must always be specified.
The following example illustrates how to define the number of characters per inch:
.CS 060
Here, the character spacing is 6 characters per inch.
This has been achieved with the .CS 060 instruction.
.SL 1
.CS 100
Here, the character spacing is 10 characters per inch.
This has been achieved with the .CS 100 instruction.
.SL 1
.CS 120
Here, the character spacing is 12 characters per inch.
This has been achieved with the .CS 120 instruction.
.SL 1
.CS 150
Here, the character spacing is 15 characters per inch.
This has been achieved with the .CS 150 instruction.
If many .LS and .CS instructions are used in your text, it is recommended that you define separate .LS and .CS values for the top and bottom titles. Otherwise, it may happen that on the different pages the top and bottom titles have different line and character spacing.
Individual values for line spacing and character spacing can be defined for the following:
top title (.TT, .ET and .OT) including blank lines (.TM und .HM)
bottom title (.BT, .EB and .OB) including blank lines (.FM)
To do so, you specify the instructions .LS and .CS directly before the instructions that affect the top and bottom titles. For example:
.LS 030;.CS 060
.TT The top titles are printed with .LS 030 and .CS 060
.LS 040;.CS 100
.BT The bottom titles are printed with .LS 040 and .CS 100
The body of the document is also printed with .LS 040 and .CS 100.
.LS 060;.CS 120
Now the body of the document is printed with .LS 060 and .CS 120.
In the above example, different values are defined for the top title, the bottom title and the body of the document. The following example uses the same value for the top and bottom titles:
.LS 030;.CS 060
.TT The top titles are printed with .LS 030 and .CS 060
.BT The bottom titles are also printed with .LS 030 and .CS 060
.LS 060;.CS 120
The body of the document is printed with .LS 060 and .CS 120.
If you omit the instructions .LS 060 and .CS 120, the same
values are used in the top and bottom titles and in the
body of the document (.LS 030 and .CS 060).
Since the .LS instruction can cause the bottom lines to be positioned differently on different pages, an internal calculation is done, and if required, one blank line is printed. For this blank line the most fitting line spacing definition from the Con-nect printer profile is used. It is therefore recommended that you define as many line spacing definitions as possible in your printer profile (for example, LI060) so that the bottom lines can evenly be aligned on all pages.
See also: Top Titles and Bottom Titles, Blank Lines at the Top of the Page, and Blank Lines at the Bottom of the Page.
For header lines, separate values for line spacing and character spacing can be defined in the .HL instruction. For example:
.HL .LS 060
.HL .CS 120
.HL This is the page header.
If you do not define line and character spacing with the .HL instruction, the values currently defined for the body of the document are used. It is recommended that you define the line spacing with the .HL instruction. Otherwise, the layout of the headers may differ on different pages.
For detailed information on the .HL instruction, see .HL - Header Lines.
For footnotes, separate values for line and character spacing can be defined. To do so, you must place the .LS and .CS instructions in a separate footnote block as shown in the example below:
.FN ON
.LS 060
.CS 120
.FN OFF
The values defined in the above footnote block apply to all footnotes that follow in your source text. Therefore, this block must occur before the first footnote that is to be output.
If you want to use other values for the next footnote, you have to place another footnote block before this footnote. The values defined in this footnote block are then valid for all following footnotes.
Note:
The concept of a separate footnote block for line and character
spacing is an exception. To define a different layout for the footnotes (for
example, left and right margins), you must still define it separately for each
footnote.
For detailed information on footnotes, see .FN - Footnote.