
You can view the current Entire Net-Work Server log file or start a new one. This document describes both processes.
 To view the log file for the Entire Net-Work Server:
Make sure you have accessed the System Management Hub.
Select the name of the managed host on which Entire Net-Work Server is installed.
Expand the tree-view frame for the managed host by clicking on the plus sign (+) to the left of its name.
Select "Entire Net-Work Server" in the tree-view under the managed host.
The Entire Net-Work Server administration area of the System Management Hub becomes available to you.
Expand Servers in tree-view, by clicking on the plus sign (+) to the left of its label.
The list of installed servers appears.
In tree-view, right-click on the name of the server whose log file you want to view and select command from the resulting drop-down menu.
The console log for the Entire Net-Work Server appears in detail-view.
You can close the current log file for an Entire Net-Work Server and start a new
one at any time. When you do this, the current log file
(wcp-svc.log) is saved under a new name and is cleared of
all log entries. The name of the renamed log file is assigned in the format
wcpnnnnn.log, where
nnnnn is an incremental number determined by the
number of the most recent log file that was renamed and saved. The log file
with the name that includes the highest number is the most recently saved log
file.
By default, Entire Net-Work Server log files are stored in the logsvc directory in one of the following locations:
In Windows 7 environments: ProgramData\Software AG\Entire
Net-Work Server\logsvc75
In Linux environments: $SAG\wcp\.
If you would like to specify the location in which server log files should be stored, read Specifying the Entire Net-Work Server Log File Location.
To start a new log file for the Entire Net-Work Server:
Make sure you have accessed the System Management Hub.
Select the name of the managed host on which Entire Net-Work Server is installed.
Expand the tree-view frame for the managed host by clicking on the plus sign (+) to the left of its name.
Select "Entire Net-Work Server" in the tree-view under the managed host.
The Entire Net-Work Server administration area of the System Management Hub becomes available to you.
Expand Servers in tree-view, by clicking on the plus sign (+) to the left of its label.
The list of installed servers appears.
In tree-view, right-click on the name of the server for which you want to start a new log file and select command from the resulting drop-down menu.
The Start New Log File panel appears in detail-view.

Click .
A new log file is started for the Entire Net-Work Server and the old one is closed.
You can specify the fully-qualified path of the directory in which log files should be stored. If you do not specify a log file location, the default location for server log files (the logsvc directory) will be used. This directory will be stored in one of the following locations:
In Windows 7 environments: ProgramData\Software AG\Entire
Net-Work Server\logsvc75
In Linux environments: $SAG\wcp\.
Note:
If you want to put your Entire Net-Work log files on a shared server,
read Directing Log Files to a Shared
Server. However, please be sure
that the directory name you specify for the log files for each server is
unique.
To specify the log file location:
Make sure you have accessed the System Management Hub.
Select the name of the managed host on which Entire Net-Work Server is installed.
Expand the tree-view frame for the managed host by clicking on the plus sign (+) to the left of its name.
Select "Entire Net-Work Server" in the tree-view under the managed host.
The Entire Net-Work Server administration area of the System Management Hub becomes available to you.
Expand Servers in tree-view, by clicking on the plus sign (+) to the left of its label.
The list of installed servers appears.
Select and right-click on the server. Then select the option from the resulting drop-down menu.
The Server Parameters panel appears in detail-view.
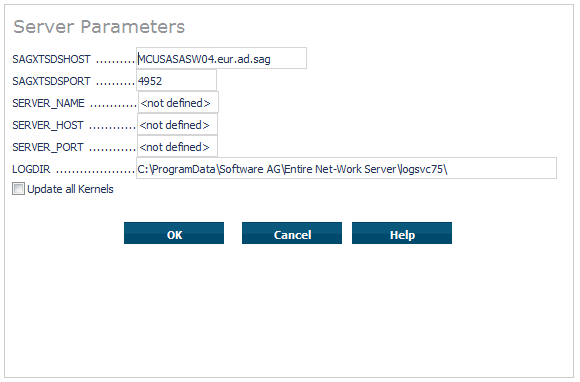
Specify the fully-qualified path of the directory in which you want log files stored in the LOGDIR parameter.
Optionally, select the Update all Kernels checkbox if you want all of the Kernel definitions defined for this server to have these parameters applied to them. If you do not select the Update all Kernels checkbox, only new Kernel definitions will have these parameters applied.
When all parameters are set as you want, click .
The Entire Net-Work Server parameters are updated.