The CONNX SQL Server module enables access
to SQL Server database objects through the Microsoft SQL Server driver.
CONNX has been tested with SQL Server 7.0 and SQL Server 2000. Refer to
the section on the CONNX SQL Server Database Module in the CONNX
User Reference Guide, which is available online, within the CONNX
product, and on the CONNX CD-ROM, for more information on the text boxes
required to import SQL database tables.
Note: SQL Server 7.0 can use OLE DB or ODBC provider connections.
During installation, click
Yes to install sample database
tables, or click the Start
button, and then point to All
Programs. Point to CONNX Sample Databases, and click
Build SQL Server Sample Data.
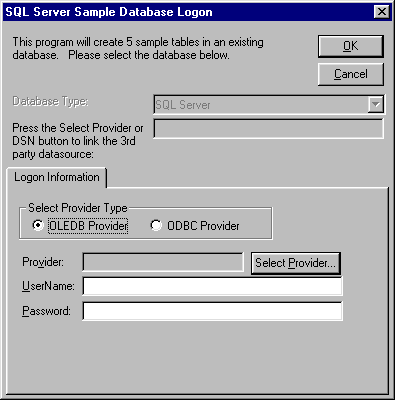
The SQL Server Sample Database Logon
dialog box appears. Select the OLEDB
Provider option under Logon
Information.

Click the Select Provider button.
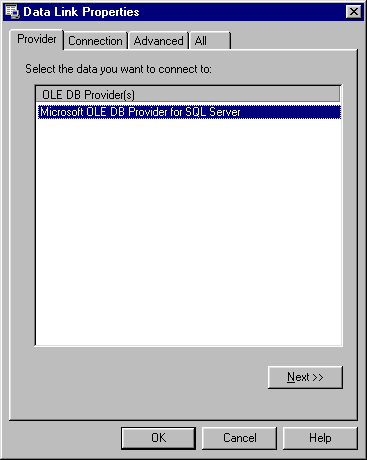
The Data
Link Properties dialog box appears. Select a SQL
Server OLE DB provider from the list.

Click the Next
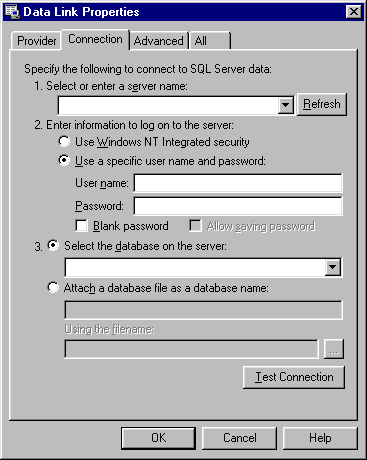
button, or select the Connection
tab, and then type a name of a SQL Server 7.0 host in which the sample
database tables are to be installed. Type a user name and password
for the SQL Server OLE DB data source provider in item 2.

Select a database/catalog in item 3. If Item 3 is left blank, the default catalog for the given user is used.
Click the Test Connection button to verify that the data source is available. Click the OK button.
The Data Link Properties dialog box appears. Click the OK button to return to the SQL Server Sample Database Logon dialog box.
The SQL Server Sample Database Logon dialog box appears. Type a user name and password for CONNX, and then click the OK button.
The samples are installed in the selected SQL Server data source table. You can refer to the sample tables in the post-installation stage by opening the CONNX Data Dictionary Manager window.