The following instructions describe installation procedures for CONNX Administrator and CONNX client components.
If
you have not done so already, open the email you received containing
the CONNX installation information and copy the license files from
the email to a shared location that all CONNX administrative computers
can access. The installation process will ask where the license files
are located in a later step; make a note of where you have saved the
files.
Download and run the installation
kit from Empower or use the download links if any were provided during
your maintenance renewal or evaluation period.
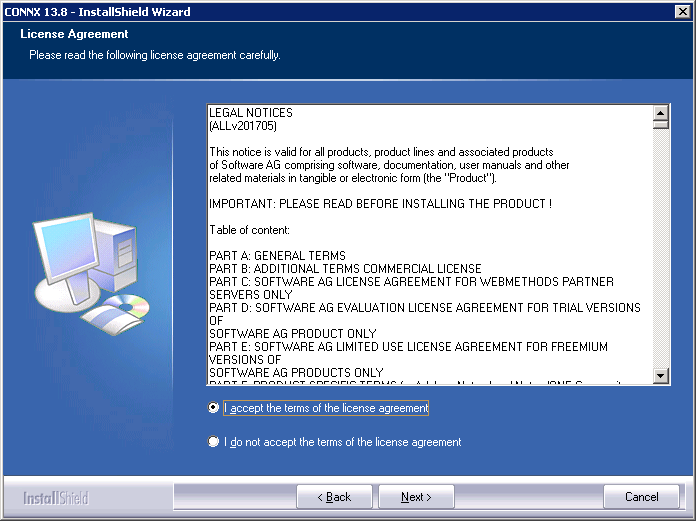
Click "I
accept the terms of the license agreement" radio button.. The Destination
Folders window appears. On 64-bit systems, you have the option
of selecting the location of the 32-bit, and 64-bit components separately.
On 32-bit systems, you will only have the option for selecting the
location of 32-bit components.
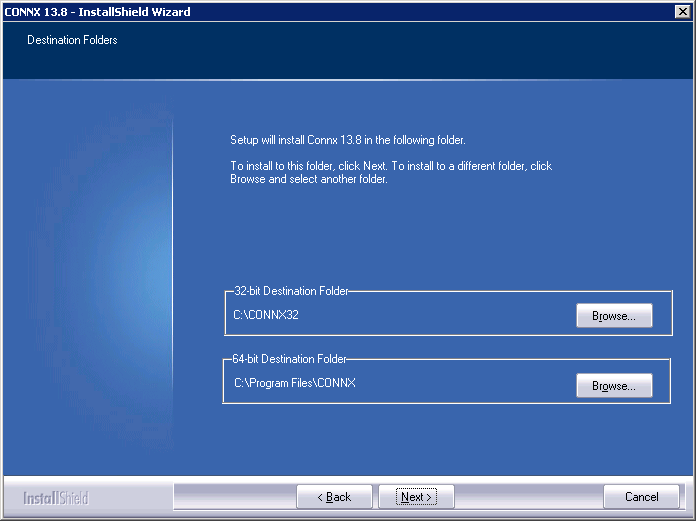
Click Next.
The License Server Information
window appears. If you already have a CONNX license server installed
on your network, specify the correct server name and port number.
The default port number for the CONNX license server is 7501. If you
want to install the license server locally on this computer, select
the appropriate radio button
Warning: The CONNX
License Server needs to be installed on the network one
time only, regardless of whether the user is on the LAN or
WAN or connected via VPN. If the CONNX License Server has already
been installed, simply specify the name of the license server and
the port number (default is 7501).
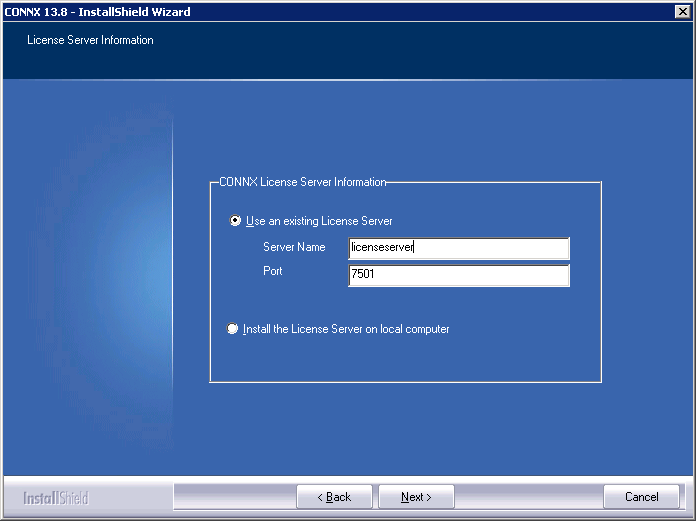
Click Next.
The Database Modules window
appears.
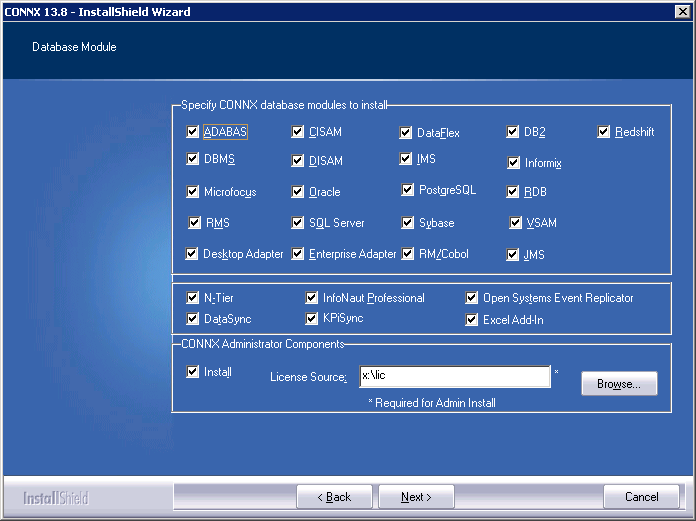
In Specify
CONNX database modules to install,
click the database modules you have purchased or are evaluating. You
must have a license file for each database module you select.
Select DataSync, InfoNaut Professional or N-Tier only if you purchased or are evaluating these
products. For more information on any of these products, contact your
CONNX sales representative.
Note: InfoNaut Lite is included
with all CONNX licenses. Select InfoNaut
Professional
only if you purchased or are evaluating this product.
In CONNX
Administrative Components, if you are installing CONNX on an
administrative computer, click Install
and enter the file path to that folder containing the license files
in License Source. This will
install the CONNX Data Dictionary tool and the License Administrator
program.
If you are not installing CONNX on an administrative computer, clear
Install.
Click Next.
The Select Components window appears.
Select the check boxes beside the CONNX components you want to install. A description of each component appears. Click the Change button to alter the sub-components.
Note: You can save drive space by
clearing the unused sub-component check boxes. CONNX
Components and Sub-Components below contains a list of the CONNX
components, sub-components, and component descriptions.
CONNX Components and Sub-Components
|
Component |
Description |
Subcomponents |
|
CONNX Client Driver
|
Required on all CONNX client machines. |
InfoNaut Query Tool CONNX ODBC Driver CONNX OLE Automation Object CONNX JDBC Components |
|
CONNX UNIX Client Driver |
Required on all unix based CONNX clint machines. |
CONNX ODBC Driver CONNX JDBC Components |
|
OpenVMS Server Components |
Required for Rdb, RMS, and DBMS databases. Must be installed on at least one administrator machine, and then transferred to an OpenVMS database server. |
CONNX OpenVMS Setup Alpha components VAX components Itanium components (RMS only) |
|
IMS Mainframe Server Components |
Required for access of IMS data on the mainframe. |
Setup Utility |
|
VSAM Mainframe Server Components |
Required for access of VSAM data on the mainframe. |
Setup Utility |
|
CONNX JDBC Server |
Must be installed on at least one machine if you use JDBC. |
CONNX JDBC Binaries |
|
UNIX Server Setup |
Required for access of Adabas, C-ISAM, DISAM, Micro Focus and RM/Cobol data on Linux/unix. |
Setup Utility for Adabas, C-ISAM, DISAM, Micro Focus and RM/Cobol |
|
CONNX Help and Samples |
For users who want to test different types of sample databases and front-end applications. Help files can be installed on both admin and client machines. |
CONNX Help Files Microsoft® Access® Sample CONNX OLE RPC Test Drive for VMS Data Dictionary Viewer Infonaut Lite |
|
CONNXStore Database Server |
Native CONNXStore database server (PostgreSQL for windows). Required for DataSync. Note: If DataSync was checked on the Database Module screen, CONNXStore will be installed and there will be no check box option for it on the component screen. |
|
|
CONNX Enterprise Server Service |
Allows datasources hosted on Windows to be accessed from other machines and operating systems |
|
|
Adabas Mainframe Components |
Required for access of Adabas data on the mainframe. |
Setup Utility |
|
InstantdbSync (Open Systems Event Replicator for Adabas customers) components |
Allows selection of individual InstantdbSync components. |
Installer for Unix components |
If you are installing
the Adabas Mainframe Components, scroll down to view the ADABAS Mainframe
Server Setup check box. Select the check box if you are installing
or updating the server components on the mainframe. This step only
has to be done once or when the server changes. If you will be installing
multiple clients later, it is not necessary to check the check box
during installation. For information on all Adabas installation configurations,
see Recommended
Configurations for the Adabas SQL Gateway (CONNX for Adabas).
Note: Install the CONNX client
components on each computer requiring data access. See Silent CONNX Client Installation.
You do not have to install the administrator component and JDBC server
components on machines requiring data access only.
Warning: For administrator
machines, ensure that both the CONNX client driver and the CONNX administrator
components are installed. The OpenVMS server components required for
Rdb, DBMS, and RMS databases must be installed on at least one administrator
machine and then transferred to the OpenVMS database server machine.
The server components need not be installed on client machines. See
CONNX
OpenVMS Installation Procedure for information on transferring
the server components to the server. For client machines requiring
data access only, select only the CONNX Client Driver component in
the Select Components window.
Warning: Do not select UNIX
Server Setup if you are using C-ISAM, DISAM, or Micro Focus on a Windows
platform.
Warning: Do not select Adabas
Mainframe Components if you are using Adabas on a Windows platform.
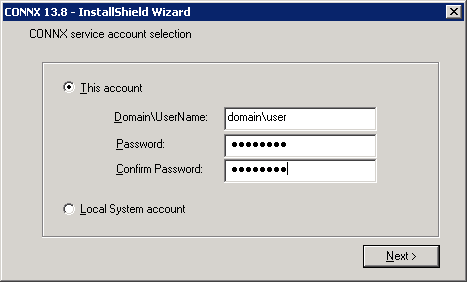
If you have selected the
CONNX JDBC Server Service, the Enterprise Server Service, the CONNX
Store Database Server Service, InstantdbSync, KPiSync or Install CONNX
License server on local computer, the CONNX
Service Account Selection dialog box appears. To have the services
run as a specific domain user, Select This
account and type a domain or user name in the Domain\UserName
text box in the format shown. Type a password in the Password
text box. To have the services run under the local system account,
select Local System account.
Click Next
and the installer will copy the files. When the copy process
has finished, an information message box appears stating that the
CONNX Server Setup programs are set to install the server components
that you have selected. Click OK.
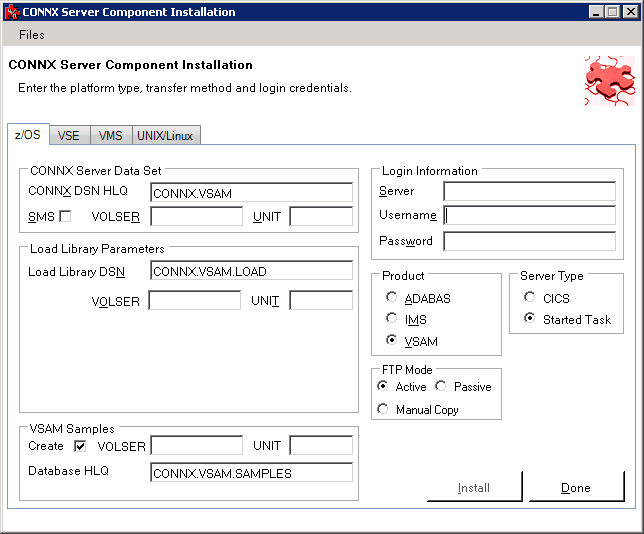
The CONNX Server Component Installation
window appears. See Step4
- Install CONNX OpenVMS Server, Step
5 - Install IBM Mainframe-Compatible Servers (includes Adabas
installation for these servers), Step
6 - Install Adabas SQL Gateway for Adabas UNIX installation),
or Step 7 - Install
C-ISAM, D-ISAM and Micro Focus Servers component on a UNIX machine
for more information on installing these server components.
If you selected Oracle,
DB2, C-ISAM, Informix, Sybase, ODBC, or OLE DB data sources in the
Database Modules window, a dialog box appears asking whether you want
to install sample database table.
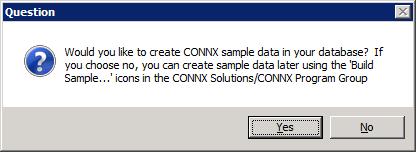
Click Yes to continue with
sample table installation through CONNX
Sample Database Logon dialog boxes. Click No
to continue with CONNX installation. You can install sample tables
for each of the listed databases at any time using the Build
Sample Database icons available in your program group.
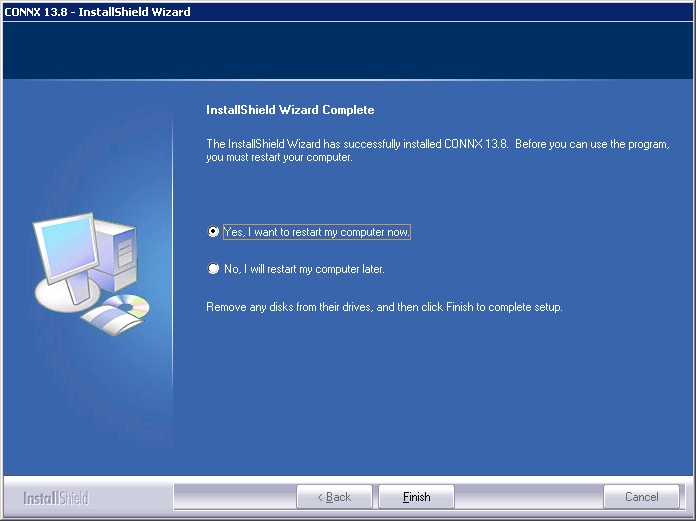
This completes the
preliminary CONNX installation procedures. If
you are prompted to reboot after the installation finishes, please
do so.