
Use the following procedure to install the CONNX OpenVMS server components. Before starting this procedure, be sure to review About the OpenVMS User Account and Password.
Select a computer on which the CONNX Administrator component is installed. Click the Start button, and then point to All Programs. Point to CONNX Driver and then click CONNX Server Setup. The CONNX Server Component Installation dialog box appears. Select the VMS tab on the CONNX Server Component Installation dialog box.
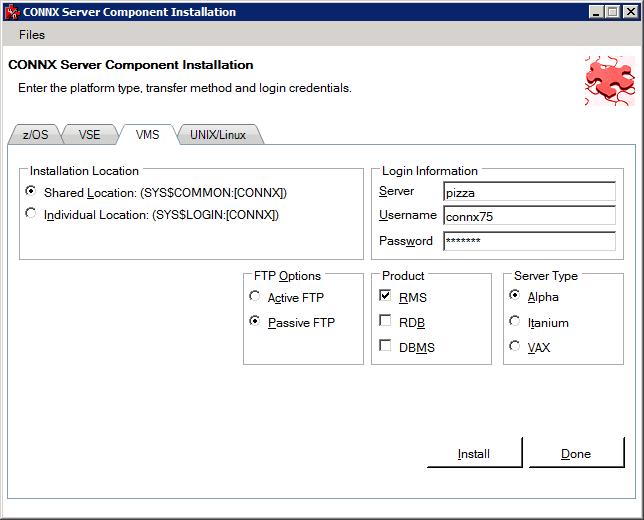
In the Installation Location frame, select whether this will be a shared or individual location.
Note: The Shared Location option can only be selected for an account that has WRITE and CREATE privileges in the SYS$COMMON directory.
Individual Location Account. Select this option for a single-user installation of CONNX. When this option is selected, the following occur on the OpenVMS server:
Directory Machine1:[NickD,CONNX] is created, where Machine 1is the server drive and NickD is the User Account name, and CONNX server installation files are copied from the administrator computer to this directory
Directory SYS$COMMON:[CONNX] is created and CONNX server installation files are copied from the administrator computer to this directory
CONNX files are copied from the administrator computer to SYS$LIBRARY
Shared Location Account. Select this option for CONNX multi-user and demo installations. When this option is selected, the following occur on the OpenVMS server:
Directory SYS$COMMON:[,CONNX] is created and CONNX server installation files are copied from the administrator computer to this directory
CONNX files are copied from the administrator computer to SYS$LIBRARY
Login Information. Type the VMS Server Name for the OpenVMS server in the Server text box, a privileged user account name in the User ID text box, and its password in the Password text box.
Product. Select the database(s) for which you have licenses.
Server Type. Select the server type on which your OpenVMS system resides.
Click the Install button. Allow several minutes for the file transfer process between the CONNX administrator computer and the OpenVMS server. After the transfer process is complete, the Installation Successful dialog box appears.
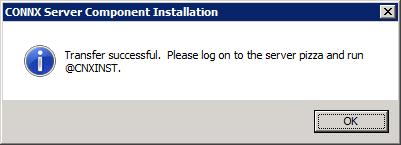
Click the OK button. The Installation Successful dialog box closes. The CONNX server files have been successfully copied to the OpenVMS server. Click the Close button.
On the CONNX administrator computer, start a terminal emulator and log into the account used to copy files to the server. The $ prompt appears.
After the $ prompt, type @cnxinst.com and then press <Enter>. The monitor displays installation results from the cnxinst.com command. For example, if you are installing Rdb, a successful installation displays:
CONNX for Rdb has installed successfully!
If there are problems, an unsuccessful installation displays:
The CONNX Server setup did NOT complete successfully.
Note: If the installation fails for an Individual Location accout, you have insufficient privileges to perform these actions. In this case, continue with the Individual Account installation and, when finished, have your OpenVMS system administrator perform the License File Only procedure.
Note: If the procedure fails for a Shared Location account, it means the user account has insufficient access privileges. Either change the access privileges for this user account or select a user account with sufficient privileges.
After the cnxinst.com execution is complete (allow several minutes), the $ prompt is returned. If the installation was unsuccessful, you may have used a user name with insufficient privileges. Choose another user name and try the installation again.
Review the CNXSETUP.LOG file to analyze the installation results. To do this, after the $ prompt, type edit/edt CNXSETUP.LOG and press <Enter>.
After the * character, type c and then press <Enter> for a full window display. Use the arrow keys to scroll through the file
Look for a string of *** characters that appear around the installation messages; for example, if the installation was successful, look for
$ write cnx$screen “********************************************”
$ write sys$output “CONNX for RMS has installed successfully!”
$ write cnx$screen “********************************************”
$ write sys$output “The CONNX Server setup did NOT complete successfully.”
Note: You can transfer the CNXSETUP.LOG to your computer for analysis. See Reviewing CNXSETUP.LOG Using FTP -- TCP/IP.
Disconnect and close the terminal emulator.
Continue by testing the
OpenVMS server installation. See Testing
the OpenVMS Server Installation.
Tip: If an error message appears,
check your entries for OpenVMS server name, user account name, and
password, then try again.