
This document describes how to use the Event Replicator Target Adapter Administration. It covers the following topics:
About the Event Replicator Target Adapter Administration Tool
Activating Your Event Replicator Target Adapter or Adabas Analytics Collector MF License
Maintaining the Event Replicator Target Adapter Engine Configuration
Maintaining the Event Replicator Target Adapter Repository Configuration
Configuring Target Definitions for Event Replicator Target Adapter
Configuring Target Definitions for Adabas Analytics Collector MF
Configuring Source Definitions for Event Replicator Target Adapter
Configuring Source Definitions for Adabas Analytics Collector MF
This section describes how to start and stop the Event Replicator Target Adapter Administration tool as well as the major features of the Event Replicator Target Adapter Administration tool interface. It covers the following topics:
Note:
The Event Replicator Target Adapter must be stopped and restarted every time an Event Replicator Target Adapter
definition is saved or deleted using the Administration tool. For this reason,
we recommend that you shut down the Event Replicator Target Adapter prior to making changes to the
definitions and restart the Event Replicator Target Adapter when all definition changes are complete. For
information about stopping and starting the Event Replicator Target Adapter, read
Shutting Down the
Event Replicator Target Adapter and Starting the
Event Replicator Target Adapter.
Refer to the section Supported Operating System Platforms in Installing Event Replicator Target Adapter Administration for details.
The Administration tool runs in both Windows and UNIX environments.
 To start the Administration tool in Windows using the Windows
Start menu, complete the following steps:
To start the Administration tool in Windows using the Windows
Start menu, complete the following steps:
From the Windows Start menu, select .
Select , where <installation-directory> is the name of the directory in which you installed Event Replicator Target Adapter Administration. The default installation directory is .
Select .
Select , where v.r represent the version and release number of the Event Replicator Target Adapter.
Select .
The Administration tool starts up.
Important:
Before you can use the Administration tool, you
must set preferences that identify where the Event Replicator Target Adapter definitions should be
stored, the locations of the startup and shutdown commands for the Event Replicator Target Adapter, and
the location of the Event Replicator Target Adapter log files. For more information, read
Setting Configuration File and Target
Adapter Preferences.
To start the Administration tool in Windows using the
administration.bat file, complete the following
steps:
Navigate to the following directory: <installation-dir>/EventReplicatorTargetAdapterAdministration/bin, where <installation-dir> is the name of the directory in which the Event Replicator Target Adapter Administration program files were installed.
Run the administration.bat file.
The Administration tool starts up.
Important:
Before you can use the Administration tool, you
must set preferences that identify where the Event Replicator Target Adapter definitions should be
stored, the locations of the startup and shutdown commands for the Event Replicator Target Adapter, and
the location of the Event Replicator Target Adapter log files. For more information, read
Setting Configuration File and Target
Adapter Preferences.
To start the Administration tool in UNIX, complete the
following steps:
Navigate to the following directory: <installation-dir>\bin, where <installation-dir> is the name of the directory in which the Event Replicator Target Adapter Administration program files were installed.
Source file sagenv.new to establish your environment variables by entering:
. ./sagenv.new
Run the administration.sh file.
The Administration tool starts up.
Important:
Before you can use the Administration tool, you
must set preferences that identify where the Event Replicator Target Adapter definitions should be
stored, the locations of the startup and shutdown commands for the Event Replicator Target Adapter, and
the location of the Event Replicator Target Adapter log files. For more information, read
Setting Configuration File and Target
Adapter Preferences.
This section describes how to shut down the Administration tool in Windows environments. At this time, the Administration tool only runs in Windows environments.
The simplest way of stopping the Administration tool is to shut down (kill) the window in which it runs.
To shut down Event Replicator Target Adapter from the Administration tool:
Select the command from the menu.
The Administration Tool shuts down.
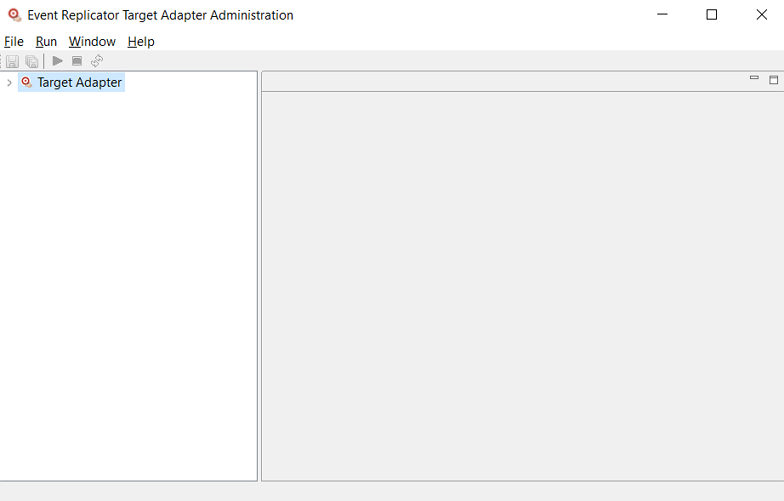
When you first start up the Administration tool, the main window displays.
To access the preferences area of the Administration
tool:
Start the Administration tool, as described in Starting the Administration Tool
The Administration tool main window appears.
Select the option from the menu.
The Preferences dialog appears. By default, the configuration file preferences are shown:
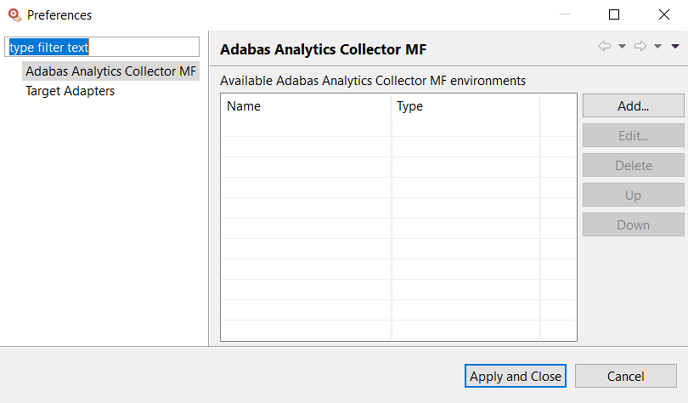
Modify the Target Adapter environments with the commands described in the following table, if necessary:
| Command | Description |
|---|---|
| Add | Add an existing Target Adapter environment to the Administration control. |
| Edit | Edit the Target Adapter properties. |
| Delete | Delete the Target Adapter
environment from the Administration control.
Note: |
|
Tip: |
|
| Up | Move Target Adapter one position up in the Preferences Tree View. |
| Down | Move Target Adapter one position down in the Preferences Tree View. |
Modify the Adabas Analytics Collector MF environments with the commands described in the following table, if necessary:
| Command | Description |
|---|---|
| Add | Add an existing Adabas Analytics Collector MF environment to the Administration control. |
| Edit | Edit the Adabas Analytics Collector MF properties. |
| Delete | Delete the Adabas Analytics Collector MF environment
from the Administration control.
Note: |
|
Tip: |
|
| Up | Move Adabas Analytics Collector MF one position up in the Preferences Tree View. |
| Down | Move Adabas Analytics Collector MF one position down in the Preferences Tree View. |
The configuration file preferences identify, among other things, the location of the configuration files used by the Event Replicator Target Adapter and Adabas Analytics Collector MF you will set up using the Administration tool. The Target Adapter preferences identify the locations of the Event Replicator Target Adapter startup and shutdown commands as well as the location of its log files; the Adabas Analytics Collector MF preferences identify the location of its configuration file.
Note:
Event Replicator Target Adapter Administration cannot start and stop the collector, only set its
configuration.
If the configuration file preferences are not supplied, you cannot set the preferences.
| Warning: We do not recommend that you alter Event Replicator Target Adapter definitions in the context.xml file using a text editor or any editor other than the Event Replicator Target Adapter Administration tool. If you do, errors may result. |
To set configuration file and Target Adapter preferences:
Access the preferences area, as described in Accessing the Preferences Area
The Preferences dialog appears.
Select Target Adapter on the left side of the Preferences dialog.
Select the Target Adapter environment.
Click on the button.
The preferences appear on the pop-up dialog.
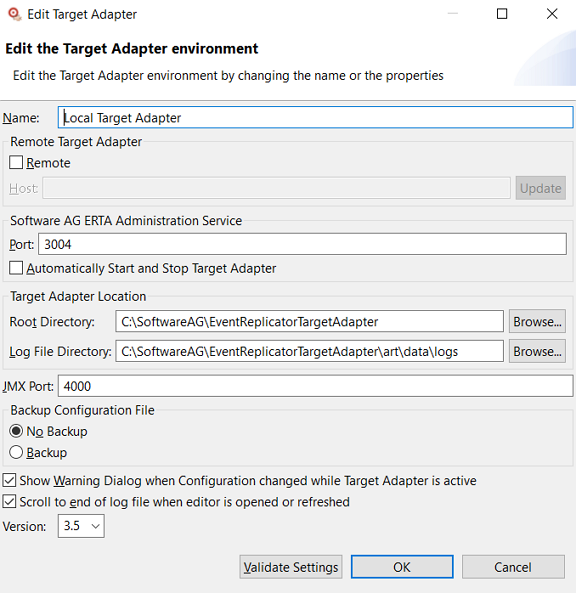
Modify the preferences as described in the following table, if necessary:
Click to validate the Target Adapter settings:

Click to apply the updates and close the Preferences dialog. No validation is performed; you should validate settings before closing.
Click to close the Preferences dialog without update
To set configuration file and Adabas Analytics Collector MF preferences:
Access the preferences area, as described in Accessing the Preferences Area
The Preferences dialog appears.
Click on the button.
The preferences appear on the pop-up dialog.

Modify the preferences as described in the following table, if necessary:
Click to validate the Adabas Analytics Collector MF settings:

Click to apply the updates and close the Preferences dialog. No validation is performed; you should validate settings before closing.
Click to close the Preferences dialog without update
Each Target Adapter and Adabas Analytics Collector MF node appears in the tree view under the corresponding parent node:
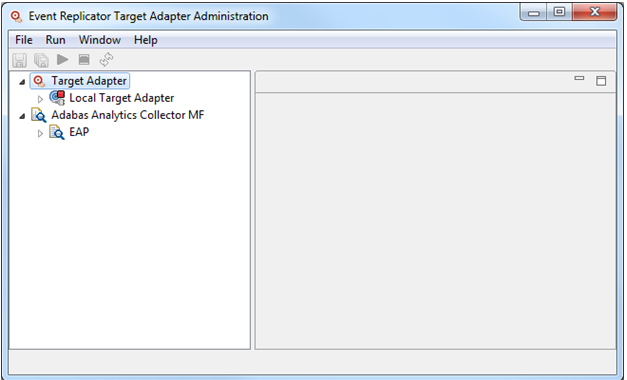
The current status of Target Adapter nodes are indicated by an icon.
The icons are described in the following table:
|
|
The Target Adapter is running. |
|
|
The Target Adapter is stopped. |
|
|
The Target Adapter is coming up. |
|
|
The Target Adapter is going down. |
|
|
Checking the state of the Target Adapter. |
|
|
The Target Adapter has an error. Perform in the Preferences to check for a cause. |
Note:
The display only shows the running status of Target Adapter
instances. It does not show the status of any Adabas Analytics Collector MF instances, only the
configuration file settings.
The Administration tool main window has four menus. The commands on each menu are described in the following table:
| Menu | Menu Item (Command) | Description |
|---|---|---|
|
The submenu depends on the selected node. The following is applicable for a Target Adapter Node. Allows you to create a new definition. When you select the command, a submenu appears from which you can select the type of definition you would like to create:
The following is applicable for an Adabas Analytics Collector MF Node.
|
||
| Allows you to close the definition you have currently selected in the Administration tool. If the definition has not been saved, you will be prompted to save it. | ||
| Allows you to close all open definitions in the Administration tool. If any definition has not been saved, you are prompted to save them. | ||
| Allows you to open an existing definition in the Administration tool. | ||
Saves the definition you have
currently selected in the Administration tool. If no name has been specified
for a new definition, you are prompted for one. You can also click the
 button on the toolbar to do
this. button on the toolbar to do
this.
|
||
Saves all the definitions you
currently have open in the Administration tool. If a name has not been
specified for one or more definition, you are prompted for them. You can also
click the  button on the toolbar to
do this. button on the toolbar to
do this.
|
||
| Refreshes the definitions in the Administration tool, based on the definitions stored in the currently saved configuration file. You can also press the F5 key to refresh the definitions. | ||
| Shuts down the Administration tool. | ||
|
Only applicable for Target Adapter nodes |
Starts the Event Replicator Target Adapter. You can also click
the  button on the toolbar to do
this. button on the toolbar to do
this.
|
|
Stops the Event Replicator Target Adapter. You can also click
the  button on the toolbar to do
this. button on the toolbar to do
this.
|
||
Stops and restarts the Event Replicator Target Adapter. You can
also click the  button on the
toolbar to do this. button on the
toolbar to do this.
|
||
| Allows you to set configuration file and target adapter preferences for the Administration tool. | ||
| Gives you access to the online help system shipped with the Administration tool. | ||
| Allows you to search the online help system shipped with the Administration tool. | ||
| Displays information about the Administration tool you have installed. |
The Administration tool main window has four buttons on its toolbar. The buttons are described in the following table:
| Button | Description |
|---|---|
|
Saves the definition you have currently selected in the Administration tool. If no name has been specified for a new definition, you are prompted for one. You can also select the command on the menu to do this. |
|
Saves all the definitions you currently have open in the Administration tool. If a name has not been specified for one or more definition, you are prompted for them. You can also select the command on the menu to do this. |
|
Starts the Event Replicator Target Adapter. You can also select the command on the menu to do this. |
|
Stops the Event Replicator Target Adapter. You can also select the command on the menu to do this. |
|
Stops and restarts the Event Replicator Target Adapter. You can also select the command on the menu to do this. |
The Administration tool help through the menu. In addition, you can get information about the version of the Administration tool you have installed by selecting the option on the menu.
Tool tip help is available for some items within the Administration tool, including toolbar buttons and menu items.
To use tool tip help, simply allow your mouse cursor to rest momentarily over an item for which you would like help. For example, resting the mouse cursor over a toolbar button will display a tool tip that describes a button.
Click option on the menu to access the online help for the Administration tool. A browser opens to the documentation overview screen, allowing you to browse help by topic or search for a specific help topic by clicking Search.
WithEvent Replicator Target Adapter, a license key is not required during installation. Further, since licenses are target specific, you may have been provided with more than one license key file, depending on the terms of your license. With the Event Replicator Target Adapter Administration you can manage your license keys.
Notes:
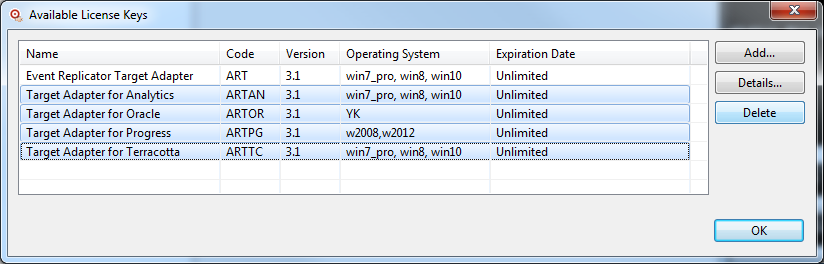
Right click on the appropriate Target Adapter node and select the item :
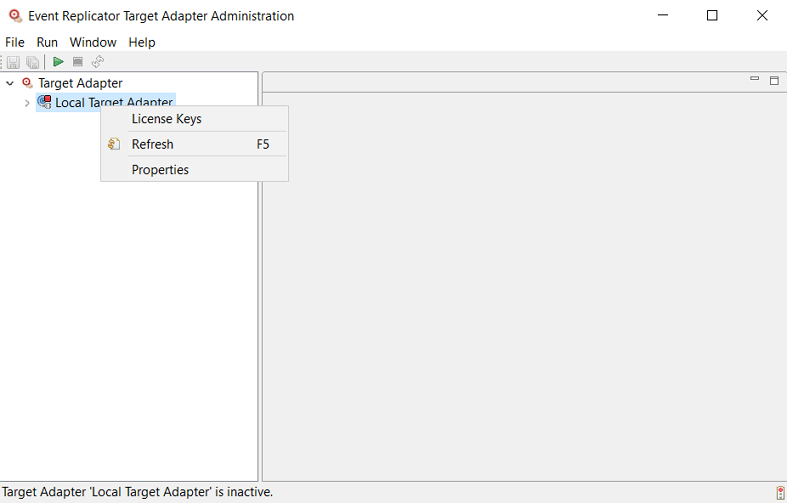
The following dialog is displayed:
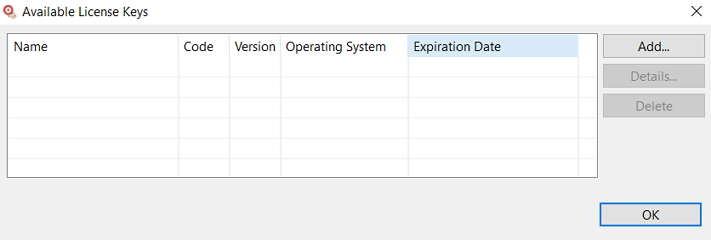
To add new licenses
Click on the "Add…" button
Browse to the location where you have stored your license key(s)
Select the license file(s) you want to add and click "Open"
The following screen appears:
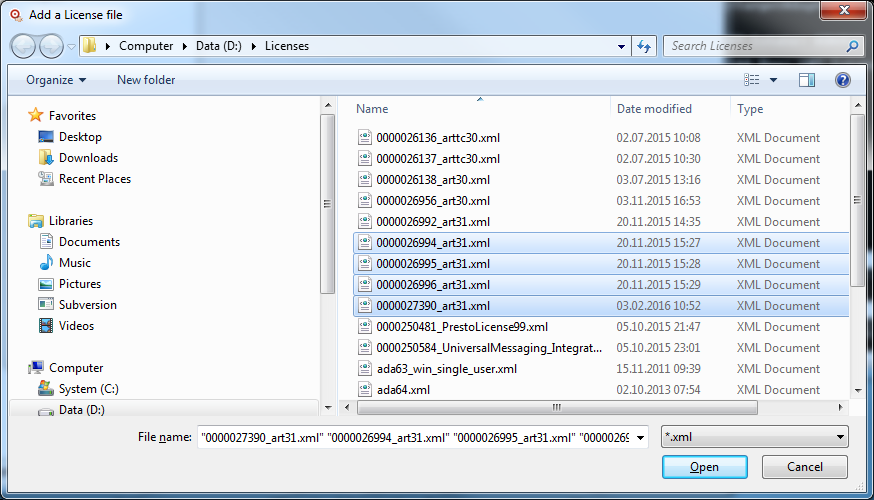
Note:
It is possible to select more than one license key file at a
time!
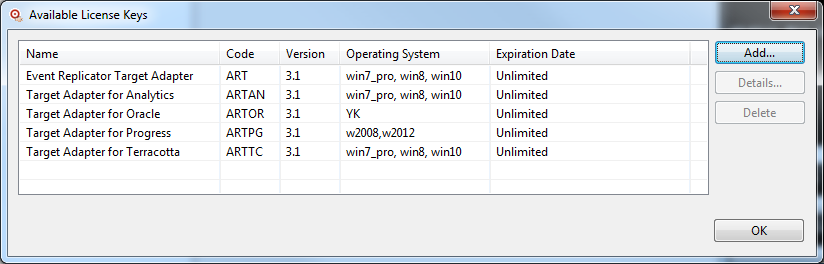
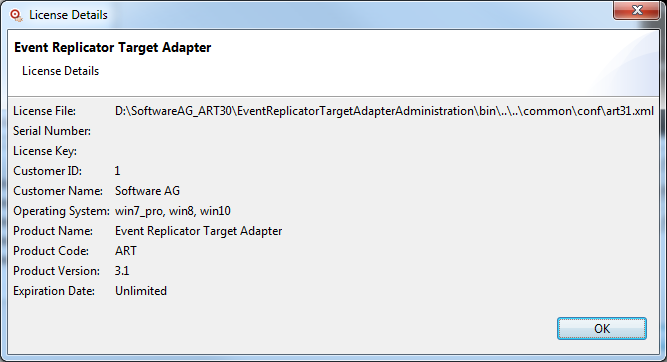
To view the details of an activated license, select the license you want to view and press the "Details…" button:
The following screen appears:
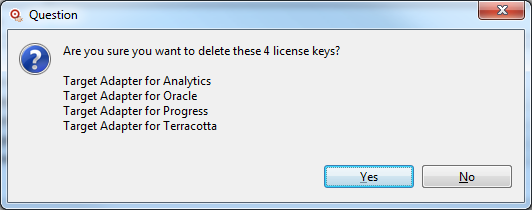
To delete license keys:
Select the license(s) to be deleted and press the "Delete" button:
The following screen appears:
and confirm your decision to delete your selected license key(s):
Note:
Changes you make to the engine configuration require that the
Event Replicator Target Adapter be restarted. For information about restarting the Event Replicator Target Adapter,
read
Restarting the
Event Replicator Target Adapter.
To modify the Event Replicator Target Adapter engine configuration, complete the
following steps:
Start up the Administration tool, as described in Starting the Administration Tool.
The Administration tool window appears.
On the left side of the Administration tool window, expand the Configuration File section and then expand the Configurations section.
The Event Replicator Target Adapter engine and Repository configurations are listed under Configurations.
Double-click on Engine .
The Engine Configuration panel appears on the right side of the window, as shown below:
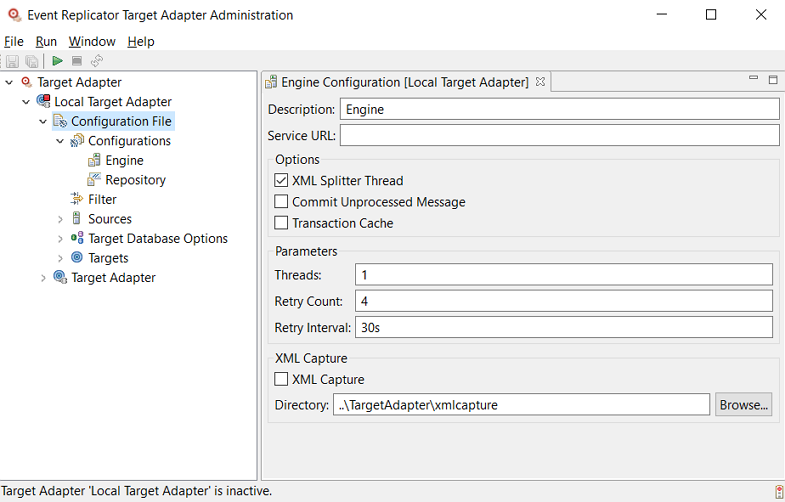
Verify and update the values on the Engine Configuration panel, as described in the following table:
Once all fields have been specified satisfactorily, click
the button () on the toolbar to save the engine
configuration.
Or:
Select the command on the
menu of the Administration tool.
The configuration is saved in the context file for the Event Replicator Target Adapter.
The Event Replicator Target Adapter repository is used as a persistent store to save:
information sent to it by the Event Replicator Server
generated XSLT files.
Using the Event Replicator Target Adapter Administration tool, you can maintain the settings for the persistent store.
Note:
Changes you make to the repository configuration require that
the Event Replicator Target Adapter be restarted. For information about restarting the Event Replicator Target
Adapter, read
Restarting the
Event Replicator Target Adapter.
To modify the repository (persistent store) configuration,
complete the following steps:
Start up the Administration tool, as described in Starting the Administration Tool.
The Administration tool window appears.
On the left side of the Administration tool window, expand the Configuration File section and then expand the Configurations section.
The Event Replicator Target Adapter engine and repository configurations are listed under Configurations.
Double-click on Repository .
The WebDAV Configuration panel appears on the right side of the window, as shown below:
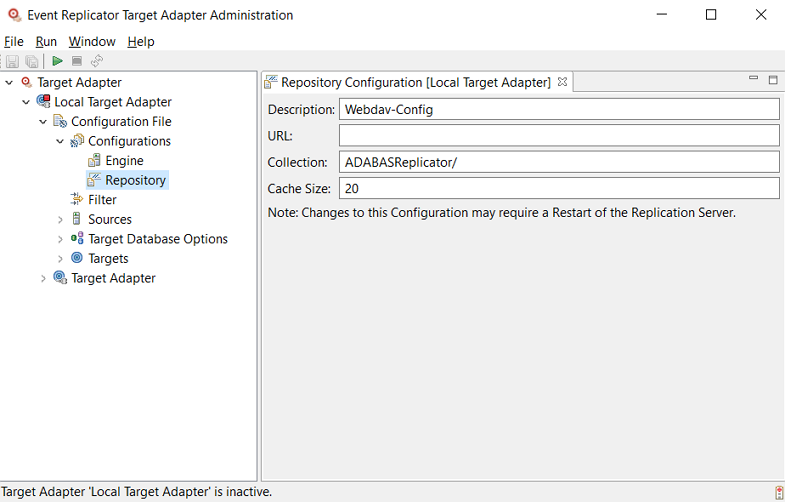
Verify and update the values on the WebDAV Configuration panel, as described in the following table:
Once all fields have been specified satisfactorily, click
the button () on the toolbar to save the WebDAV
configuration.
Or:
Select the command on the
menu of the Administration tool.
Note:
Changes to this configuration may require a restart of
the Event Replicator Target Adapter. For more information, read Restarting the
Event Replicator Target Adapter.
The configuration is saved in the context file for the Event Replicator Target Adapter.
The Event Replicator Target Adapter supports several types of targets to which replicated data can be submitted: JMS, RDBMS databases, Adabas, Terracotta (caches and database server) and web services. Before you can use the Event Replicator Target Adapter, you must set up a target definition for every unique target you intend to use for the replicated data the Event Replicator Target Adapter processes. These definitions provide Event Replicator Target Adapter with the information it needs to access your target and to communicate with Event Replicator for Adabas via webMethods EntireX or WebSphere MQ.
This section covers the following topics:
Notes:
You must define target definitions for each unique RDBMS database you intend to use with the Event Replicator Target Adapter prior to using Event Replicator Target Adapter. These definitions will provide Event Replicator Target Adapter with the information it needs to access your RDBMS and to communicate with Event Replicator for Adabas via webMethods EntireX or WebSphere MQ.
Note:
Do not copy the context.xml,
server.xml, or any configuration file from an older
installation and expect it to work for this installation. Errors will result if
you try this.
To define a target definition for an RDBMS database:
Make sure you have completed all of the installation instructions specific to your RDBMS, as described in one of the following sections:
Start up the Administration tool, as described in Starting the Administration Tool.
The Administration tool window appears.
On the left side of the Administration tool window, expand the Configuration File section and then the Targets section.
The high-level categorizations of the target definitions appear.
Right-click on the Databases categorization and select from the drop-down menu.
Or:
Select the command from the
menu and then from the resulting submenu.
An untitled RDBMS database definition panel appears on the right side of the Administration tool window, as shown below:
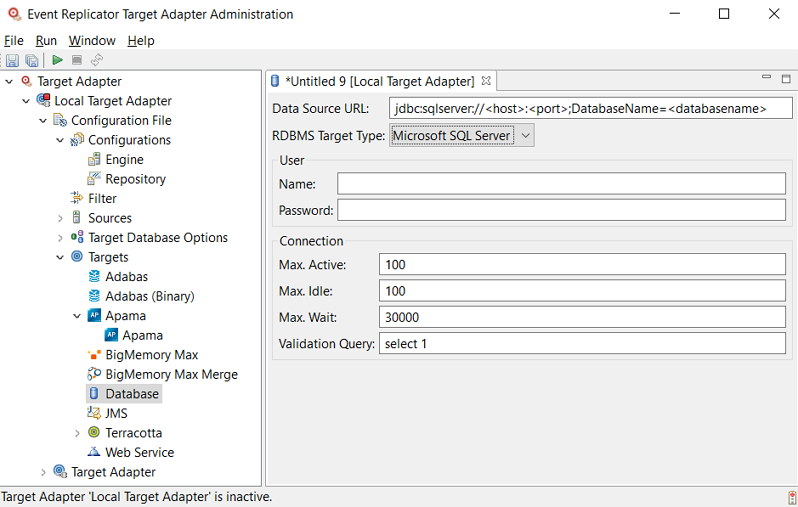
Supply valid values for the RDBMS database installed at your site. The database fields are described here.
- Data Source URL
Use this parameter to identify the fully qualified URL of the RDBMS database that should be used by Event Replicator Target Adapter.
Note:
The first database type shown in the RDBMS Target Type field affects the template shown in the Data Source URL field.The following table provides the URL format that should be used for the different relational databases supported by Event Replicator Target Adapter:
RDBMS Type Data Source URL Format DB2 Replace hostname with the name of the host machine on which DB2 is installed, port with the DB2 listening port (the default is 50000), and instance with the case-sensitive name of the DB2 database instance you created in the installation steps for DB2 (read Installation Considerations for DB2 ).
DB2 on z/OS Replace hostname with the name of the host machine on which DB2 for z/OS is installed, port with the DB2 for z/OS listening port, and instance with the case-sensitive name of the DB2 database instance you created in the installation steps for DB2 for z/OS (read Installation Considerations for DB2 on z/OS).
Microsoft SQL Server Replace hostname with the name of the host machine on which Microsoft SQL Server is installed, port with the SQL Server listening port (the default is 1433), and dbname with the case-sensitive name of the Event Replicator Target Adapter database you created in the installation steps for Microsoft SQL Server (read Installation Considerations for Microsoft SQL Server).
Note:
Note that named SQL Server instances are allowed and supported. Every instance (named or default) must run on a different port. With Event Replicator Target Adapter 2.7 hotfix 3 and later releases, when you specify an instance name, it takes precedence over any port number you might also supply; with earlier releases of the Event Replicator Target Adapter, the port number takes precedence over the instance name. If neither an instance name or port number is provided, the default port 1433 will be assumed. According to Microsoft, however, optimal performance is obtained by specifying the port number without the instance name. See Microsoft connection URL documentation https://docs.microsoft.com/en-us/sql/connect/jdbc/building-the-connection-url for details. So the safest and fastest way to specify the URL for named instances that will work even using the bulk loader is using the hostname:port syntax.MySQL Replace hostname with the name of the host machine on which MySQL is installed, port with the MySQL listening port (the default is 3306), and instance with the case-sensitive name of the MySQL database instance you created in the installation steps for MySQL (read Installation Considerations for MySQL ).
Oracle Replace hostname with the name of the host machine on which Oracle is installed, port with the port number for the database (the default is 1521), and instance with the Oracle database instance name you created in the installation steps for Oracle (read Installation Considerations for Oracle).
PostgreSQL jdbc:postgresql://hostname:port/databasename
Replace hostname with the name of the host machine on which PostgreSQL is installed, port with the PostgreSQL listening port (the default is 5432), and database-name with the case-sensitive name of the PostgreSQL database you created in the installation steps for PostgreSQL (read Installation Considerations for PostgreSQL).
Teradata Replace hostname with the name of the host machine on which Teradata is installed, dbname with the name of the Teradata database catalog you want to use, and port with the Teradata listening port (read Installation Considerations for Teradata).
Optionally, if you have applied an Event Replicator Target Adapter hot fix that provides support for UTF-8 characters in Teradata databases, you can specify the "CHARSET=utf8" parameter to indicate that you will be loading UTF-8 data to the database. For more information about the hot fixes that support this, refer to the README file provided with Event Replicator Target Adapter.
- RDBMS Target Type
Identifies the type of the RDBMS. The following table provides the driver class value that should be used for the different relational databases supported by Event Replicator Target Adapter:
RDBMS Type Driver Class Value DB2 DB2 on z/OS Microsoft SQL Server MySQL Oracle PostgreSQL Teradata Note:
Teradata RDBMS versions prior to version 12 will no longer be supported in future versions of the Event Replicator Target Adapter.- Name
Specify a user name with authorization to access the database.
- Password
Specify the password associated with the user name.
Supply the connection parameters:
- Max. Active
Specify the maximum number of active connections provided by the connection pool. Enter the number of maximum anticipated concurrent connections to the target. As a guide, you should enter a number equivalent to the number of Event Replicator sources that may at any one time be providing replicated data to this target.
- Max. Idle
Specify the maximum number of idle connections in the connection pool. Usually this number is set to the same as Max. Active.
- Max. Wait
Specify the time (in milliseconds) that Event Replicator will wait for an available connection from the connection pool.
- Validation Query
The SQL query used to validate the connection. The default is determined by the target type. We recommend not changing this value from the default.
Once all fields have been specified satisfactorily, click
the button () on the toolbar to save the target database
definition.
Or:
Select the command on the
menu of the Administration tool.
A Save As pop-up window appears.
Specify the name of the new target definition on the Save As pop-up window and then click the button.
The definition is saved in the context file for the Event Replicator Target Adapter.
You can configure the Event Replicator Target Adapter to stream replicated data from the Event Replicator to a JMS topic or queue managed by a JMS provider that supports the "Java Naming and Directory Interface" (JNDI). To do this, you must create a target definition for each unique JMS topic or queue with which you want Event Replicator Target Adapter to interact.
To set up a JMS target definition for the Event Replicator Target Adapter, complete the
following steps:
You must have a JMS target or queue created that is designed to handle the replicated data. For information on setting this up, consult the JMS provider documentation.
Start up the Administration tool, as described in Starting the Administration Tool.
The Administration tool window appears.
On the left side of the Administration tool window, expand the Configuration File section and then the Targets section.
The high-level categorizations of the target definitions appear.
Right-click on the JMS categorization and select from the drop-down menu.
Or:
Select the command from the
menu and then
from the resulting submenu.
An untitled JMS target definition panel appears on the right side of the Administration tool window, as shown below:
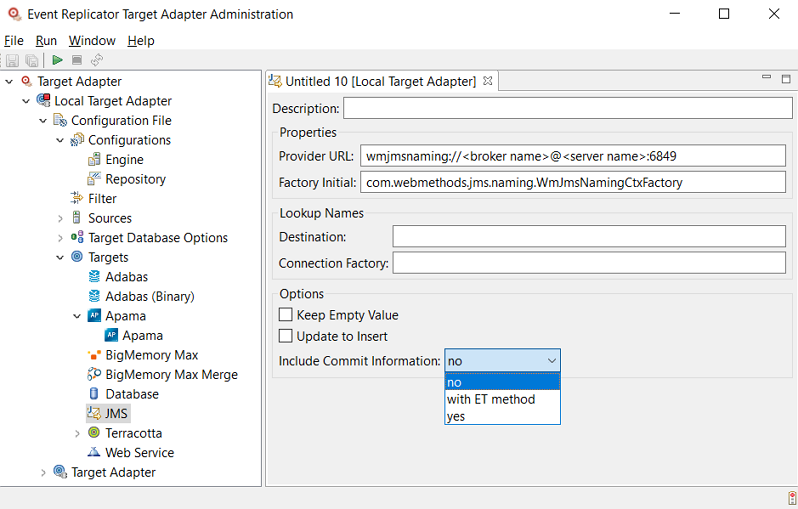
Supply valid values for the JMS queue or topic. The JMS fields are described here.
| Field Name | Value | ||
|---|---|---|---|
| Description | Type a description for this target definition. | ||
| Provider URL | Supply the fully-qualified URL of the initial context of the JNDI provider in which the JMS-administered objects should be stored by the Event Replicator Target Adapter. This JNDI provider must be managed by the JMS provider. | ||
| Factory Initial | The class name of the JNDI factory. This JNDI factory must be managed by the JMS provider. | ||
| Destination | Supply the lookup name of the destination. This is either the name of the JMS topic or the JMS queue, as defined by the JMS provider. | ||
| Connection Factory | Supply the name of the topic (publish-subscribe) or queue (point-to-point) connection factory to be used, as defined by the JMS provider. | ||
| Keep Empty Value |
Select this option (check it) to indicate that all values of periodic (PE) fields or multiple-value (MU) fields within PE fields should be replicated, even if they are empty. If this option is NOT selected, only non-empty values of PE fields or MU fields within PE fields are replicated. This option is only available for JMS targets when running the Event Replicator with OPTIONS=32 on the mainframe. |
||
| Update to Insert |
Select this option (check it) to indicate that update commands should be converted to insert commands. When this option is selected, the Event Replicator Target Adapter first issues a delete of the existing row if it exists and then inserts a new row with the changed information instead of issuing an update command. To use this feature, the mainframe replication OPTIONS parameter specified in the destination class parameter data (DCLASSPARM parameter) must be set to 32 (OPTIONS=32). For more information read DCLASSPARM Parameter.
The default is to leave this option unchecked (unselected). Note: |
||
| Include Commit Information |
Select an option from the drop-down menu on whether and how to include Adabas commit time information in the replicated data for all processed transactions.
|
Once all fields have been specified satisfactorily, click
the button () on the toolbar to save the target JMS
definition.
Or:
Select the command on the
menu of the Administration tool.
A Save As pop-up window appears.
Specify the name of the new target definition on the Save As pop-up window and then click the button.
The definition is saved in the context file for the Event Replicator Target Adapter.
You can configure the Event Replicator Target Adapter to stream replicated data from the Event Replicator to a BigMemory Max cache. To do this, you must create a target definition for a BigMemory Max environment with which you want Event Replicator Target Adapter to interact. The Event Replicator Target Adapter offers two different BigMemory Max targets: "BigMemory Max" and "BigMemory Max Merge". "BigMemory Max" replicates an Adabas file to a BigMemory Max cache. "BigMemory Max Merge" has the ability, but is also able to merge multiple Adabas files to one cache via a single key.
To set up a BigMemory Max target definition for the Event
Replicator Target Adapter, complete the following steps:
You must have a BigMemory Max environment that is designed to handle the replicated data. For information on setting this up in BigMemory Max, read Terracotta documentation on Software AG's Empower web site.
Start up the Administration tool, as described in Starting the Administration Tool.
On the left side of the Administration tool window, expand the Configuration File section and then the Targets section.
The high-level categorizations of the target definitions appear.
Right-click on the BigMemory Max categorization and select New from the drop-down menu.
Or:
Select the New command from the File menu and then BigMemory Max Target from the resulting submenu.
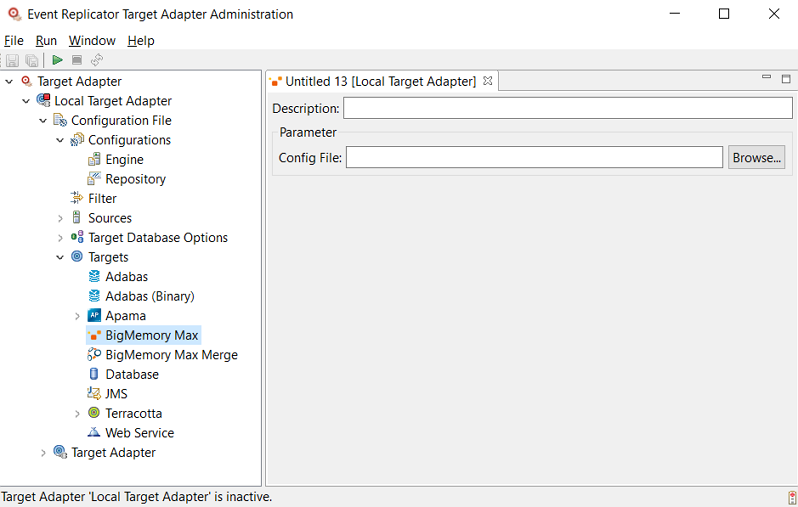
An untitled BigMemory Max target definition panel appears on the right side of the Administration tool window, as shown below:
BigMemory Max target:
BigMemory Max Merge target:
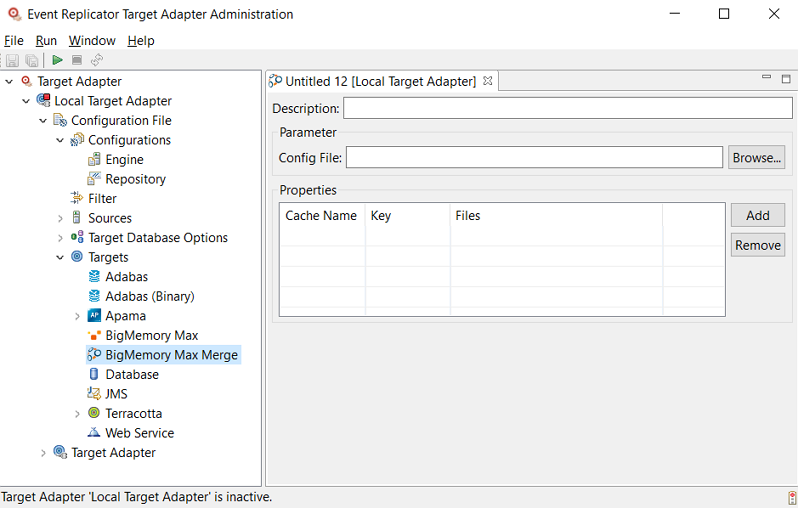
Supply valid values for the BigMemory Max target. The BigMemory Max fields are described in the following table:
| Field Name | Value |
|---|---|
| Description | Type a description for this target definition. |
| Config File | Supply the path to ehcache.xml. BigMemory Max offers different types of cache: from local cache to clustered server arrays. All parameters are controlled by the ehcache.xml file. In order to connect to the right BigMemory Max instance, the Event Replicator Target Adapter will use the specified configuration file. More details about the configuration file can be found in the BigMemory Max documentation. |
| Properties |
Note: |
| Cache Name | Name of the merged cache. |
| Key | Key that must exist in every merged file. |
| Files | List of Adabas Files that are merge in the cache. The file must be separated with a comma. |
Once all fields have been specified satisfactorily, click
the Save button ( ) on the toolbar
to save the target Terracotta definition.
Or:
Select the Save command on the File menu of the
Administration tool.
A "Save As" pop-up window appears.
Specify the name of the new target definition on the "Save As" pop-up window and then click the OK button.
The definition is saved in the context file for the Event Replicator Target Adapter.
Note:
The ehcache.xml file is not
affected by any entries made here. You must provide
ehcache.xml according to your cache configuration. See the
BigMemory Max documentation on Software AG's
Empower
web site for more information on ehcache.xml.
You can configure the Event Replicator Target Adapter to stream replicated data from the Event Replicator to a web service instead of an SQL database. To do this, you must create a target definition for each unique web service with which you want Event Replicator Target Adapter to interact.
To set up a web service target definition for the Event Replicator Target Adapter,
complete the following steps:
You must have a web service created that is designed to handle the replicated data.
Start up the Administration tool, as described in Starting the Administration Tool.
The Administration tool window appears.
On the left side of the Administration tool window, expand the Configuration File section and then the Targets section.
The high-level categorizations of the target definitions appear.
Right-click on the Web Service categorization and select from the drop-down menu.
Or:
Select the command from the
menu and then from the resulting submenu.
An untitled web service target definition panel appears on the right side of the Administration tool window, as shown below:
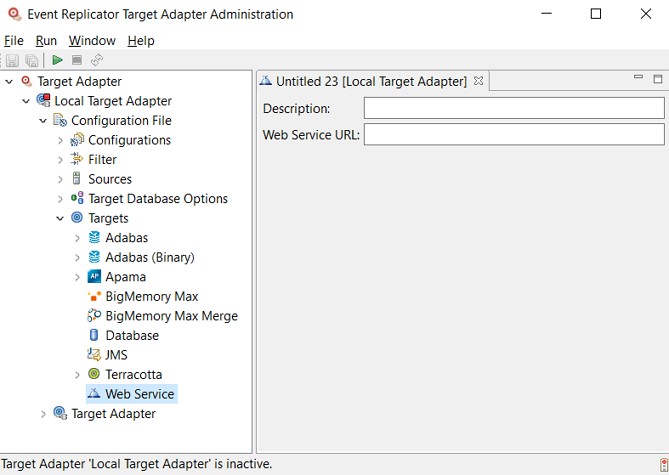
Supply valid values for the web service. The web service fields are described here.
| Field Name | Value |
|---|---|
| Description | Type a description for this target definition. |
| Web Service URL | Use this parameter to supply the fully-qualified URL of your web service. |
Once all fields have been specified satisfactorily, click
the button () on the toolbar to save the target web service
definition.
Or:
Select the command on the
menu of the Administration tool.
A Save As pop-up window appears.
Specify the name of the new target definition on the Save As pop-up window and then click the button.
The definition is saved in the context file for the Event Replicator Target Adapter.
You can configure the Event Replicator Target Adapter to stream replicated data from the Event Replicator to Adabas on Linux, UNIX and Windows. To do this, you must create a target definition for the Adabas environment you want Event Replicator Target Adapter to interact with.
Note:
Use of short names in Adabas to Adabas replication requires
Event Replicator for Adabas Version 3.7.1 with zap AZ371002 applied.
When the Target Adapter receives data that is bound for an Adabas target, it will leverage functionality provided by Adabas Client for Java (ACJ) to store data in the target. Adabas short names are used in the replication unless an ACJ map is defined. For more information on replication to an Adabas target and the use of maps, please refer to the Event Replicator Target Adapter documentation.
To set up an Adabas target definition for the Event Replicator Target Adapter, complete
the following steps:
You must have an Adabas environment that is designed to handle the replicated data. For information on setting up Adabas, refer to the Adabas documentation on Software AG's Empower web site.
Start up the Administration tool, as described in Starting the Administration Tool.
The Administration tool window appears.
On the left side of the Administration tool window, expand the Configuration File section and then the Targets section.
The high-level categorizations of the target definitions appear.
Right-click on the Adabas categorization and select from the drop-down menu.
Or:
Select the command from the
menu and then
from the resulting submenu.
An untitled Adabas target definition panel appears on the right side of the Administration tool window, as shown below:
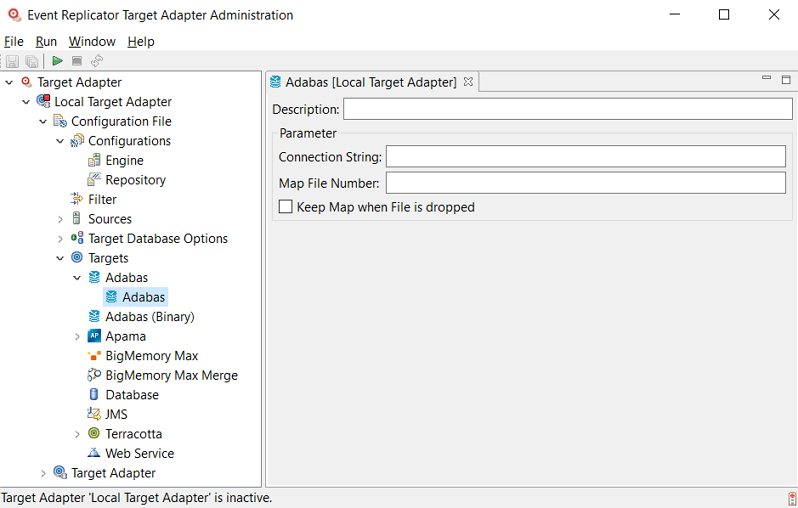
Supply valid values for the Adabas target. The target fields are described below:
Once all fields have been specified satisfactorily, click
the button () on the toolbar to save the Adabas target
definition.
Or:
Select the command on the
menu of the Administration tool.
A Save As pop-up window appears.
Specify the name of the new target definition on the Save As pop-up window and then click the button.
The definition is saved in the context file for the Event Replicator Target Adapter.
You can configure the Event Replicator Target Adapter to stream replicated data from the Event Replicator to Adabas on Linux, UNIX and Windows using raw binary source data. This method is analogous to Node to Node replication on the mainframe and bypasses conversion of replicated transactions to XML data as is used in other replication scenarios. To do this, you must create a target definition for the Adabas environment you want Event Replicator Target Adapter to interact with.
To set up an Adabas (Binary) target definition for the Event Replicator Target Adapter,
complete the following steps:
You must have an Adabas environment that is designed to handle the replicated data. The target database must be accessible via a lookup in a Software AG Directory Server. The Directory Server Entry is normally created by an Entire Net-Work node that services that Adabas target and registers the database with the Directory Server. For information on setting up Adabas and configuring its access via Entire Net-Work, refer to the documentation for those products on Software AG's Empower web site.
Start up the Administration tool, as described in Starting the Administration Tool.
The Administration tool window appears.
On the left side of the Administration tool window, expand the Configuration File section and then the Targets section.
The high-level categorizations of the target definitions appear.
Right-click on the Adabas (Binary) icon and select from the drop-down menu.
Or:
Select the command from the
menu and then from the resulting submenu.
An untitled Adabas (Binary) target definition panel appears on the right side of the Administration tool window, as shown below:
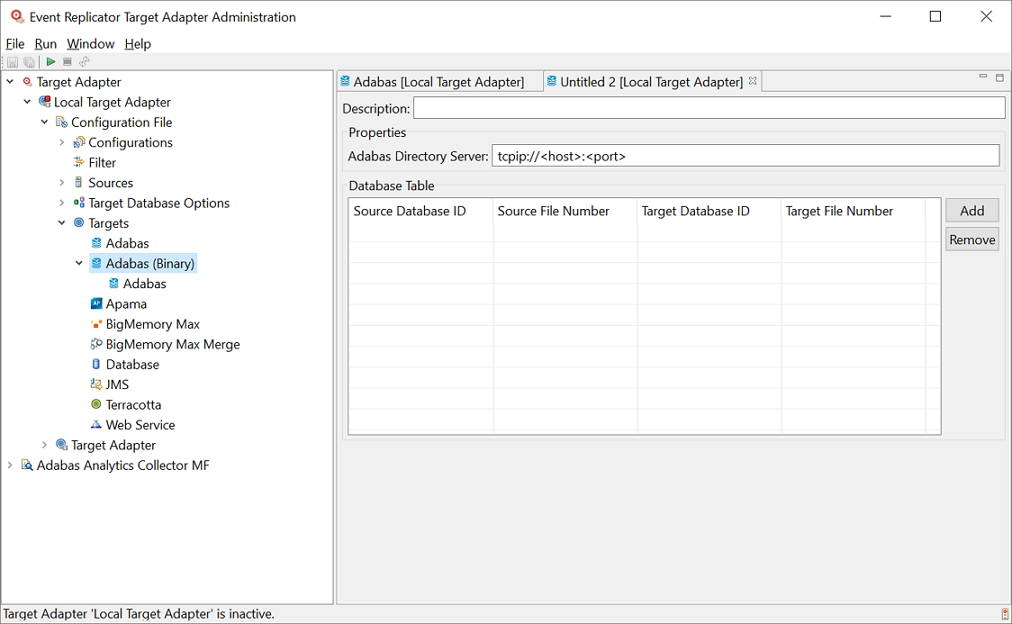
Supply valid values for the Adabas target. The target fields are described below:
The Software AG Directory Server is used for doing lookup of the Adabas target.
For the mapping of the target files to the source files, wildcard notations are available as well as excluding files from the replication. Here are some examples:
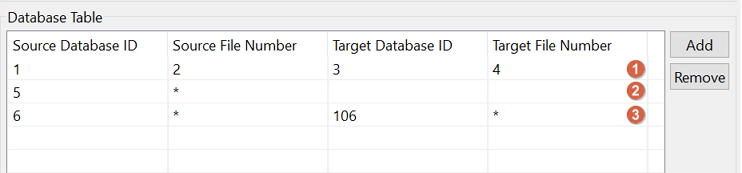
 the
file from source database 1 with file number 2 is mapped to target database 3
with file number 4
the
file from source database 1 with file number 2 is mapped to target database 3
with file number 4
 all
files from source database 5 are not processed (ignored)
all
files from source database 5 are not processed (ignored)
 all
files from source database 6 are mapped to target database 106
all
files from source database 6 are mapped to target database 106
Once all fields have been specified satisfactorily, click
the button () on the toolbar to save the Adabas (Binary)
target definition.
Or:
Select the command on the
menu of the Administration tool.
A Save As pop-up window appears.
Specify the name of the new target definition on the Save As pop-up window and then click the button.
The definition is saved in the context file for the Event Replicator Target Adapter.
You can configure the Event Replicator Target Adapter to stream replicated data from the Event Replicator to a Terracotta target. To do this, you must create a target definition for the Terracotta environment you want Event Replicator Target Adapter to interact with.
Terracotta behaves like a relational database system with datasets that are comparable to tables in an RDBMS.
To set up a Terracotta target definition for the Event Replicator Target Adapter,
complete the following steps:
You must have a Terracotta environment that is designed to handle the replicated data. For information on setting up Terracotta, refer to the Terracotta documentation on Software AG's Empower web site.
Start up the Administration tool, as described in Starting the Administration Tool.
The Administration tool window appears.
On the left side of the Administration tool window, expand the Configuration File section and then the Targets section.
The high-level categorizations of the target definitions appear.
Right-click on the Terracotta categorization and select from the drop-down menu.
Or:
Select the command from the
menu and then from the resulting submenu.
An untitled Terracotta target definition panel appears on the right side of the Administration tool window, as shown below:
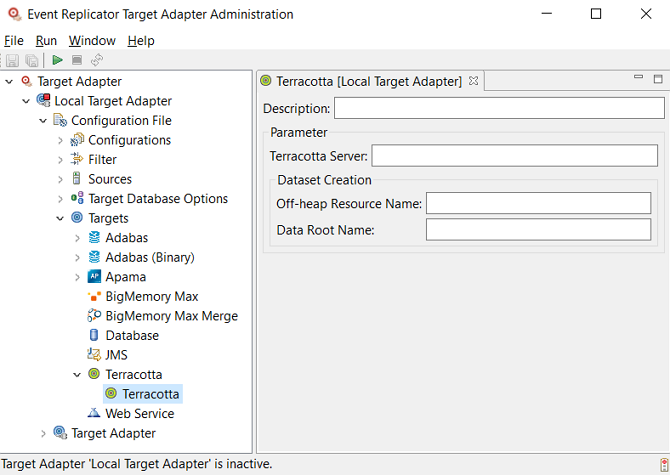
Supply valid values for the Terracotta target. The Terracotta fields are described here.
Once all fields have been specified satisfactorily, click
the button () on the toolbar to save the Terracotta target
definition.
Or:
Select the command on the
menu of the Administration tool.
A Save As pop-up window appears.
Specify the name of the new target definition on the Save As pop-up window and then click the button.
The definition is saved in the context file for the Event Replicator Target Adapter.
You can configure the Event Replicator Target Adapter to stream replicated data from the Event Replicator to an Apama target. To do this, you must create a target definition for the Apama environment you want Event Replicator Target Adapter to interact with.
With the Apama Target, Adabas business data can be sent to Apama for further processing. The schema how the data is sent to Apama can be learned from the code below:
package com.softwareag.adabas;

/** This event type contains the Adabas Business Data */
event AdabasBusinessData {
    dictionary<string, string> fields;
    dictionary<string, sequence<string> > multiple_fields;
    dictionary<string, sequence<AdabasBusinessData> > periodic_groups;
}

/** This event type contains the Adabas Business Event */
event AdabasBusinessEvent {
    string method;
    string table_name;
    string key;
    AdabasBusinessData data;
}
The following are examples for Adabas business data that is sent to Apama.
com.softwareag.adabas.AdabasBusinessEvent(
	"Insert",
	"EMPL_EMPLOYEES",
	"1111",
		com.softwareag.adabas.AdabasBusinessData(
			{
				"CITY":"Auckland",
				"COUNTRY":"NZ",
				"DEPT":"SALE01",
				"FIRST_NAME":"Max",
				"ISN":"1111",
				"NAME":"Johnson",
				"PERSONNEL_ID":"12345678"
			},
			{
				"LANG":["ENG","FRA"]
			},
			{
				"INCOME":
					[
						com.softwareag.adabas.AdabasBusinessData(
							{
								"CURRCODE":"FRA",
								"SALARY":"159980"
							},
							{
								"BONUS":["23000"]
							},
						{}
					]
				}
			}
		)
)
com.softwareag.adabas.AdabasBusinessEvent(
		"Update",
		"EMPL_EMPLOYEES",
		"1111",
		com.softwareag.adabas.AdabasBusinessData(
			{"CITY":"Wellington","ISN":"1111"},
		{},
		{}
	)
)
com.softwareag.adabas.AdabasBusinessEvent(
		"Delete",
		"EMPL_EMPLOYEES",
		"1111",
		com.softwareag.adabas.AdabasBusinessData(
			{"ISN":"1111"},
			{},
			{}
	)
)
To set up an Apama target definition for the Event Replicator Target Adapter, complete
the following steps:
You must have an Apama environment that is designed to handle the replicated data. For information on setting up Apama, refer to the Apama documentation on Software AG's Empower web site.
Start up the Administration tool, as described in Starting the Administration Tool.
The Administration tool window appears.
On the left side of the Administration tool window, expand the Configuration File section and then the Targets section.
The high-level categorizations of the target definitions appear.
Right-click on the Apama categorization and select from the drop-down menu.
Or:
Select the command from the
menu and then
from the resulting submenu.
An untitled Apama target definition panel appears on the right side of the Administration tool window, as shown below:
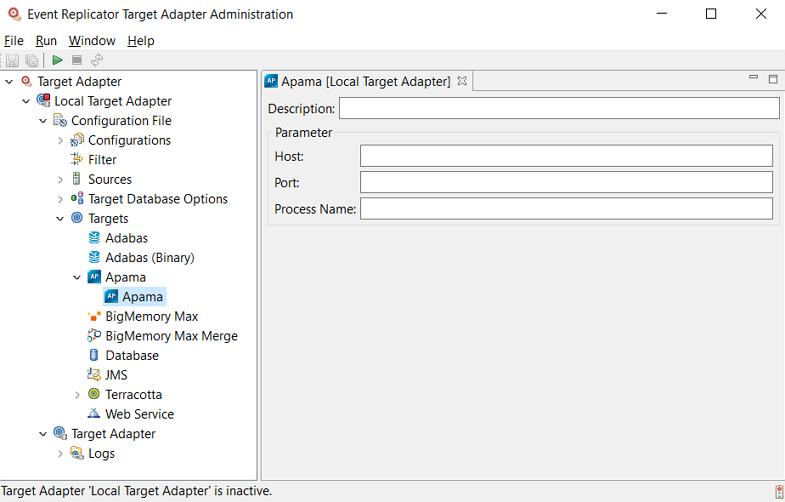
Supply valid values for the Apama target. The target fields are described here.
Once all fields have been specified satisfactorily, click
the button () on the toolbar to save the Apama target
definition.
Or:
Select the command on the
menu of the Administration tool.
A Save As pop-up window appears.
Specify the name of the new target definition on the Save As pop-up window and then click the button.
The definition is saved in the context file for the Event Replicator Target Adapter.
To modify an existing target definition:
Start up the Administration tool, as described in Starting the Administration Tool.
The Administration tool window appears.
On the left side of the Administration tool window, expand the Configuration File section and then the Targets section.
The high-level categorizations of the target definitions (Database and Web Service) appear.
Expand the Database, JMS, or Web Service categorizations, locate the target definition you want to modify in them, and double-click on the name.
The definition opens on the right side of the Administration tool.
Modify the values of the target definition as described in Defining New RDBMS Database Target Definitions and Defining New Web Service Target Definitions.
Once all fields have been specified satisfactorily, click
the button () on the toolbar to save the target
definition.
Or:
Select the command on the
menu of the Administration tool.
The definition is saved in the context file for the Event Replicator Target Adapter.
To rename an existing target definition:
Start up the Administration tool, as described in Starting the Administration Tool.
The Administration tool window appears.
On the left side of the Administration tool window, expand the Configuration File section and then the Targets section.
The high-level categorizations of the target definitions (Database and Web Service) appear.
Expand the Database, JMS, or Web Service categorizations, locate the target definition you want to rename, and right-click on the name.
A drop-down menu appears providing you with several options.
Select the option on the drop-down menu.
A Rename dialog for the target definition appears. Here is a sample of such a dialog when you rename a database target:
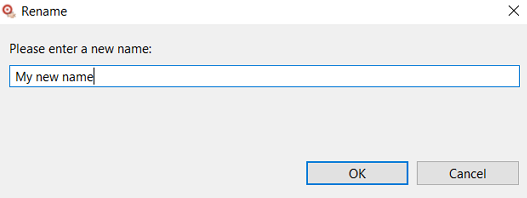
Supply a new name for the target definition in the input field and click .
Make sure you have altered any source definitions that reference the target definition. For more information, read Configuring Source Definitions for Event Replicator Target Adapter.
In addition, make sure that any target database option definitions with the same name are also renamed. Target database option definitions must have the same name as any target database to which they apply (unless the default definition is used). For more information, read Specifying Target Database Processing Option Definitions.
Once all fields have been specified satisfactorily, click
the button () on the toolbar to save the target
definition.
Or:
Select the command on the
menu of the Administration tool.
The definition is saved in the context file for the Event Replicator Target Adapter.
To delete an existing target definition:
Start up the Administration tool, as described in Starting the Administration Tool.
The Administration tool window appears.
On the left side of the Administration tool window, expand the Configuration File section and then the Targets section.
The high-level categorizations of the target definitions (Database and Web Service) appear.
Expand the Database, JMS, or Web Service categorizations, locate the target definition you want to delete, and right-click on the name.
A drop-down menu appears providing you with several options.
Select the option on the drop-down menu.
A dialog prompting you to verify that you really want to delete the target definition appears.
Select Yes to delete the definition.
Make sure you have altered any source definitions that reference the target definition. For more information, read Configuring Source Definitions for Event Replicator Target Adapter.
The Adabas Analytics Collector MF currently supports one type of target to which analytics data can be submitted: Elasticsearch. Before you can use the Adabas Analytics Collector MF, you must set up a target definition for every unique target you intend to use for the analytics data the Adabas Analytics Collector MF processes. These definitions provide Adabas Analytics Collector MF with the information it needs to access your target.
This section covers the following topics:
Note:
You will need to restart the Adabas Analytics Collector MF servive or daemon to fully
process any additions or changes made to Adabas Analytics Collector MF configuration definitions in the
Administration tool.
You must define target definitions for each unique Elasticsearch target you intend to use with the Adabas Analytics Collector MF prior to using the collector. These definitions will provide Adabas Analytics Collector MF with the information it needs to access your Elasticsearch.
Note:
Do not copy the context.xml,
server.xml, or any configuration file from an older
installation and expect it to work for this installation. Errors will result if
you try this.
To define a target definition for Elasticsearch:
Make sure you have completed all of the installation instructions specific to your Elasticsearch, as described in the Adabas Analytics Collector MF documentation.
Start up the Administration tool, as described in Starting the Administration Tool.
The Administration tool window appears.
On the left side of the Administration tool window, expand the Adabas Analytics Collector MF section, your Adabas Analytics Collector MF environment and then the Targets section.
The high-level categorizations of the target definitions appear.
Right-click on the Elasticsearch node and select from the drop-down menu.
Or:
Select the command from the
menu and then from the resulting submenu.
An untitled Elasticsearch definition panel appears on the right side of the Administration tool window, as shown below:
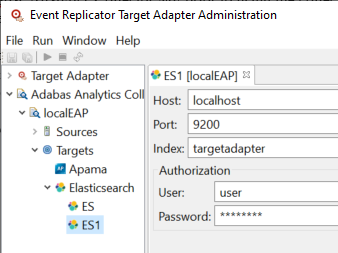
Supply valid values for the Elasticsearch installed at your site. The database fields are described here.
You must define target definitions for each unique Apama target you intend to use with the Adabas Analytics Collector MF prior to using the collector. These definitions will provide Adabas Analytics Collector MF with the information it needs to access your Apama.
With the Apama Target Adabas Analytic data can be sent to Apama for further processing. The schema how the data is sent to Apama can be seen from the code below:
package com.softwareag.adabas;

/** This event contains the Adabas Analytic Data */
event AdabasAnalyticsEvent {
	string name;
	string date;
    dictionary<string, string> fields;
}
Here is an example for Adabas Analytic data that is sent to Apama:
com.softwareag.adabas.AdabasAnalyticsEvent(
	"ReptorStatisticGlobal",
	"Thu Sep 12 14:03:03 CEST 2019",
	{
		"dbFCBFDTTransOnSLOG":"0",
		"dbTransDeloggedSLOG":"0",
		"dbTransLoggedSLOG":"0",
		"dbTransOnSLOG":"0",
		"inputTransactions":"0",
		"intervalLength":"60002",
		"nucleusID":"0",
		"pendingInputTransactions":"0",
		"reptorStatus":"RSTA",
		"targetID":"22133",
		"timestamp":"Thu Sep 12 14:02:03 CEST 2019",
		"timestampEnd":"Thu Sep 12 14:03:03 CEST 2019",
		"totalBackoutsAllQueues":"0",
		"totalBytesAllDests":"22784",
		"totalBytesAllQueues":"0",
		"totalCommitsAllQueues":"0",
		"totalItemsDeloggedSLOG":"0",
		"totalItemsLoggedSLOG":"0",
		"totalItemsOnSLOG":"0",
		"totalMessagesAllDests":"24",
		"totalMessagesAllQueues":"0",
		"type":"ReptorStatisticGlobal"
	}
)
To define a target definition for Apama:
Make sure you have completed all of the installation instructions specific to your Apama, as described in the Adabas Analytics Collector MF documentation.
Start up the Administration tool, as described in Starting the Administration Tool.
The Administration tool window appears.
On the left side of the Administration tool window, expand the Adabas Analytics Collector MF section, your Adabas Analytics Collector MF environment and then the Targets section.
The high-level categorizations of the target definitions appear.
Right-click on the Apama node and select from the drop-down menu.
Or:
Select the command from the
menu and then
from the resulting submenu.
An untitled Apama definition panel appears on the right side of the Administration tool window, as shown below:
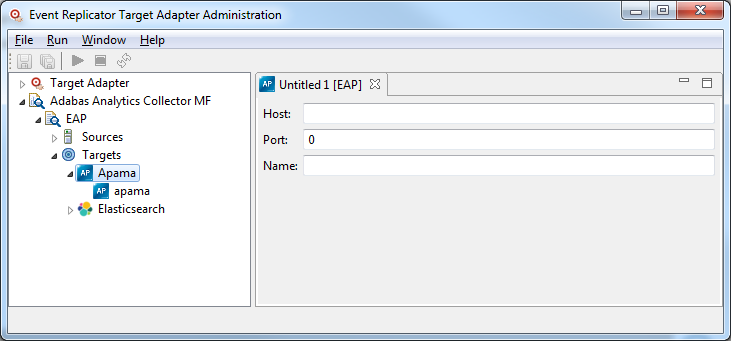
Supply valid values for the Apama installed at your site. The database fields are described here.
To modify an existing target definition:
Start up the Administration tool, as described in Starting the Administration Tool.
The Administration tool window appears.
On the left side of the Administration tool window, expand the Adabas Analytics Collector MF section, your Adabas Analytics Collector MF environment and then the Targets section.
The high-level categorization of the target definitions (Elasticsearch) appears.
Expand the Elasticsearch categorizations, locate the target definition you want to modify, and double-click on the name.
The definition opens on the right side of the Administration tool.
Modify the values of the target definition as described in Maintaining Elasticsearch Database Target Definitions.
Once all fields have been specified satisfactorily, click
the button () on the toolbar to save the target
definition.
Or:
Select the command on the
menu of the Administration tool.
The definition is saved in the context file for the Adabas Analytics Collector MF.
To rename an existing target definition:
Start up the Administration tool, as described in Starting the Administration Tool.
The Administration tool window appears.
On the left side of the Administration tool window, expand the Adabas Analytics Collector MF section, your Adabas Analytics Collector MF environment and then the Targets section.
The high-level categorization of the target definitions (Elasticsearch) appears.
Expand the Elasticsearch categorization, locate the target definition you want to rename, and right-click on the name.
A drop-down menu appears providing you with several options.
Select the option on the drop-down menu.
A Rename dialog for the target definition appears.
Supply a new name for the target definition in the input field and click .
Make sure you have altered any source definitions that reference the target definition. For more information, read Configuring Source Definitions for Adabas Analytics Collector MF.
To delete an existing target definition:
Start up the Administration tool, as described in Starting the Administration Tool.
The Administration tool window appears.
On the left side of the Administration tool window, expand the Adabas Analytics Collector MF section, your Adabas Analytics Collector MF environment and then the Targets section.
The definition opens on the right-hand side of the Administration tool.
Expand the Elasticsearch categorization, locate the target definition you want to delete, and right-click on the name.
A drop-down menu appears providing you with several options.
Select the option on the drop-down menu.
A dialog prompting you to verify that you really want to delete the target definition appears.
Select Yes to delete the definition.
Make sure you have altered any source definitions that reference the target definition. For more information, read Configuring Source Definitions for Adabas Analytics Collector MF.
You can set processing options for your target databases. You do this by creating and using target database processing option definitions.
This section covers the following topics:
Note:
You will need to restart the Event Replicator Target Adapter to fully process any
additions or changes made to Event Replicator Target Adapter Configuration definitions in the
Administration tool. For more information, read Restarting the
Event Replicator Target Adapter.
You must define target definitions for each unique RDBMS database you intend to use with the Event Replicator Target Adapter prior to using Event Replicator Target Adapter. These definitions provide Event Replicator Target Adapter with the information it needs to access your RDBMS and to communicate with Event Replicator for Adabas via webMethods EntireX or WebSphere MQ.
Note:
Do not copy the context.xml,
server.xml, or any configuration file from an older
installation and expect it to work for this installation. Errors will result if
you try this.
To create a new target database option definition:
Start up the Administration tool, as described in Starting the Administration Tool.
The Administration tool window appears.
On the left side of the Administration tool window, expand the Configuration File section.
Right-click on the Target Database Options section and select from the drop-down menu.
Or:
Select the command from the
menu and then from the resulting submenu.
An untitled target database option definition panel appears on the right side of the Administration tool window, as shown below:
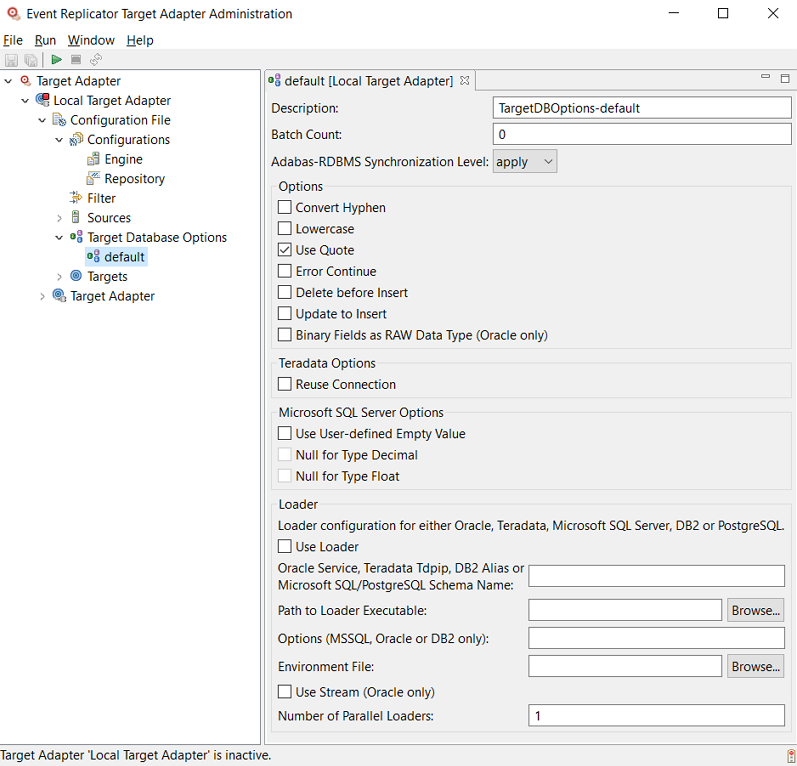
Verify and update the values for the database option definition panel, as described in the following table:
| Field Name | Description | ||
|---|---|---|---|
| Description | Specify a description for the database option definition. | ||
| Batch Count | Specify zero (0) for this field
unless specifically directed to change it by a support representative.
This field specifies the recommended maximum number of SQL statements that should be grouped and sent to the RDBMS to process as a batch. Use of this environment entry can be used to improve the performance of your database and is especially useful if you are requesting that initial-state data or ADALOD data be replicated to your RDBMS database. The value you specify should be selected based on your RDBMS database and network configuration requirements. If you specify zero ("0") for this field, all SQL statements generated for a transaction are grouped and processed in a single batch. If you specify any other value for this field, then any generated SQL statements are grouped and processed in batches of statements that do not exceed the number of statements you specified. For example if you set this field to 1000, a maximum of 1000 SQL statements would be grouped and processed in a single batch. Notes:
|
||
| Adabas-RDBMS Synchronization Level | Select the level at which the
Event Replicator Target Adapter should synchronize the RDBMS table layout with the Adabas file.
The RDBMS-Adabas file synchronization (activated by this option) is triggered by the use of a new GFB and field table (GFFT) in the subscription you use for replication. Therefore, if you make changes to your Adabas database file or field structure, you must generate a new GFB/GFFT (using the Data Mapping Tool) and apply it to the appropriate subscription definition, prior to replicating data with the new structure. Valid values for this option are:
|
||
| Convert Hyphen | Select this option (check it)
to indicate that hyphens (-) in table and column names should be automatically
converted to underscore characters (_).
When you select this option, it indicates that hyphens in table and column names should be converted to underscore characters; if you do not select this option, it indicates that they should not. |
||
| Lowercase | Select this option (check it)
to indicate that the table and column names should be automatically converted
to lowercase.
When you select this option, it indicates that table and column names should be converted to lowercase; if you do not select this option, it indicates that they should not. |
||
| Use Quote | Select this option (check it )
to indicate that table and column names should be included in quotation marks
(").
When you select this option, it indicates that the table and column names should be included in quotation marks; if you do not select this option, it indicates that they should not. Be aware that not selecting this option has performance implications because this setting causes the Event Replicator Target Adapter to analyze each table and column name for use of special characters. |
||
| Error Continue | Select this option (check it)
to indicate that Event Replicator Target Adapter should continue processing when SQL transaction
errors
occur.
When you select this option, it indicates that, after logging the error, Event Replicator Target Adapter should continue processing data when a SQL transaction error occurs; if you do not select this option, it indicates that, after logging the error, Event Replicator Target Adapter should terminate. |
||
| Delete before Insert | Select this option (check it)
to indicate that an existing record should be deleted before its replacement is
inserted in the table. This allows you to specify how resent data from the
Event Replicator is handled in the table. Data will be resent from the Event Replicator if Event
Replicator
abnormally terminates and then is restarted.
Note: When you select this option, it indicates that existing records should be deleted before their replacements are inserted; if you do not select this option, it indicates that the replacement records should simply be inserted without deletion. Be aware that selecting this option has performance implications because Event Replicator Target Adapter must first determine whether each record it processes already exists in the table. |
||
| Update to Insert | Select this option (check it)
to indicate that update commands should be converted to insert commands. When
this option is selected, the Event Replicator Target Adapter first issues a delete of the existing
row if
it exists and then inserts a new row with the changed information instead of
issuing an update command. To use this feature, the mainframe replication
OPTIONS parameter specified in the destination class parameter data (DCLASSPARM
parameter) must be set to 32 (OPTIONS=32). For more information read
DCLASSPARM
Parameter.
The default is to leave this option unchecked (unselected). Note: |
||
| Binary Fields as RAW
Data Type
(Oracle only) |
Binary Fields will be stores in Oracle fields with data type ‘raw’. | ||
| Reuse Connection |
This option is only useful for Teradata databases. Select this option (check it) to indicate that the data source connection should be reused, instead of using the Tomcat connection pool. By selecting this option, you can reduce the number of SQL commands issued by the JDBC driver, thus reducing the performance overhead of Event Replicator Target Adapter processing to Teradata databases. The default is to leave this field unselected (unchecked). |
||
| User-Defined Empty Value |
This option is only useful for Microsoft SQL Server databases. Select this option (check it) to indicate that zero or null should be used to represent an empty value for numeric, integer, or floating point fields directed to Microsoft SQL Server databases. When you select this option, the Null for Type Decimal and Null for Type Float fields become selectable. The default is to leave this field unselected (unchecked). This option was introduced in an Event Replicator Target Adapter hot fix, prior to release 2.6. If you want to set this as the default for tables created before this option was made available in the Event Replicator Target Adapter, you should run the following command: ALTER TABLE table_name ADD CONSTRAINT constraint_name DEFAULT 0 FOR column_name Substitute the appropriate table, constraint, and column names in the command. Likewise, if you want to change the values in the tables created before this option was made available in the Event Replicator Target Adapter, run the following command: UPDATE table_name SET column_name = 0 WHERE column_name IS NULL Substitute the appropriate table and column names in the command. |
||
| Null for Type Decimal |
This option is only useful for Microsoft SQL Server databases. It only becomes available if the User-Defined Empty Value option is selected (checked). Select this option (check it) to indicate that zero or null should be used for empty numeric or integer fields directed to Microsoft SQL Server databases. The default is to leave this field unselected (unchecked). This option was introduced in an Event Replicator Target Adapter hot fix, prior to release 2.6. If you want to set this as the default for tables created before this option was made available in the Event Replicator Target Adapter, review the instructions provided in the User-Defined Empty Value field above. |
||
| Null for Type Float |
This option is only useful for Microsoft SQL Server databases. It only becomes available if the User-Defined Empty Value option is selected (checked). Select this option (check it) to indicate that zero or null should be used for empty floating point fields directed to Microsoft SQL Server databases. The default is to leave this field unselected (unchecked). This option was introduced in an Event Replicator Target Adapter hot fix, prior to release 2.6. If you want to set this as the default for tables created before this option was made available in the Event Replicator Target Adapter, review the instructions provided in the User-Defined Empty Value field above. |
||
| Use Loader |
Select this option (check it) to indicate that Oracle SQL*Loader, the Teradata MultiLoad (MLoad) utility, the Microsoft SQL Server bulk copy (bcp) utility, the DB2 CONNECT IMPORT or the PostgreSQL Loader (psql) utility command should be used to process and load initial-state data into an Oracle, Teradata, Microsoft SQL, DB2 or the PostgreSQL database. If you select this option, you should evaluate the values for the Service, Path, Options, Environment File and Use Stream fields on this screen, as these fields apply to the use of Oracle SQL*Loader in the Event Replicator Target Adapter. The default is to leave this field unselected (unchecked). For more information on the use of the Oracle SQL*Loader to load initial-state data in the Event Replicator Target Adapter, read Using the Oracle SQL*Loader to Load Initial-State Data. For more information on the use of the Teradata MLoad utility to load initial-state data in the Event Replicator Target Adapter, read Using the Teradata MultiLoad (MLoad) Utility to Load Initial-State Data. For more information on the use of the Microsoft SQL Server bcp utility to load initial-state data in the Event Replicator Target Adapter, read Using the Microsoft SQL Server Bulk Copy (bcp) Utility to Load Initial-State Data. For more information on the use of the DB2 CONNECT IMPORT command to load initial-state data in the Event Replicator Target Adapter, read Using the DB2 CONNECT IMPORT Command to Load Initial-State Data. For more information on the use of the PostgreSQL psql command to load initial-state data in the Event Replicator Target Adapter, read Using the PostgreSQL psql Command to Load Initial-State Data, in the Event Replicator Target Adapter User Guide. |
||
| Oracle Service, Teradata Tdpip, Microsoft SQL Schema Name or DB2 Alias |
If Oracle SQL*Loader will be used to process and load initial-state data into an Oracle database, optionally specify the Oracle database service name that should be used with the Oracle SQL*Loader. This is the service name you configured using the Oracle Net Manager tool. Optionally, if the Oracle EZConnect feature is supported on this machine, you can specify the machine name, port number, and database name instead of the service name. If the Oracle database is installed and running on the same machine as the Event Replicator Target Adapter and only one Oracle database is installed, this field should be left blank. This is the default. For more information on the use of the Oracle SQL*Loader to load initial-state data in the Event Replicator Target Adapter, read Using the Oracle SQL*Loader to Load Initial-State Data. If the Teradata MLoad utility will be used to process and load initial-state data into a Teradata database, specify the Teradata Director Program Identifier (TDPID) in this field. This is usually the first eight characters of the Teradata database name or the Teradata service name. Teradata database names can be up to 30 characters long. However, MLoad restrictions for Teradata releases up to Version 12 require that TDPIDs be eight (8) characters or less. Event Replicator Target Adapter current logic dynamically determines the TDPID using the first eight characters of the name specified in this field. If you do not supply a name, the first eight characters of the Teradata database name is used. Whatever TDPID is used must also be present in the HOSTS file. Be sure that the specifications in the database option definition and the specification in the HOSTS file match. For more information on the use of the Teradata MLoad utility to load initial-state data in the Event Replicator Target Adapter, read Using the Teradata MultiLoad (MLoad) Utility to Load Initial-State Data. If the Microsoft SQL Server Bulk Copy (bcp) utility will be used to process and load initial-state data to a Microsoft SQL Server database, optionally specify the MS SQL Server schema name in this field if the schema name is different from the user login name. Prior to the release of MS SQL Server 2005, all tables created by MS SQL Server used the user login name as the default schema name; in MS SQL Server 2005 and later versions, Microsoft suggests that you use "dbo" as the common schema name (which is different from the user login name). If you have used any MS SQL Server schema name that is not the same as the user login name, specify your non-default schema name in the Oracle Service or Teradata Tdpip field. For more information on the use of the Microsoft SQL Server bcp utility to load initial-state data in the Event Replicator Target Adapter, read Using the Microsoft SQL Server Bulk Copy (bcp) Utility to Load Initial-State Data. If the DB2 CONNECT IMPORT command will be used to process and load initial-state data into a DB2 database, specify the alias name of the DB2 database. For more information on the use of the DB2 CONNECT IMPORT command to load initial-state data in the Event Replicator Target Adapter, read Using the DB2 CONNECT IMPORT Command to Load Initial-State Data. |
||
| Path to Loader Executable |
If Oracle SQL*Loader, the Teradata MLoad utility, or the Microsoft SQL Server bulk copy (bcp) utility will be used to process and load initial-state data into an Oracle, Teradata, or Microsoft SQL Server database, this field is required.
|
||
| Options (MSSQL, Oracle or DB2 only) |
If the Microsoft SQL Server Bulk Copy (bcp) utility will be used to process and load initial-state data into a Microsoft SQL Server database, you can specify the -b (batch size) option in this field. This option specifies the number of rows per batch of imported data. Each batch is imported and logged as a separate transaction that imports the whole batch before being committed. By default, all rows in the data file are imported as one batch. To distribute the rows among multiple batches, use the -b option to specify a batch size that is smaller than the number of rows in the data file. If the transaction for any batch fails, only insertions from the current batch are rolled back. Batches already imported by committed transaction are unaffected by a later failure. Do not use this option in conjunction with the -h ("ROWS_PER_BATCH=bb") option. The syntax of the -b option is: -b batchsize If Oracle SQL*Loader will be used to process and
load initial-state data into an Oracle database, the rows=nnnn Note: For more information on the use of the Oracle SQL*Loader to load initial-state data in the Event Replicator Target Adapter, read Using the Oracle SQL*Loader to Load Initial-State Data. If the DB2 CONNECT IMPORT command will be used to process and load initial-state data into a DB2 database, there are several options that can be specified in this field. For a complete description of these options and the use of the DB2 CONNECT IMPORT command to load initial-state data in the Event Replicator Target Adapter, read Using the DB2 CONNECT IMPORT Command to Load Initial-State Data. Note: |
||
| Environment File |
Optionally, specify the file name containing the Oracle environment variables that should be used with the Oracle SQL*Loader, if the SQL*Loader will be used to process and load initial-state data into an Oracle database. The Oracle environment variables are used by UNIX and Linux operating systems. If used, the environment variable file will contain settings for the PATH, ORACLE_BASE, and ORACLE_HOME environment variables. You can use the button to search for the environment file on the machine. If the environment variables are defined at the UNIX or Linux system level, this field should be left blank. This is the default. For more information on the use of the Oracle SQL*Loader to load initial-state data in the Event Replicator Target Adapter, read Using the Oracle SQL*Loader to Load Initial-State Data. Note: |
||
| Use Stream (Oracle only) |
This optional field should only be selected if the Oracle SQL*Loader will be used to process and load initial-state data into an Oracle database. Select this option (check it) to indicate that records should be read in stream mode rather than first being written to DAT files prior to being loaded into the Oracle database. Stream mode processing is much faster and greatly reduces the disk space required for this feature. The default is to leave this field unselected (unchecked). For more information on the use of the Oracle SQL*Loader to load initial-state data in the Event Replicator Target Adapter, read Using the Oracle SQL*Loader to Load Initial-State Data. Note: |
||
| Number of Parallel Loaders |
Specifies the number of parallel loader processes that can run for the given target. The default is 1. This avoids a potential error that can occur if a second loader process attempts to load files into target tables before a previous one is finished. This can occur if, for example, the user is processing multiple ADARIS loads for the same source/target/dbid/fnr combination, with the first one larger than the second. The result will be unusable tables because competing loader processes attempt to load target tables at the same time. Setting this to 1 will ensure that only one loader process is allowed to run for that same table target at a time. |
Once all fields have been specified satisfactorily, click
the button () on the toolbar to save the target database
option definition.
Or:
Select the command on the
menu of the Administration tool.
A Save As pop-up window appears.
Specify the name of the new target database option definition on the Save As pop-up window and then click the button.
The definition is saved in the context file.
To modify an existing target database option definition:
Start up the Administration tool, as described in Starting the Administration Tool.
The Administration tool window appears.
On the left side of the Administration tool window, expand the Configuration File section and then expand the Target Database Options section.
The target database option definitions are listed.
Locate the definition in the list of option definitions and double-click on the name.
The definition opens on the right side of the Administration tool.
Modify the values of the target database option definition as described in Creating a New Target Database Option Definition .
Once all fields and options have been specified
satisfactorily, click the button () on the toolbar to save the target database
option definition.
Or:
Select the command on the
menu of the Administration tool.
The definition is saved in the context file for the Event Replicator Target Adapter.
To rename an existing target database option definition:
Start up the Administration tool, as described in Starting the Administration Tool.
The Administration tool window appears.
On the left side of the Administration tool window, expand the Configuration File section and then expand the Target Database Options section.
The target database option definitions are listed.
Locate the definition in the list of option definitions and right-click on the name.
A drop-down menu appears providing you with several options.
Select the option on the drop-down menu.
A Rename dialog for the target database option definition appears.
Supply a new name for the definition in the input field and click .
Make sure you have renamed any target definitions that share the same name as the target database option definition. If you do not do this, the target database option definition will not get applied to the correct target definition. For more information, read Configuring Target Definitions for Event Replicator Target Adapter.
Once all fields have been specified satisfactorily, click
the button () on the toolbar to save the target database
option definition.
Or:
Select the command on the
menu of the Administration tool.
The definition is saved in the context file for the Event Replicator Target Adapter.
To delete an existing target database option definition:
Start up the Administration tool, as described in Starting the Administration Tool.
The Administration tool window appears.
On the left side of the Administration tool window, expand the Configuration File section and then expand the Target Database Options section.
The target database option definitions are listed.
Locate the definition in the list of option definitions and right-click on the name.
A drop-down menu appears providing you with several options.
Select the option on the drop-down menu.
A dialog prompting you to verify that you really want to delete the definition appears.
Select Yes to delete the definition.
You can set filter definitions for Event Replicator Target Adapter processing. You do this by creating and using filter definitions. Transactions that meet the requirements set by filter definitions are not processed by the Event Replicator Target Adapter (they are filtered out).
This section covers the following topics:
Note:
You will need to restart the Event Replicator Target Adapter to fully process any
additions or changes made to Event Replicator Target Adapter configuration definitions in the
Administration tool. For more information, read Restarting the
Event Replicator Target Adapter.
To create a new filter definition:
Start up the Administration tool, as described in Starting the Administration Tool.
The Administration tool window appears.
On the left side of the Administration tool window, expand the Configuration File section.
Right-click on the Filter section and select from the drop-down menu.
Or:
Select the command from the
menu and then from
the resulting submenu.
An untitled filter definition panel appears on the right side of the Administration tool window, as shown below:
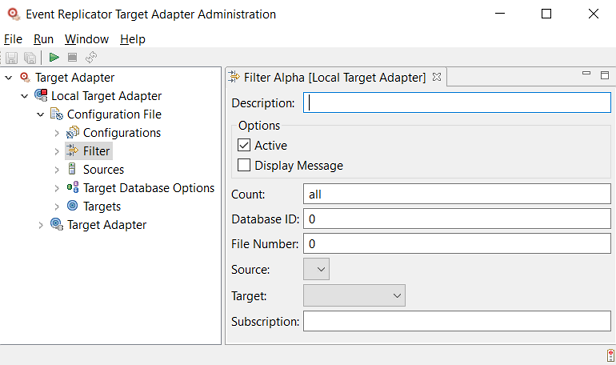
Verify and update the values for the filter definition panel, as described in the following table:
Once all fields have been specified satisfactorily, click
the button () on the toolbar to save the filter option
definition.
Or:
Select the command on the
menu of the Administration tool.
A Save As pop-up window appears.
Specify the name of the new filter definition on the Save As pop-up window and then click the button.
The definition is saved in the context file for the Event Replicator Target Adapter.
An individual filter definition can specify many conditions (database ID, file number, source, target, and subscription names). Any transaction that meets all of the conditions in an individual filter definition is rejected by Event Replicator Target Adapter processing. In other words, the conditions specified in an individual filter definition are logically ANDed by the Event Replicator Target Adapter. If a transaction only meets a few of the conditions in an individual filter definition, it is not rejected for processing.
You can also specify multiple filter definitions for Event Replicator Target Adapter processing. In this case, if a transaction is rejected by any one of the filter definitions, it is not processed by the Event Replicator Target Adapter. In other words, the conditions specified by different filter definitions are logically ORed by the Event Replicator Target Adapter. If a transaction does not meet all of the filter conditions in any individual filter condition (although it might meet a few conditions in several different filter conditions) it is still processed by the Event Replicator Target Adapter.
Transactions that are filtered out can be identified in the Event Replicator Target Adapter log file, depending on the setting of the Display Message option in the filter definition.
To modify an filter definition:
Start up the Administration tool, as described in Starting the Administration Tool.
The Administration tool window appears.
On the left side of the Administration tool window, expand the Configuration File section and then expand the Filter section.
The filter definitions are listed.
Locate the definition in the list of option definitions and double-click on its name.
The definition opens on the right side of the Administration tool.
Modify the values of the filter definition as described in Creating a New Filter Definition .
Once all fields and options have been specified
satisfactorily, click the button () on the toolbar to save the filter
definition.
Or:
Select the command on the
menu of the Administration tool.
The definition is saved in the context file for the Event Replicator Target Adapter.
To rename an existing filter definition:
Start up the Administration tool, as described in Starting the Administration Tool.
The Administration tool window appears.
On the left side of the Administration tool window, expand the Configuration File section and then expand the Filter section.
The filter definitions are listed.
Locate the definition in the list of option definitions and right-click on its name.
A drop-down menu appears providing you with several options.
Select the option on the drop-down menu.
A Rename dialog for the filter definition appears.
Supply a new name for the definition in the input field and click .
Once all fields have been specified satisfactorily, click
the button () on the toolbar to save the filter
definition.
Or:
Select the command on the
menu of the Administration tool.
The definition is saved in the context file for the Event Replicator Target Adapter.
To delete an existing filter definition:
Start up the Administration tool, as described in Starting the Administration Tool.
The Administration tool window appears.
On the left side of the Administration tool window, expand the Configuration File section and then expand the filter section.
The filter definitions are listed.
Locate the definition in the list of option definitions and right-click on its name.
A drop-down menu appears providing you with several options.
Select the option on the drop-down menu.
A dialog prompting you to verify that you really want to delete the definition appears.
Select Yes to delete the definition.
The Event Replicator Target Adapter supports two types of sources through which replicated data can be submitted to your RDBMS databases and web services: webMethods EntireX and WebSphere MQ (MQSeries). Before you can use the Event Replicator Target Adapter, you must set up a source definition for every unique webMethods EntireX or WebSphere MQ data source you will be using to retrieve the replicated data for your Event Replicator Target Adapter targets.
This section covers the following topics:
Note:
You will need to restart the Event Replicator Target Adapter to fully process any
additions or changes made to Event Replicator Target Adapter configuration definitions in the
Administration tool. For more information, read Restarting the
Event Replicator Target Adapter.
You must define a webMethods EntireX source definitions for each unique webMethods EntireX system that the Event Replicator Target Adapter needs to use to access your RDBMS and to communicate with Event Replicator for Adabas via webMethods EntireX.
To define a new webMethods EntireX source definition for
Event Replicator Target Adapter:
Start up the Administration tool, as described in Starting the Administration Tool.
The Administration tool window appears.
On the left side of the Administration tool window, expand the Configuration File section.
Expand the Sources section.
Right-click on the EntireX Communicator section and then select from the resulting drop-down menu.
Or:
Select the command from the
menu and then from the resulting submenu.
A blank webMethods EntireX source definition panel appears on the right side of the Administration tool window, as shown below:
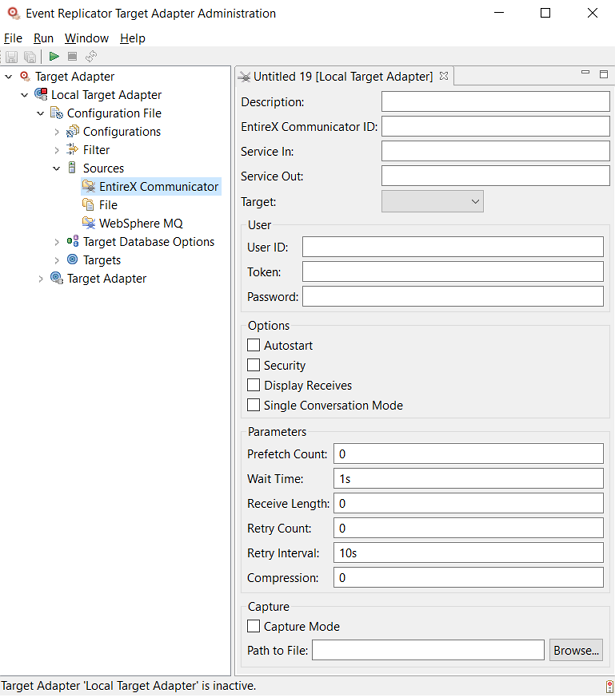
Specify field values for the webMethods EntireX source definition on the panel. Each field and option is described in the following table.
| Entry Name | Description |
|---|---|
| Description | Specify a description for this webMethods EntireX source definition. |
| Broker ID | Specify the location of the
webMethods EntireX system that will be sending replicated data to Event Replicator Target Adapter.
The
format of this location must be in the format:
hostname:port
or
tcpip-address:port.
If the host name is the same as the current machine, only the port number need be specified. |
| Service In | Specify the unique name of the
webMethods EntireX system that will be receiving replicated data from the
Event Replicator Server. This name should be specified in the following format and is
case-sensitive: Broker
class/server/service
|
| Service Out | Specify the unique name of the
webMethods EntireX system that will be used to send initial-state requests from
Event Replicator Target Adapter to the Event Replicator Server. This name should be specified
in the following format
and is case-sensitive: Broker
class/server/service |
| Target | Click on the arrow associated with this field and select the target definition to which replicated data received from this source should be sent. |
| User ID | Specify the webMethods EntireX
user ID required for security purposes. This field is not optional.
Note: |
| Token | Specify a unique ID for this
source definition. This field is used to uniquely identify this webMethods
EntireX source when multiple sources are used. It is not optional.
A maximum of 32 alphanumeric characters can be specified. Note: |
| Password | Specify the webMethods EntireX
password associated with the user ID specified in the User
ID field.
This option is only required if EntireX is running with security. |
| Autostart | Select this option (check it)
to indicate that this webMethods EntireX source definition should be
automatically started when the Event Replicator Target Adapter is started.
The default is to leave this option unselected (unchecked). |
| Security | Select this option (check it)
to indicate that system security is activated for this source.
When you select this option, it indicates that system security is activated; if you do not select this option, it indicates that system security is not activated. |
| Display Receives | Select this option (check it)
to indicate that messages should be written to the log files indicating how
many bytes were received from this source.
The default is to leave this option unselected (unchecked). |
| Single Conversation Mode | Select this option if your
EntireX Broker queues are configured as Destination and Input queues in the
Event Replicator Server and are configured to use Single Conversation Mode.
The default is to leave this option unselected (unchecked). |
| Prefetch Count | Specify the maximum number of
records that should be prefetched for this source before Event Replicator Target Adapter processing
occurs for those records.
This field has no effect on queues configured for Single Conversation mode. |
| Wait Time | Indicate how long this source will wait for a message, in seconds. This is how long the source will wait to receive a message before it attempts to receive a different message. For webMethods EntireX sources, the default value is "1s" (one second). |
| Receive Length | Specify the maximum message size that can be processed by this source. The default value is 32768 bytes. |
| Retry Count | Specify the number of times the Event Replicator Target Adapter should attempt to connect to the source if the connection is unavailable or interrupted. The default is "0" (zero) times. |
| Retry Interval | Specify the number of seconds this source should wait between attempts to reconnect to the source when the connection is down. The default is "10s" seconds. |
| Compression | Specify the webMethods EntireX data compression level for data coming to the Event Replicator from this source. Valid compression levels are integers ranging from "0" (zero, or no compression) to "8" (maximum compression). The default is "0". |
| Capture Mode | Select this option (check it)
to indicate that all incoming Event Replicator messages should be captured to a sequential
file for debugging purposes. This file is stored with the other log files
created for Event Replicator Target Adapter. For more information, read Managing Event Replicator Target Adapter
Log Files and Console Messages.
Notes:
|
| Path to File | Specify the fully-qualified name of the capture log file to which Event Replicator messages will be written if the Capture Mode option is selected. You can click on the button associated with this field to select the file. |
Once all fields have been specified satisfactorily, click
the button () on the toolbar to save the webMethods EntireX
source definition.
Or:
Select the command on the
menu of the Administration tool.
A Save As pop-up window appears.
Specify the name of the new webMethods EntireX source definition on the Save As pop-up window and then click the button.
The definition is saved in the context file for the Event Replicator Target Adapter.
You must define an WebSphere MQ source definitions for each unique WebSphere MQ system that the Event Replicator Target Adapter needs to use to access your RDBMS and to communicate with Event Replicator for Adabas via WebSphere MQ.
To define a new WebSphere MQ source definition for
Event Replicator Target Adapter:
Start up the Administration tool, as described in Starting the Administration Tool.
The Administration tool window appears.
On the left side of the Administration tool window, expand the Configuration File section.
Expand the Sources section.
Right-click on the WebSphere MQ section and then select from the resulting drop-down menu.
Or:
Select the command from the
menu and then from the resulting submenu.
A blank WebSphere MQ source definition panel appears on the right side of the Administration tool window, as shown below:
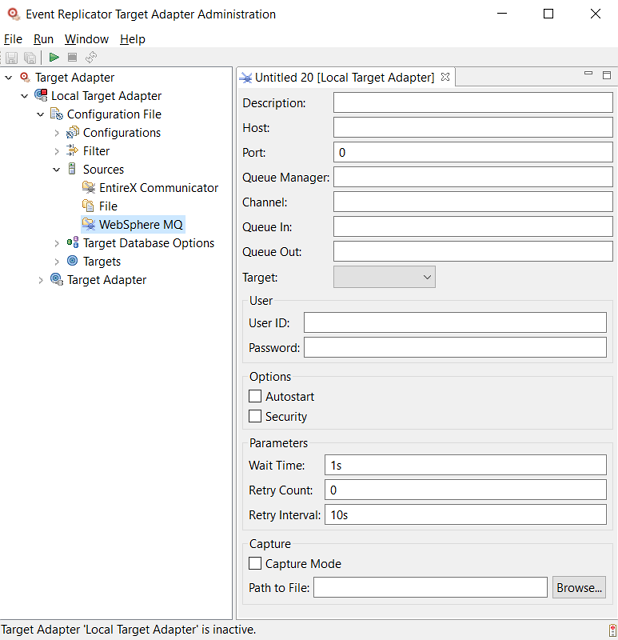
Specify field values for the WebSphere MQ source definition on the panel. Each field and option is described in the following table.
| Entry Name | Description |
|---|---|
| Description | Specify a description for this WebSphere MQ source definition. |
| Host | Specify the case-sensitive WebSphere MQ host name. |
| Port | Specify the WebSphere MQ port number. |
| Queue Manager | Specify the case-sensitive WebSphere MQ queue manager name to which you are trying to connect. |
| Channel | Specify the case-sensitive WebSphere MQ channel name to which you are trying to connect. |
| Queue In | Specify the case-sensitive WebSphere MQ queue name you want to use to receive replicated data from the Event Replicator Server. |
| Queue Out | Specify the case-sensitive WebSphere MQ queue name you want to use to send initial-state requests from Event Replicator Target Adapter to the Event Replicator Server. |
| Target | Click on the arrow associated with this field and select the target definition to which replicated data received from this source should be sent. |
| User ID | Specify the WebSphere MQ user ID required for security purposes. |
| Password | Specify the WebSphere MQ
password associated with the user ID specified in the User
ID field.
|
| Autostart | Select this option (check it)
to indicate that this WebSphere MQ source definition should be automatically
started when the Event Replicator Target Adapter is started.
The default is to leave this option unselected (unchecked). |
| Security | Select this option (check it)
to indicate that system security is activated for this source.
When you select this option, it indicates that system security is activated; if you do not select this option, it indicates that system security is not activated. |
| Wait Time | Indicate how long this source will wait for a message, in seconds. This is how long the source will wait to receive a message before it attempts to receive a different message. If you are using WebSphere MQ, set the wait time to a value greater than "0"; its default is "1s" (one second). |
| Retry Count | Specify the number of times of times the Event Replicator Target Adapter should attempt to connect to the source if the connection is unavailable or interrupted. The default is "0" (zero) times. |
| Retry Interval | Specify the number of seconds this source should wait between attempts to reconnect to the source when the connection is down. The default is "10s" seconds. |
| Capture Mode | Select this option (check it)
to indicate that all incoming Event Replicator messages should be captured to a sequential
file for debugging purposes. This file is stored with the other log files
created for Event Replicator Target Adapter. For more information, read Managing Event Replicator Target Adapter
Log Files and Console Messages.
Notes:
|
| Path to File | Specify the fully-qualified name of the capture log file to which Event Replicator messages will be written if the Capture Mode option is selected. You can click on the button associated with this field to select the file. |
Once all fields have been specified satisfactorily, click
the button () on the toolbar to save the WebSphere MQ source
definition.
Or:
Select the command on the
menu of the Administration tool.
A Save As pop-up window appears.
Specify the name of the new WebSphere MQ source definition on the Save As pop-up window and then click the button.
The definition is saved in the context file for the Event Replicator Target Adapter.
You can specify global trace options for your webMethods EntireX and WebSphere MQ sources.
Note:
You cannot specify global source trace options for a source
type that has not been defined. For example, you cannot specify WebSphere MQ
trace options if no WebSphere MQ sources have been
defined.
To specify global webMethods EntireX trace options:
Start up the Administration tool, as described in Starting the Administration Tool.
The Administration tool window appears.
On the left side of the Administration tool window, expand the Configuration File section.
Expand the Sources section.
Right-click on the EntireX Communicator section and then select from the resulting drop-down menu.
Or:
Double-click on EntireX
Communicator.
The Global EntireX Communicator Source panel appears on the right side of the Administration tool window, as shown below:
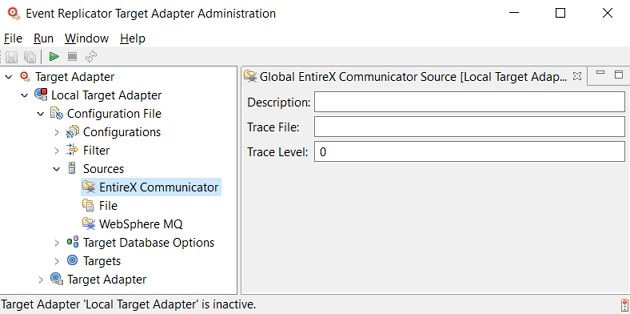
Verify and update the values for the trace option definition panel, as described in the following table:
| Field Name | Description |
|---|---|
| Description | Specify a description for the trace options. |
| Trace File | Specify the name of the trace file to be used. |
| Trace Level | Specify the level of tracing
that should be performed.
Valid values range from "0" (no trace) to "5". If you request that source tracing occur, the trace file is created and is stored with the other log files created for Event Replicator Target Adapter. For more information, read Managing Event Replicator Target Adapter Log Files and Console Messages. Notes:
|
Once all fields have been specified satisfactorily,
click the button () on the toolbar to save the trace settings.
Or:
Select the command on
the menu of the Administration tool.
The trace settings are saved in the context file for the Event Replicator Target Adapter.
To specify global WebSphere MQ trace options:
Start up the Administration tool, as described in Starting the Administration Tool.
The Administration tool window appears.
On the left side of the Administration tool window, expand the Configuration File section.
Expand the Sources section.
Right-click on the WebSphere MQ section and then select from the resulting drop-down menu.
Or:
Double-click on WebSphere MQ.
The Global WebSphere MQ Source panel appears on the right side of the Administration tool window, as shown below:
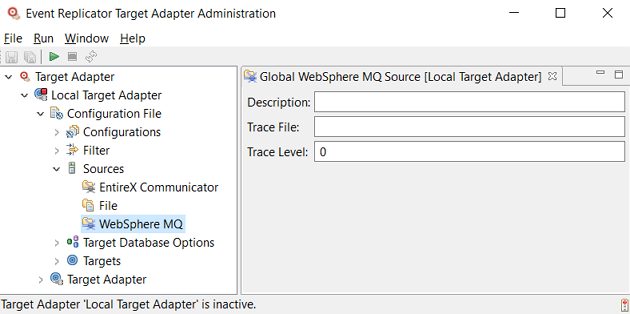
Verify and update the values for the trace option definition panel, as described in the following table:
| Field Name | Description |
|---|---|
| Description | Specify a description for the trace options. |
| Trace File | Specify the name of the trace file to be used. |
| Trace Level | Specify the level of tracing
that should be performed.
Valid values range from "0" (no trace) to "5". If you request that source tracing occur, the trace file is created and is stored with the other log files created for Event Replicator Target Adapter. For more information, read Managing Event Replicator Target Adapter Log Files and Console Messages. Notes:
|
Once all fields have been specified satisfactorily,
click the button () on the toolbar to save the trace settings.
Or:
Select the command on
the menu of the Administration tool.
The trace settings are saved in the context file for the Event Replicator Target Adapter.
To modify an existing source definition:
Start up the Administration tool, as described in Starting the Administration Tool.
The Administration tool window appears.
On the left side of the Administration tool window, expand the Configuration File section and then the Sources section.
The high-level categorizations of the source definitions (EntireX Communicator and WebSphere MQ) appear.
Locate the source definition in the EntireX Communicator or WebSphere MQ categorization, as appropriate and double-click on the name.
The definition opens on the right side of the Administration tool.
Modify the values of the source definition as described in Defining a New webMethods EntireX Source Definition and Defining a New WebSphere MQ Source Definition.
Once all fields have been specified satisfactorily, click
the button () on the toolbar to save the source
definition.
Or:
Select the command on the
menu of the Administration tool.
The definition is saved in the context file for the Event Replicator Target Adapter.
To rename an existing source definition:
Start up the Administration tool, as described in Starting the Administration Tool.
The Administration tool window appears.
On the left side of the Administration tool window, expand the Configuration File section and then the Sources section.
The high-level categorizations of the source definitions (EntireX Communicator and WebSphere MQ) appear.
Locate the source definition in the EntireX Communicator or WebSphere MQ categorization and right-click on the name.
A drop-down menu appears providing you with several options.
Select the option on the drop-down menu.
A Rename dialog for the source definition appears.
Supply a new name for the source definition in the input field and click .
Once all fields have been specified satisfactorily, click
the button () on the toolbar to save the source
definition.
Or:
Select the command on the
menu of the Administration tool.
The definition is saved in the context file for the Event Replicator Target Adapter.
To delete an existing source definition:
Start up the Administration tool, as described in Starting the Administration Tool.
The Administration tool window appears.
On the left side of the Administration tool window, expand the Configuration File section and then the Sources section.
The high-level categorizations of the source definitions (EntireX Communicator and WebSphere MQ) appear.
Locate the source definition in the EntireX Communicator or WebSphere MQ categorization and right-click on the name.
A drop-down menu appears providing you with several options.
Select the option on the drop-down menu.
A dialog prompting you to verify that you really want to delete the source definition appears.
Select Yes to delete the definition.
The Adabas Analytics Collector MF supports three types of sources through which the analytics data can be sent to the targets: webMethods EntireX, WebSphere MQ (MQSeries) and Event Replicator Target Adapter. Before you can use the Adabas Analytics Collector MF, you must set up a source definition for every unique webMethods EntireX, Target Adapter or WebSphere MQ data source you will be using to send your analytics data for your Adabas Analytics Collector MF targets.
This section covers the following topics:
Note:
You will need to restart the Adabas Analytics Collector MF to fully process any
additions or changes made to Adabas Analytics Collector MF configuration definitions in the
Administration tool.
You have to define a webMethods EntireX Adapter source definition for each unique webMethods EntireX Adapter system that the Adabas Analytics Collector MF needs to use to access your target and to communicate with Event Replicator for Adabas via webMethods EntireX Adapter.
To define a new webMethods EntireX Adapter source definition
for Adabas Analytics Collector MF:
Start up the Administration tool, as described in Starting the Administration Tool.
The Administration tool window appears.
On the left side of the Administration tool window, expand the Adabas Analytics Collector MF section.
Expand the environment section.
Expand the Sources section.
Right-click on the EntireX Adapter section and then select from the resulting drop-down menu.
Or:
Select the command from the
menu and then from the resulting submenu.
A blank webMethods EntireX Adapter source definition panel appears on the right side of the Administration tool window, as shown below:
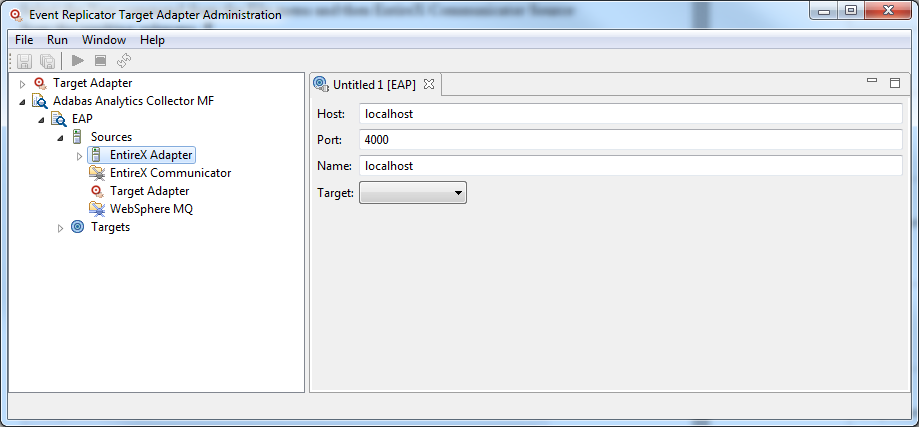
Specify field values for the webMethods EntireX Adapter source definition on the panel. Each field and option is described in the following table.
| Entry Name | Description |
|---|---|
| Host | Specify the host of the webMethods EntireX Adapter system that will be sending analytics data to Adabas Analytics Collector MF. |
| Port | Specify the port of the webMethods EntireX Adapter system that will be sending analytics data to Adabas Analytics Collector MF. |
| Name | Specify the name of the webMethods EntireX Adapter system that will be sending analytics data to Adabas Analytics Collector MF. |
| Target | Click on the arrow associated with this field and select the target definition to which replicated data received from this source should be sent. |
Once all fields have been specified satisfactorily, click
the button () on the toolbar to save the webMethods EntireX
Adapter source definition.
Or:
Select the command on the
menu of the Administration tool.
A Save As pop-up window appears.
Specify the name of the new webMethods EntireX Adapter source definition on the Save As pop-up window and then click the button.
The definition is saved in the configuration file for the Adabas Analytics Collector MF.
You have to define a webMethods EntireX Communicator source definition for each unique webMethods EntireX Communicator system that the Adabas Analytics Collector MF needs to use to access your target and to communicate with Event Replicator for Adabas via webMethods EntireX Communicator.
To define a new webMethods EntireX Communicator source
definition for Adabas Analytics Collector MF:
Start up the Administration tool, as described in Starting the Administration Tool.
The Administration tool window appears.
On the left side of the Administration tool window, expand the Adabas Analytics Collector MF section.
Expand the environment section.
Expand the Sources section.
Right-click on the EntireX Communicator section and then select from the resulting drop-down menu.
Or:
Select the command from the
menu and then from the resulting submenu.
A blank webMethods EntireX Communicator source definition panel appears on the right side of the Administration tool window, as shown below:
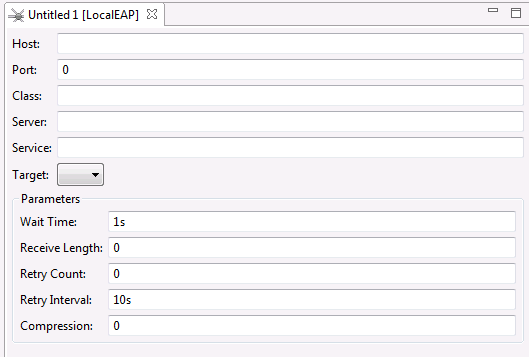
Specify field values for the webMethods EntireX Communicator source definition on the panel. Each field and option is described in the following table.
| Entry Name | Description |
|---|---|
| Host | Specify the host of the webMethods EntireX Communicator system that will be sending analytics data to Adabas Analytics Collector MF. |
| Port | Specify the port of the webMethods EntireX Communicator system that will be sending analytics data to Adabas Analytics Collector MF. |
| Class | Specify the class of the webMethods EntireX Communicator system that will be sending analytics data to Adabas Analytics Collector MF. |
| Server | Specify the server name of the webMethods EntireX Communicator system that will be sending analytics data to Adabas Analytics Collector MF. |
| Service | Specify the service of the webMethods EntireX Communicator system that will be sending analytics data to Adabas Analytics Collector MF. |
| Target | Click on the arrow associated with this field and select the target definition to which replicated data received from this source should be sent. |
| Wait Time | Indicate how long this source will wait for a message, in seconds. This is how long the source will wait to receive a message before it attempts to receive a different message. For webMethods EntireX Communicator sources, the default value is "1s" (one second). |
| Receive Length | Specify the maximum message size that can be processed by this source. Entering as 0 uses the Adabas Analytics Collector MF default value of 32767. |
| Retry Count | Specify the number of times this source should attempt to connect to the target RDBMS database or web service if the connection to the connection is down. The default is "0" (zero) times, meaning connections will not be retried if there is a failed connect attempt. |
| Retry Interval | Specify the number of seconds this source should wait between attempts to reconnect to the target RDBMS database or web service when the connection is down. The default is "10s" seconds. |
| Compression | Specify the webMethods EntireX Communicator data compression level for data coming to the Event Replicator from this source. Valid compression levels are integers ranging from "0" (zero, or no compression) to "8" (maximum compression). The default is "0". |
Once all fields have been specified satisfactorily, click
the button () on the toolbar to save the webMethods EntireX
Communicator source definition.
Or:
Select the command on the
menu of the Administration tool.
A Save As pop-up window appears.
Specify the name of the new webMethods EntireX Communicator source definition on the Save As pop-up window and then click the button.
The definition is saved in the configuration file for the Adabas Analytics Collector MF.
You have to define a Target Adapter source definition for each unique Event Replicator Target Adapter that the Adabas Analytics Collector MF needs to use to access your target and to communicate with the Target Adapter.
To define a new Target Adapter source definition for
Adabas Analytics Collector MF:
Start up the Administration tool, as described in Starting the Administration Tool.
The Administration tool window appears.
On the left side of the Administration tool window, expand the Adabas Analytics Collector MF section.
Expand the environment section.
Expand the Sources section.
Right-click on the Target Adapter section and then select from the resulting drop-down menu.
Or:
Select the command from the
menu and then from the resulting submenu.
A blank Target Adapter source definition panel appears on the right side of the Administration tool window, as shown below:
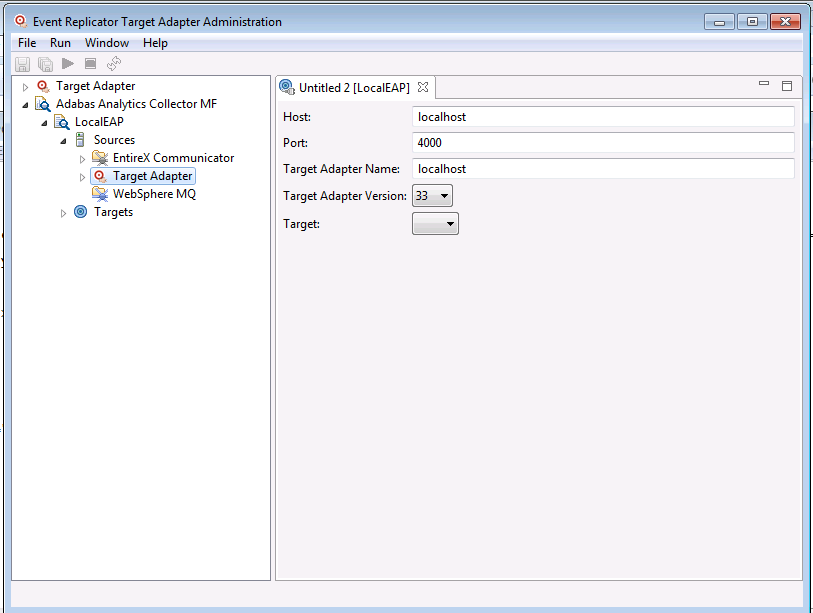
Specify field values for the Target Adapter source definition on the panel. Each field and option is described in the following table.
| Entry Name | Description |
|---|---|
| Host | Specify the case-sensitive Target Adapter host name. |
| Port | Specify the Target Adapter JMX port number. The default of 4000 is given. |
| Target Adapter Name | Specify the name for the Target Adapter to distinguish in on the target. |
| Target Adapter Version | Specify the version of the Target Adapter. |
| Target | Click on the arrow associated with this field and select the target definition to which replicated data received from this source should be sent. |
Once all fields have been specified satisfactorily, click
the button () on the toolbar to save the Target Adapter source
definition.
Or:
Select the command on the
menu of the Administration tool.
A Save As pop-up window appears.
Specify the name of the new Target Adapter source definition on the Save As pop-up window and then click the button.
The definition is saved in the configuration file for the Adabas Analytics Collector MF
The default monitoring interval for the collection of metrics from Target Adapter sources is 5 seconds. This can be overridden by right-clicking the Adabas Analytics Collector MF > CollectorName > Sources > Target Adapter node in the display and selecting Parameter:
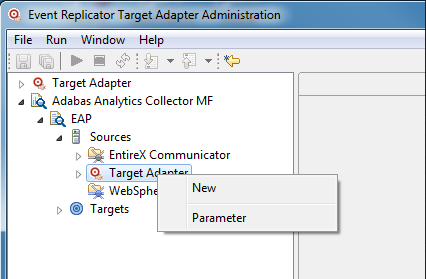
Then setting the interval as follows:
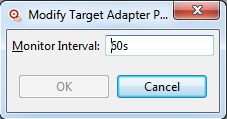
The interval should be specified as a number followed by "s", indicating the number of seconds elapsed between each collection of metrics from the Target Adapter.
Note:
This parameter setting is global for all Target Adapter
sources.
You have to define a WebSphere MQ source definition for each unique WebSphere MQ system that the Adabas Analytics Collector MF needs to use to access your target and to communicate with Event Replicator for Adabas via WebSphere MQ.
To define a new WebSphere MQ source definition for
Adabas Analytics Collector MF:
Start up the Administration tool, as described in Starting the Administration Tool.
The Administration tool window appears.
On the left side of the Administration tool window, expand the Adabas Analytics Collector MF section.
Expand the environment section.
Expand the Sources section.
Right-click on the WebSphere MQ section and then select from the resulting drop-down menu.
Or:
Select the command from the
menu and then from the resulting submenu.
A blank WebSphere MQ source definition panel appears on the right side of the Administration tool window, as shown below:
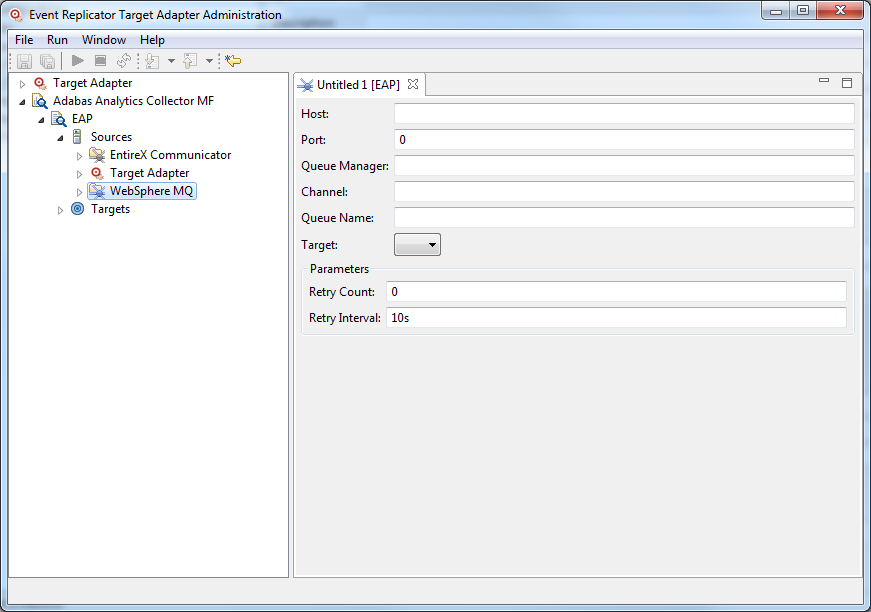
Specify field values for the WebSphere MQ source definition on the panel. Each field and option is described in the following table.
| Entry Name | Description |
|---|---|
| Host | Specify the case-sensitive WebSphere MQ host name. |
| Port | Specify the WebSphere MQ port number. |
| Queue Manager | Specify the case-sensitive WebSphere MQ queue manager name to which you are trying to connect. |
| Channel | Specify the case-sensitive WebSphere MQ channel name to which you are trying to connect. |
| Queue Name | Specify the case-sensitive WebSphere MQ queue name you want to use to receive replicated data from the Event Replicator Server. |
| Target | Click on the arrow associated with this field and select the target definition to which replicated data received from this source should be sent. |
| Retry Count | Specify the number of times this source should attempt to connect to the target if the connection to the connection is down. The default is "0" (zero) times. |
| Retry Interval | Specify the number of seconds this source should wait between attempts to reconnect to the target when the connection is down. The default is "10s" seconds. |
Once all fields have been specified satisfactorily, click
the button () on the toolbar to save the WebSphere MQ source
definition.
Or:
Select the command on the
menu of the Administration tool.
A Save As pop-up window appears.
Specify the name of the new WebSphere MQ source definition on the Save As pop-up window and then click the button.
The definition is saved in the configuration file for the Adabas Analytics Collector MF.
To modify an existing source definition:
Start up the Administration tool, as described in Starting the Administration Tool.
The Administration tool window appears.
On the left side of the Administration tool window, expand the Adabas Analytics Collector MF node, environment node and then the Sources section.
The high-level categorizations of the source definitions (EntireX Communicator, Target Adapter and WebSphere MQ) appear.
Locate the source definition in the EntireX Communicator, Target Adapter or WebSphere MQ categorization, as appropriate and double-click on the name.
The definition opens on the right side of the Administration tool.
Modify the values of the source definition as described in Defining a New webMethods EntireX Source Definition, Defining a New Target Adapter Source Definition and Defining a New WebSphere MQ Source Definition.
Once all fields have been specified satisfactorily, click
the button () on the toolbar to save the source
definition.
Or:
Select the command on the
menu of the Administration tool.
The definition is saved in the configuration file for the Adabas Analytics Collector MF.
To rename an existing source definition:
Start up the Administration tool, as described in Starting the Administration Tool.
The Administration tool window appears.
On the left side of the Administration tool window, expand the Adabas Analytics Collector MF node, environment node and then the Sources section.
The high-level categorizations of the source definitions (EntireX Communicator, Target Adapter and WebSphere MQ) appear.
Locate the source definition in the EntireX Communicator, Target Adapter or WebSphere MQ categorization and right-click on the name.
A drop-down menu appears providing you with several options.
Select the option on the drop-down menu.
A Rename dialog for the source definition appears. Here is sample dialog for renaming a webMethods EntireX source definition:
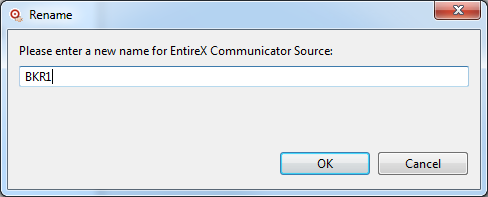
Supply a new name for the source definition in the space provided and click .
Once all fields have been specified satisfactorily, click
the button () on the toolbar to save the source
definition.
Or:
Select the command on the
menu of the Administration tool.
The definition is saved in the configuration file for the Adabas Analytics Collector MF.
To delete an existing source definition:
Start up the Administration tool, as described in Starting the Administration Tool.
The Administration tool window appears.
On the left side of the Administration tool window, expand the Adabas Analytics Collector MF node, environment node and then the Sources section.
The high-level categorizations of the source definitions (EntireX Communicator, Target Adapter and WebSphere MQ) appear.
Locate the source definition in the EntireX Communicator, Target Adapter or WebSphere MQ categorization and right-click on the name.
A drop-down menu appears providing you with several options.
Select the option on the drop-down menu.
A dialog prompting you to verify that you really want to delete the source definition appears.
Select Yes to delete the definition.
Event Replicator Target Adapter provides two commands (batch utilities) you can use to verify the connection between your environment and the source definition.
| Warning: Do not run these commands if Event Replicator Target Adapter is already started. If it is started, stop it before running these commands. In addition, both of these commands will drain the input queue if anything is in it. |
These commands are located in the bin directory, wherever the Event Replicator Target Adapter source code and program files are installed.
Use the etbivp
command to verify the connection between your
environment and webMethods EntireX.
Use the mqsivp
command to verify the connection between your
environment and WebSphere MQ.
At a command prompt, navigate to the bin directory and enter the appropriate command, using one of the following syntaxes:
etbivp brokerID class/server/service tracelevel (scm userid token password)
or
mqsivp queuemgr host port channel queue tracelevel
where:
brokerID is the URL (host:port) of the webMethods EntireX Broker system to which you are trying to connect.
class/server/service is the case-sensitive class, server, and service name of the webMethods EntireX Broker to which you are trying to connect.
queuemgr is the case-sensitive WebSphere MQ queue manager name to which you are trying to connect.
host is the WebSphere MQ host name.
port is the WebSphere MQ port number.
channel is the case-sensitive WebSphere MQ channel to which you are trying to connect.
queue is the case-sensitive WebSphere MQ queue name to which you are trying to connect.
tracelevel is the trace level that should be used for the connection attempt. Valid values range from "0" (no trace) through "5". The default is "0".
Optional for etbivp if the EntireX Broker queue is configured for Single Conversation Mode:
scm indicates you are connecting to an input queue configured for Single Conversation Mode.
userid is the Broker userid.
token is the user token (Single Conversation Mode).
password is an optional password if the EntireX Broker is running in secured mode.
If errors occur when you run etbivp or mqsivp, rerun them using a trace level setting of "3". Then submit the trace log to your webMethods EntireX or WebSphere MQ administrators to identify the problem. For more information about Event Replicator Target Adapter log files, read Managing Event Replicator Target Adapter Log Files and Console Messages.
You can review all of the configuration definitions you have specified in the Administration tool. In addition, you can dynamically alter some of them while the Event Replicator Target Adapter is running; there is no need to restart the Event Replicator Target Adapter to pick up these changes.
Note:
Some configuration definitions can only be altered in the
configuration area of the Administration tool. Changes to these settings
require that you restart the Event Replicator Target Adapter to fully process the changes. For more
information, read Restarting the
Event Replicator Target Adapter.
To review configuration definitions in the Administration tool
and optionally modify the editable fields:
Start up the Administration tool, as described in Starting the Administration Tool.
The Administration tool window appears.
Verify that the Event Replicator Target Adapter is started. If is not, start it now. For more information, read Starting the Event Replicator Target Adapter
On the left side of the Administration tool window, expand the Target Adapter section and then expand the Configurations section.
The configuration definitions are listed under Configurations.
Click on any definition under Configurations
The specifications for configuration definition you selected appear on the right side of the window, where you can review them.
Any fields on the right side of the window that appear in
bright blue can be dynamically altered. For example, in the following window
the DbErrorContinue and
DbDeleteBeforeInsert properties can be dynamically
altered.
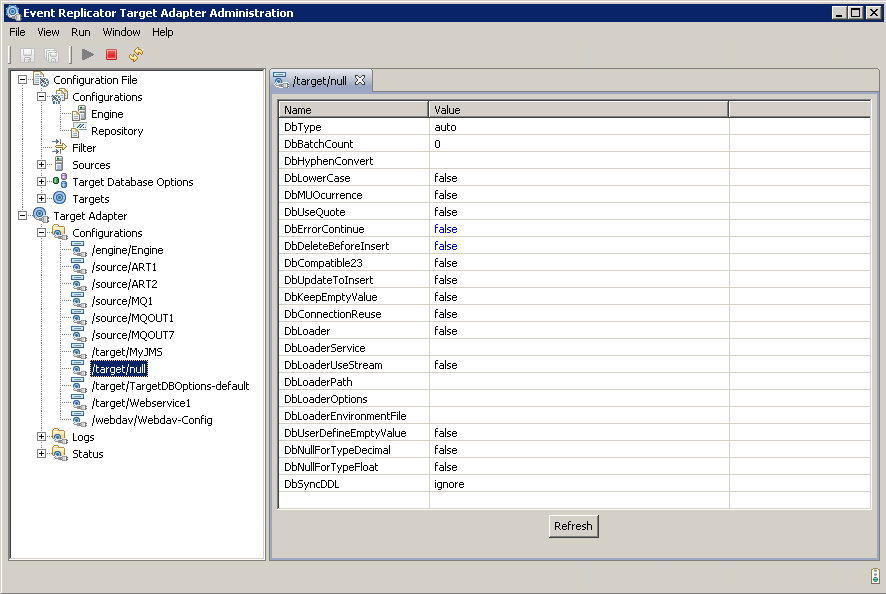
Optionally, modify any fields you want that appear in bright
blue on the right side of the window. When all your updates are made, click the
button () on the toolbar to save the configuration
definition.
Or:
Select the command on the
menu of the Administration tool.
The configuration definition is saved in the context file for the Event Replicator Target Adapter.
You can review all of the Event Replicator Target Adapter log files located in the \logs subdirectory wherever your Event Replicator Target Adapter program data files are installed.
To review log files in the Administration tool:
Start up the Administration tool, as described in Starting the Administration Tool.
The Administration tool window appears.
Verify that the Event Replicator Target Adapter is started. If is not, start it now. For more information, read Starting the Event Replicator Target Adapter.
On the left side of the Administration tool window, expand the Target Adapter section and then expand the Logs section.
The log files are listed under Logs.
Click on any log file under Logs
The contents of the log file appear on the right side of the screen. The following example shows one selected log file's contents on the right side of the screen:
Note:
You can use the button to
refresh the display.
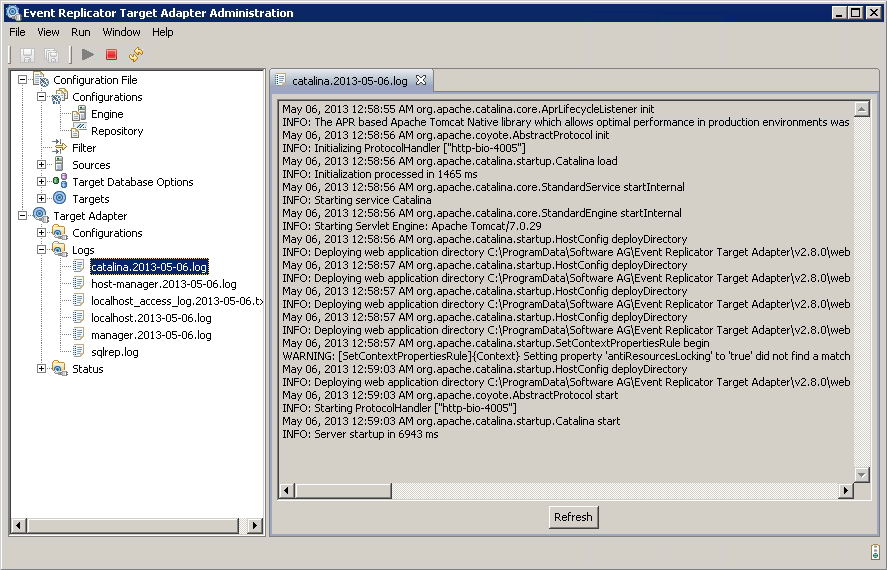
As records are received and processed by the Event Replicator Target Adapter, statistics are
passively updated. When the Event Replicator Target Adapter shuts down, the final statistics for the
session are written to a log file with a name in the format
ArtMetrics_yyyymmdd_hhmmss.log, where
yyyymmdd_hhmmss is the date and time that the log
file is written. You can review all of the Event Replicator Target Adapter log files located in the
\logs subdirectory wherever your Event Replicator Target Adapter program data files
are installed.
You can also review the ongoing Event Replicator Target Adapter processing statistics from the Administration tool.
To review the ongoing Event Replicator Target Adapter processing statistics in the
Administration tool:
Start up the Administration tool, as described in Starting the Administration Tool.
The Administration tool window appears.
Verify that the Event Replicator Target Adapter is started. If is not, start it now. For more information, read Starting the Event Replicator Target Adapter.
On the left side of the Administration tool window, expand the Target Adapter section and then expand the Status section.
The statistics areas are listed under Status.
Click on any statistic area under Status
The processing statistics for that area appear on the right side of the screen. The following example shows the status of the configuration engine on the right side of the screen:
Note:
You can use the button to
refresh the display.
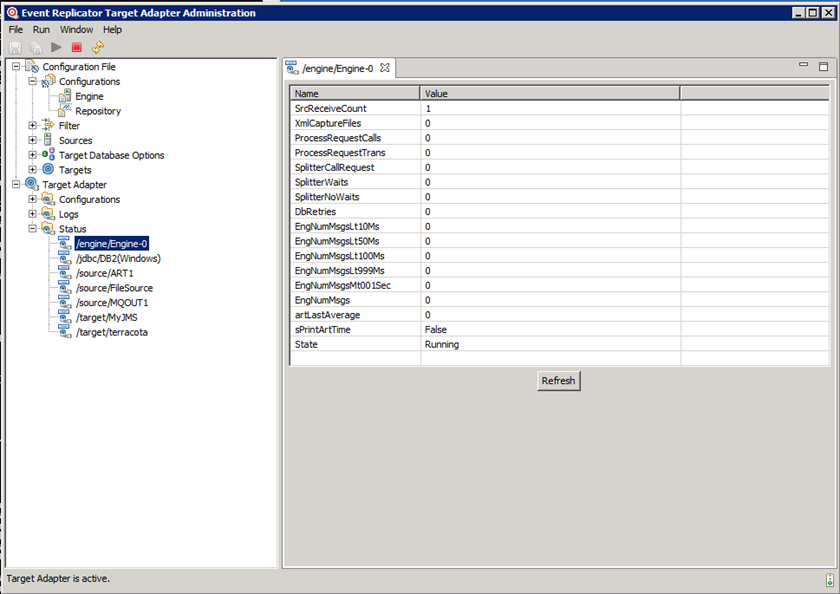
The following table provides lists each of the statistics collected, with a brief explanation of each.
Note:
This list may not be complete or comprehensive. Changes to the
statistics collected may change at any time.
| Category Type | Statistic | Description |
|---|---|---|
| Engine (/engine/...) |
artLastAverage | Event Replicator Target Adapter average processing time.
This value is the average of the backend Event Replicator Target Adapter internal processing time. It is expressed in milliseconds. There are two parts of such backend processing time:
The value of artLastAverage is calculated as the total time spent in backend Event Replicator Target Adapter internal processing during the last minute divided by the number of backend calls occurring in that minute. |
| DbRetries | The number of database retry attempts. | |
| EngNumMsgs | Total number of messages processed. | |
| EngNumMsgsLt100Ms | The number of messages processed in under 100 milliseconds | |
| EngNumMsgsLt10Ms | The number of messages processed in under 10 milliseconds. | |
| EngNumMsgsLt50Ms | The number of messages processed in under 50 milliseconds. | |
| EngNumMsgsLt999Ms | The number of messages processed in under 999 milliseconds. | |
| EngNumMsgsMt001Sec | The number of messages processed in over 001 second. | |
| ProcessRequestCalls | The number of call requests processed. | |
| ProcessRequestTrans | The number of transaction requests processed. | |
| SplitterCallRequest | The number of asynchronous process calls split. | |
| SplitterNoWaits | The number of splitter calls completed with no waits. | |
| SplitterWaits | The number of splitter calls that waited for a resource. | |
| sPrintArtTime | Event Replicator Target Adapter display statistics time. | |
| SrcReceiveCount | The number of receives issued. | |
| State | The engine state. | |
| XmlCaptureFiles | The number of capture files written. | |
| File Source (/source/sourcename) |
FileId | The file ID. |
| FileLastException | The last exception time. | |
| FileNumBytesReceived | The number of bytes received. | |
| FileNumCommits | The number of commits. | |
| FileNumExceptions | The number of exceptions. | |
| FileNumMsgs | The number of messages. | |
| FileNumRollbacks | The number of rollbacks. | |
| FileProcessingTime | The processing time. | |
| FileTimeException | The last exception time. | |
| FileTimeShutdown | The shutdown time. | |
| FileTimeStart | The start time. | |
| State | The current state. | |
| TransactionInfo | Last transaction information. | |
| Heartbeat (/heartbeat/destinationname) |
artTime | Time when message arrives at ART. |
| artTimeMilli | artTime in milliseconds. | |
| creationTime | Time the URBS was created. | |
| ctimeMilli | creationTime in milliseconds. | |
| destination | Destination Name. | |
| destinationType | Destination Type. | |
| eventId | Event Identification. | |
| hbtmMilli | InfoTime in milliseconds. | |
| hbtnMilli | newestItem time in milliseconds. | |
| hbtoMilli | oldestItem time in milliseconds. | |
| hsdrMilli | readFromSlog time in milliseconds . | |
| hsdwMilli | readFromSlog time in milliseconds. | |
| infoTime | Timestamp when Unit-of-Work status obtained from Entire Broker. | |
| latency | Heartbeat Latency - time span between creationTime and artTime. | |
| maxBytes | Max. value of bytes in one UOW- determined at infoTime *). | |
| maxMessages | Max. value of messages in one UOW - determined at infoTime *) . | |
| newestItem | Timestamp when newest item was stored in message queue - determined at infoTime *). | |
| nucleusId | Nucleus ID. | |
| numberBytes | Current number of bytes on queue - determined at infoTime *). | |
| numberHeartbeats | Total Number of Heartsbeats. | |
| numberMessages | Current number of messages on queue - determined at infoTime *). | |
| numberUows | Current number of UOWs on queue - determined at infoTime *). | |
| oldestItem | Timestamp when oldest item was stored in message queue - determined at infoTime *). | |
| processingTime | Heartbeat processing time - time span between creationTime and infoTime or zero if not a Broker destination. | |
| readFromSlog | Timestamp when heartbeat was read from SLOG **). | |
| replicatorId | Replicator ID. | |
| slogTime | Time on SLOG **). | |
| writtenToSlog | Timestamp when heartbeat was written to SLOG **) | |
| Latency (/latency/source.target.subscription) |
source | Source Name |
| target | Target Name | |
| subscription | Subscription Name | |
| messageSize | Total Size of all Messages | |
| numberMessages | Total Number of Messages | |
| latencyReplicator | Total Latency of the Replicator | |
| latencyMiddleware | Total Latency of the Middleware | |
| latencyTargetAdapter | Total Latency of the Target Adapter | |
| RDBMS Target (/jdbc/targetname) |
artExecLt10Ms | Event Replicator Target Adapter processes executed in under 10 milliseconds. |
| artExecLt50Ms | Event Replicator Target Adapter processes executed in under 50 milliseconds. | |
| artExecLt100Ms | Event Replicator Target Adapter processes executed in under 100 milliseconds. | |
| artExecLt999Ms | Event Replicator Target Adapter processes executed in under 999 milliseconds. | |
| artExecMt001Sec | Event Replicator Target Adapter processes executed in over 1 second. | |
| artLastAverage | Event Replicator Target Adapter average processing time.
This value is the average of the backend Event Replicator Target Adapter internal processing time. It is expressed in milliseconds. There are two parts of such backend processing time:
The value of artLastAverage is calculated as the total time spent in backend Event Replicator Target Adapter internal processing during the last minute divided by the number of backend calls occurring in that minute. |
|
| DbName | The database name. | |
| DbVersion | The database version. | |
| DbUrl | The database URL. | |
| DbDriverClass | The database driver class. | |
| DbDriverName | The database driver name. | |
| DbDriverVersion | The database driver version. | |
| dbExecLt10Ms | JDBC processes executed in under 10 milliseconds. | |
| dbExecLt50Ms | JDBC processes executed in under 50 milliseconds. | |
| dbExecLt100Ms | JDBC processes executed in under 100 milliseconds. | |
| dbExecLt999Ms | JDBC processes executed in under 999 milliseconds. | |
| dbExecMt001Sec | JDBC processes executed in over 1 second. | |
| DbUserName | The database user name. | |
| Commits | The number of commits to this database. | |
| Connections | The number of connections to this database. | |
| ConnectionsReused | The number of connections reused. | |
| lastAverage | JDBC average processing time.
Event Replicator Target Adapter records the time it takes to execute SQL statements via JDBC. It then calculates the JDBC average processing time by dividing the total JDBC elapsed time (in milliseconds) for all requests during the last minute by the total number of JDBC requests in milliseconds in the last minute. This value is only updated when there are JDBC function calls. It is usually zero unless SQL statements are being heavily processsed. Note: |
|
| sFakeIUD | The number of fake DB insert/update/delete attempts. | |
| sPrintArtTime | Event Replicator Target Adapter display backend statistics time. | |
| Statements | The number of statements for this database. | |
| TimeLastConnection | The time of last connection. | |
| TransactionTime | Total RDBMS time. | |
| Subscription | ProcessRequestCalls | The number of transaction requests. |
| TransactionInfo | Last transaction information. | |
| Table (/table/tablename) |
Table | Table Name |
| Target | Target Name | |
| Inserts | Table Inserts | |
| Updates | Table Updates | |
| Deletes | Table Deletes | |
| TotalCommands | Table Total Commands | |
| dbInsertExecLt10Ms | JDBC Insert Execution Time <10Ms | |
| dbInsertExecLt50Ms | JDBC Insert Execution Time <50Ms | |
| dbInsertExecLt100Ms | JDBC Insert Execution Time <100Ms | |
| dbInsertExecLt999Ms | JDBC Insert Execution Time <999Ms | |
| dbInsertExecLt060Sec | JDBC Insert Execution Time < 60s | |
| dbInsertExecMt001Min | JDBC Insert Execution Time >1 Min | |
| dbUpdateExecLt10Ms | JDBC Update Execution Time <10Ms | |
| dbUpdateExecLt50Ms | JDBC Update Execution Time <50Ms | |
| dbUpdateExecLt100Ms | JDBC Update Execution Time <100Ms | |
| dbUpdateExecLt999Ms | JDBC Update Execution Time <999Ms | |
| dbUpdateExecLt060Sec | JDBC Update Execution Time < 60s | |
| dbUpdateExecMt001Min | JDBC Update Execution Time >1 Min | |
| dbDeleteExecLt10Ms | JDBC Delete Execution Time <10Ms | |
| dbDeleteExecLt50Ms | JDBC Delete Execution Time <50Ms | |
| dbDeleteExecLt100Ms | JDBC Delete Execution Time <100Ms | |
| dbDeleteExecLt999Ms | JDBC Delete Execution Time <999Ms | |
| dbDeleteExecLt060Sec | JDBC Delete Execution Time < 60s | |
| dbDeleteExecMt001Min | JDBC Delete Execution Time >1 Min | |
| webMethods EntireX
Source (/source/sourcename) |
BrkExceptionNum | The number of exceptions. |
| BrkExceptionTime | The last exception time. | |
| BrkExceptionType | The last exception type. | |
| BrkId | The webMethods EntireX Broker ID. | |
| BrkInfo | webMethods EntireX Broker information. | |
| BrkNumBytesReceived | The number of bytes received. | |
| BrkNumBytesSent | The number of bytes sent. | |
| BrkNumCommits | The number of commits performed. | |
| BrkNumMsgs | The number of messages processed. | |
| BrkNumMsgsLt100Ms | The number of messages received in under 100 milliseconds. | |
| BrkNumMsgsLt10Ms | The number of messages received in under 10 milliseconds. | |
| BrkNumMsgsLt50Ms | The number of messages received in under 50 milliseconds. | |
| BrkNumMsgsLt999Ms | The number of messages received in under 999 milliseconds. | |
| BrkNumMsgsMt001Sec | The number of messages received in over 001 second. | |
| BrkNumPrefetchMax | The maximum number of prefetched messages. | |
| BrkNumRcvs | The number of messages received. | |
| BrkNumRollbacks | The number of rollbacks. | |
| BrkNumSends | The number of sends. | |
| BrkNumUows | The number of UOWs. | |
| BrkTimeCommit | The last commit time. | |
| BrkTimeReceive | The last receive time. | |
| BrkTimeRollback | The last rollback time. | |
| BrkTimeSend | The last send time. | |
| BrkTimeShutdown | The shutdown time. | |
| BrkTimeStart | The start time. | |
| State | The current state. | |
| TransactionInfo | Last transaction information. | |
| WebSphere MQ Source (/source/sourcename) |
MqsCfgHost | The WebSphere MQ host machine. |
| MqsCfgPort | The WebSphere MQ port number. | |
| MqsLastException | The last exception. | |
| MqsNumBytesReceived | The number of bytes received. | |
| MqsNumBytesSent | The number of bytes sent. | |
| MqsNumCommits | The number of commits. | |
| MqsNumExceptions | The number of exceptions. | |
| MqsNumMsgs | The number of messages. | |
| MqsNumRcvs | The number of receives. | |
| MqsNumRollbacks | The number of rollbacks. | |
| MqsNumSends | The number of sends. | |
| MqsTimeCommit | The last commit time. | |
| MqsTimeException | The last exception time. | |
| MqsTimeReceive | The last receive time. | |
| MqsTimeRollback | The last rollback time. | |
| MqsTimeSend | The last send time. | |
| MqsTimeShutdown | The shutdown time. | |
| MqsTimeStart | The start time. | |
| State | The current state. | |
| TransactionInfo | Last transaction information. | |
| JMS Target (/source//<targetname>) |
JMSProvider | The URL of the JMS provider. |
| JMSFactory | The JMS factory class in use. | |
| JMSConnection | The configured connection factory. | |
| JMSDestination | The destination topic. | |
| JMSNumCreates | The number of create statements processed. | |
| JMSNumInserts | The number of insert statements processed. | |
| JMSNumUpdates | The number of update statements processed. | |
| JMSNumDeletes | The number of delete statements processed | |
| JMSNumDrops | The number of drop statements processed. | |
| Terracotta Target (/target/<targetname>) |
Parameter | The location of the ehcache.xml file. |
| GenericNumCreates | The number of create statements processed. | |
| GenericNumInserts | The number of insert statements processed. | |
| GenericNumUpdates | The number of update statements processed. | |
| GenericNumDeletes | The number of delete statements processed. | |
| GenericNumDrops | The number of drop statements processed. | |
| GenericNumPopulates | The number of populate statements processed. |
*) value might be zero if no messages are stored in the message queue at infoTime.
**) value might be zero if heartbeat was not written to SLOG.


