A GFB definition defines a global format buffer (GFB) stored separately for reference in SFILE definitions. GFB definitions can be used to decompress replicated data from a specific database file for one or more subscriptions.
While a format buffer specification is required in a subscription's SFILE definition, a stored GFB definition does not need to be used. The SFILE definition could simply include the format buffer specifications it needs.
Using Event Replicator Administration you can manually add, modify, and delete GFB definitions. If you have an appropriate version of Predict installed (see Predict Requirements in the Event Replicator for Adabas Installation Guide), you can also generate a GFB. If the correct version of Predict is not installed, you will not be able to use this feature.
Notes:
This document covers the following topics:
![]() To use Event Replicator Administration to list the general format buffer (GFB) definitions
stored in the Replicator system file:
To use Event Replicator Administration to list the general format buffer (GFB) definitions
stored in the Replicator system file:
Select an Event Replicator Server in tree-view as described in Selecting Event Replicator Databases.
Click and expand Replication Definitions in tree-view under the selected database.
Click on Global Format Buffers in the tree-view under Replication Definitions.
A table listing the GFB definitions in the Replicator system file appears in detail-view.
You can add global format definitions by typing in the format buffer definition manually or using Predict to generate one for you. This section describes how to add one manually.
![]() To use Event Replicator Administration to add a global format definition manually to the
Replicator system file:
To use Event Replicator Administration to add a global format definition manually to the
Replicator system file:
List the GFB definitions in Event Replicator Administration, as described in Listing GFB Definitions.
The GFB definitions are listed in detail-view.
Right-click on Global Format Buffers in the tree-view under Replication Definitions.
A drop-down menu appears.
Click on Create New Format Buffer in the drop-down menu.
A blank Create New Global Format Buffer panel appears in detail-view.
Tab to Value of the Global Format Buffer Name field and specify a unique name for the global format buffer definition. The name must be between one and seven alphanumeric characters long.
Note:
If, at this point, you want to generate the GFB and field table,
rather than enter it manually, click on . The Predict Parameters table
appears in detail-view. For more information about generating a GFB, skip the
rest of the documentation in this section and read
Generating a
GFB.
If you elect not to generate the GFB, use the box in the Create New Global Format Buffer panel to manually specify the format buffer for this definition. The format buffer must conform to the format buffer requirements (for read commands) documented in the Adabas command reference documentation.
Use the scroll bar to scroll backwards and forwards through the format buffer definition.
PE and MU fields cannot use the range notation 1-N in format buffers for a subscription that is sent to a destination that has specified the replication intialization parameter DCLASS=SAGTARG. The SAGTARG application invoked requires that the range of occurrences specified are contained in the record buffer even if they are empty occurrences. 1-N results in a range of 1-191, but unless there are 191 occurrences containing data, space in the record buffer is not allocated for any empty occurrences, resulting in incorrect field positioning when processing the record.
If the destination target for replicated data is an Adabas mainframe database running Adabas 8.1.3 or later, you can specify the symbolic notation "C." alone as the global format buffer. This notation will cause the Event Replicator Server to replicate the entire source record to the target mainframe Adabas database.
Caution:
This "C." option may be used
only if the destination target file has been defined with the same
fields in the same order as the fields in the source file; if there are
differences in the definitions of the files, the replication of the data is
likely to incur errors. The only exception to this rule is that the definitions
of the descriptors and superdescriptors in the target and source files may be
different.
When all specifications have been made to your satisfaction, click to save the GFB definition.
If you have Predict 4.4.1 with Service Pack 3 (or higher) installed, you can now generate format buffers and corresponding field tables from Predict file definitions using the Event Replicator Administration. If this version of Predict is not installed, you will not be able to use this feature.
Notes:
![]() To use Event Replicator Administration to generate global format buffer definition using
Predict:
To use Event Replicator Administration to generate global format buffer definition using
Predict:
Click on while editing a GFB definition.
The following screen appears in detail-view.
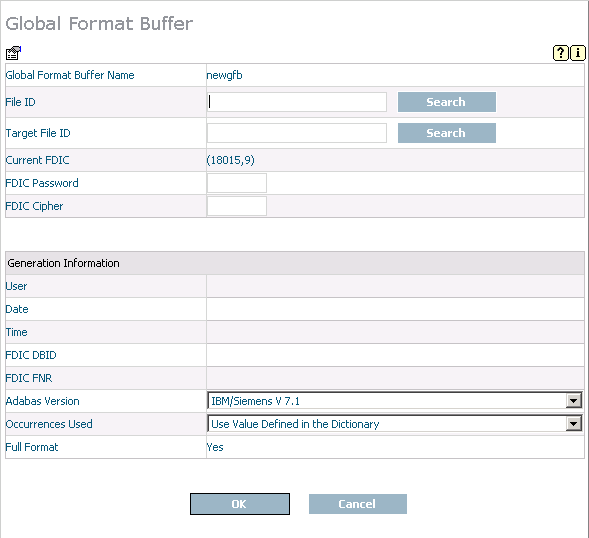
Update the following fields in the screen as described in the following table.
| Parameter Name | Specify | Default |
|---|---|---|
| Global Format Buffer Name | The unique name of the GFB definition you are editing. You cannot change this name here. | --- |
| File ID | The name of a Predict file with a file type or
Adabas (A) or Adabas user view (U).
Use the button to search and select a file from a list. |
--- |
| Target file ID | The name of a Predict file with a file type of
sequential (S). This file may be used to insert space notation (nX) into the
format buffer. For fields in the target file with matching definitions in the
File ID file (in other words, if a field exists with the same field long name),
a short name clause is generated. For fields that do not have a matching
definition in the File ID file, an appropriate space notation (nX clause) is
generated. The spaces defined by nX clauses can be filled using a user exit.
Use the button to search and select a file from a list. |
--- |
| Current FDIC | The database and file number of the current Predict file. | --- |
| FDIC Password | The password for the current Predict file. | --- |
| FDIC Cipher | The cipher for the current Predict file. | --- |
| Adabas version | The version of Adabas for which the global
format buffer was generated.
Select a version from the list. If you want special fields and descriptors included in the generated GFB and corresponding field tables, select the version that includes the phrase "Collation DEs are in Record/Format Buffer". |
|
| Occurrences used | How multiple occurrences of PE and MU fields
are generated in the GFB and resulting field table. A value of
"Use Maximum" indicates that the maximum number of
occurrences should be generated (191); a value of
"No" indicates that no occurrences will be
generated; a value of "Use value defined in the
dictionary" indicates that the number of occurrences defined by
the Predict Occ attribute should be
generated.
|
"Use value defined in the dictionary" |
You cannot modify the following fields on this screen. These display-only fields are described in the following table:
| Parameter Name | Displays |
|---|---|
| User | The user ID of the user who generated the global format buffer. |
| Date | The date the global format buffer was generated. |
| Time | The time of day the global format buffer was generated. |
| FDIC DBID | The current database of the Predict file. |
| FDIC FNR | The current file number of the Predict file. |
| Full format | Whether the full format buffer was generated. The full format buffer includes the length and format of Adabas fields. A value of "Yes" indicates that the full format buffer was generated; a value of "No" indicates it was not. |
When you have supplied values for the fields, click to start generating the global format buffer.
A Global Format Buffer table appears in detail-view showing the generated GFB.
The Type column identifies the field type. SQL Significance Indicator fields are marked with an "_S"; counter fields are marked with "CM" or "CP" in the Type column.
Optionally, modify the Cs, Read Only, and Key Type settings for the fields, as described in the following table:
| Setting | Valid Values | Description |
|---|---|---|
| Cs | "C" or blank | This setting indicates whether or not the
field content should be converted to character format in the destination user
exit. The Cs setting is only modifiable for non-counter fields in binary format
with lengths of 1-8 characters. Valid values are C (convert to the field
content to character) or blank (do not convert the field content).
Note: |
| Read Only | "Y" or blank | This setting indicates whether or not the
field is read-only. Read-only fields are not replicated. When this is checked,
it indicates that the field is read-only (not replicated); a blank value
indicates that the field is not read-only and is replicated.
Note: |
| Key Type | "Descriptor", "Primary Key", "UQ Descriptor", or "no key" | This setting indicates the kind of key field
that the field represents. Possible values are:
Note: |
When all specifications have been made to your satisfaction, click to save the GFB definition.
If you have generated a GFB and field table using the Data Mapping Tool, you can import it into Event Replicator Administration and save it on the Replicator system file. Once it is stored on the Replicator system file, it can be used with the Event Replicator Target Adapter to replicate data to an RDBMS. For complete information on using the Data Mapping Tool, read Using the Data Mapping Tool.
Data Mapping Tool-generated GFBs and field tables can be imported into new and existing GFB definitions. If you want to import them into an existing GFB definition, the existing GFB definition must not already have an associated field table defined. This section covers the following topics:
Importing a Data Mapping Tool GFB and Field Table into a New GFB Definition
Importing a Data Mapping Tool GFB and Field Table into an Existing GFB Definition
![]() To import a Data Mapping Tool-generated GFB and field table into a new GFB
definition:
To import a Data Mapping Tool-generated GFB and field table into a new GFB
definition:
List the GFB definitions in Event Replicator Administration, as described in Listing GFB Definitions.
The GFB definitions are listed in detail-view.
Right-click on Global Format Buffers in the tree-view under Replication Definitions and click on Create New Format Buffer in the resulting drop-down menu.
A drop-down menu appears.
Click on Create New Format Buffer in the drop-down menu.
A blank Create New Global Format Buffer panel appears in detail-view.
Specify a unique name for the GFB definition in the Global Format Buffer Name field and click the button.
The Import File panel appears in detail-view.
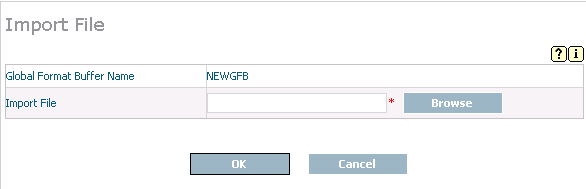
In the Import File field on the Import File panel, specify the fully qualified path name of the file containing the Data Mapping Tool-generated GFB and field table.
Or:
Click on the button to locate the
file. The Select Import File panel appears allowing you to
locate and select the file.
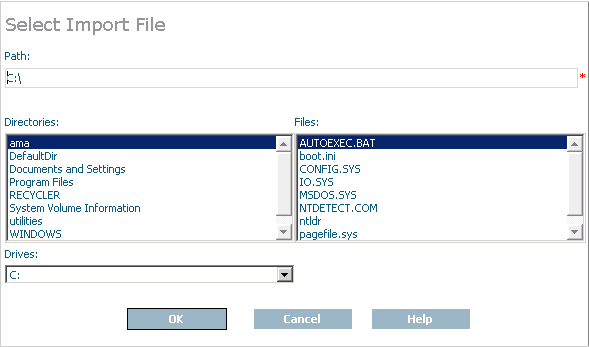
Use the drop-down boxes and other fields on the Select Import File panel to select the drive, directory, and file name of the file. When the file has been selected, click to return to the Import File panel.
The Import File panel appears with the name of the Data Mapping Tool-generated file specified in the Import File field.
Click on the Import File panel.
The Data Mapping Tool-generated file is imported into Event Replicator Administration, stored in the Replicator system file, and a Global Format Buffer panel appears in detail-view, showing the GFB.
![]() To import a Data Mapping Tool-generated GFB and field table into an existing GFB
definition:
To import a Data Mapping Tool-generated GFB and field table into an existing GFB
definition:
List the GFB definitions in Event Replicator Administration, as described in Listing GFB Definitions.
The GFB definitions are listed in detail-view.
Select an existing GFB definition in the GFB list
The existing GFB definition appears in detail-view.
Click on the button.
The existing GFB definition still appears in detail-view, but now you have the option of generating a field table using Predict (read Generating a GFB) or of importing a GFB file with an associated field table.
Click the button.
The Import File panel appears in detail-view.
In the Import File field on the Import File panel, specify the fully qualified path name of the file containing the Data Mapping Tool-generated GFB and field table.
Or:
Click on the button to locate the
file. The Select Import File panel appears allowing you to
locate and select the file. Use the drop-down boxes and other fields on this
panel to select the drive, directory, and file name of the file. When the file
has been selected, click to return to the
Import File panel.
The Import File panel appears with the name of the Data Mapping Tool-generated file specified in the Import File field.
Click on the Import File panel.
The Data Mapping Tool-generated file is imported into Event Replicator Administration, stored in the Replicator system file, and a Global Format Buffer panel appears in detail-view, showing the GFB.
If you have generated a GFB using Predict or if you have imported a GFB and field table that were generated using the Data Mapping Tool, you can review the GFB generation information. This includes, but is not limited to statistics such as the file ID (table name) included in the GFB and the date and time the GFB was generated.
![]() To review the generation information of a GFB:
To review the generation information of a GFB:
List the GFB definitions in Event Replicator Administration, as described in Listing GFB Definitions.
The GFB definitions are listed in detail-view.
Select a generated or imported GFB from the list.
The GFB Definition panel appears in detail-view listing the current settings for the GFB definition you selected.
Click on the  icon in the
upper left corner of the detail-view display.
icon in the
upper left corner of the detail-view display.
The Generation Information is listed in detail-view.
![]() To use Event Replicator Administration to modify a global format buffer (GFB) definition in the
Replicator system file:
To use Event Replicator Administration to modify a global format buffer (GFB) definition in the
Replicator system file:
List the GFB definitions in Event Replicator Administration, as described in Listing GFB Definitions.
The GFB definitions are listed in detail-view.
Locate the definition you want to modify in the table in detail-view and click on it.
The GFB Definition panel appears in detail-view listing the current settings for the GFB definition you selected.
Click the button.
The GFB parameters you can modify become editable in detail-view. For information on modifying these parameters, read the descriptions of Adding GFB Definitions and Generating a GFB.
When all modifications have been made, click to save the changes or click to cancel the changes.
![]() To use Event Replicator Administration to copy a global format buffer (GFB) definition in the
Replicator system file:
To use Event Replicator Administration to copy a global format buffer (GFB) definition in the
Replicator system file:
List the GFB definitions in Event Replicator Administration, as described in Listing GFB Definitions.
The GFB definitions are listed in detail-view.
Locate the definition you want to copy in the table in detail-view and click on it.
The GFB Definition panel appears in detail-view listing the current settings for the GFB definition you selected.
Click the button.
A copy of the GFB definition is created and its parameter values appear in detail-view.
Specify a new, unique name for the copy of the GFB definition in the Value column for the Global Format Buffer Name parameter.
If you wish, modify any other parameters for the new copy in detail-view. For information on modifying the parameters, read the description of Adding GFB Definitions.
When all modifications have been made, click to save the changes or click to cancel the copy.
![]() To use Event Replicator Administration to delete a global format buffer (GFB) definition in the
Replicator system file:
To use Event Replicator Administration to delete a global format buffer (GFB) definition in the
Replicator system file:
List the GFB definitions in Event Replicator Administration, as described in Listing GFB Definitions.
The GFB definitions are listed in detail-view.
Locate the definition you want to delete in the table in detail-view and click on it.
The GFB Definition panel appears in detail-view listing the current settings for the GFB definition you selected.
Click the button.
A confirmation panel appears verifying that you want to delete the definition. If you click (indicating that you do want to delete the definition), the definition is deleted. If you click (indicating that you do not want to delete the definition), the definition is not deleted.