The upgrade process is similar to the installation process. Please refer to the webMethods Installer documentation, which you can find at http://documentation.softwareag.com/. When selecting the installation directory, ensure not to select the directory where ApplinX is currently installed (the default path is C:\SoftwareAG).
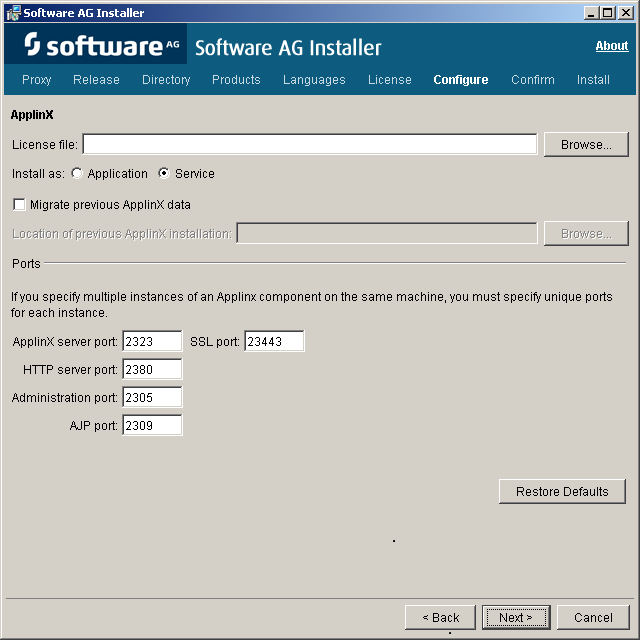
In the panel including the ApplinX specific parameters, browse and select the ApplinX license file.
When opening the Software AG Designer, the default workspace will point to a new location. It is possible to select and use the workspace location from the previous version, and in this way preserve your preferences (such as ApplinX server connection list and ApplinX (Eclipse) preferences ()) from the previous version. If you use the new workspace location, check that the preferences suit your needs.
From version 8.2, the batch and shell commands used to start and stop the server, and to start the Administrator are located in the <ApplinX installation>/bin folder.
When using ApplinX web applications (JSP or .NET): Upgrade the web application using the ApplinX Web Application Manager in the Designer (refer to Framework Management in the Web Application Development documentation of ApplinX).
You may have made changes in your previous ApplinX version, in one of the following files. Backup copies of these files can be found (unless otherwise stated) in the ApplinX installation directory with the .bak suffix. To apply these changes to your current ApplinX version, you must copy the changes from within the backup files to the relevant file.
GXApplinXService.ini
bin/startup.bat
bin/startup.sh
bin/gxadmin.bat
bin/gxadmin.sh
config/gxadmin.prp
config/gxstartup.prp
ApplinX applications from previous ApplinX versions are able to run on the current ApplinX version once you have performed a number of migration activities. The migration process has been tested for supported versions. Migration can be performed when installing the new ApplinX server version or via batch files after the new server has been installed.
The following topics are covered below:
Back up the repository database.
When using ApplinX .NET 1.1 web applications based on Visual Studio 2003, you will require installing Visual Studio 2008/2010.NET 2.0-4.0 as .NET framework 1.1 is no longer supported.
Migration can be carried out as follows:
To migrate ApplinX applications during the installation process: In the screen where you select the ApplinX parameters, select the Migrate previous ApplinX data check box and specify the existing installation location.
To migrate all ApplinX applications after the installation has been completed: Run the <ApplinX root>\utilities\migrate_ApplinX_server.bat/sh file, enter the installation path of your previous installation, and then enter the new path of the current installation.
For example: migrate_ApplinX_server.bat "c:\ApplinX52"
"c:\SoftwareAG\ApplinX"
To migrate a single ApplinX application from versions previous to 8.0:
Export the relevant GXZ file of the application (the GXZ file in older versions (5 and below) includes both the application and the entities).
Convert the GXZ file to a GXAR file (using <ApplinX root>/utilities/convert_gxz_to_gxar.bat). Refer to Convert Utility Batch File in the Administration documentation.
Import the GXAR file into ApplinX 8.x. Refer to Importing an Application's Configuration or Entities in the Designing and Developing an Application documentation.
To migrate a single ApplinX application from version 8.x and above:
Export the relevant GXAR file of the application (the GXAR file includes both the application and entities).
Import the GXAR to the new version. Refer to Importing an Application's Configuration or Entities in the Designing and Developing an Application documentation.
For ApplinX applications that use an external database (except JDBC-ODBC), the database type will be changed automatically to internal database. A message warns that there are applications containing a JDBC-ODBC database type that will not be migrated. You have two options:
Choose to continue with the installation. ApplinX will migrate all applications except for the JDBC-ODBC types. The names of these applications will be written to a log.
Choose to stop the installation, then modify those applications.
 To modify JDBC-ODBC applications
Change the repository type to internal DB /gxz in the original ApplinX installation installed on your computer, and then restart the installation and migration.
The following is the outcome of the migration process and relates to migrating all ApplinX applications:
The entire old config folder (except for the http.xml file) is copied to the new installation location. The gxstartup.prp file from this folder is renamed to .bak, and the new gxstartup.prp file (from the new installation) is used.
The new config folder (from the new installation) is renamed to config.bak.
The entire host-applications folder is copied except for the demo applications. The demo applications from the new installation are used.
All database related jar/zip (classes*.zip, classes*.jar, *sql*, *db2*) are copied to the lib folder of the new installation. Note: any other DB driver should be copied manually to \ApplinX\applinx-web\WEB-INF\lib.
The batch and shell commands used to start and stop the server, and to start the Administrator are no longer located in the ApplinX installation folder. These files are now located in <ApplinX installation>/bin folder and are named startup.bat and shutdown.bat accordingly for the server, and gxadmin for the Administrator.
The start-gxserver.bat/sh and gxadmin.bat/sh files from the previous ApplinX installation are copied to <ApplinX Installation>\bin and the gxstartup.prp and GXApplinXService.ini files are copied to <ApplinX Installation>. These files are renamed to *.bak.
Notes:
The following actions occur when the server is started for the first time after the migration process has been completed:
Each application (configured in config/gxconfig.xml), will be created as a separate file and copied to host-application/<application name>/gxconfig.xml. The original file config/gxconfig.xml will hold from now on only ApplinX server configuration and host definitions which are not in use by any application.
Replay files are copied to host-applications/<application name>/records and new recorded files are saved in this location.
If a file based repository (GXZ or MDB) is configured for the application, the repository is copied to host-applications/<application name>/db .
A post-migration report is written to the <ApplinX root>/log/gxlog.txt.
Note:
If the application name includes space characters, these are
replaced by underscores, as space characters are not supported in versions from
8.0 and above. However, previous SOAP clients will be able to connect to old
addresses which include spaces.
When opening ApplinX Designer, enter the name of a workspace directory. When upgrading from ApplinX version 8.0 and above, define a new workspace directory in order to be able to work with both versions.
Note:
The following entities are still supported in runtime, but cannot
be edited or changed, it is therefore strongly recommended to follow the
guidelines below
Paths and Path Wrappers require a conversion process.
Note:
When converting a Path Wrapper, the path which is invoked by the
path wrapper is also converted. When converting a Path which is invoked by a
Path Wrapper, the Path Wrapper is also converted.
To convert
Right-click on the Path or Path Wrapper and select Convert. The Conversion wizard is displayed. The first screen displays the name of the Path and Path Wrapper that are to be converted.
Click .
Warning Messages: The conversion process may detect that the Path/Path Wrapper which you are attempting to convert includes steps which need to be manually tweaked, after the conversion has been completed, or may include attributes or settings which cannot be converted. Read the warnings carefully to understand whether you are required to make changes after completing the conversion.
Path warning messages
Warning messages appear when a path detects one of the
following issues. Manual changes may be required for items that are not
supported:
Path timeout (the conversion process does not support this).
Exception paths are not handled in the conversion process. Now, there can be only one Exception path per application, defined in the application properties.
"*lastup" field is not supported.
<any unexpected screen> is not supported.
Input values in "any screen" are not supported. It is recommended to define a Screen Group for these fields instead of mapping to ANY screen.
Inputs are not mapped when the input field is not found in either the source or target screen.
Path Wrapper warning messages
The conversion process does not support collecting attribute
data from within a specific instance of a screen. To preserve this setting, you
need to manually define to collect data from this screen: when you know the
specific instance, preserve the links to outputs in the relevant step and
remove links to outputs within irrelevant steps.
Retrieving field colors using the Path Wrapper returned colors such as LightBlue and LightYellow in a single word. After the conversion these colors are returned as two words, separated with a space (i.e. Light Blue, Light Yellow).
It is only possible to convert a Path Wrapper that invokes an old Path. Path Wrappers which invoke Path Procedures cannot be automatically converted.
The Always collect last screen option, if selected, is ignored in the conversion process.
Click .
When ApplinX detects that an entity with the name of the entity that you are trying to convert, already exists, you are required to enter a different name. Click .
The Summary screen is displayed. Here you can see the entities that are to be converted. Select whether to open these entities in the Editor once the conversion process is completed.
Old Path based tables are still supported in runtime, but cannot be edited or changed. It is recommended to convert the path used by the table.
Right-click on the path and select Convert.
The table must be represented as a Data Structure array in the path procedure output. In order to do this, one must first define a Data Structure type (entity) that will represent a single row in the table. Follow these steps to do this:
In the relevant ApplinX screen, add a Table definition of the tabular data. This allows you to easily create a Data Structure entity and map data to the procedure output.
In the relevant step, right-click the screen table and select .
Select the Path Procedure root node and then define an output as an array of the newly created structure type.
In the mapper, drag the screen table onto the data structure array output. Ensure that all of the table columns are properly mapped to the arrays attributes.
Create a Procedure Group and assign the path procedure to it.
Generate a Procedure Client into the web project (refer to Generating a Procedure Client in the Designing and Developing an Application documentation).
In the relevant web page, replace the gx_fillTable code with
code that executes and binds the procedure result to the HTML table (refer to
Binding Procedure
Outputs to an ApplinX Framework Based Web Page in the Web Application Development documentation).
Examples for collecting tables can be found in CompositeDemo (BrowseCustomers1.jsp/aspx) or SOADemo (CustomerList.jsp/aspx).
All map paths are automatically merged into a single Application Map during the repository synchronization (refer to Application Map in the Designing and Developing an Application documentation). The Map paths are removed and each step in them is assigned to its relevant screen. These steps appear in the screen editor, in the Map Steps tab.
Note:
Advanced usage in the old Map path flow tab or dynamic variables
is currently not supported in the new Application Map. Refer to
Application Map in the Designing and Developing an Application documentation for further details.
The Namespace entity is deprecated. It is not possible to create new Namespaces, however, in procedure groups you can still specify a Namespace. A migrated application that had Data Structures (Business entity in 5.2 and lower) that were associated with namespaces still refers to them, but this reference is not displayed and is not editable. Procedure groups display the namespace name and allow you to edit the name.
If you have Procedure Groups in the repository, their SOAP clients are redirected to WS-Stack. Set each procedure group to automatically be deployed to WS-Stack (in the Procedure Group editor).
Note:
For performance improvements, it is recommended to regenerate
all your SOAP clients. For automatic deployment of the web services to
WS-Stack, the application initialization mode should be set to "Automatic".
Sorting functionality in tables is no longer provided.
When working with an application which included space characters in the application name, you are required to manually change the application name in each of the Procedures Clients, replacing the space character with an underscore.
Ensure that you have:
JDK 1.7
A supported web server (refer to ApplinX for JSP Web Application in the section Software Requirements).
It is recommended to import/copy the web applications from older Eclipse versions to Software AG Designer 9.9 (based on Eclipse 4.4 technology), as this is the common Software AG development tool, used with other Software AG products such as ApplinX, EntireX, CentraSite and Integration Server.
Upgrade the web application using the ApplinX Web Application Manager in the Designer (refer to Framework Management in the Web Application Development documentation).
Compile the JSP project:
With IDE (from Eclipse or any other IDE)
Without IDE (make.bat)
Note:
When working with an application which included space characters in
the application name, you are required to manually change the application name
in the web application (e.g. in GXBasicWebForm.jsp file,
or in the Framework Configuration Editor, in the Application
name parameter).
Visual Studio 2003 and .NET 1.1 Users: Visual Studio 2003/.NET 1.1 applications should be migrated to Visual Studio 2008/2010.NET 2.0-4.0 using Microsoft's Visual Studio automatic converter.
It is recommended to convert from .NET project type "Web Project" to "Web Site" as from the current version ApplinX generates .NET web pages based on the "Web Site" format and file structure.
Upgrade the web application using the ApplinX Web Application Manager in the Designer (refer to Framework Management in the Web Application Development documentation).
Compile (relevant for .NET "Web Projects" type projects):
With IDE (from Visual studio)
Without IDE (make.bat)
Note:
When working with an application which included space characters in
the application name, you are required to manually change the application name
in the web application (e.g. in
GXBasicWebForm.cs/GXBasicWebForm.vb file, or in the
Framework Configuration Editor, in the Application name
parameter).
Fixes are available for UNIX and Window on the Software AG Empower website. Follow the instructions below when downloading the fix from Empower.
Note that when applying a fix, you must make sure that the installed ApplinX version is of the same service pack as the fix version, i.e. that the first three digits are the same (e.g. 9.5.1).
To install a fix
The fix will install and add all the necessary new files to your existing ApplinX installation.
Before starting the fix installation, close ApplinX and Eclipse and stop the ApplinX service.
To start the fix installation process, extract the fix zip file to the existing ApplinX directory: For example: C:\SoftwareAG\ApplinX. A new directory is created: \hotfix-<hot fix version>.
To install the fix, just run install-hotfix.bat on Windows
platforms, or install-hotfix.sh on UNIX platforms. On Windows platforms:
Check that the ECLIPSE_PATH parameter is pointing to the desired Eclipse
installation location and that you have removed the rem remark indication.
During the fix installation, a backup folder will be created containing the original files from before the update (backup-for-hotfix-<hot fix version>).
After the fix installation, a log is created with a list of all the copied files (install.hotfix.log).
Upgrade the web application using the ApplinX Web Application Manager in the Designer (refer to Framework Management in the Web Application Development documentation).
Note:
It is possible to uninstall the fix. This will revert all updated
files to their original state. To uninstall the fix, just run
uninstall-hotfix.bat on Windows platforms, or uninstall-hotfix.sh on UNIX
platforms. After the fix uninstallation, a log is created with a list of
all copied files (uninstall.hotfix.log).