Secure Sockets Layer (SSL) and its successor, Transport Layer Security (TLS), are program layers for managing the security of message transmissions in a network. The idea is to contain the programming required to keep messages confidential in a program layer between an application (such as your Web browser or HTTP) and the internet's TCP/IP layers. The term sockets refers to the method of passing data back and forth between a client and a server program in a network or between program layers in the same computer. SSL and TLS use the public-and-private key encryption system from RSA, which also includes the use of a digital certificate.
This document describes Secure Sockets Layer (SSL) or Transport Layer Security (TLS) and Certificates within an EntireX context. When "SSL" is used in the documentation, this refers to both SSL and TLS. It covers the following topics:
Validating the Certificates when SSL/TLS Connection is Initiated
Additional Considerations for PKI (Public Key Infrastructure)
See also Running Broker with SSL or TLS Transport under z/OS | UNIX | Windows.
One of the major components when using SSL is the certificate. One of the tasks of certificates is to ensure that communication, which runs atop TCP/IP, adheres to an industrial-strength encryption.
Certificates can be described as electronic passports. They contain information about someone (or a machine or location), generally called the Subject. The authenticity of the subject's information is digitally signed by a trustworthy instance, called the Issuer. With certificates, this issuer is also known as a Certificate Authority (CA).
In addition to the above, a certificate also contains a random number that is called the subject's public key. Together with this public key, the subject must also be in possession of a private key. As their names suggest, the public key can be viewed by anyone, whereas the private key must be strictly secured. The public and the private keys together always form a key pair, i.e. they are always created together and complement each other.
Here are some typical scenarios of their usage:
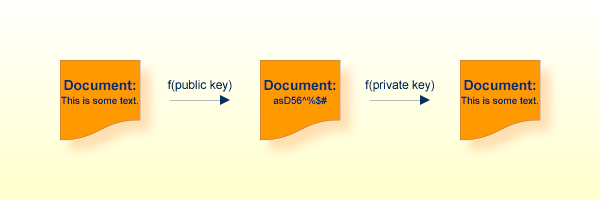
In the image above, a public key has been used to encrypt a document. Only the owner of the private key is able to decrypt this text.
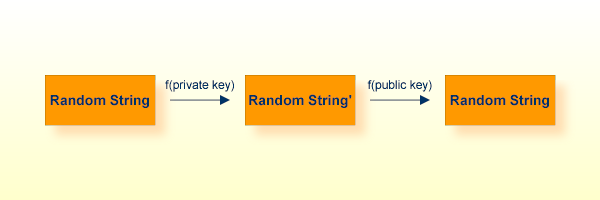
To verify that the instance that presented a certificate is really who they claim to be (authentic), I can choose a random string, encrypt it with their public key, send it to the subject, have it decrypted with their private key and sent back. I then compare it with my original random string. Only the owner of the appropriate private key is able to perform this operation.
Another of the major components with SSL is called the Random Number Generator (RNG). To ensure genuinely random keys with each new session, SSL uses its own random number generator.
This requires a "seed", which should be unique for each installation.
On UNIX systems, make sure you have defined the environment variable
RANDFILE, which refers to a file that
contains some random text (e.g. some 20 lines of 50 characters each should
suffice).
On Windows systems, the seed is automatically taken by using the pixels of the current desktop.
Certificates play an important role with SSL. The term "SSL" in this section refers to both SSL and TLS. In order to use SSL as the transport method for EntireX, you need to have certificates available at various locations and for various purposes. The sample certificates come as two types: a trust store (containing a public key), and a keystore (containing a private key). EntireX provides the following default certificates for preliminary test purposes:
We strongly recommended you create your own certificates. See below for how to create your own certificates with OpenSSL and keytool.
After the installation process, you will find certificates in the data set EXX970.CERT ready to use for preliminary testing of the SSL transport:
| Certificate | Description | Notes |
|---|---|---|
APPP12 |
No keys can be stored directly in RACF. The pkcs12 format member APPP12 was generated as a container for the necessary keys and the APPCERT member. The password to unlock this private key is ExxAppPkcs12.
|
1 |
CACERT |
The CA certificate. This certificate can be used to verify the application certificate. | 2 |
CAKEY |
The private key of the CA certificate above. The password to unlock this private key is ExxCAKey. You will need this password only if you want to sign more certificates with this CA (not recommended).
|
|
APPCERT |
To be used as the SSL server certificate. If your SSL server is EntireX Broker, see SSL-specific broker attribute KEY-STORE. This certificate is signed with the private key within CAKEY.
|
|
APPKEY |
The private key of the application certificate. The password to unlock the key is ExxAppKey. If your SSL server is EntireX Broker see SSL-specific broker attributes KEY-FILE and KEY-PASSWD-ENCRYPTED.
|
Notes:
README with step-by-step description for setting up an environment that enables an SSL-secured communication with a mainframe Broker
and certificates stored in RACF.
After the installation process, you will find certificates in directory etc ready to use for preliminary testing of the SSL transport.
| Certificate | Description | Notes |
|---|---|---|
ExxCACert.pem |
The CA certificate. This certificate can be used to verify the application certificate.
Use the SSL parameter trust_store.
|
1 |
ExxCAKey.pem |
The private key of the CA certificate above. The password to unlock this private key is ExxCAKey. You will need this password only if you want to sign more certificates with this CA (not recommended).
|
|
ExxAppCert.pem |
To be used as the SSL server certificate. If your SSL server is EntireX Broker, see SSL-specific broker attribute KEY-STORE. This certificate is signed with the private key within ExxCAKey.pem |
|
ExxAppKey.pem |
The private key of the application certificate. The password to unlock the key is ExxAppKey. If your SSL server is EntireX Broker see SSL-specific broker attributes KEY-FILE and KEY-PASSWD-ENCRYPTED.
|
Notes:
After the installation process, you will find certificates in etc directory for preliminary testing of the SSL transport:
| Certificate | Explanation | Notes |
|---|---|---|
ExxCACert.jks |
The truststore containing the default CA certificate. Use SSL parameter trust_store.
|
1 |
ExxJavaAppCert.jks |
The keystore containing the application certificate. The password to unlock this container is ExxJavaAppCert (use SSL parameters key_store and key_passwd for Java).
|
Notes:
The term "SSL" in this section refers to both SSL and TLS. EntireX clients and servers are always SSL clients. The SSL server can be either the EntireX Broker, Broker SSL Agent or direct RPC in webMethods Integration Server (IS inbound).
SSL usually requires a certificate on the SSL server side of a communication. In order to validate the certificate, the SSL client needs to accept the issuer of the server certificate, that is, it needs to trust the same instance that the certificate has signed. (Customs do not trust your passport - which could be forged - but instead verify its authenticity electronically!) If you are using EntireX Broker as your SSL server, use the following SSL-specific broker attributes:
| Broker Attribute | Description |
|---|---|
KEY-STORE |
The server certificate is specified using the broker attribute KEY-STORE.
|
KEY-FILE |
The appropriate private key is found using the broker attribute KEY-FILE.
|
KEY-PASSWD-ENCRYPTED |
Generally, the private key is not stored in the open, it is further encrypted with a password, which - because it is often
more than a single word - is sometimes also called passphrase. To use the private key properly, the application must be able
to re-create the original private key. Therefore you have to provide the appropriate password with the broker attribute KEY-PASSWD-ENCRYPTED.
|
The SSL client must now present the CA (i.e. its certificate, which includes the public key),
so that SSL can determine whether to accept a server certificate or not.
For this purpose, specify SSL parameter trust-store (see below) with the EntireX client or server.
Checking the SSL server certificate by an SSL client is also known as one-way SSL.
| SSL Parameter | Description | ||||
|---|---|---|---|---|---|
trust_store |
The trust_store parameter is mandatory.
It specifies the file name of a keystore that must contain the list of trusted certificate authorities for the certificate
of the SSL server.
By default a check is made that the certificate of the SSL server is issued for the hostname specified in the Broker ID.
The common name of the subject entry in the server's certificate is checked against the hostname.
If they do not match, the connection will be refused. This check can be disabled by specifying SSL subparameter verify_server=no.
|
||||
verify_server |
Possible values:
The default application certificate (see Default Certificates Delivered with EntireX) is issued to " |
||||
key_storekey_passwd |
If the SSL server requests a client certificate (known as two-way SSL; verify_client=yes is defined in the configuration of the SSL server) two additional parameters have to be specified: key_store and key_passwd.
This keystore must contain the private key of the SSL client. The password that protects the private key is specified with
key_passwd.
The ampersand (&) character cannot appear in the password.
|
How you provide SSL parameters depends on the EntireX component in use. SSL parameters are separated by ampersand (&). Two examples below for ACI-based Programming show how SSL parameters are specified differently, depending on programming language:
C
Use the broker function SETSSLPARMS and specify SSL parameters in the second parameter:
'broker' etbcb "VERIFY_SERVER=N&TRUST_STORE=c:\\certs\\CaCert.pem"
See SETSSLPARMS under Broker ACI Functions.
Java
Append SSL parameters to the Broker ID:
ssl://localhost:22101?trust_store=C:\SoftwareAG\EntireX\etc\ExxCACert.jks&verify_server=n
See table SSL/TLS Parameters for EntireX Clients and Servers above.
This section contains step-by-step instructions on how to create your own certificates.
Note:
Certificates adhere to a standard format and can also be created with
other tools; openssl is delivered with EntireX and
can be used as an example.
 To create your own certificates
Create a new directory in which the new certificates will be created and where all of the other required files will be stored.
In your new directory create a file named genca.cnf and cut and paste the contents of the file gencacnf.html (delivered with this documentation) to your new file.
Create a file called .rand in your new directory. Edit it, adding about 20 lines (each about 40 to 50 characters long) of random text. (This file is used by the random number generator, so do not use it in more than one location to create certificates!)
Create an empty directory newcerts in your new directory.
Create an empty directory certs in your new directory.
Create an empty file called index.txt in the current directory.
Create a file called serial in the current directory and enter a number in column 1, line 1, for example: 1000. This serial number will be incremented for each certificate that you create.
Now edit the genca.cnf file which you cut and pasted into your new directory in step 2, above. Please read the comments carefully. There are a few defaults that you will probably want to adapt to your own environment.
Below is a list of the important variables that should be checked:
Set the variable RANDFILE to point to
the .rand file. (This appears twice in the file; adjust
both occurrences.)
Set the variable database to point to
the index.txt file.
Set the variable serial to point to the
serial file.
Set the variable new_certs_dir to point
to the newcerts directory.
Set the variable certs_dir to point to
the certs directory.
Set the variable certificate to point
to the CA certificate file (see NewCACert.pem in the
example below).
Set the variable private_key to point
to the CA certificate's private key file (see NewCAKey.pem
in the example below).
Save the configuration file.
You can now start creating certificates.
First, you need to define a Certificate Authority (CA); create a key pair and a self-signed certificate to represent this CA.
Enter the following command in a shell and follow the instructions (be patient, loading the screen state takes several seconds)
openssl req -config genca.cnf -newkey rsa:1024 -x509 -keyout <NewCAKey.pem> -out <NewCACert.pem> -days 365
Do not forget the passphrase for the key file! You will need it soon.
Now you have a CA certificate and a CA key file.
Next, create a certificate that can be used by various products (for example the Broker kernel) to start an SSL server session.
With the CA cert and key files described above you can create any number of certificates. We will sign all of them with the same CA (used from the genca.cnf file).
Create a certificate request:
openssl req -config genca.cnf -newkey rsa:1024 -out <ExxAppCertReq.pem> -keyout <ExxAppKey.pem> -days 365
You will be prompted for a new passphrase. Again, this will be the passphrase to lock the MyAppKey.pem file. Remember it well.
You must then sign this certificate request with your CA to create a proper certificate:
openssl ca -config genca.cnf -policy policy_anything -out <ExxAppCert.pem> -infiles <ExxAppCertReq.pem>
Note:
The passphrase you are prompted with is the one used to unlock the CA
key.
A certificate management tool is also supplied with the standard JDK kit, i.e. it is part of J2SE kit, not the JSSE kit. Certificate requests can be generated and keystores and truststores can be built with this tool. The steps for building keystores and truststores are outlined below.
To create a keystore
Create a keystore containing a self-signed certificate and key (example yourkeystore).
The following command will prompt you for identification information.
keytool -genkey -v -alias yourJavaApp -keyalg RSA -validity 900 -keypass yourkeypsw -keystore yourkeystore -storepass yourkeypsw
The private key password and keystore password must be identical for XTS 1.2 JSSE implementation. The keytool provides commands to change either the private key or keystore password.
Import any CA certificates of CAs which will sign the certificate generated above.
keytool -import -v -alias yourcacert -file yourcacert.pem -keystore yourkeystore -storepass yourkeypsw
(Optional) List certificate chain present in keystore.
keytool -list -v -keystore yourkeystore -storepass yourkeypsw
Extract certificate for signing by a CA.
keytool -certreq -v -alias yourJavaApp -file yourJavaAppreq -keypass yourkeypsw -keystore yourkeystore -storepass yourkeypsw
Sign Java certificate request with openssl tool.
openssl ca -config yourca.cnf -policy policy_anything -out yourjavaapp.pem -notext -days 365 -infiles yourJavaAppreq
Note:
The -notext parameter is required. Without
it, the import of a signed certificate to keystore will fail. The error will be
either a Not an X.509 certificate or a Tag
sequence error. The reason for the error is that the openssl
signing tool will write both a text version and an encoded version of the
signed certificate to the output file if the -notext
parameter is not specified.
Import signed certificate.
keytool -import -v -alias yourJavaApp -file yourjavaapp.pem -keypass yourkeypsw -keystore yourkeystore -storepass yourkeypsw
Notes:
To create a truststore
Import the CA certificates that were used to sign the client and server certificates.
Import signed CA certificates.
keytool -import -v -alias yourcacert -file yourcacert.pem -keystore yourtruststore -storepass yourstorepsw
(Optional) List truststore.
keytool -list -v -keystore yourtruststore -storepass yourstorepsw
Note:
Applies to operating system z/OS only.
Enter the following command to create a file containing the application certificate and application key files for import into RACF:
openssl pkcs12 -export -in <ExxAppCert.pem> -inkey <ExxAppKey.pem> -out <ExxAppCert.p12>
You will be prompted for the passphrase of the private key and for an export password. The output file is created in PKCS#12 format. FTP can be used to transfer the output file in binary mode to the IBM host.
Note:
Applies to operating system z/OS only.
To import certificates and private keys with RACDCERT into RACF
See readme file EXX970.CERT(README) in the product distribution for detailed instructions.
When using a PKI, there are usually more than two certificates involved. Typically, there is one (self-signed) root certificate, one or more CA certificates, and several application certificates, usually one for every server.
For the SSL server side (Broker) you need a suitable application certificate.
To check the certificate
Execute the command:
openssl x509 -in <YourSSLCert.pem> -text
This will display relevant information about the certificate such as key extensions with key usage and basic constraints. (For example, the Basic Contraint CA should be "FALSE".)
Given a specific server certificate, it is also possible to verify the certificate chain.
To verify the certificate chain
Execute the command:
openssl verify -CAfile <YourCaCert.pem> -purpose sslserver <YourSSLCert.pem>
If you receive an OK, then <YourSSLCert.pem> should work on the
SSL server side together with the <YourCaCert.pem> on the SSL client
side.
Note:
If there is a chain of CA certificates defined, copy the contents of
the appropriate CAxxx.pem files into one new file
and use this as the <YourCaCert.pem> on the client side to verify the SSL
server certificate against.
To support self-signed certificates it is sometimes necessary to modify the LDAP settings. For example, to allow use of self-signed certificates in OpenLDAP, add the following line to file /etc/openldap/ldap.conf:
TLS_REQCERT never