Details on how to publish an asset are described in the following sections.
You can publish an asset (i.e., add an asset) to the catalog in one of the following ways:
You can use an importer, which is a utility that generates a catalog entry from an input file. CentraSite includes importers for many of the asset types that it supports out-of-the-box. For information about using an importer, see Adding an Asset to the Catalog Using an Importer.
You can publish an asset from scratch, meaning that you create the asset (and set its attributes) manually. For information about manually adding an asset to the catalog, see Adding an Asset to the Catalog from Scratch.
To add assets to an organization's asset catalog, you must belong to a role that has the "Create Assets" or "Manage Assets" permission for that organization. To see a list of the predefined roles that include the "Create Assets" or "Manage Assets" permission, see the section About Roles and Permissions in the document Users, Groups, Roles and Permissions.
By default, everyone in your organization is permitted to view the assets that you publish to your organization's catalog. However, only you (as the asset owner) and users that belong to a role that has the "Manage Assets" permission for your organization can view, edit and delete the assets that you add to the catalog.
To enable other users to view, edit and/or delete an asset that you have published, you must modify the asset's instance-level permission settings. For more information about allowing other users to access an asset, see Setting Permissions on an Asset.
An importer generates a catalog entry for an asset from a particular type of input file. For example, the Web service importer installed with CentraSite reads a WSDL file and from it, generates a catalog entry for the service that the WSDL describes. In most cases, the importer also uploads the input file to the CentraSite repository and links the file to the catalog entry. When you import a Web service from a WSDL file, for example, the importer copies the WSDL file into the repository and then links the file to the catalog entry for the Web service.
If during import of a service or schema the importer detects that the asset with the given identification already exists in the catalog, you can either overwrite the existing version or create a new version. If you decide to create a new version, the imported file will be applied to the new version.
You can also choose the option Interactive resolution of Import/Includes, which will allow you to specify how an already existing imported/included file (further WSDL or schema) is handled. For each of the imported/included files you have one of these options:
Overwrite the importing file (WSDL or schema) with new content.
Create a new version of the file with the new content (if, for example, you want to modify a schema but want to retain its previous version).
Reuse any version of the file (if, for example, an intermediate version of a schema is currently referred to by a WSDL, you can redirect it to the newest version).
The following table lists the importers installed with CentraSite and identifies the types of files they require as input.
| To import this asset... | You must supply this type of file... |
|---|---|
| Web Service (including Abstract Service) | Web Service Definition Language (WSDL) file. |
| XML Schema | XML Schema Definition (XSD) file. |
| XML Service | XML Schema Definition (XSD) file. |
| REST Service | XML Schema Definition (XSD) file. |
| BPEL | Business Process Execution Language for Web Services (BPEL) file. |
| Process | XML Process Definition Language (XPDL) file. |
| Archive | A file that was previously exported from CentraSite Control. |
Note:
The following sections describe how to use CentraSite's predefined
importers from the CentraSite Control user interface. You can also call these
importers using the Java-based import API, the SOAP API, or a command-line
utility. For information, see the document Importing Objects Using
the API.
An administrator can add custom asset types to CentraSite and install custom importers for those types. If your CentraSite is equipped with custom importers, consult your administrator to determine which types of files those importers expect as input.
A Web service is represented in CentraSite by a set of related entries in the registry and in the repository. When a Web service is imported, the appropriate entries are created. Some of the entries are visible in the detail pages of the Web service asset, others are not displayed in the detail pages but are displayed when you use the impact analysis feature.
If you import a Web service for which registry entries already exist (for example, from a previous import), the existing set of entries is extended as appropriate. Thus, for example, if you had previously imported a Web service, and now you import the web service again with an additional web service operation in the WSDL file, a new Operation object will be added to the existing set of entries for the Web service in the registry.
The registry entries created are summarized in the following diagram:
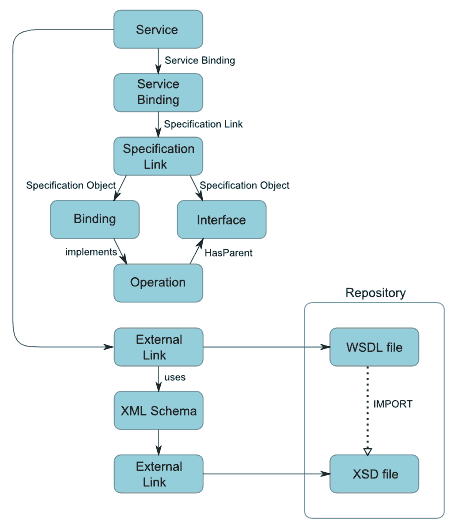
The registry entries are as follows:
An asset of type Service.
An object of type Service Binding, representing the binding defined in the WSDL file. This object contains the access URI of the launchable Web service. The Web service asset contains an internal reference to the service binding, i.e., there is no explicit association.
An object of type Specification Link. The service binding object contains an internal reference to the specification link, i.e., there is no explicit association.
An object of type Binding. The Web service object contains an internal reference to the binding, i.e., there is no explicit association object.
One or more objects of the type Operation. The
operation objects represent the operations of the Web service, as defined in
the Web service's WSDL. For each operation, there is an association link
Implements from the binding object and an association link
HasParent to the interface object.
An object of type Interface. This object contains the port type elements of the WSDL definition.
An object of the type External Link. This object contains a link to the Web service's WSDL file stored in the CentraSite repository.
The repository entries are as follows:
The WSDL file of the Web service.
A WSDL definition can be spread across several physical files that contain IMPORT statements to refer to each other. Also, a WSDL definition can contain an XML schema definition, which can also be spread across several physical files. In such cases, each of the WSDL and schema files is stored in the repository, and appropriate references are created in the registry as follows:
An External Link object in the registry refers to the top-level WSDL file of the Web service in the repository, as described above.
Each WSDL file in the repository that is referred to by a
higher-level WSDL file for the same Web service has an External
Link object in the registry that is referred to by the
External Link object of the higher-level WSDL file. The
reference is implemented as an association of the type
uses.
Each schema file in the repository that is referred to by a WSDL
file in the repository has an XML Schema object in the
registry that is referred to by the External Link object
of the higher-level WSDL file. The reference is implemented as an association
of the type uses. The XML Schema object in the
registry contains an External Link to the schema file in the repository.
Each schema file in the repository that is referred to by a
higher-level schema file in the repository has an XML
Schema object in the registry that is referred to by the XML Schema
object of the higher-level schema file. The reference is implemented as an
association of the type uses. The XML Schema
object in the registry contains an External Link to the schema file in the
repository.
If the importer detects an equivalent service within CentraSite during the import of a Web service, the import dialog will prompt you to specify either Overwrite latest version or Create new version. If you decide to create a new version, the importing WSDL will be applied to the new version.
You can use abstract services to support a top-down service development. An abstract service asset just contains abstract definitions like interface, operation or message definitions. But, in contrast to a normal service asset, it does not contain the complete information that is necessary to call the web service that it represents. This means the required definitions are missing or not complete. You can supply the concrete definitions of an abstract service at a later time in order to turn the abstract service into a normal service. An abstract service is represented in the CentraSite registry by a normal service asset.
You can define abstract services by creating them from scratch or by importing WSDLs that comply with the WSDL 1.1 specification.
According to the WSDL 1.1 specification, a WSDL file does not need to
contain any service or binding element. This kind of WSDL is called an abstract
WSDL. Importing an abstract WSDL to CentraSite results in an abstract
service. The name and the targetNamespace of the abstract service are taken
from the name and the
targetNamespace attributes of the WSDL's
definition element. If the attributes are missing,
the import is rejected.
To enable the import of name-less abstract WSDLs, the import dialog in CentraSite Control allows you to specify a name.
The minimal abstract WSDL that is supported just contains a
definitions element with a
name and a
targetNamespace attribute.
An abstract service does not contain concrete definitions that refer
to the registry objects for the abstract definitions. Instead the abstract
service is linked to the abstract definitions via a
HasParent relationship attribute. The
relationship attribute points from the Interface objects to the Service object.
Operation objects are not referred to directly since they are always part of an
Interface. Types or messages do not need to be considered, since they are not
represented in the registry. The HasParent
relationship is classified as an aggregation relationship to ensure that the
abstract definitions are considered properly when deleting, moving or exporting
the abstract service. The abstract WSDL is linked to the abstract service via
an externalLink.
You can update an abstract service's definitions by attaching a WSDL to it. Attaching a WSDL overwrites all the registry objects that can be defined via a WSDL. This ensures that the attached WSDL reflects correctly the registry objects representing the service and its components. This also affects the service object itself. Objects that cannot be added by attaching a WSDL are not overwritten. The service object's name is not overwritten automatically when you attach a WSDL. This makes the name provided by the WSDL a technical name of a service. By default, the technical name is reflected by the local-name classification of the service object. You can align the service name with the technical name by marking the appropriate checkbox in the Attach WSDL dialog. For more information about attaching a WSDL to an abstract service, see the section Editing an Asset in the Catalog.
To show the technical name in the CentraSite Control, a computed read-only attribute is needed.
When importing a web service that refers to XML Schema, keep the following points in mind:
When you have at least a Modify permission on the referenced XML Schema, both the web service and the XML Schema are imported automatically.
When you have only View permission on the referenced XML Schema, the web service is imported and the XML Schema implicitly reused.
When you do not have any permission on the referenced XML Schema, the web service is imported and a warning message logged.
![]() To import a Web Service asset to the
catalog
To import a Web Service asset to the
catalog
Before you begin, you must have the WSDL file that you want to import. This file can reside on the file system of the computer where your browser is running, or it can reside anywhere on the network, as long as its location is addressable via a URL.
In CentraSite Control, go to Asset Catalog > Browse.
Click the Import icon.
In the Import dialog, specify the following attributes:
| In this field... | Do the following... |
|---|---|
| Organization | Choose the organization to which the asset
will be added. (The drop-down list will contain the list of organizations to
which you are permitted to add assets.) If you select an organization other
than your own organization, you will nevertheless be the owner of the asset.
Note: |
| Import as | Choose Web Service. |
| Initial Version |
Enter an identifier for the initial version of the asset. This is the user-defined version, as opposed to the automatically assigned system version. You can enter any string in this field, i.e. the version identifier does not need to be numeric. You can also leave the field blank. You can later create new versions of the asset (see Optional.Versioning an Asset). If the versioning feature is disabled for this asset type, the field is nevertheless displayed, thus allowing you to assign an identifier for this first version. If the import of the asset also causes other related objects to be imported (for example, if the WSDL definition for a Web service includes references to other WSDL or schema definition files), the initial version is only assigned to the main asset identified in this dialog, and the initial version of the other imported objects is not assigned. |
| Name |
Optional. Enter a the name for the service. If you do not specify a name, the name is set automatically to
the value of the |
| Import from | Specify whether the input file will be read from a URL-addressable location on the network (the URL option) or from your local file system (the File option). |
| URL or File |
If the file you are importing resides on the network, specify its URL. If the file resides in your local file system, specify the file name. You can use the button to navigate to the required folder. |
| URL Authentication |
If you have specified a URL, and the site you want to access via the URL requires user authentication, check this box. This opens an Authentication sub-dialog in which you can enter a username and password for authentication at the URL site. |
| Interactive resolution of Import/Includes |
This option determines how referenced WSDLs/schemas are handled when the WSDL/schema that is referred to already exists in the registry. When this option is enabled, you will be prompted during import to specify whether you want to reuse any WSDL/schema files referred to in the main file or upload new files. |
Click Finish.
CentraSite retrieves the specified file and generates the catalog entry. The Web service asset’s details page is displayed.
CentraSite retrieves the specified file and generates the catalog entry. If you have specified Interactive resolution of Import/Includes, you will be prompted to specify whether you wish to reuse any of the WSDL/schema files referred to in the main WSDL file or upload new files.
If the importer detects that the service you are trying to import already exists within CentraSite, the import dialog will prompt you to specify whether you want to Overwrite latest version or Create new version. If you have specified Interactive resolution of Import/Includes, you will be prompted to specify whether you wish to reuse any of the WSDL/schema files referred to in the main WSDL file via IMPORT or INCLUDE statements or upload new files.
During import of a Web Service asset, CentraSite will not allow you to add the service to the asset catalog unless you have specified all "required" attributes in the Web Service type definition and all referenced objects to which the WSDL file has an association. The value for the "required" attribute must be specified in the Web service’s profile. Additionally, if the Web service asset has internally referenced objects, the value for the "required" attributes of all such referenced objects should be specified by choosing the button at the top right side of the details page in order to add the Web Service asset to the asset catalog. Thus, for example, if the WSDL/XML schema files that are referenced in the main WSDL file have "required" attributes, then you will be prompted to specify a value for the required attributes in order to save the asset.
After you specify the value for all of the required attributes, click to save the Web Service asset.
Review the import log that CentraSite displays after the import process. If errors occur while reading and processing the file, they will be reported in this log.
Configure the asset's extended attributes as described in Editing an Asset in the Catalog.
Note:
Tip:
If
you have previously imported a WSDL that has an associated schema file, and you
now re-import the same WSDL with a modified schema file, your browser might not
display the updated contents of the schema file when you click on the external
link for the schema file. This can happen if the browser cache is not being
updated automatically. To rectify the problem, you can change your browser
settings so that pages are always updated on every visit.
The following restrictions apply for abstract services:
WSDL 2.0 is not supported for importing abstract services.
An abstract service cannot be virtualized.
When an XML Schema is imported, the schema file is copied to the repository, and an XML Schema asset is created in the registry. The asset contains an External Link to the schema file in the repository.
The entries created are summarized in the following diagram:
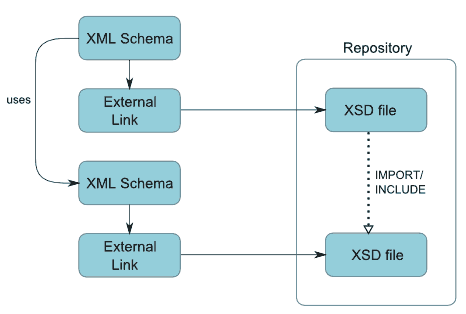
A schema definition can consist of several physical files that refer to each other using IMPORT or INCLUDE statements. In such cases, each of the schema files is stored in the repository, and appropriate references are created in the registry as follows:
Each schema file in the repository that is referred to by a
higher-level schema file in the repository has an XML
Schema object in the registry that is referred to by the XML Schema
object of the higher-level schema file. The reference is implemented as an
association of the type uses. The XML Schema
object in the registry contains an External Link to the schema file in the
repository.
If the importer detects an equivalent schema within CentraSite during the import of a schema, the import dialog will prompt you to specify either Overwrite latest version or Create new version.
You can also choose the option Interactive resolution of Import/Includes, which will allow you to specify how an already existing imported/included file is handled. For each of the imported/included files you have one of these options:
Overwrite the importing file with new content.
Create a new version of the file with the new content (if, for example, you want to modify a schema but want to retain its previous version).
Reuse any version of the file (if, for example, an intermediate version of a schema is currently referred to by a WSDL, you can redirect it to the newest version).
If you choose the Reuse option, and there is more than one schema with the same name and namespace, you can choose between these. To allow you to select the required schema, the tab Reuse Existing lists the available schemas that match the given name, and also their available versions. You can view the contents of any schema in the list by clicking view link in the column Content; this is useful if you want to check that you have selected the correct file from the list.
Additionally, when importing an XML Schema that refers to other XML Schemas, keep the following points in mind:
When you have at least a Modify permission on the referenced XML Schema, both the asset's schema and referenced schema are imported automatically.
When you have only View permission on the referenced XML Schema, the asset's schema is imported and the referenced XML Schema implicitly reused.
When you do not have any permission on the referenced XML Schema, the asset's schema is imported and a warning message logged.
![]() To import a new XML Schema asset to the catalog
To import a new XML Schema asset to the catalog
Before you begin, you must have the XML schema file that you want to import. This file can reside on the file system of the computer where your browser is running, or it can reside anywhere on the network, as long as its location is addressable via a URL.
In CentraSite Control, go to Asset Catalog > Browse.
Click the Import icon.
In the Import dialog, specify the following attributes:
| In this field... | Do the following... |
|---|---|
| Organization | Choose the organization to which the asset
will be added. (The drop-down list will contain the list of organizations to
which you are permitted to add assets.) If you select an organization other
than your own organization, you will nevertheless be the owner of the asset.
Note: |
| Import as | Choose Schema. |
| Initial Version |
Optional. Enter an identifier for the initial version of the asset. See the description of the import dialog for Web service described above in the section Importing Web Services for details of usage. |
| Name |
Optional. Enter a the name for the asset. If you do not specify a name for the asset, it is set automatically to the schema's file name. |
| Import from | Specify whether the input file will be read from your local file system (the File option) or from a URL-addressable location on the network (the URL option). |
| URL or File |
If the file you are importing resides on the network, specify its URL. If the file resides in your local file system, specify the file name. You can use the button to navigate to the required folder. |
| URL Authentication |
If you have specified a URL, and the site you want to access via the URL requires user authentication, check this box. This opens an Authentication sub-dialog in which you can enter a username and password for authentication at the URL site. |
| Interactive resolution of Import/Includes |
This option determines how referenced schemas are handled when the schema that is referred to already exists in the registry. When this option is enabled, you will be prompted during import to specify whether you want to reuse any schema files referred to in the main file or upload new files. |
Click Finish.
CentraSite retrieves the specified file and generates the catalog entry. The XML schema asset’s details page is displayed.
CentraSite retrieves the specified file and generates the catalog entry. If you have specified Interactive resolution of Import/Includes, you will also be prompted to specify whether you wish to reuse any of the schema files that might be referred to in the main schema file via IMPORT or INCLUDE statements or upload new files.
If the importer detects that the schema you are trying to import already exists within CentraSite, the import dialog will prompt you to specify whether you want to Overwrite latest version or Create new version. If you have specified Interactive resolution of Import/Includes, you will be prompted to specify whether you wish to reuse any of the schema files referred to in the main schema file via IMPORT or INCLUDE statements or upload new files.
Click OK.
CentraSite retrieves the specified file and generates the catalog entry.
During import of an XML Schema asset, CentraSite will not allow you to add the schema to the asset catalog unless you have specified all "required" attributes in the Schema type definition and all referenced objects to which the XML file has an association. The value for the "required" attribute must be specified in the schema's profile. Additionally, if the schema asset has internally referenced objects, the value for the "required" attributes of all such referenced objects should be specified by choosing the button at the top right side of the details page in order to add the XML schema asset to the asset catalog. Thus, for example, if the XML schema file that is referenced in the main XML file have "required" attributes, then you will be prompted to specify a value for the required attributes in order to save the asset.
After you specify the value for all of the required attributes, click to save the XML Schema asset.
Review the import log that CentraSite generates for the import process. If errors occur while reading and processing the file, they will be reported in this log.
Configure the asset's extended attributes as described in Editing an Asset in the Catalog.
Tip:
If
you had previously imported a WSDL that has an associated schema file, and you
now re-import just the schema file with modifications, your browser might not
display the updated contents of the schema file. This can happen if the browser
cache is not being updated automatically. To rectify the problem, you can
change your browser settings so that pages are always updated on every
visit.
XML Schema files can contain references to DTD (Document Type Definition) files. If you import such an XML schema file, the referenced DTD files are not imported to CentraSite.
An XML service is represented in CentraSite by a set of related entries in the registry and in the repository. When an XML service is imported, the schema file is copied to the repository, and a set of entries (for example, the XML service asset with links) is created in the registry representing the schema definition. Some of the entries are visible in the detail pages of the XML service asset, others are not displayed in the detail pages but are displayed when you use the impact analysis feature.
If you import an XML service for which registry entries already exist (for example, from a previous import), the existing set of entries is extended as appropriate. Thus, for example, if you had previously imported an XML service, and now you import the service again with an additional schema file, a new link to the XML service's additional schema will be added to the existing set of entries for the XML service in the registry.
The entries created are summarized in the following diagram:
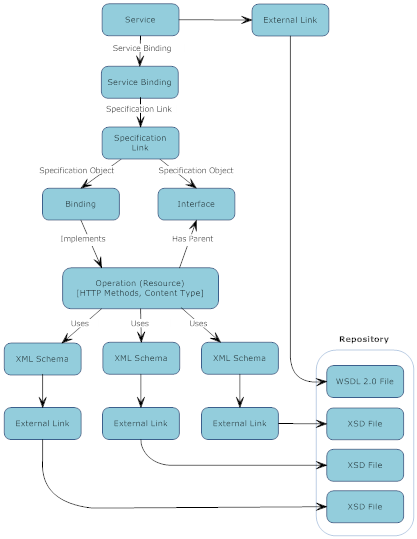
The registry entries are as follows:
An asset of type Service.
An object of type Service Binding, representing the binding defined in the schema file. This object contains the access URI of the launchable XML service. The XML service object contains an internal reference to the service binding, i.e., there is no explicit association.
An object of type Specification Link. The service binding object contains an internal reference to the specification link, i.e., there is no explicit association.
An object of type Binding. The XML service object contains an internal reference to the binding, i.e., there is no explicit association object.
An object of type Interface. This object contains the port type elements of the schema and HTTP methods. The specification link object contains an internal reference to the interface, i.e. there is no explicit association.
An object of the type Operation (Resource). This
object contains the HTTP methods and content type of the XML service that an
importer auto-generates. The object is represented in CentraSite by
<invoke>. The resource object contains an
association link Implements from the binding object and an
association link HasParent to the interface object.
An object of the type External Link. This object
contains a link to the schema file stored in the CentraSite repository. The
reference is implemented as an association of the type
uses.
The repository entries are as follows:
The schema file of the XML service.
Each schema file in the repository has an XML
Schema object in the registry that is referred to by the
External Link object. The reference is implemented as an
association of the type uses. The XML Schema
object in the registry contains an External Link to the schema file in the
repository.
A schema file can be spread across several physical files that contain IMPORT statements to refer to each other. Also, a schema file can contain a WSDL 2.0 representation, which can also be spread across several physical files. In such cases, each of the schema and WSDL files is stored in the repository, and appropriate references are created in the registry as follows:
An External Link object in the registry refers to the schema file of the XML service in the repository, as described above.
Each WSDL file in the repository that is referred to by a schema file
in the repository has an External Link object. The
reference is implemented as an association of the type
uses.
When you import an XML service, the import dialog offers you the option Overwrite existing imported schema files. This option is of particular relevance if you are importing a schema that you have already previously imported, and it allows you to import just the main schema file without any of the schema files referred to by the main schema file via IMPORT or INCLUDE statements. If only the main schema file has changed since the previous import, but none of the referenced schema files, do not select this option; this avoids creating new versions of objects that have not changed.
Additionally, when importing an XML Schema that refers to other XML Schemas, keep the following points in mind:
When you have at least a Modify permission on the referenced XML Schema, both the asset's schema and referenced schema are imported automatically.
When you have only View permission on the referenced XML Schema, the asset's schema is imported and the referenced XML Schema implicitly reused.
When you do not have any permission on the referenced XML Schema, the asset's schema is imported and a warning message logged.
![]() To import an XML Service asset to the catalog
To import an XML Service asset to the catalog
Before you begin, you must have the file that you want to import and the service's endpoint. This file can reside on the file system of the computer where your browser is running, or it can reside anywhere on the network, as long as its location is addressable via a URL.
In CentraSite Control, go to Asset Catalog > Browse.
Click the Import icon to open the Import dialog.
In panel 1, specify the following attributes:
| In this field... | Do the following... |
|---|---|
| Organization | Choose the organization to which the asset
will be added. (The drop-down list will contain the list of organizations to
which you are permitted to add assets.) If you select an organization other
than your own organization, you will nevertheless be the owner of the asset.
Note: |
| Import as | Choose XML Service. |
| Name | Optional. Enter a name for the asset. An asset name can contain any character (including spaces). |
| Initial Version |
Optional. Enter an identifier for the initial version of the asset. This is the user-defined version, as opposed to the automatically assigned system version. You can enter any string in this field, i.e. the version identifier does not need to be numeric. You can also leave the field blank. You can later create new versions of the asset (see Versioning an Asset). If the versioning feature is disabled for this asset type, the field is nevertheless displayed, thus allowing you to assign an identifier for this first version. If the import of the asset also causes other related objects to be imported (for example, if the schema definition for an XML service includes references to other schema definition files), the initial version is only assigned to the main asset identified in this dialog, and the initial version of the other imported objects is not assigned. |
| Endpoint | Enter the service endpoint URL in a valid format. |
| HTTP Method | Choose the HTTP request method(s) for bridging the protocols (e.g., GET, POST, PUT, DELETE). |
Click Next.
In panel 2, specify the following attributes to associate schema(s) for this service.
| In this field... | Do the following... |
|---|---|
| Import from | Specify whether the input file will be read from a URL-addressable location on the network (the URL option) or from your local file system (the File option). |
| URL or File |
If the file you are importing resides on the network, specify its URL. If the file resides in your local file system, specify the file name. You can use the button to navigate to the required folder. If you want to specify multiple schemas, use the plus button to add additional rows. |
| URL Authentication |
If you have specified a URL, and the site you want to access via the URL requires user authentication, check this box. This opens an Authentication sub-dialog in which you can enter a username and password for authentication at the URL site. |
| Overwrite existing imported schema files | This option determines how referenced schemas are handled when the schema that is referred to already exists in the registry. When this option is enabled, the existing schemas in the registry are replaced with the new ones specified by the input schema file(s). When this option is disabled, the importer simply references the schema that already exists in the registry. |
Click Finish.
Be aware that if the XML file references another asset, CentraSite will automatically check whether the referenced asset exists in the catalog. If not, CentraSite will attempt to locate the required file and add it to the catalog. If CentraSite cannot locate the file, it will prompt you for the file's location.
CentraSite retrieves the specified file and generates the catalog entry. The XML Service asset’s details page is displayed.
During import of an XML Service asset, CentraSite will not allow you to add the service to the asset catalog unless you have specified all "required" attributes in the XML Service type definition and all referenced objects to which the XML file has an association. The value for the "required" attribute must be specified in the XML service's profile. Additionally, if the XML Service asset has internally referenced objects, the value for the "required" attributes of all such referenced objects should be specified by choosing the button at the top right side of the details page in order to add the XML service to the asset catalog. Thus, for example, if the schema file that is referenced in the main XML file have "required" attributes, then you will be prompted to specify a value for the required attributes in order to save the asset.
After you specify the value for all of the required attributes, click to save the XML Service asset.
Review the import log that CentraSite generates for the import process. If errors occur while reading and processing the file, they will be reported in this log.
Configure the asset's extended attributes as described in Editing an Asset in the Catalog.
XML Schema files can contain references to DTD (Document Type Definition) files. If you import such an XML Schema file, the referenced DTD files are not imported to CentraSite.
An imported XML service cannot contain any of the custom profiles that were included in the "Service" type.
Tip:
If
you have previously imported a schema that has an associated schema file, and
you now re-import the same schema with a modified schema file, your browser
might not display the updated contents of the schema file when you click on the
external link for the schema file. This can happen if the browser cache is not
being updated automatically. To rectify the problem, you can change your
browser settings so that pages are always updated on every visit.
A REST service is represented in CentraSite by a set of related entries in the registry and in the repository. When a REST service is imported, the appropriate entries are created. Some of the entries are visible in the detail pages of the REST service asset, others are not displayed in the detail pages but are displayed when you use the impact analysis feature.
If you import a REST service for which registry entries already exist (for example, from a previous import), the existing set of entries is extended as appropriate. Thus, for example, if you had previously imported a REST service, and now you import the REST service again with an additional REST service operation in the XML Schema file, a new Operation object will be added to the existing set of entries for the REST service in the registry.
The registry entries created are summarized in the following diagram:
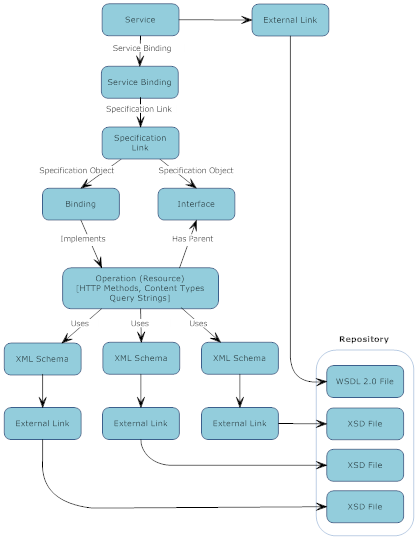
The registry entries are as follows:
An asset of type Service.
An object of type Service Binding, representing the binding defined in the schema file. This object contains the access URI of the launchable REST service. The REST service object contains an internal reference to the service binding, i.e., there is no explicit association.
An object of type Specification Link. The service binding object contains an internal reference to the specification link, i.e., there is no explicit association.
An object of type Binding. The REST service object contains an internal reference to the binding, i.e., there is no explicit association object.
An object of type Interface. This object contains the port type elements of the schema and HTTP methods. The specification link object contains an internal reference to the interface, i.e. there is no explicit association.
An object of the type Operation (Resource).
This object contains the HTTP methods, content type and query strings of the
REST service that an importer auto-generates. The object is represented in
CentraSite by <invoke>. The resource
object contains an association link Implements from the binding
object and an association link HasParent to the interface
object.
An object of the type External Link. This
object contains a link to the schema file stored in the CentraSite
repository. The reference is implemented as an association of the type
uses.
The repository entries are as follows:
The schema file of the REST service.
A schema file can be spread across several physical files that contain IMPORT statements to refer to each other. Also, a schema file can contain a WSDL 2.0 representation, which can also be spread across several physical files. In such cases, each of the schema and WSDL files is stored in the repository, and appropriate references are created in the registry as follows:
An External Link object in the registry refers to the schema file of the REST service in the repository, as described above.
Each WSDL file in the repository that is referred to by a schema
file in the repository has an External Link object. The
reference is implemented as an association of the type
uses.
If the importer detects an equivalent service within CentraSite during the import of a REST service, the import dialog will prompt you to specify either Overwrite latest version or Create new version.
You can also choose the option Interactive resolution of Import/Includes, which will allow you to specify how an already existing imported/included file is handled. For each of the imported/included files you have one of these options:
Overwrite the importing file with new content.
Create a new version of the file with the new content (if, for example, you want to modify a schema but want to retain its previous version).
Reuse any version of the file (if, for example, an intermediate version of a schema is currently referred to by another schema, you can redirect it to the newest version).
You can define webMethods Integration Server (IS) REST services in CentraSite by using the webM REST Publish action. You use this action in the pre-defined webM REST Publish policy to automatically create a webMethods IS REST Service in CentraSite. The service is created using the webMethods IS Service Interface object that is published by the webMethods Designer during any of the following events:
Post-Create
Pre-Update
Important:
To implement the capability to create webMethods IS REST
Services in CentraSite, you must activate the webM REST Publish policy
manually.
For more information about using the webM REST Publish action, see the document Built-In Actions for Design/Change-Time Policies.
Additionally, when importing an XML Schema that refers to other XML Schemas, keep the following points in mind:
When you have at least a Modify permission on the referenced XML Schema, both the asset's schema and referenced schema are imported automatically.
When you have only View permission on the referenced XML Schema, the asset's schema is imported and the referenced XML Schema implicitly reused.
When you do not have any permission on the referenced XML Schema, the asset's schema is imported and a warning message logged.
Before you begin, you must have the XML Schema file that you want to import. This file can reside on the file system of the computer where your browser is running, or it can reside anywhere on the network, as long as its location is addressable via a URL.
![]() To import a REST service asset to the catalog
To import a REST service asset to the catalog
In CentraSite Control, go to Asset Catalog > Browse.
Click the Import icon to open the Import dialog.
In panel 1, specify the following attributes:
| In this field... | Do the following... |
|---|---|
| Organization | Choose the organization to which the asset
will be added. (The drop-down list will contain the list of organizations to
which you are permitted to add assets.) If you select an organization other
than your own organization, you will nevertheless be the owner of the asset.
Note: |
| Import as | Choose REST Service. |
| Name | Enter a name for the asset. An asset name can contain any character (including spaces). |
| Initial Version |
Optional. Enter an identifier for the initial version of the asset. This is the user-defined version, as opposed to the automatically assigned system version. You can enter any string in this field, i.e. the version identifier does not need to be numeric. You can also leave the field blank. You can later create new versions of the asset (see Versioning an Asset). If the versioning feature is disabled for this asset type, the field is nevertheless displayed, thus allowing you to assign an identifier for this first version. If the import of the asset also causes other related objects to be imported (for example, if the schema definition for a REST service includes references to other schema definition files), the initial version is only assigned to the main asset identified in this dialog, and the initial version of the other imported objects is not assigned. |
| Endpoint | Enter the service endpoint URL in a valid format. |
| HTTP Method | Choose the HTTP request method(s) for bridging the protocols (e.g., GET, POST, PUT, DELETE). |
Click Next.
In panel 2, specify the following attributes to associate schema(s) for this service.
| In this field... | Do the following... |
|---|---|
| Import from | Specify whether the input file will be read from a URL-addressable location on the network (the URL option) or from your local file system (the File option). |
| URL or File |
If the file you are importing resides on the network, specify its URL. If the file resides in your local file system, specify the file name. You can use the button to navigate to the required folder. If you want to specify multiple schemas, use the plus button to add additional rows. |
| URL Authentication |
If you have specified a URL, and the site you want to access via the URL requires user authentication, check this box. This opens an Authentication sub-dialog in which you can enter a username and password for authentication at the URL site. |
| Overwrite existing imported schema files | This option determines how referenced schemas are handled when the schema that is referred to already exists in the registry. When this option is enabled, the existing schemas in the registry are replaced with the new ones specified by the input schema file(s). When this option is disabled, the importer simply refers to the schema that already exists in the registry. |
Click Finish.
Be aware that if the XML schema file references another asset, CentraSite will automatically check whether the referenced asset exists in the catalog. If not, CentraSite will attempt to locate the required file and add it to the catalog. If CentraSite cannot locate the file, it will prompt you for the file's location.
CentraSite retrieves the specified file and generates the catalog entry. The REST service asset’s details page is displayed.
During import of a REST service asset, CentraSite will not allow you to add the service to the asset catalog unless you have specified all "required" attributes in the REST Service type definition and all referenced objects to which the XML file has an association. The value for the "required" attribute must be specified in the REST service's profile. Additionally, if the REST service asset has internally referenced objects, the value for the "required" attributes of all such referenced objects should be specified by choosing the button at the top right side of the details page in order to add the REST service to the asset catalog. Thus, for example, if the XML schema file that is referenced in the main XML file have "required" attributes, then you will be prompted to specify a value for the required attributes in order to save the asset.
After you specify the value for all of the required attributes, click to save the REST Service asset.
Review the import log that CentraSite generates for the import process. If errors occur while reading and processing the file, they will be reported in this log.
Configure the asset's extended attributes as described in Editing an Asset in the Catalog.
The following restrictions apply for REST services:
XML Schema files can contain references to DTD (Document Type Definition) files. If you import such an XML schema file, the referenced DTD files are not imported to CentraSite.
An imported REST service will not contain any of the custom profiles that were included in the "Service" type.
The BPEL Process importer copies a BPEL file to the repository, and creates a set of objects in the registry that represent the BPEL process definition.
The entries created are summarized in the following diagram:
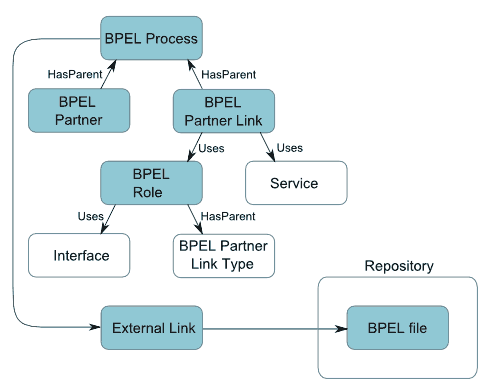
The registry objects are as follows:
A BPEL Process asset. This asset has an External Link that points to the BPEL definition file in the repository.
A BPEL Partner object that refers to the BPEL Process asset using an association.
A BPEL Partner Link object that refers to the BPEL Process asset using an association.
A BPEL Role object that is referred to by the BPEL Partner Link object. If the BPEL Process definition contains the activation of a Web service interface, a reference is created from the BPEL Role object to a Web service's Interface object. The Web service's Interface object must already exist in the repository, otherwise the import of the BPEL process will fail.
A BPEL Partner Link Type object that is referred to by the BPEL Role object.
The Service, Interface and BPEL Partner Link Type objects are objects that already exist from a previous import of a Web service.
Additionally, when importing a BPEL asset that refers to other XML Schemas, keep the following points in mind:
When you have at least a Modify permission on the referenced XML Schema, both the BPEL file and XML schema are imported automatically.
When you have only View permission on the referenced XML Schema, the BPEL file is imported and the referenced XML Schema implicitly reused.
When you do not have any permission on the referenced XML Schema, the BPEL file is imported and a warning message logged.
![]() To import a new BPEL asset to the catalog
To import a new BPEL asset to the catalog
Before you begin, you must have the BPEL file that you want to import. This file must reside on the file system of the computer where your browser is running.
In CentraSite Control, go to Asset Catalog > Browse.
Click the Import icon.
In the Import dialog, specify the following attributes:
| In this field... | Do the following... |
|---|---|
| Organization | Choose the organization to which the asset
will be added. (The drop-down list will contain the list of organizations to
which you are permitted to add assets.) If you select an organization other
than your own organization, you will nevertheless be the owner of the asset.
Note: |
| Import as | Choose BPEL. |
| Initial Version |
Optional. Enter an identifier for the initial version of the asset. See the description of the import dialog for Web service described above in the section Importing Web Services for details of usage. |
| File | The input file's fully qualified name. |
| Product |
Optional. This option allows the user to assign a category from the Products taxonomy to the BPEL asset. |
Click Finish.
Be aware that if the BPEL file references another asset, CentraSite will automatically check whether the referenced asset exists in the catalog. If not, CentraSite will attempt to locate the required file and add it to the catalog. If CentraSite cannot locate the file, it will prompt you for the file's location.
CentraSite retrieves the specified file and generates the catalog entry. The BPEL asset’s details page is displayed.
During import of a BPEL process asset, CentraSite will not allow you to add the asset to the asset catalog unless you have specified all "required" attributes in the BPEL process type definition and all referenced objects to which the BPEL file has an association. The value for the "required" attribute must be specified in the BPEL asset's profile. Additionally, if the BPEL asset has internally referenced objects, the value for the "required" attributes of all such referenced objects should be specified by choosing the button at the top right side of the details page in order to add the BPEL process asset to the asset catalog. Thus, for example, if the XML schema file that is referenced in the main XML file have "required" attributes, then you will be prompted to specify a value for the required attributes in order to save the asset.
After you specify the value for all of the required attributes, click to save the BPEL asset.
Review the import log that CentraSite generates for the import process. If errors occur while reading and processing the file, they will be reported in this log.
Configure the asset's extended attributes as described in Editing an Asset in the Catalog.
The XML Process Definition Language (XPDL) is a standard language that is used to represent workflow and business processes. It is generally used to exchange process definitions between different business processing systems. CentraSite provides an importer for XPDL files. This importer reads an XPDL 2.x file and adds the process that it defines to the registry as a Process object. It stores the XPDL file itself in CentraSite's repository.
The following diagram illustrates the registry and repository items that the importer generates when it imports an XPDL file.
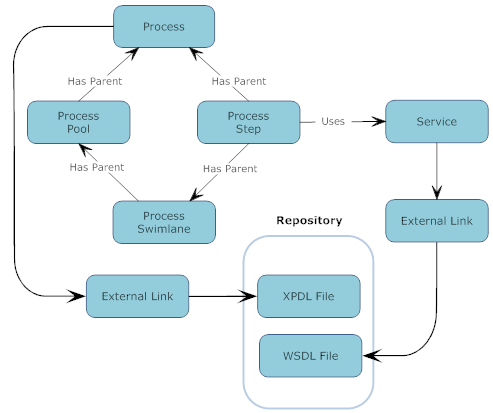
The following registry objects and repository items are created by the import of an XPDL file:
A Process object is created for each Workflow process element defined in the XPDL file.
The "Name" attribute for this element determines the name of the Process object.
The "Id" attribute for this element is assigned to an attribute called UniqueID in the Process object.
A Process Step object is created for each Activity element defined in the XPDL file. Associations are generated to represent the transitions between Process Step objects.
A Process Pool object is created for each Pool element defined in the XPDL file, and a Process Swim Lane object is created for each Lane element defined in the XPDL file.
The XPDL file is added to the CentraSite repository. The Process object will include an attribute called ProcessDefinitionURL, which will contain a link to this file.
If the XPDL file refers to a WSDL document, the importer will prompt you to provide the specified WSDL file. When you provide the file, the importer will check whether the service described in the WSDL already exists in the registry. If it does, the importer will associate the Process object with that service. If it does not, the importer will import the WSDL file, add the service to the registry, and associate the service with the Process object. If the imported WSDL file refers to other WSDL files and/or XML Schemas, the importer will add those assets to the registry as described in Importing Web Services.
If the process in the XPDL file has a workflow Id that matches the UniqueID attribute of a Process object that already exists in the registry, the importer will handle the import in the following way:
If the Process object in the registry is not associated with a lifecycle model or if it is in the initial state of its lifecycle, the importer will replace the Process object in the registry with the process from the XPDL file. (If you do not have Modify permission on the Process object in the registry, the import of the XPDL file will fail.)
If the Process object is in any state other than the initial state of its lifecycle, the XPDL file will be imported as a new version of the existing Process object.
CentraSite is installed with a predefined lifecycle model for Process objects. If you want to apply lifecycle governance to the Process objects in your registry, you can use the predefined lifecycle provided by CentraSite or you can define a custom lifecycle. If you want to use the predefined lifecycle model, you must activate it first. (It is installed in the inactive state.) You may customize the predefined lifecycle as you choose.
For more information about working with lifecycle models, see the document Customizing Lifecycle Management.
Use the following procedure to import an XPDL file into CentraSite.
Note:
If you are using ARIS Architect to create process definitions to
share with webMethods BPMS, do not use this procedure to add them to
the registry. Use the publishing tools provided with ARIS Architect instead.
Using the ARIS Architect ensures that the appropriate metadata is included in
the Process object.
![]() To import an XPDL File
To import an XPDL File
Before you begin, you must have the XPDL file that you want to import. This file must reside on the file system of the computer where your browser is running.
In CentraSite Control, go to Asset Catalog > Browse.
Click the Import icon.
In the Import dialog, specify the following attributes:
| In this field... | Do the following... |
|---|---|
| Organization | Choose the organization to which the asset
will be added. (The drop-down list will contain the list of organizations to
which you are permitted to add assets.) If you select an organization other
than your own organization, you will nevertheless be the owner of the asset.
Note: |
| Import as | Choose XPDL. |
| Initial Version |
Optional. Enter an identifier for the initial version of the asset. For information about version identifiers, see the description of the Initial Version field provided in the Importing Web Services section. |
| File | The fully qualified name of the XPDL file that you want to import. |
| Product | Optional. The product with which this XPDL file is associated. |
Click Finish.
Be aware that if the XPDL file references another asset, CentraSite will automatically check whether the referenced asset exists in the catalog. If not, CentraSite will attempt to locate the required file and add it to the catalog. If CentraSite cannot locate the file, it will prompt you for the file's location.
CentraSite retrieves the specified file and generates the catalog entry. The XPDL asset’s details page is displayed.
During import of an XPDL asset, CentraSite will not allow you to add the asset to the asset catalog unless you have specified all "required" attributes in the XPDL type definition and all referenced objects to which the XPDL file has an association. The value for the "required" attribute must be specified in the XPDL asset's profile. Additionally, if the XPDL asset has internally referenced objects, the value for the "required" attributes of all such referenced objects should be specified by choosing the button at the top right side of the details page in order to add the XPDL asset to the asset catalog. Thus, for example, if the XML schema file that is referenced in the main XML file have "required" attributes, then you will be prompted to specify a value for the required attributes in order to save the asset.
After you specify the value for all of the required attributes, click to save the XPDL asset.
Review the import log that CentraSite generates for the import process. If errors occur while reading and processing the XPDL file, they will be reported in this log.
Configure the process model's additional attributes as necessary. For information about setting attributes for an asset, see Editing an Asset in the Catalog.
The Export and Import features of CentraSite allow you to export a set of assets and other objects from a source CentraSite registry to an archive file on the file system, then to import the contents of the archive file to a target CentraSite registry. The target registry can be the same registry as the source registry.
The Export and Import features are described in detail in the document Importing/Exporting Registry Objects.
Some asset types, such as Application Servers, do not have importers. To add this type of asset to the catalog, you must define it from scratch, meaning that you must create the asset and set its attributes manually.
Note that CentraSite allows you to add any type of asset to the catalog manually, even those that you can create using importers. Be aware, however, that you might not be able to manually set all of the attributes for these types of assets. Certain attributes can only be set by an importer. For example, CentraSite allows you to add a Web service to the catalog from scratch, but attributes such as the list of operations and the service endpoints cannot be specified manually. To set these attributes, you must attach the WSDL file to the catalog entry using the command in the asset's menu. Similarly, CentraSite allows you to add a REST service or an XML service to the catalog from scratch, but attributes such as the HTTP methods, content type and service endpoints cannot be specified manually. To set these attributes, you must specify the HTTP methods, content type and schema files to the catalog entry using the resource command in the asset's Technical Details profile.
![]() To add a new asset to the catalog from scratch
To add a new asset to the catalog from scratch
In CentraSite Control, go to Asset Catalog > Browse.
Click the Add Asset button.
In the Add Asset dialog, specify the following attributes:
| In this field... | Do the following... |
|---|---|
| Type |
Choose the type of asset that you want to add to the catalog. All top-level asset types are shown in the drop-down list. The asset types that are supported out-of-the-box are: Application, Web service, REST service, XML Service, BPEL Process, XML Schema, Virtualized Services etc.). (For information about creating and managing virtual services, see the document Working with Virtualized Services.) |
| Name |
Enter a name for the asset. An asset name can contain any character (including spaces). An asset name does not need to be unique within the catalog. However, to reduce ambiguity, you should avoid giving multiple assets of the same type the same name. As a best practice, we recommend that you adopt appropriate naming conventions to ensure that assets are distinctly named within an organization. |
| Description | Optional. Enter a comment or descriptive information about the new asset. |
| Organization | Choose the organization to which the asset
will be added. (The drop-down list will contain the list of organizations to
which you are permitted to add assets.) If you select an organization other
than your own organization, you will nevertheless be the owner of the asset.
Note: |
| Initial Version |
Optional. Enter an identifier for the initial version of the asset. The version identifier does not need to be numeric. You can later create new versions of the asset (see Versioning an Asset). If the versioning feature is disabled for an asset type, the field is nevertheless displayed, thus allowing you to assign an identifier for this first version. |
Click OK
Configure the asset's extended attributes as described in Editing an Asset in the Catalog.