This document describes the CentraSite Business UI's pluggable architecture. Using this architecture, you can extend CentraSite Business UI's functionality by adding your own features with appropriate widgets and JavaScripts.
The content is organized under the following sections:
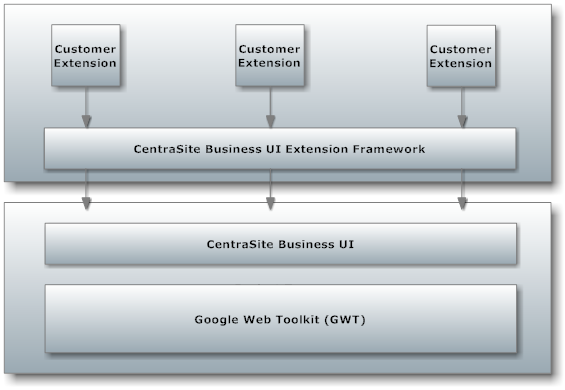
CentraSite Business UI offers a pluggable architecture that allows you to extend the standard graphical interface by adding your own widgets.
The CentraSite Business UI extension framework is a plug-in to a core infrastructure, in other words, the core infrastructure provides extension points where CentraSite Business UI extension framework is plugged in. The core infrastructure comprises of the CentraSite Business UI built on top of the Google Web Toolkit (GWT), which provides the widget classes for the Business User Interface.
The pluggable architecture is illustrated in the following diagram:
Extensions are implemented as widgets. The points in the code at which extensions can be added are called extension points. CentraSite Business UI offers extension points that allow you to implement or extend the following features:
Provide an alternative login screen.
Provide an alternative screen for requesting an account.
Extend the search dialog by additional search conditions.
Replace the standard asset details view.
Extend the set of available actions in an asset's details page.
The available extension points are described in the section Extension Points below.
The Login page that you see when you access CentraSite Business user interface can be customized to suit your own requirements. You can change aspects such as logos used, colors, text, time formats and layouts. You can also define links that will take you straight to the login screen or guest screen, and links to the user registration and the "Take a Tour" mechanism of the CentraSite Business UI.
The information contained in the following sections describes how to customize your login page.
The standard Login page contains a header section, infopanel, login pane and a footer section.
The login page has the following schematic layout:
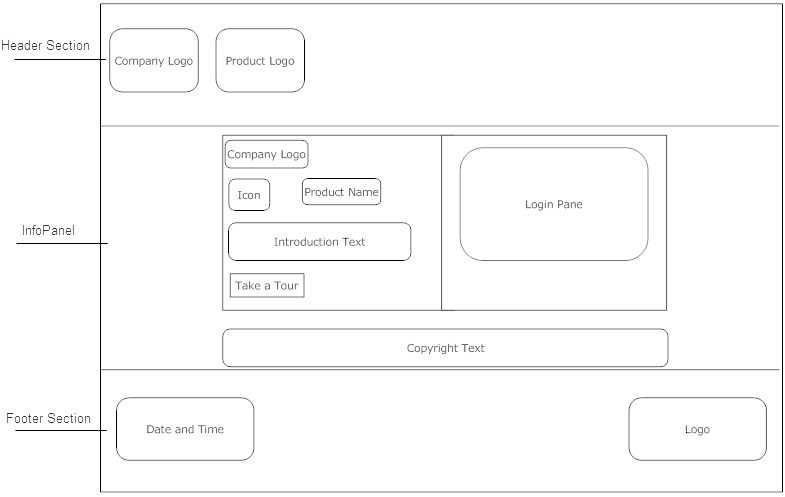
The header section at the top contains a company logo and a product logo. You can change the logo and colors used to display the logo. You can hide the logos as part of the page customization. You can change the background color for the whole header section.
The infopanel contains a company logo, product name, and an overview of the CentraSite Business UI. Additionally, the infopanel includes a link that takes you to a download site, either from Software AG or a popular external site, or a delivered document such as a PDF document.
The login pane contains the text fields for username and password to access your CentraSite Business UI account. It includes links to the user registration and guest access screens. A Remember Me checkbox allows you to save the login credentials of your account.
The footer section displays the current date and time. Additionally, it contains the CentraSite copyright information and subtitle text. You can hide the copyright information and the subtitle text as part of the page customization. You can change the background color of the whole footer section.
The Login page is implemented as an extension point in the context of CentraSite's Business UI architecture. To install your customized login page, you need to modify the CentraSite Business UI configuration in the Software AG Runtime environment.
The required steps are described in the following sections:
Before you make any changes, stop the Software AG Runtime process.
The standard centrasite.xml configuration file delivered with the CentraSite kit contains all of the names of the CentraSite Business UI extension points, including the extension point for the login configuration. You must create a copy of the extension point for the login configurations in the centrasite.xml file in order to define a customized login page.
The configuration files for the CentraSite Business UI reside in the following directory.
When you start Software AG Runtime, property settings in the following files determine the features of the CentraSite Business UI.
<CentraSiteInstallDir>\cast\cswebapps\BusinessUI\
| File name | Description |
|---|---|
| centrasite.xmlfile in the <CentraSiteInstallDir>\cast\cswebapps\BusinessUI\conf\system\ directory |
Contains property settings that are installed for the CentraSite Business UI. Do not modify the contents of this file unless asked to do so by Software AG. |
| custom_centrasite.xml |
Contains properties that modify the installed settings in centrasite.xml. If you need to modify the property settings for the CentraSite Business UI, you make your changes in this file. |
The element <GUIConfiguration> in the
standard centrasite.xml file
refers to the login configuration.
<!-- HEADER PANEL CONFIGURATION -->
  <Header>
     <CompanyLogo tooltip="CS_MSG_INMBX_IMG_APP_MAIN_LOGO_ALT_TEXT">images/system/softwareag.png</CompanyLogo>
     <HeaderLogo tooltip="CS_MSG_INMBX_LBL_PAGE_TITLE">images/system/CS_Nameplate.png</HeaderLogo>
  </Header>

<!-- FOOTER PANEL CONFIGURATION -->
  <Footer>
     <Time visibility="true" />
     <CopyRight visibility="true">CS_MSG_INMBX_LBL_COPYRIGHT</CopyRight>
     <PoweredBy tooltip="CS_MSG_INMBX_LBL_FOOTER_TEXT" visibility="true">images/system/webfooter_powered_by.png</PoweredBy>
  </Footer>

<!-- INFORMATION PANEL CONFIGURATION	-->

  <InfoPanel visibility="true">
     <LoginCompanyLogo tooltip="CS_MSG_INMBX_IMG_APP_MAIN_LOGO_ALT_TEXT">images/system/SAG_Blue_Flag_forLogin_129x51.png</LoginCompanyLogo>
     <ProductLogo tooltip="CS_MSG_INMBX_LBL_PRODUCT_INTRO_HEADER">images/system/cs_product_logo_70x70.png</ProductLogo>
     <ProductName tooltip="CS_MSG_INMBX_LBL_PRODUCT_INTRO_TEXT">CS_MSG_INMBX_IMG_APP_HEADER_ALT_TEXT</ProductName>
     <ProductNameLogo tooltip="CS_MSG_INMBX_LBL_PRODUCT_INTRO_HEADER">images/system/cs_nameplate_forlogin_206x36.png</ProductNameLogo>
     <IntroductionText>CS_MSG_INMBXI0001</IntroductionText>
     <TakeATour visibility="true" url="http://www.softwareag.com">CS_MSG_INMBX_BTN_TOUR</TakeATour>
  </InfoPanel>

<!-- LOGIN PANEL CONFIGURATION	-->

  <LoginPage loginAsGuest="false">
     <RememberMe visibility="true" />
     <Guest visibility="true" />
     <RequestAnAccount visibility="true">
     <ReasonForRequest visibility="true" />
     </RequestAnAccount>
  </LoginPage>
To use your customized login page instead of the standard login page, set the following properties as required:
| Layout Component | Source Element | Description |
| Header logo |
|
Sets the header logo. |
| Company logo |
|
Sets the company logo in header. |
| Layout Component | Source Element | Description |
| Company logo |
|
Sets the company logo in information panel. |
| Product logo |
|
Sets the product logo in information panel. |
| Product name |
|
Sets the product name in information panel. |
| Product name |
|
Sets the product name logo in information panel. |
| Information panel |
|
Sets the information panel. However, the |
| Introduction |
|
Defines the introduction text about CentraSite. |
| Take a tour |
|
Sets the button. However, the button is only visible if the attribute visibility value is set to "true". |
| Layout Component | Source Element | Description |
| Login as guest |
|
Sets the link. However, the link is only visible if the attribute visibility value is set to "true". |
| Guest visibility |
|
Defines the visibility of the link. A value set to "true" sets the link visible. |
| Remember me |
|
Sets the Remember Me check box for supplying user login credentials. However, the Remember Me check box is only visible if the attribute visibility value is set to "true". |
| Request an account |
|
Sets the Request an Account link for registering a new user. However, the Request an Account link is only visible if the attribute visibility value is set to "true". |
| Reason for request an account |
|
Sets the Reason for Request text box. However, the Reason for Request text box is only visible if the attribute visibility value is set to "true". |
| Layout Component | Source Element | Description |
| Copyright information |
|
Defines the copyright information of CentraSite in footer. However, the CopyRight information is only visible if the attribute visibility value is set to "true". |
| Date and time |
|
Defines the current date and time in footer. |
| Powered by |
|
Sets the "Powered by" logo in footer. However, the "Powered by" logo is only visible if the attribute visibility value is set to "true". |
After you have made the changes, restart Software AG Runtime. The changes you have made should now be visible when you view the login page.
The Welcome page that you see when you access CentraSite Business user interface can be customized to suit your own requirements. You can change aspects such as the search widget, search scopes, activity menus, the main navigation links and Welcome page.
The information contained in the following sections describes how to customize your Welcome page.
The standard Welcome page gives you quick links to the pages of CentraSite Business UI that you will probably use frequently during your day-to-day work with CentraSite. It also provides links to external web sites that provide useful information related to CentraSite.
A search box allows you perform a keyword search for registry assets whose name or description contains the given keyword.
The Welcome page has the following schematic layout:
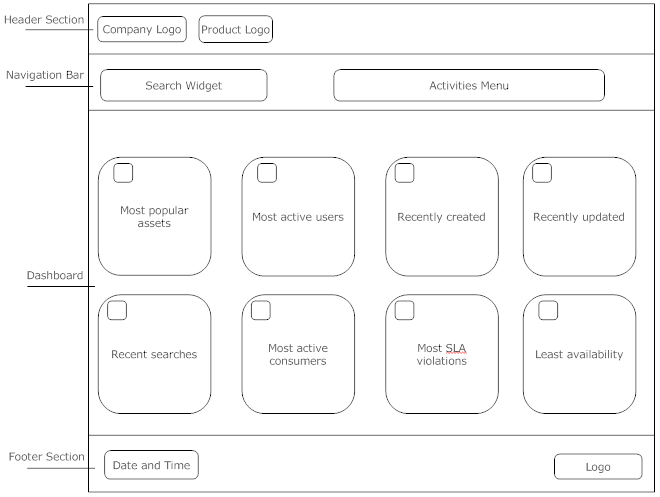
The header section at the top contains a company logo and a product logo. You can change the logo and colors used to display the logo. You can hide the logos as part of the page customization. You can change the background color for the whole header section .
A set of header links in this section provide easy access to items (such as the assets, search capabilities etc.) that you use routinely, notifications and alerts, the CentraSite product documentation and related information.
The navigation bar contains a search widget which allows you to perform a keyword search for an asset. You can choose to have a user-defined search widget or the default search widget as part of the page customization. You can change the background color of the search widget. Additionally, a browse link is displayed by default, which allows you to perform an advanced search for an asset. You can customize the browse link to contain a custom URL that either opens an Advanced Search page or an external page of your choice. You can rename or hide the browse link as part of the page customization.
Adjacent to the search widget is the activities menu. This menu includes options that enable you to access the various CentraSite functions (such as the Create Assets, Import Assets etc). You can rearrange the order of these menu options. Also, you can customize the activities menu to include or exclude one or more CentraSite functions as part of the customization process.
Below the header section, we have the Welcome page. The Welcome page can contain one or more so-called portlets. Each portlet contains a header and content. The header includes a title, with an icon adjacent to the text, some selectable markers (example, set user configuration of an individual portlet, expanding and collapsing a portlet etc.) and a close button. Under the header, you can have a list of entries, either representing the result set of a search query, any external HTML page or a graphical image.
CentraSite Business UI supports the following portlets:
Text portlet – This portlet represents the result set of a saved search query as executable actions. Typically, an action contains the URL of a search result (for example, the name of an asset) that renders the appropriate details page (in this case, the asset details page) within the CentraSite Business UI.
The names of the search results are displayed as a table consisting of single or multiple columns. Each table cell contains one executable action. Each cell can also have an icon beside it.
IFrame portlet – Represents an arbitrary URL that points to the corresponding external HTML page inside the HTML IFrame component.
Graphical portlet – Represents the saved search queries in graphical representation.
The portlets are rendered in the welcome page according to how you configure them. The portlets can be displayed side by side in rows. For details on the portlet configuration, refer to the section Installing the Customized Welcome Page below.
The footer section displays the current date and time. Additionally, it contains the CentraSite copyright information and subtitle text. You can hide the copyright information and the subtitle text as part of the page customization. You can change the background color of the whole footer section.
In general, you can use CSS stylesheet statements to customize the appearance of text and colors in the Welcome page.
To install your customized Welcome page, you need to modify the CentraSite Business UI configuration in the Software AG Runtime environment.
The required steps are described in the following sections:
Before you make any changes, stop the Software AG Runtime process.
The centrasite.xmlfile in the <CentraSiteInstallDir>\cast\cswebapps\BusinessUI\conf\system\ directory contains the properties that are installed for the CentraSite Business UI.
If you need to customize the Welcome page for the
CentraSite Business UI, copy the element <GUIConfiguration> from the installed filecentrasite.xml, and make your changes in
the centrasite.xmlfile located in the <CentraSiteInstallDir>\cast\cswebapps\BusinessUI\conf\custom\directory.
After you have made the changes, restart Software AG Runtime.
. The changes you have made should now be visible when you view the Welcome page.
Header links are product-specific information links you can define to display pages or trigger functions when a user clicks on an information label. Header links only appear in the headers when defined in the <HeaderLinks> element of the configuration file.
By default, the CentraSite Business UI contains the following header links:
<HeaderLinks>
  <HeaderLink id="dashboard" displayName="CS_MSG_INMBU_LINK_DASHBOARD" token="welcome:welcome" />
  <HeaderLink id="inbox" displayName="CS_MSG_INMBU_LINK_INBOX" token="inbox:inbox" />
  <HeaderLink id="help" displayName="CS_MSG_INMBU_LINK_HELP" token="help:help" />
  <HeaderLink id="about" displayName="CS_MSG_INMBU_LINK_ABOUT" token="about:about" />
  <HeaderMenuSeparator tooltip="CS_MSG_INMBX_LBL_HEADER_MENU_SEPERATOR">images/system/Separator_White_1X1.png</HeaderMenuSeparator>
</HeaderLinks>
Additionally, you can create a custom header link to suit your
requirement. You define a custom header link under the section Header
Panel Configuration in the centrasite.xml file.
Important:
You cannot customize the header link
(even if you belong to the CentraSite
Administrator role).
The search scopes enable you to narrow the search for assets based on the following objects:
Everything
Assets
Organizations
Users
<SearchScopes>
   <SearchScope id="Assets" isExpandable="false" class="com.softwareag.centrasite.api.csom.search.impl.AssetScope" exclude="uddi:7613515f-77eb-11dd-bc9f-f62b6cf80b00">INMCL_STR_Assets</SearchScope>
   <SearchScope id="Everything" isExpandable="true" class="com.softwareag.centrasite.api.csom.search.impl.EverythingScope" exclude="uddi:7613515f-77eb-11dd-bc9f-f62b6cf80b00">INMCL_STR_Everything</SearchScope>
   <SearchScope id="Users" isExpandable="false" class="com.softwareag.centrasite.api.csom.search.impl.CSOTypeScope" types="User" include="uddi:2ebc76b4-128b-11dd-8c31-ae80cb45c029" exclude="uddi:7613515f-77eb-11dd-bc9f-f62b6cf80b00">INMCL_STR_Users</SearchScope>
   <SearchScope id="Organizations" isExpandable="false" class="com.softwareag.centrasite.api.csom.search.impl.CSOTypeScope" types="Organization" exclude="uddi:7613515f-77eb-11dd-bc9f-f62b6cf80b00">INMCL_STR_Organizations</SearchScope>
</SearchScopes>
Additionally, you can create a custom scope with the search query that
you require. You define a custom search scope under the section Search
Scopes Configuration in the centrasite.xml
file.
The CentraSite Business UI's Activity Menu helps you access the following functions by default:
Create Assets
Global Reports
Manage Organizations
<Activities>
   <Activity id="Create Assets" class="com.softwareag.centrasite.api.activity.impl.CreateAssetActivityImpl">INMCL_ACTIVITY_CREATE_ASSET</Activity>
   <Activity id="Global Reports" class="com.softwareag.centrasite.api.activity.impl.GlobalReportActivityImpl">INMCL_ACTIVITY_GLOBAL_REPORTS</Activity>
   <Activity id="Manage Organizations" class="com.softwareag.centrasite.api.activity.impl.ManageOrganizationsImpl">INMCL_ACTIVITY_MANAGE_ORGANIZATIONS</Activity>
 </Activities>
Additionally, you can create a custom activity that have the specific
function and format that you require. You define a custom activity as an
extension under the section Activities Configuration in the
centrasite.xml file. For procedures, see
Extend Activity Menu by Additional
Functions.
The Browse link enables you to locate assets in the CentraSite registry using the advanced search options.
<BrowseLink visibility="true" displayName="CS_MSG_INMBU_LINK_BROWSE" token="browse:browse" />
You can customize the Browse link in the centrasite.xml file to show any of the following behaviors:
Enable or disable the Browse link
Provide custom URL
Rename the Browse link
Portlets are the information display components of the CentraSite Business UI. A portlet can process requests from the user and generate dynamic content such as report lists, notifications or performance metrics. In addition to a set of standard portlets, CentraSite provides a framework that enables you to define and deploy custom portlets that meet your requirements.
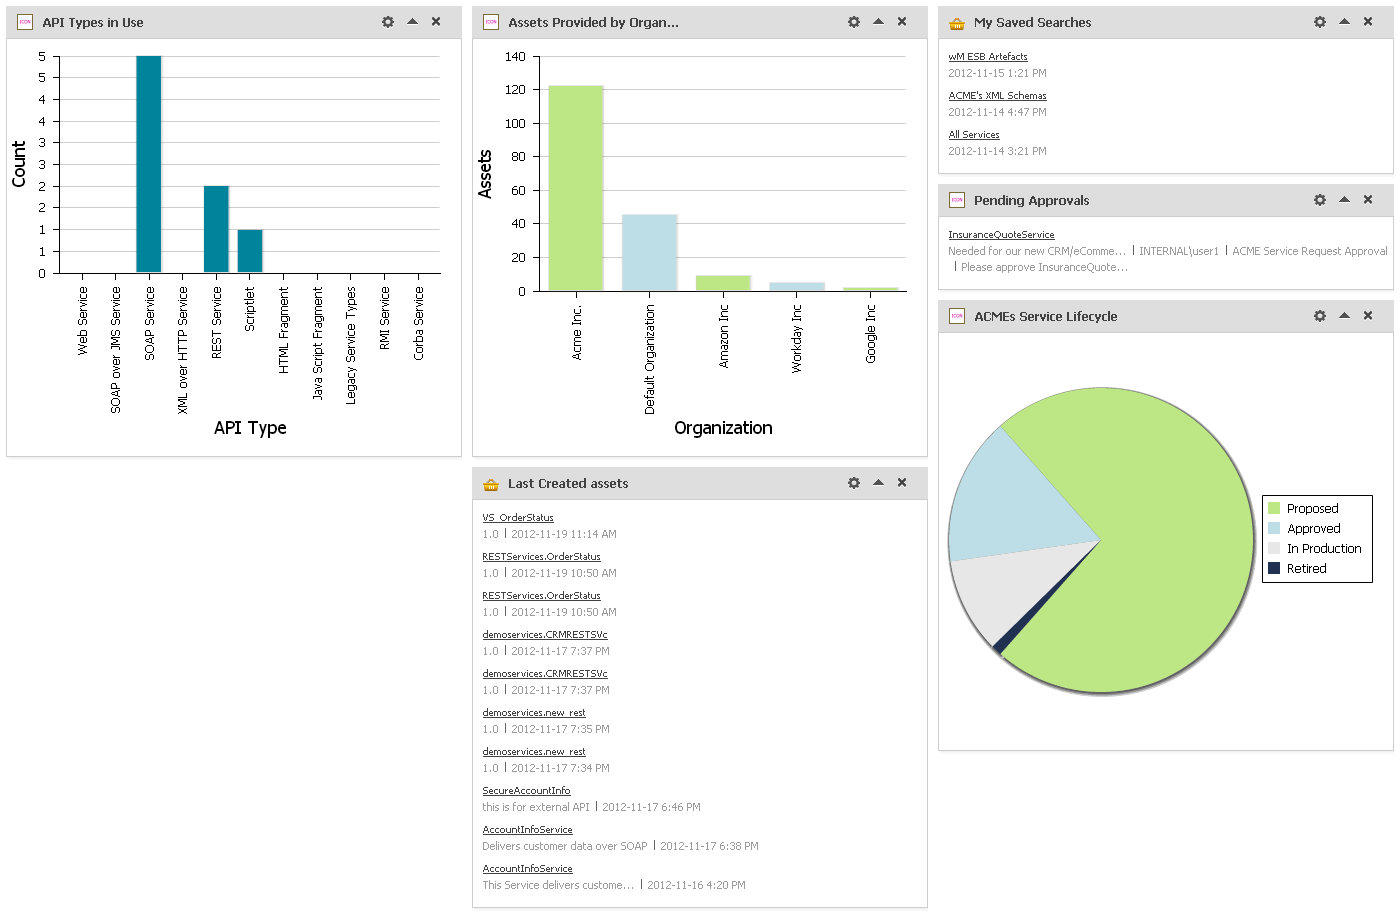
Portlets that are created with the framework provided in the CentraSite Business UI have a standard appearance. A portlet includes a title bar with icons that link to portlet actions, and a list of content items as shown in the following example:
The CentraSite Business UI includes a default set of portlets. For a list of the design/change-time portlets and run-time portlets that CentraSite preships, see the section Built-in Portlets Reference.
<Portlets>
  <Portlet id="MyFavoritesPortlet"
           description="INMBU_STR_PORTLET_FAVORITES_DESC"
           type="text"
           dataFeed="MyFavorites"
           icon="images/system/favorites_16X16.png"
           row="0"
           column="0"
           isVisible="true"
           refreshInterval="0"
           actions="configure,refresh">
    INMBU_STR_PORTLET_NAME_MY_FAVORITES
  </Portlet>
  <Portlet id="TopXServicesBasedOnInvocationsPortlet"
           description="INMBU_STR_PORTLET_TOPX_SERVICES_BASED_ON_INVOCATIONS"
           type="text"
           dataFeed="TopXServicesBasedOnInvocations"
           icon="images/system/highest_invocation_16X16.png"
           row="0"
           column="1"
           isVisible="true"
           refreshInterval="0"
           actions="configure,refresh">
    INMBU_STR_PORTLET_NAME_TOPX_SERVICES
  </Portlet>
  <Portlet id="RecentLifecycleChangesPortlet"
           description="INMBU_STR_PORTLET_RECENT_LIFECYCLE_CHANGES_DESC"
           type="text"
           dataFeed="RecentLifecycleChanges"
           icon="images/system/recent_lifecycle_changed_16X16.png"
           row="0"
           column="2"
           isVisible="true"
           refreshInterval="0"
           actions="configure,refresh">
   INMBU_STR_PORTLET_NAME_RECENT_LCM_CHANGES
  </Portlet>
  <Portlet id="LastCreatedAssetsPortlet"
           description="INMBU_STR_PORTLET_RECENTLY_CREATED_ASSETS_DESC"
           type="text"
           dataFeed="LastCreatedAssets"
           icon="images/system/recently_created_16X16.png"
           row="1"
           column="0"
           isVisible="true"
           refreshInterval="0"
           actions="configure,refresh">
    INMBU_STR_PORTLET_NAME_LAST_CREATED_ASSETS
  </Portlet>
  <Portlet id="MySavedSearchesPortlet"
           description="INMBU_STR_PORTLET_SAVED_SEARCH_DESC"
           type="text"
           dataFeed="MySavedSearches"
           icon="images/system/saved_searches_16X16.png"
           row="1"
           column="1"
           isVisible="true"
           refreshInterval="0"
           actions="configure,refresh">
    INMBU_STR_PORTLET_NAME_MY_SAVED_SEARCHES
  </Portlet>
  <Portlet id="MyPendingApprovalRequestsPortlet"
           description="INMBU_STR_PORTLET_PENDING_APPROVAL_DESC"
           type="text"
           dataFeed="MyPendingApprovalRequests"
           icon="images/system/pending_approval_16X16.png"
           row="1"
           column="2"
           isVisible="true"
           refreshInterval="0"
           actions="configure,refresh">
    INMBU_STR_PORTLET_NAME_MY_PENDING_APPROVALS
  </Portlet>
</Portlets>
Additionally, you can create a custom portlet to suit your
requirement. You define a custom portlet as an extension under the section
Portlets Configuration in the centrasite.xml
file. For procedures, see Add
Portlet.
This section describes the available extension points for the CentraSite Business UI, as well as the Java classes and methods that you need to implement in order to plug in to the extension points.
An extension point is characterized by the following properties:
An ID by which it can be referenced.
A GWT widget that wraps the extension functionality.
The available extension points are described in the following sections.
| Usage |
Use at the start of a session of CentraSite Business UI. |
| Elements |
|
| Processing |
When you log in to the user interface, a custom defined login page is rendered. |
| Provided by | BusinessUI |
| Example |
<ExtensionPointLogin custom="false" /> |
| Usage |
Use this when requesting an account in the CentraSite Business UI. |
| Elements |
|
| Processing |
When you request an account in CentraSite, this invokes a user-defined registration page that displays parameters that are required for entering the user credentials. |
| Provided by | BusinessUI |
| Example |
<ExtensionPointRegister custom="false" /> |
The Activity Menu contains a set of functions that you can perform on the CentraSite Business UI. CentraSite's flexible and extensible registry structure enables you to model any kind of activity menu that you might want to include in your Business UI.
The CentraSite Business UI's Activity Menu helps you access the following functions by default:
Create Assets
Global Reports
Manage Organizations
You can add a custom activity to have the specific function and format that you require.
Additionally, you can change the order of displaying activities within the activity menu.
To define a tailored activity, you perform the following high-level steps:
Implement the new activity as a GWT extension point. For procedures, see Implement Activity as an Extension.
Configure the new activity in centrasite.xml file. For procedures, see Enable Activity through Configuration.
| Usage |
Use this to define a custom activity menu. For example, add an activity, reorder the existing activities, and remove activities to suit your requirements. |
| Elements |
|
| Interfaces |
|
| Abstract base class | Activity |
| Processing |
When starting the user interface, a custom defined activity menu is rendered. |
| Provided by | CentraSiteLogicLayer |
| Code | See the sample code. |
You can find the following sample code for defining an activity as extension point in the CentraSiteBUIExtension.gwt.xml file that is provided in the demo folder under the CentraSite installation folder.
<!-- Use ExtensionWidgetFactory by default -->
  	<replace-with class="com.softwareag.centrasite.bui.extension.client.factory.ExtensionWidgetFactory">
    	<when-type-is class="com.softwareag.centrasite.bui.extension.core.client.IExtensionWidgetFactory"/>
  	</replace-with>
After you define a custom activity as an extension with the above steps, you need to enable the activity configuration so as to display the activity in the CentraSite Business UI. To enable the custom activity configuration, follow these steps:
Important:
The activity configuration parameters initially defined in the
configuration file are editable and cannot be protected.
Open the centrasite.xml file.
The system configuration (centrasite.xml) file resides in the cast\cswebapps\BusinessUI\system\conf folder under the CentraSite installation directory.
The custom configuration (centrasite.xml) file resides in the cast\cswebapps\BusinessUI\custom\conf folder under the CentraSite installation directory.
Locate the Activities Configuration section under
CLL Configurations.
The configuration snippet looks like this:
<CLLConfigurations>
 <Activities>
   <Activity id="Create Assets" class="com.softwareag.centrasite.api.activity.impl.CreateAssetActivityImpl">INMCL_ACTIVITY_CREATE_ASSET</Activity>
   <Activity id="Global Reports" class="com.softwareag.centrasite.api.activity.impl.GlobalReportActivityImpl">INMCL_ACTIVITY_GLOBAL_REPORTS</Activity>
   <Activity id="Manage Organizations" class="com.softwareag.centrasite.api.activity.impl.ManageOrganizationsImpl">INMCL_ACTIVITY_MANAGE_ORGANIZATIONS</Activity>
 </Activities>
</CLLConfigurations>
Append the required custom activity (for example, "Create Report Templates") configuration statement as below:
<CLLConfigurations>
 <Activities
   <Activity id="Create Report Templates" class="com.softwareag.centrasite.api.activity.impl.CreateReportTemplatesImpl">INMCL_ACTIVITY_CREATE_REPORT _TEMPLATES</Activity>
 </Activities>
</CLLConfigurations>
wherein,
| Parameter | Denotes |
|---|---|
id |
A unique identifier for the activity, in this example
|
class |
The implementation class of
|
INMCL_ACTIVITY |
The i18n string to display the activity in CentraSite Business UI. If you want to specify a localized name, enter the message ID
starting with a prefix "INMCL" (in this example,
|
Now the Activities Configuration section looks similar
to this.
<CLLConfigurations>
 <Activities>
   <Activity id="Create Assets" class="com.softwareag.centrasite.api.activity.impl.CreateAssetActivityImpl">INMCL_ACTIVITY_CREATE_ASSET</Activity>
   <Activity id="Global Reports" class="com.softwareag.centrasite.api.activity.impl.GlobalReportActivityImpl">INMCL_ACTIVITY_GLOBAL_REPORTS</Activity>
   <Activity id="Manage Organizations" class="com.softwareag.centrasite.api.activity.impl.ManageOrganizationsImpl">INMCL_ACTIVITY_MANAGE_ORGANIZATIONS</Activity>
   <Activity id="Create Report Templates" class="com.softwareag.centrasite.api.activity.impl.CreateReportTemplatesImpl">INMCL_ACTIVITY_CREATE_REPORT_TEMPLATES</Activity>
 </Activities>
</CLLConfigurations>
Locate the Activities Configuration section under
BUI Configurations.
<UIProperties>
  <Activities noOfActivitiesInMainNav="5">
    <Activity refId="Create Assets" numOfProfilesPerRow="3" token="activity:Create Assets"/>
    <Activity refId="Global Reports" token="activity:Global Reports"/>
    <Activity refId="Manage Organizations" token="activity:Manage Organizations"/>
  </Activities>
</UIProperties>
The configuration snippet looks like this:
Append the defined custom activity (for example, "Create Report Templates") configuration statement as below:
<Activity refId="Create Report Templates" token="customactivity:Create Report Templates"/>
wherein,
| Parameter | Denotes |
|---|---|
refId |
Refers to an unique identifier |
token |
The place tokenizer of the activity that helps in rendering the activity as a deep link URL. Important: |
Now the Activities Configuration section looks similar
to this.
<UIProperties>
  <Activities noOfActivitiesInMainNav="5">
    <Activity refId="Create Assets" numOfProfilesPerRow="3" token="activity:Create Assets"/>
    <Activity refId="Global Reports" token="activity:Global Reports"/>
    <Activity refId="Manage Organizations" token="activity:Manage Organizations"/>
    <Activity refId="Create Report Templates" token="customactivity:Create Report Templates"/>
</UIProperties>
Save and close the configuration file.
Restart Software AG Runtime.
| Usage |
Use this when the layout of a standard search widget (comprising of search field, search options and search execution) needs to be replaced with a custom search widget. |
| Elements |
|
| Processing |
When starting the user interface, a custom defined (keyword) search widget is rendered. |
| Provided by | BusinessUI |
| Example |
<ExtensionPointSearchWidget custom="false" /> |
| Usage |
Extend the existing advanced search panel of an asset keyword search for entering custom related search settings, for example, you can add specific search predicates for your own object types. |
| Elements |
|
| Processing |
|
| Provided by | BusinessUI |
| Example |
<ExtensionPointSearchCriteria custom="false" /> |
| Usage |
|
| Elements |
|
| Processing |
link that would either open a custom Search Results page or a custom link that would either open a CentraSite page or an external web page of your choice. |
| Provided by | BusinessUI |
| Example |
<ExtensionPointBrowseView custom="false" /> |
| Usage |
Extend the existing advanced search panel of an asset browse for entering custom related search settings, for example, you can add specific search predicates for your own object types. |
| Elements |
|
| Processing |
|
| Provided by | BusinessUI |
| Example |
<ExtensionPointBrowseCriteria custom="false" /> |
| Usage |
Change the default layout of entire search view to suit your requirements. |
| Elements |
|
| Processing |
When you opt for a search of assets, this invokes:
|
| Provided by | BusinessUI |
| Example |
<ExtensionPointSearch custom="false" /> |
| Usage |
Use this to customize the layout of a standard asset details page to fit your needs. |
| Elements |
|
| Processing |
If the details page for an asset is opened, an user-defined asset details page is rendered. |
| Provided by | BusinessUI |
| Example |
<ExtensionPointAssetDetails custom="false" /> |
The Action Menu allows you to perform various actions such as modifying properties, attaching documents, generating reports etc., for a single asset or a set of assets.
CentraSite supports the following predefined actions:
Save
Edit
Version
Delete
Download Documents
Attach
Export
Watch/Unwatch
Add to List
Remove from List
Permission
Consume
View Report
You can define actions to suit your needs and configure the tailored action to display in the asset details page and Search Results page.
Additionally, you can customize the way in which you want action to render:
You can add or remove an action to or from the action menu.
You can change the text string displayed for an action in the action menu.
You can change the icon that represents an action in the action menu.
You can enable an action for "bulk" operation.
To define a tailored action, you perform the following high-level steps:
Implement the new action as a GWT extension point. For procedures, see Implement Action as an Extension.
Configure the new action in centrasite.xml file. For procedures, see Enable a Action by Configuration.
| Usage |
Use this to define a custom action menu. For example, add an action, reorder the existing actions, enable/disable an action, and remove actions to suit your requirements. |
| Elements |
|
| Interface | See the sample code |
| Abstract base class | ActionListener |
| Processing |
When a list of actions for an action menu is retrieved, the following steps are performed for each known action:
|
| Provided by | BusinessUI |
| Code | See the sample code |
You can find sample code for defining the action menu as an extension point in the file CentraSiteBUIExtension.gwt.xml that is provided in the demo folder under the CentraSite installation folder.
<!-- Use ActionListener by default -->
  	<replace-with class="com.softwareag.centrasite.bui.extension.client.action.ActionListener">
    	<when-type-is class="com.softwareag.centrasite.bui.extension.core.client.IActionListener"/>
  	</replace-with>
After you define a custom action as an extension with the above steps, you need to enable the custom action configuration so as to display the action in the CentraSite Business UI. To enable a custom action configuration, follow these steps:
Important:
The action configuration parameters initially defined in the
configuration file are editable and cannot be protected.
Open the centrasite.xml file.
The system configuration (centrasite.xml) file resides in the cast\cswebapps\BusinessUI\system\conf folder under the CentraSite installation directory.
The custom configuration (centrasite.xml) file resides in the cast\cswebapps\BusinessUI\custom\conf folder under the CentraSite installation directory.
Locate the Actions Configuration section under
CLL Configuration.
The configuration snippet looks like this:
<CLLConfigurations>
 <Actions>
      <Action id="SaveAction" inbox="false" bulk="false" group="basic" icon="images/system/actionbar/01_Save.gif" class="com.softwareag.centrasite.api.csom.action.impl.SaveActionImpl">INMCL_ACTION_SAVE</Action>
      <Action id="EditAction" inbox="false" bulk="false" group="basic" icon="images/system/actionbar/02_Edit.gif" class="com.softwareag.centrasite.api.csom.action.impl.EditActionImpl">INMCL_ACTION_EDIT</Action>
      <Action id="NewVersionAction" inbox="false" bulk="true" group="basic" icon="images/system/actionbar/03_NewVersion.gif" class="com.softwareag.centrasite.api.csom.action.impl.NewVersionActionImpl">INMCL_ACTION_VERSION</Action>
      <Action id="DeleteAction" inbox="false" bulk="true" group="basic" icon="images/system/actionbar/04_Delete.gif" class="com.softwareag.centrasite.api.csom.action.impl.DeleteActionImpl">INMCL_ACTION_DELETE</Action>
      <Action id="DownloadDocumentAction" isAllowedForGuest="true" inbox="false" bulk="true" group="attach" icon="images/system/actionbar/download_32x32.png" class="com.softwareag.centrasite.api.csom.action.impl.DownloadDocumentActionImpl">INMCL_ACTION_DOWNLOADDOCS</Action>
      <Action id="AttachDocumentAction" timeout="600000" inbox="false" bulk="false" group="attach" icon="images/system/actionbar/08_Attach.gif" class="com.softwareag.centrasite.api.csom.action.impl.AttachDocumentActionImpl">INMCL_ACTION_ATTACH</Action>
      <Action id="Export" isAllowedForGuest="true" inbox="false" bulk="true" group="attach" icon="images/system/actionbar/Export.gif" class="com.softwareag.centrasite.api.csom.action.impl.ExportActionImpl">INMCL_ACTION_EXPORT</Action>
      <Action id="WatchAction" inbox="false" bulk="true" group="moniter" icon="images/system/actionbar/watch.png" class="com.softwareag.centrasite.api.csom.action.impl.WatchActionImpl">INMCL_ACTION_WATCH</Action>
      <Action id="UnwatchAction" inbox="false" bulk="true" group="moniter" icon="images/system/actionbar/unwatch.png" class="com.softwareag.centrasite.api.csom.action.impl.UnwatchActionImpl">INMCL_ACTION_UNWATCH</Action>
      <Action id="AddToListAction" inbox="false" bulk="true" group="moniter" icon="images/system/actionbar/AddtoList_32x32.png" class="com.softwareag.centrasite.api.csom.action.impl.AddToListActionImpl">INMCL_ACTION_ADD_TO_LIST</Action>
      <Action id="RemoveFromListAction" inbox="false" bulk="true" group="moniter" icon="images/system/actionbar/RemovefromList_32X32_up.png" class="com.softwareag.centrasite.api.csom.action.impl.RemoveFromListActionImpl">INMCL_ACTION_REMOVE_FROM_LIST</Action>
      <Action id="Consume" inbox="false" bulk="true" group="moniter" icon="images/system/actionbar/consume.png" class="com.softwareag.centrasite.api.csom.action.impl.ConsumeActionImpl">INMCL_ACTION_CONSUME</Action>
      <Action id="ApproveAction" inbox="false" bulk="false" group="moniter" icon="images/system/actionbar/Approve.png" class="com.softwareag.centrasite.api.csom.action.impl.ApproveActionImpl">INMCL_ACTION_APPROVE</Action>
      <Action id="RejectAction" inbox="false" bulk="false" group="moniter" icon="images/system/actionbar/Reject.png" class="com.softwareag.centrasite.api.csom.action.impl.RejectActionImpl">INMCL_ACTION_REJECT</Action>
      <Action id="RevertAction" inbox="false" bulk="false" group="moniter" icon="images/system/actionbar/Revert.png" class="com.softwareag.centrasite.api.csom.action.impl.RevertActionImpl">INMCL_ACTION_REVERT</Action>
      <Action id="ViewReportAction" inbox="false" bulk="false" group="moniter" icon="images/system/actionbar/ViewReport.png" class="com.softwareag.centrasite.api.csom.action.impl.ViewReportActionImpl">INMCL_ACTION_VIEW_REPORT</Action>
      <Action id="DeleteNotificationAction" inbox="true" bulk="true" group="moniter" icon="images/system/actionbar/04_Delete.gif" class="com.softwareag.centrasite.api.csom.action.impl.DeleteNotificationActionImpl">INMCL_ACTION_DELETE_NOTIFICATION</Action>
      <Action id="Permission" inbox="false" bulk="false" group="moniter" icon="images/system/actionbar/Permission_32x32_up.png" class="com.softwareag.centrasite.api.csom.action.impl.PermissionActionImpl">INMCL_ACTION_PERMISSION</Action>
</Actions>
</CLLConfigurations>
Append the required custom action (for example, "Change Owner") configuration statement as below:
<Action id="ChangeOwnerAction" inbox="false" bulk="false" group="basic" icon="images/system/actionbar/ChangeOwner.gif" class="com.softwareag.centrasite.api.csom.action.impl.ChangeOwnerActionImpl">INMCL_ACTION_CHANGE_OWNER</Action>
wherein,
| Parameter | Denotes |
|---|---|
Action id |
A unique identifier for the action, in this example
|
class |
The implementation class of
|
INMCL_ACTIVITY |
The i18n string to display the action in CentraSite Business UI. If you want to specify a localized name, enter the message ID
starting with a prefix "INMBU" (in this example,
|
Now the Actions Configuration section looks similar to
this.
<CLLConfigurations>
 <Actions>
      <Action id="SaveAction" inbox="false" bulk="false" group="basic" icon="images/system/actionbar/01_Save.gif" class="com.softwareag.centrasite.api.csom.action.impl.SaveActionImpl">INMCL_ACTION_SAVE</Action>
      <Action id="EditAction" inbox="false" bulk="false" group="basic" icon="images/system/actionbar/02_Edit.gif" class="com.softwareag.centrasite.api.csom.action.impl.EditActionImpl">INMCL_ACTION_EDIT</Action>
      <Action id="NewVersionAction" inbox="false" bulk="true" group="basic" icon="images/system/actionbar/03_NewVersion.gif" class="com.softwareag.centrasite.api.csom.action.impl.NewVersionActionImpl">INMCL_ACTION_VERSION</Action>
      <Action id="DeleteAction" inbox="false" bulk="true" group="basic" icon="images/system/actionbar/04_Delete.gif" class="com.softwareag.centrasite.api.csom.action.impl.DeleteActionImpl">INMCL_ACTION_DELETE</Action>
      <Action id="DownloadDocumentAction" isAllowedForGuest="true" inbox="false" bulk="true" group="attach" icon="images/system/actionbar/download_32x32.png" class="com.softwareag.centrasite.api.csom.action.impl.DownloadDocumentActionImpl">INMCL_ACTION_DOWNLOADDOCS</Action>
      <Action id="AttachDocumentAction" timeout="600000" inbox="false" bulk="false" group="attach" icon="images/system/actionbar/08_Attach.gif" class="com.softwareag.centrasite.api.csom.action.impl.AttachDocumentActionImpl">INMCL_ACTION_ATTACH</Action>
      <Action id="Export" isAllowedForGuest="true" inbox="false" bulk="true" group="attach" icon="images/system/actionbar/Export.gif" class="com.softwareag.centrasite.api.csom.action.impl.ExportActionImpl">INMCL_ACTION_EXPORT</Action>
      <Action id="WatchAction" inbox="false" bulk="true" group="moniter" icon="images/system/actionbar/watch.png" class="com.softwareag.centrasite.api.csom.action.impl.WatchActionImpl">INMCL_ACTION_WATCH</Action>
      <Action id="UnwatchAction" inbox="false" bulk="true" group="moniter" icon="images/system/actionbar/unwatch.png" class="com.softwareag.centrasite.api.csom.action.impl.UnwatchActionImpl">INMCL_ACTION_UNWATCH</Action>
      <Action id="AddToListAction" inbox="false" bulk="true" group="moniter" icon="images/system/actionbar/AddtoList_32x32.png" class="com.softwareag.centrasite.api.csom.action.impl.AddToListActionImpl">INMCL_ACTION_ADD_TO_LIST</Action>
      <Action id="RemoveFromListAction" inbox="false" bulk="true" group="moniter" icon="images/system/actionbar/RemovefromList_32X32_up.png" class="com.softwareag.centrasite.api.csom.action.impl.RemoveFromListActionImpl">INMCL_ACTION_REMOVE_FROM_LIST</Action>
      <Action id="Consume" inbox="false" bulk="true" group="moniter" icon="images/system/actionbar/consume.png" class="com.softwareag.centrasite.api.csom.action.impl.ConsumeActionImpl">INMCL_ACTION_CONSUME</Action>
      <Action id="ApproveAction" inbox="false" bulk="false" group="moniter" icon="images/system/actionbar/Approve.png" class="com.softwareag.centrasite.api.csom.action.impl.ApproveActionImpl">INMCL_ACTION_APPROVE</Action>
      <Action id="RejectAction" inbox="false" bulk="false" group="moniter" icon="images/system/actionbar/Reject.png" class="com.softwareag.centrasite.api.csom.action.impl.RejectActionImpl">INMCL_ACTION_REJECT</Action>
      <Action id="RevertAction" inbox="false" bulk="false" group="moniter" icon="images/system/actionbar/Revert.png" class="com.softwareag.centrasite.api.csom.action.impl.RevertActionImpl">INMCL_ACTION_REVERT</Action>
      <Action id="ViewReportAction" inbox="false" bulk="false" group="moniter" icon="images/system/actionbar/ViewReport.png" class="com.softwareag.centrasite.api.csom.action.impl.ViewReportActionImpl">INMCL_ACTION_VIEW_REPORT</Action>
      <Action id="DeleteNotificationAction" inbox="true" bulk="true" group="moniter" icon="images/system/actionbar/04_Delete.gif" class="com.softwareag.centrasite.api.csom.action.impl.DeleteNotificationActionImpl">INMCL_ACTION_DELETE_NOTIFICATION</Action>
      <Action id="Permission" inbox="false" bulk="false" group="moniter" icon="images/system/actionbar/Permission_32x32_up.png" class="com.softwareag.centrasite.api.csom.action.impl.PermissionActionImpl">INMCL_ACTION_PERMISSION</Action> <Action id="ChangeOwnerAction" inbox="false" bulk="false" group="basic" icon="images/system/actionbar/ChangeOwner.gif" class="com.softwareag.centrasite.api.csom.action.impl.ChangeOwnerActionImpl">INMCL_ACTION_CHANGE_OWNER</Action>
</Actions>
</CLLConfigurations>
To enable an action entry for bulk usage, change "false" to "true". Similarly, if the action is already available for bulk usage and you want to revert back, set the value to "false".
Save and close the configuration file.
Restart Software AG Runtime.
Portlets enable you to create shortcuts and access the frequently-used functions (for example, Most Popular Assets, Recent Searches etc.) that you routinely use or otherwise want to keep close at hand.
The CentraSite Business UI's Welcome page contains a default set of portlets, where each portlet represents a collection of predefined entries fetched using a saved search query.
You can define portlets to suit your needs and configure the tailored portlet to display in the Welcome page.
Additionally, you can customize the way in which you want portlet to render:
You can add a portlet of type "custom".
You can define the configuration settings of the custom portlet.
You can specify a display icon to represent the custom portlet in the Welcome page.
You can make the custom portlet visible or invisible in the Welcome page.
You can specify a location for displaying the custom portlet in the Welcome page.
You can set the refresh interval for the custom portlet.
To define a tailored portlet, you perform the following high-level steps:
Implement the new portlet as a GWT extension point. For procedures, see Implement Portlet as an Extension.
Configure the new portlet in centrasite.xml file. For procedures, see Enable Portlet through Configuration.
| Usage |
Define a portlet of type "custom" in the CentraSite Business UI. |
| Elements |
renderPortletContent
executePortletAction
|
| Abstract base class | IPortListener |
| Processing |
When the Welcome page containing one or more "custom" type portlets is loaded in the CentraSite Business UI, the following steps are performed for each "custom" portlet:
|
| Provided by | BusinessUI |
| Code | See the sample code |
You can find the following sample code for defining a portlet as extension point in the CentraSiteBUIExtension.gwt.xml file that is provided in the demo folder under the CentraSite installation folder.
<!-- Use PortletListener by default -->
  	<replace-with class="com.softwareag.centrasite.bui.extension.client.portlet.PortletListener">
    	<when-type-is class="com.softwareag.centrasite.bui.extension.core.client.IPortletListener"/>
  	</replace-with>
Important:
On a "custom" portlet defined as GWT extension
point, whenever you execute a basic action (e.g., Expand, Collapse or Close)
through the user interface, CentraSite internally sends a corresponding
actionId to the GWT extension.
After you define a custom portlet as an extension with the above steps, you need to enable the custom portlet configuration so as to display the portlet in the CentraSite Business UI. To enable a custom portlet configuration, follow these steps:
Important:
The portlet configuration parameters initially defined in the
configuration file are editable and cannot be protected.
Open the centrasite.xml file.
The system configuration (centrasite.xml) file resides in the cast\cswebapps\BusinessUI\system\conf folder under the CentraSite installation directory.
The custom configuration (centrasite.xml) file resides in the cast\cswebapps\BusinessUI\custom\conf folder under the CentraSite installation directory.
Locate the Portlet Configuration under BUI
Configuration.
The configuration snippet looks like this:
<Portlets>
  <Portlet id="MyFavoritesPortlet"
           description="INMBU_STR_PORTLET_FAVORITES_DESC"
           type="text"
           dataFeed="MyFavorites"
           icon="images/system/favorites_16X16.png"
           row="0"
           column="0"
           isVisible="true"
           refreshInterval="0"
           actions="configure,refresh">
    INMBU_STR_PORTLET_NAME_MY_FAVORITES
  </Portlet>
  <Portlet id="TopXServicesBasedOnInvocationsPortlet"
           description="INMBU_STR_PORTLET_TOPX_SERVICES_BASED_ON_INVOCATIONS"
           type="text"
           dataFeed="TopXServicesBasedOnInvocations"
           icon="images/system/highest_invocation_16X16.png"
           row="0"
           column="1"
           isVisible="true"
           refreshInterval="0"
           actions="configure,refresh">
    INMBU_STR_PORTLET_NAME_TOPX_SERVICES
  </Portlet>
  <Portlet id="RecentLifecycleChangesPortlet"
           description="INMBU_STR_PORTLET_RECENT_LIFECYCLE_CHANGES_DESC"
           type="text"
           dataFeed="RecentLifecycleChanges"
           icon="images/system/recent_lifecycle_changed_16X16.png"
           row="0"
           column="2"
           isVisible="true"
           refreshInterval="0"
           actions="configure,refresh">
    INMBU_STR_PORTLET_NAME_RECENT_LCM_CHANGES
  </Portlet>
  <Portlet id="LastCreatedAssetsPortlet"
           description="INMBU_STR_PORTLET_RECENTLY_CREATED_ASSETS_DESC"
           type="text"
           dataFeed="LastCreatedAssets"
           icon="images/system/recently_created_16X16.png"
           row="1"
           column="0"
           isVisible="true"
           refreshInterval="0"
           actions="configure,refresh">
    INMBU_STR_PORTLET_NAME_LAST_CREATED_ASSETS
  </Portlet>
  <Portlet id="MySavedSearchesPortlet"
           description="INMBU_STR_PORTLET_SAVED_SEARCH_DESC"
           type="text"
           dataFeed="MySavedSearches"
           icon="images/system/saved_searches_16X16.png"
           row="1"
           column="1"
           isVisible="true"
           refreshInterval="0"
           actions="configure,refresh">
    INMBU_STR_PORTLET_NAME_MY_SAVED_SEARCHES
  </Portlet>
</Portlets>
Append the required custom portlet (for example, "My Custom Portlet") configuration statement as below:
<Portlet id="MyCustomPortlet"
	        description="INMBU_STR_PORTLET_CUSTOM_DESC"
         type="text"
         dataFeed="MyFavorites"
         icon="images/system/custom_16X16.png"
         row="1"
         column="1"
         isVisible="true"
         refreshInterval="0"
         actions="configure,refresh">
  INMBU_STR_PORTLET_NAME_MY_CUSTOM_PORTLET
</Portlet>
wherein,
| Parameter | Description |
|---|---|
id [Portlet] |
A unique identifier for the portlet. It uniquely distinguishes a portlet in the CentraSite registry. If you wish to reset the portlet at a later stage, you identify the portlet using this id. |
description |
A comment or descriptive information about the portlet. |
type |
The type of portlet. CentraSite Business UI
supports the following portlet types:
|
dataFeed |
Required for text/graphical type. Name of a saved search query that feeds in the data to the portlet. |
url |
Required for iframe type. An arbitrary URL that points to any external HTML page. It renders the HTML content within an HTML IFRAME on the portlet. |
icon |
An icon to display at the top left corner of the portlet header. The icon is specified as the path to an image file. Prerequisite:
The icon must be in PNG format. To ensure proper alignment when it is displayed in the user interface, the icon must be 16 x 16 pixels in size. The icon must reside in the folder <CentraSiteInstallDir>\cast\cswebapps\BusinessUI\images\system. The path for the icon should be specified as "images/system/icon.png" |
row, column |
The row and column number to place a portlet in the Welcome page. By default, the portlet is configured to start at level 0. Thus a setting of 0 (zero) refers to the first portlet in the Welcome page. For example, if you want to place a portlet in second row and
fourth column, you will need to specify However, if at a later state, you attempt to drag and drop a portlet in the Welcome page, automatically updates the GUI configuration in the repository. Important: |
isVisible |
To show/hide the portlet in the Welcome page when you log in to CentraSite Business UI for the first time after product installation. Once you have logged in, you can show/hide the portlet directly from the Welcome page. Possible values: true (default value) – show the portlet; false – hide the portlet. |
refreshInterval |
The time interval (in seconds) to refresh your portlet content automatically. Note: |
actions |
Actions that you want to display in the portlet's configuration. By default, CentraSite supports the following actions:
Note: Important: |
Now the Portlet Configuration section looks similar to
this.
<Portlets>
  <Portlet id="MyFavoritesPortlet"
           description="INMBU_STR_PORTLET_FAVORITES_DESC"
           type="text"
           dataFeed="MyFavorites"
           icon="images/system/favorites_16X16.png"
           row="0"
           column="0"
           isVisible="true"
           refreshInterval="0"
           actions="configure,refresh">
    INMBU_STR_PORTLET_NAME_MY_FAVORITES
  </Portlet>
  <Portlet id="TopXServicesBasedOnInvocationsPortlet"
           description="INMBU_STR_PORTLET_TOPX_SERVICES_BASED_ON_INVOCATIONS"
           type="text"
           dataFeed="TopXServicesBasedOnInvocations"
           icon="images/system/highest_invocation_16X16.png"
           row="0"
           column="1"
           isVisible="true"
           refreshInterval="0"
           actions="configure,refresh">
    INMBU_STR_PORTLET_NAME_TOPX_SERVICES
  </Portlet>
  <Portlet id="RecentLifecycleChangesPortlet"
           description="INMBU_STR_PORTLET_RECENT_LIFECYCLE_CHANGES_DESC"
           type="text"
           dataFeed="RecentLifecycleChanges"
           icon="images/system/recent_lifecycle_changed_16X16.png"
           row="0"
           column="2"
           isVisible="true"
           refreshInterval="0"
           actions="configure,refresh">
    INMBU_STR_PORTLET_NAME_RECENT_LCM_CHANGES
  </Portlet>
  <Portlet id="LastCreatedAssetsPortlet"
           description="INMBU_STR_PORTLET_RECENTLY_CREATED_ASSETS_DESC"
           type="text"
           dataFeed="LastCreatedAssets"
           icon="images/system/recently_created_16X16.png"
           row="1"
           column="0"
           isVisible="true"
           refreshInterval="0"
           actions="configure,refresh">
    INMBU_STR_PORTLET_NAME_LAST_CREATED_ASSETS
  </Portlet>
  <Portlet id="MySavedSearchesPortlet"
           description="INMBU_STR_PORTLET_SAVED_SEARCH_DESC"
           type="text"
           dataFeed="MySavedSearches"
           icon="images/system/saved_searches_16X16.png"
           row="1"
           column="1"
           isVisible="true"
           refreshInterval="0"
           actions="configure,refresh">
    INMBU_STR_PORTLET_NAME_MY_SAVED_SEARCHES
  </Portlet>
  <Portlet id="MyCustomPortlet"
           description="INMBU_STR_PORTLET_CUSTOM_DESC"
           type="text"
           dataFeed="MyFavorites"
           icon="images/system/custom_16X16.png"
           row="1"
           column="1"
           isVisible="true"
           refreshInterval="0"
           actions="configure,refresh">
    INMBU_STR_PORTLET_NAME_MY_CUSTOM_PORTLET
  </Portlet>
</Portlets>
Define the actions that you want to render in the portlet's settings as described in the following property statements.
<PortletActions>
        <PortletAction id="configure">INMBU_STR_PORTLET_ACTION_EDIT</PortletAction>
        <PortletAction id="refresh">INMBU_STR_PORTLET_ACTION_REFRESH</PortletAction>
      </PortletActions>
| Parameter | Description |
|---|---|
id [PortletAction] |
A unique identifier for the action. It uniquely distinguishes an action in the CentraSite registry. If you wish to reset the action at a later stage, you identify the action using this id. |
Define the parameters that you wish to display in the portlet as described in the following property statements:
<PortletParameters>
    <PortletParameter id="MyFavoritesPortletParam" ref="MyFavoritesPortlet" params="noOfAssets#VSEP#10#PSEP#assetTypeKeys#VSEP#uddi:cd906138-59f5-4d7f-4f5f-6115adfa8d9c#ASEP#uddi:cd906138-59f5-4d7f-4f5f-6115adfa8e3d" attributes="" />
</PortletParameters>
| Parameter | Description |
|---|---|
id [PortletParameter] |
A unique identifier for the parameter. It uniquely distinguishes the portlet's parameter in the CentraSite registry. If you wish to reset the parameter at a later stage, you identify the parameter using this id. |
ref |
The specified unique identifier for the portlet. |
params |
Parameters that you want to display in the portlet's configuration. The parameter values determine which data displays in the portlet. When you define a parameter, keep the following points in mind:
|
attributes |
List of attributes you wanted to display in the portlet's configuration. |
For a graphical chart configuration. If you have opted to show different colors in a "graphical" chart configuration, specify the colors for each bar, line or pie plot.
In this case, the line would look like this:
<Colors>
		<Color id="#233356">OceanBlue</Color>
		<Color id="#038299">LagunaBlue</Color>
	</Colors>
The <Colors> list should have the colors
specified in the HEX color code format. The HEX format is a hash
(#) followed by 6 numbers or letters. The position of the
numbers/letters correlates to the RGB value. For example,
"#233356" translates into "OceanBlue".
Locate the following property statement and specify the required values:
<PortletConfigurations portletsPerRow="3" settingsPopupColumnCount="2" helpToken="HELPCENTER_007" headerMaxCharacterLength="27">
| Parameter | Description |
|---|---|
PortletsPerRow |
The number of portlets to display per row in the Welcome page. |
settingsPopupColumnCount |
The number of columns to display in the Configure Your Welcome Page dialog. |
helpUrl |
The URL of the standard Help Center that's delivered with the CentraSite Business UI. |
headerMaxCharacterLength |
The maximum content length of a portlet's header text. By default, the allowed header text length is 27 characters. If the character in the header text exceeds 27, the text gets automatically truncated. |
Save and close the configuration file.
Restart Software AG Runtime.
The display name for a portlet or an action is the name that is displayed by the CentraSite Business user interface. A portlet's or action's display name can either be a localized string fetched from the message database or a plain string.
If you want to specify a localized name, enter the message ID. The message ID (e.g., "INMBU_LBL_PORTLET_PENDING_APPROVALS") must begin with a "INMBU" label. The portlet will internally identify the message ID, and display the localized name, if available in the message database. Else, if you specify a name without INMBU label, the portlet will simply display a plain text name.
For details on configuration of the portlets using the user interface, refer to the section Working with Portlets.
If you would like a runtime workflow to execute a task that is not provided by a built-in runtime action, you can create a custom computed runtime action to perform the work.
The CentraSite Business UI contains a default set of actions, where each action represents a collection of predefined parameters.
Your CentraSite installation contains a sample computed action (which is contained as an extension in demos folder) that you can adapt to suit your needs and configure the tailored action to display in the policy accordion.
To define a tailored computed action, you perform the following high-level steps:
Implement the new runtime action as a GWT extension point. For procedures, see Implement Runtime Action as an Extension.
Configure the new runtime action in centrasite.xml file. For procedures, see Enable Runtime Action through Configuration.
| Usage |
Define a computed runtime action in the CentraSite Business UI. |
| Elements | |
| Abstract base class | |
| Processing | |
| Provided by | BusinessUI |
| Code | See the sample code |
You can find sample code for defining a computed runtime action as extension point in the CentraSiteBUIExtension.gwt.xml file in the demos folder under the CentraSite installation folder.
After you define the computed action as an extension with the above steps, enable the computed action configuration so as to display the action in the policy accordion.
Important:
The action parameters defined in the configuration file are
editable and cannot be protected.
Open the centrasite.xml file.
The system configuration (centrasite.xml) file resides in the cast\cswebapps\BusinessUI\system\conf folder under the CentraSite installation directory.
The custom configuration (centrasite.xml) file resides in the cast\cswebapps\BusinessUI\custom\conf folder under the CentraSite installation directory.
Locate Policy Action Templates under the CLL
Configuration.
The configuration snippet looks like this:
Tham: Initial snippet should be written here.
Append the required computed runtime action ("MyComputedRuntimeAction") configuration statement as below:
<PolicyActions>
   <PolicyAction id="uddi:44e3e2de-064c-432f-b67a-8fbca0fb04d6" class="com.softwareag.centrasite.bui.extension.service.MyComputedRuntimeActionParser" />
</PolicyActions>
wherein,
| Parameter | Description |
|---|---|
id |
A unique identifier for the computed action. It uniquely distinguishes an action in the CentraSite registry. If you wish to reconfigure the action at a later stage, you identify the action using this id. |
class |
A parser implementation for the computed action. |
Save and close the configuration file.
Restart Software AG Runtime.
The display name for a portlet or an action is the name that is displayed by the CentraSite Business user interface. A portlet's or action's display name can either be a localized string fetched from the message database or a plain string.
If you want to specify a localized name, enter the message ID. The message ID (e.g., "INMBU_LBL_PORTLET_PENDING_APPROVALS") must begin with a "INMBU" label. The portlet will internally identify the message ID, and display the localized name, if available in the message database. Else, if you specify a name without INMBU label, the portlet will simply display a plain text name.
For details on configuration of the portlets using the user interface, refer to the section Working with Portlets.
You can find sample code for defining the above mentioned extension points in the file ExtensionViewFactory.java that is provided in the demos folder under the CentraSite installation folder.
For configuring an extension on the CentraSite Business UI, refer to the section Configuring an Extension.
A step-by-step guide of how to create customized extensions for the CentraSite Business UI content pages is provided in Installing an Extension.
This section gives examples of how you can use the pluggable architecture to define and install the extensions.
The descriptions in this section are based on the GWT project CentraSiteUIExtension. We will show how to use Eclipse and standard CentraSite features in order to add the extension to CentraSite.
Before you start, ensure that you have a recent Eclipse version installed on your machine. Eclipse is available as a download from http://www.eclipse.org/.
In Eclipse, select in order to configure usage of GWT plug-in with the Java version currently supported by CentraSite.
The system requirements can be checked at http://documentation.softwareag.com/.
To set up a new GWT project in Eclipse, you must perform the following high-level steps:
Specify the classpath variables for the new GWT project as follows:
![]() To specify classpaths for the new project
To specify classpaths for the new project
In Eclipse, select .
Expand the node.
Select the .
In the Classpath Variables dialog, choose . The New Variable Entry popup displays.
Specify a name for the new classpath variable ("CENTRASITE_REDIST_LOCATION") and the location. The redist folder is typically located at C:\SoftwareAG\CentraSite. Instructions throughout the remainder of this section refer to this directory as the <CentraSiteInstallDir>.
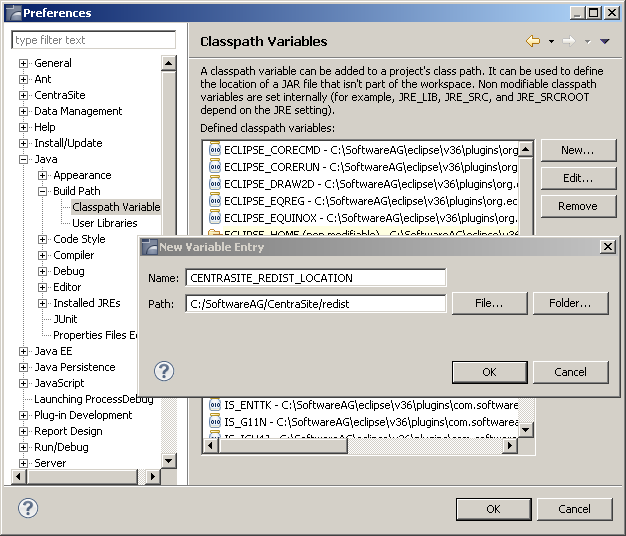
Click .
In the Classpath Variables dialog that becomes visible again, click .
Specify a second classpath variable "CENTRASITE_RTS_LOCATION". The rts folder is also typically located at <CentraSiteInstallDir>.
Two new Java classpath variables called "CENTRASITE_REDIST_LOCATION" and "CENTRASITE_RTS_LOCATION" have been created due to the previous actions.
Add all of the JAR files contained in the redist folder to the classpath.
Additionally, if you upgraded to CentraSite 9.6 using the overinstall method, and you want to use the extension points of the previous version, copy the following JAR files contained in the old_installation_directory into the MANIFEST.MF file available under new_installation_directory\cast\cswebapps\BusinessUI\META-INF folder.
Import a new GWT project in Eclipse as follows:
![]() To import a project in Eclipse
To import a project in Eclipse
Select from the main menu.
On the Select page of the Import wizard, select Existing Projects into Workspace and click .
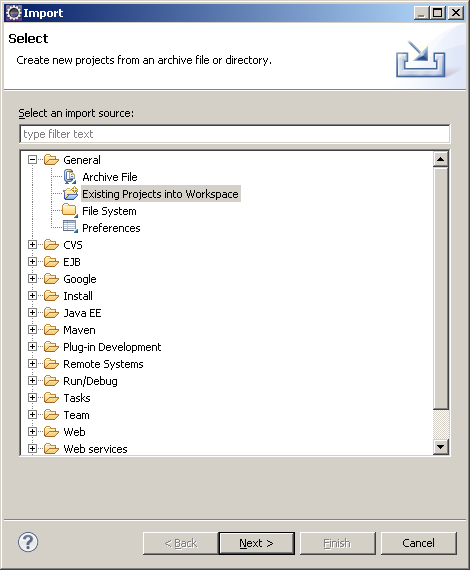
On the Import Projects dialog, choose the Select root directory radio button.
Click the button that is located beside the input field labeled Select root directory. The Browse for Folder dialog is displayed.
Within the Browse for Folder dialog, navigate to and click on the CentraSiteUIExtension folder of the Software AG Runtime application. This folder contains the definitions for the extensions that CentraSite supports out of the box.
The CentraSiteUIExtension folder resides in the demos folder under the CentraSite installation directory.
Click .
In the Import Projects dialog that becomes visible again, click .
A new Java project called "CentraSiteUIExtension" has been created due to the previous actions. This project is now visible in the Package Explorer view in Eclipse.
It contains example implementations of the existing extension
points for the Business UI. You can modify them to suit your needs. For using
your own Widget as Extension Point, specify it as a return value in the
ExtensionWidgetFactory class in the
com.softwareag.centrasite.bui.extension.client.factory
package.
Open the file build.properties. Enter the
paths to your GoogleWebToolkit_HOME, the Extension target
location, the redist and the rts folder. Now the project can be build using
apache ant. Run the build.xml script.
To install the extension, use the ant
deploy target. Open a command line and navigate to
your project location. Enter: ant deploy.
We have now created a Java project inside the Business UI web application. The extension functionality for the CentraSite Business UI is contained in the centrasite.xml file. You can configure this file to adapt to the appropriate extensions as required.
![]() To configure an extension
To configure an extension
On the file system, locate the configuration file centrasite.xml in the folder <CentraSiteInstallDir>\cast\cswebapps\BusinessUI\custom\conf .
Open the file in a text editor, and locate the configuration entry EXTENSION
POINTS:
<Extensions src="">
  <! --
    centrasitebuiextension/centrasitebuiextension.nocache.js -->
   <ExtensionPointLogin custom="false" />
   <ExtensionPointRegister custom="false" />
   <ExtensionPointBrowseView custom="false" />
   <ExtensionPointBrowseCriteria custom="false" />
   <ExtensionPointSearchWidget custom="false" />
   <ExtensionPointSearch custom="false" />
   <ExtensionPointSearchCriteria custom="false" />
   <ExtensionPointAssetDetails custom="false" />
      <ExtensionPlaces protected="true">
      <ExtensionPlace className="com.softwareag.centrasite.bui.client.place.home.ExtensionPlace" />
      </ExtensionPlaces>
</Extensions>
Specify the extensions file path as centrasiteuiextension/centrasiteuiextension.nocache.js in order to point to the location of the Java script files.
Identify the extension point that you want to configure to the CentraSite Business UI.
Enable the extension point by modifying its custom value from "false" to "true". The default value is "false".
After making the above changes, the extension entry would look like this:
<Extensions src="centrasitebuiextension/centrasitebuiextension.nocache.js">
   <ExtensionPointLogin custom="true" />
   <ExtensionPointRegister custom="true" />
   <ExtensionPointBrowseView custom="true" />
   <ExtensionPointBrowseCriteria custom="true" />
   <ExtensionPointSearchWidget custom="true" />
   <ExtensionPointSearch custom="true" />
   <ExtensionPointSearchCriteria custom="true" />
   <ExtenstionPointAssetDetails custom="true" />
      <ExtensionPlaces protected="true">
      <ExtensionPlace className="com.softwareag.centrasite.bui.client.place.home.ExtensionPlace" />
      </ExtensionPlaces>
</Extensions>
Save and close the file.
Locate the configuration file web.xml in the folder <CentraSiteInstallDir>\cast\cswebapps\BusinessUI\WEB-INF .
Open the file in a text editor, and locate the ExtensionServlet
entry:
<servlet>
    <servlet-name>ExtensionServlet</servlet-name>
    <servlet-class>com.softwareag.centrasite.ui.extension.service.ExtensionServiceImpl</servlet-class>
</servlet>

<servlet-mapping>
    <servlet-name>ExtensionServlet</servlet-name>
    <url-pattern>/centrasiteuiextension/extensionService</url-pattern>
</servlet-mapping>
Uncomment the ExtensionServlet entry in order to enable
the extension configurations that are performed in the previous actions.
Similarly, if the extension configuration is already enabled and you want to
disable it, simply comment out the ExtensionServlet entry.
Save and close the file.
Restart Software AG Runtime.
Note:
The extension point's readme file is recommended for reading. The
readme file is available in the
<CentraSiteInstallDir>\demos\CentraSiteUIExtension
directory.
The following actions need to be performed to uninstall extension(s) manually:
![]() To uninstall an extension
To uninstall an extension
Locate the configuration file centrasite.xml in the folder <CentraSiteInstallDir>\cast\cswebapps\BusinessUI\custom\conf .
Open the file in a text editor and locate the configuration entry for extension points:
<Extensions src="centrasitebuiextension/centrasitebuiextension.nocache.js">
   <ExtensionPointLogin custom="true" />
   <ExtensionPointRegister custom="true" />
   <ExtensionPointBrowseView custom="true" />
   <ExtensionPointBrowseCriteria custom="true" />
   <ExtensionPointSearchWidget custom="true" />
   <ExtensionPointSearch custom="true" />
   <ExtensionPointSearchCriteria custom="true" />
   <ExtenstionPointAssetDetails custom="true" />
      <ExtensionPlaces protected="true">
      <ExtensionPlace className="com.softwareag.centrasite.bui.client.place.home.ExtensionPlace" />
      </ExtensionPlaces>
</Extensions>
Identify the extension point that you want to uninstall.
Set the extension point's custom value to "false". Similarly, you can uninstall multiple extension points.
After making the above changes, the extension entry would look like this:
<Extensions src="centrasitebuiextension/centrasitebuiextension.nocache.js">
   <ExtensionPointLogin custom="false" />
   <ExtensionPointRegister custom="false" />
   <ExtensionPointBrowseView custom="false" />
   <ExtensionPointBrowseCriteria custom="true" />
   <ExtensionPointSearchWidget custom="false" />
   <ExtensionPointSearch custom="false" />
   <ExtensionPointSearchCriteria custom="true" />
   <ExtenstionPointAssetDetails custom="true" />
      <ExtensionPlaces protected="true">
      <ExtensionPlace className="com.softwareag.centrasite.bui.client.place.home.ExtensionPlace" />
      </ExtensionPlaces>
</Extensions>
Save and close the file.
Restart Software AG Runtime.
If at a later stage you want to remove all the extensions, proceed as follows:
![]() To uninstall all extensions
To uninstall all extensions
Locate the configuration file centrasite.xml in the folder <CentraSiteInstallDir>\cast\cswebapps\BusinessUI\custom\conf .
Open the file in a text editor and locate the configuration entry for extension points:
<Extensions src="centrasitebuiextension/centrasitebuiextension.nocache.js">
   <ExtensionPointLogin custom="false" />
   <ExtensionPointRegister custom="false" />
   <ExtensionPointBrowseView custom="false" />
   <ExtensionPointBrowseCriteria custom="false" />
   <ExtensionPointSearchWidget custom="false" />
   <ExtensionPointSearch custom="false" />
   <ExtensionPointSearchCriteria custom="false" />
   <ExtenstionPointAssetDetails custom="false" />
      <ExtensionPlaces protected="false">
      <ExtensionPlace className="com.softwareag.centrasite.bui.client.place.home.ExtensionPlace" />
      </ExtensionPlaces>
</Extensions>
Remove the above configuration entry for extension points.
Save and close the file.
Restart Software AG Runtime.
Note:
The extension point's readme file is recommended for reading. The
readme file is available in the
<CentraSiteInstallDir>\demos\CentraSiteUIExtension
directory.
To create a custom GWT specific extension to your requirements, perform the following steps:
![]() To create a custom extension
To create a custom extension
Write a new widget class.
Open the file ExtensionWidgetFactory.java that resides in the CentraSiteUIExtension folder.
Locate the method corresponding to the extension Id whose widget you wish to customize.
Return the new widget in the corresponding method.
Save and close the ExtensionWidgetFactory.java file.
Edit the centrasite.xml file to configure the extensions as appropriate. For more information on configuring the extension properties, refer to the section Configuring an Extension.