This document describes how to add assets to CentraSite and perform the various actions on an asset.
The content is organized under the following sections:
CentraSite enables business users to view and manage assets such as the web services, XML schemas, XML services and REST services.
Business users use the CentraSite catalog to view and manage their organization's assets, publish assets, edit asset details and assign permissions to assets.
Consumer and guest users use the CentraSite catalog tab to browse the catalog and search for assets.
CentraSite serves as the central catalog of reusable assets within a development environment. When initially installed, the CentraSite catalog supports several types of assets, such as web services, XML schemas, XML services, REST services and application servers.
Note:
Not all operations are allowed for all users. A user's role and the
instance-level permissions on an asset determine which assets a user is allowed
to see and what operations the user is allowed to perform on the asset.
Assets are composed of attributes. For visual representation, the attributes are grouped into profiles. An attribute provides information about an individual characteristic or property of an asset. The set of profiles that display for an asset, as well as the specific attributes that appear within the profiles, vary by asset type.
An attribute represents an individual characteristic or property of an asset. For example, an entry that represents a webservice will include attributes that identify the name of the service, provide the service's endpoints, identify the author of the service, supply links to specifications and programming documentation, classify the service according to a particular taxonomy, and so forth.
In this section, we'll look at the different types of attributes that CentraSite supports out-of-the box:
All assets in the CentraSite registry include the generic set of attributes shown in the table below:
| Attribute | Description |
|---|---|
| Name |
The name under which the asset is cataloged. |
| Description |
A descriptive comment that provides additional information about an asset. |
| Creation Date |
The date on which the asset was added to the catalog. CentraSite automatically sets this attribute when a user adds the asset to the catalog. Once it is set, it cannot be modified. |
| Modified Date |
The date on which the catalog entry for the asset was last updated. CentraSite automatically updates this attribute when a user modifies any of the asset's attributes. |
| Lifecycle State |
The asset's current lifecycle state. If a lifecycle model has been associated with an asset type, CentraSite updates this attribute as the asset passes through the various states of its lifecycle. |
| Key |
The Universally Unique Identifier (UUID) that is assigned to the asset and uniquely identifies it within the registry. CentraSite automatically assigns a UUID to an asset when the asset is added to the registry. Once it is set, it cannot be modified. |
| Version |
The user-assigned version identifier for an asset. The user-assigned identifier can be made up of any sequence of characters. It is not required to be numeric. |
| Owner |
The user who currently owns the asset. CentraSite automatically sets this attribute when a user adds the asset to the catalog. |
| Submitting Organization |
The organization to which the asset belongs. |
| Consumers |
The list of users and applications that are registered to consume the asset. |
| Subscribers |
The list of users who are registered to receive notifications when changes are made to the asset. |
An asset can also have any number of custom attributes that are specific to the asset's type. For example, an asset might include attributes that do the following:
Provide contact information for technical support (for example, phone numbers and email addresses.
Classify the asset according to one or more taxonomies.
Describe an asset's relationship to other assets or registry objects.
Specify details regarding system requirements and technical specifications.
Provide links to program documentation, sample code, usage notes and so forth.
Computed attributes involve complex computation in Java and implementation as a Java plug-in; thus overcoming the limitations of predefined attribute types and generating dynamic real-time values for attributes. You could, for example, have attribute values localizable by using computed attributes.
A computed attribute describes its scale for the rendering within the profile of the asset.
See the CentraSite Control online documentation section Creating a New Type in the document Object Type Management for information on how to implement a computed attribute.
Important:
The CentraSite Business UI does not distinguish a computed
attribute from other attributes. To identify a computed attribute from other
normal attributes, check for the attribute's data type. See the below section
Attribute Data
Types for more information.
Each attribute in an asset belongs to a specific data type. The data type determines what kind of information the attribute can hold.
The following table lists the data types that are available for an attribute. Most types are configured to hold a single value or multiple values (i.e., an array of values).
| Data Type | Description |
|---|---|
| String |
Holds a string of text. When this type of string is displayed, it is displayed in a single-line text box. If a value exceeds the width of the box, the excess characters are simply not displayed. |
| International String |
Holds a String attribute that can have different values for different locales. |
| Multiline String |
Holds a string of text. When this type of string is displayed in the CentraSite user interface, the string is displayed in a multi-line text box and lines of text are wrapped to fit the width of the box. (Compare this with the String data type described below.) |
|
Holds an email address. This data type only accepts values in the format: username@host Note: |
|
| URL/URI |
Holds a URL/URI. This type of attribute only accepts values in the form: protocol://host/path Where:
|
| Number |
Holds a numeric value. |
| Boolean |
Holds a "true" or "false" value. Note: |
| Date/Time |
Holds a timestamp that represents a specific date and/or time. |
| Duration |
Holds a value that represents a period of time as expressed in Years, Months, Days, Hours, Minutes and Seconds. |
| IP Address |
Holds a numeric IP address in the v4 or v6 format. |
| File |
Holds references to one or more documents that reside in CentraSite's supporting document library or at a specified URL. You can use this type of attribute to attach documents such as programming guides, sample code and other types of files to an asset. |
| Classification |
Holds references to one or more categories in a specified taxonomy. You use this type of attribute to classify assets according to a specified taxonomy. |
| Relationship |
Holds references to other registry objects. You use this type of attribute to express a relationship between an asset and another object in the registry. |
| Computed Attribute |
Holds a value that is dynamically computed by a user-defined Java plug-in. |
For detailed information about the attributes and their data types, see the CentraSite online documentation section What is a Type? in the document Object Type Management.
Profiles are used to manage the presentation of attributes in the user interface. They determine how the attributes are grouped when an instance of the asset type is displayed. When you display an asset in CentraSite Business UI, for example, the attributes associated with a particular profile are grouped together as a selectable tab.
CentraSite includes the following predefined profiles:
An asset type can contain any number of profiles. Each of these profiles functions as a container for a set of attributes.
The Basic Information profile is a top-level profile and represents an individual characteristic, property or piece of information about the asset. For example, the asset of type Service includes attributes that specify the description of the service, provide the service's lifecycle state, identify the owner and organization of the service, and so forth.
The Advanced Information profile is a top-level profile and has one or more secondary profiles. The secondary profiles represent additional information that is specific to the asset's type. For example, an asset might include attributes that do the following:
Classify the asset according to one or more taxonomies.
Provide the asset's instance-level permissions.
Provide run-time performance metrics about the asset.
Describe the asset's relationship to other assets or registry objects.
Specify details regarding system requirements and technical specifications.
Provide links to program documentation, sample code, usage notes and so forth.
In addition to the top-level profiles mentioned above, CentraSite provides several secondary profiles, called Generic profiles, which you can optionally have in an asset type.
| Generic Profile | Description |
|---|---|
| Object-Specific Properties | Displays the list of object-specific properties
that have been assigned to the asset. An object-specific property consists of a
key, which identifies the name of the property, and an optional String value,
which contains the data associated with the property. (A property's value can
be null.)
Object-specific properties are used to hold information about an instance of an asset when there is no predefined attribute to hold that data. Typically, they are used in one-off situations to attach ad-hoc data to an instance of the asset type. For example, if you were managing a certification effort, you might use an object-specific property to identify the set of assets that required certification. |
| Technical Details |
Displays the asset file and the native service's endpoint. This profile also contains the set of operations supported by the service using HTTP methods. |
| Specification |
Displays the external documents such as Functional Requirements, Error Messages, Release Notes and so forth that are attached to the asset. |
| Identification | Applicable only for Application and API Key
types.
Provides the consumer information for a virtual API. For an Application asset type, this profile displays the consumer identifier tokens, while for an API Key asset type, this profile in addition to the list of consumer identifiers, also displays the access key and, expiration date of the access key for that particular API. For a list of the supported consumer identifier tokens, refer to the section Identification Profile. Note: |
| API Key Scope | Applicable only for API Key types.
The name of the native API that is associated with the access key. To view details of the native API, click its hyperlinked name. Note: |
| ARIS Properties | Available only for Process type.
Displays the ARIS-specific attributes that are of use when CentraSite is integrated with the ARIS products. |
| Policies | Displays the list of design-time/change-time
policies and run-time policies that are applicable to the asset (i.e., it
displays all the policies whose scope encompasses the displayed asset).
Note: |
| Runtime Metrics | Displays the run-time performance metrics
associated with a virtualized asset. If you are using webMethods Mediator,
webMethods Insight or another run-time monitoring component to log
performance metrics for the asset, CentraSite displays those metrics on this
profile.
Note: |
| Runtime Events | Displays the run-time events associated with a
virtualized asset. If you are using webMethods Mediator, webMethods Insight
or another run-time monitoring component to log run-time events for an asset,
CentraSite displays those events on this profile.
Note: |
CentraSite offers you the possibility to add computed profiles into asset type definitions; this gives you the option to define your own profile, which means that you can implement your own algorithms for calculating the values you wish to represent. You could for example aggregate or compute attribute information from embedded or linked objects.
You can combine the attribute specific profile and the generic profiles layout concept in a single computed profile.
Computed profiles let you create your own layout by using a UI Rendering Concept. You can also specify your own rendering logic to display the computed values. You could, for example, create a custom display of performance metrics as a graphic or an animation.
A computed profile can be implemented as a Java plug-in. For a Java-based plug-in for a computed profile, you create an archive file that contains the plug-in definition, and you load the archive file via CentraSite into the repository.
After you have added a computed profile into the asset type definition, you can perform administration tasks on the computed profile in the same way as for normal profiles. For example, you can define profile-based permissions, and you can define the order of the computed profile relative to the other profiles in the asset detail display.
You can write a custom computed profile to your requirement and integrate it into the CentraSite environment. See the below section Writing Your Own Computed Profile.
You can write your own custom computed profile specific to the CentraSite Business UI. The custom computed profile is a collection of files in a specific directory structure.
In the following sections, we demonstrate a custom profile named "SampleProfile" that illustrates how to write a computed profile. The sample extends the profile selection list for an asset type and presents a screen that prompts for the profile archive to be uploaded. After confirming the archive, the appropriate adapter classes are called.
You may use this sample as a guideline, adapting it and renaming it to suit your individual requirements. The sample indicates where customization is required.
The following topics are discussed in this document:
A Java based computed profile has the following rendering mechanism:
WithUiRendering: This dictates the user-defined
rendering of the profile's attributes.
WithoutUiRendering: This dictates the CentraSite's
default rendering of the profile's attributes. This default rendering is based
on the attribute's data type.
This section explains the build environment for generating the HTML files that are used for the GUI and for compiling the necessary Java source files. It assumes the use of Ant, the Java-based build tool.
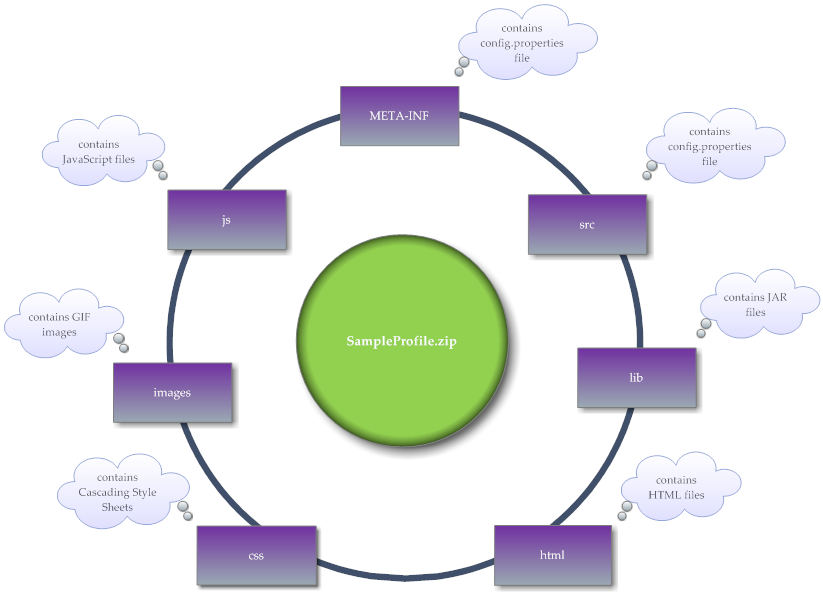
The following file system structure under the computed profile directory is assumed:
| Name of File or Folder | Description |
|---|---|
| META-INF |
This folder contains the "config.properties" file, which is the build file for the computed profile. This properties file contains an entry of the following format: com.softwareag.centrasite.computed.profile.bui.impl.class=com.softwareag.centrasite.bui.profile.server.SampleComputedProfileImpl |
| src | This folder that holds the Java source files. |
| lib | This folder contains the archive file with the source code examples, the plug-in's executor class and the external libraries. |
| html | This folder holds the html files that specify your computed profile window. |
| images | This folder holds the image files. |
| css | This folder holds the css files. |
| js | This folder holds the JavaScript codes. |
| build.xml | The Ant input file for building the destination files |
The Ant file shown below, named build.xml, can be used to establish a custom computed profile.
<?xml version="1.0" encoding="utf-8"?>
<project name="SampleProfile" default="all" basedir=".">
  <property file="${basedir}/build.properties" />
  <property name="src.dir" value="${basedir}/src" />
  <property name="classes.dir" value="${basedir}/classes" />
  <property name="build.output.dir" value="${basedir}/build_output" />
  <path id="project.class.path">
    <fileset dir="${gwt.home}">
      <include name="gwt-dev.jar" />
      <include name="gwt-user.jar" />
      <include name="validation-api-1.0.0.GA.jar" />
      <include name="validation-api-1.0.0.GA-sources.jar" />
    </fileset>
    <fileset dir="${centrasite.redist.dir}">
      <include name="gf.jaxr-api-osgi.jar" />
      <include name="INMConfiguration.jar" />
    </fileset>
    <fileset dir="${centrasite.rts.dir}">
      <include name="CentraSiteLogicLayer-API.jar" />
      <include name="CentraSiteLogicLayer-impl.jar" />
      <include name="CentraSiteUtils.jar" />
      <include name="gf.jaxr-api-osgi.jar" />
      <include name="CentraSiteJAXR-API.jar" />
    </fileset>
    <fileset dir="${others.dir}">
      <include name="gson-2.2.2.jar" />
    </fileset>
    <pathelement location="${src.dir}" />
  </path>
  <target name="all"
  depends="clean, compile, compile-to-javascript,create-jar,create-zip" />
  <target name="clean">
    <delete dir="${basedir}/gwt-unitCache" />
    <delete dir="${build.output.dir}" />
    <delete dir="${classes.dir}" />
    <delete dir="${basedir}/html/SampleProfile" />
  </target>
  <target name="compile">
    <mkdir dir="${classes.dir}" />
    <javac srcdir="src" destdir="${classes.dir}" debug="${javac.debug}"
    debuglevel="${javac.debuglevel}" optimize="${javac.optimize}"
    deprecation="${javac.deprecation}" classpathref="project.class.path"
    failonerror="true" memoryMaximumSize="512m" fork="true" />
  </target>
  <target name="compile-to-javascript" depends="compile"
  description="GWT compile to JavaScript">
    <mkdir dir="${build.output.dir}" />
    <java failonerror="true" fork="true"
    classname="com.google.gwt.dev.Compiler" classpathref="project.class.path">
      <arg value="-war" />
      <arg value="${build.output.dir}" />
      <arg value="com.softwareag.centrasite.bui.profile.SampleProfile" />
      <jvmarg value="-Xms1024m" />
    </java>
  </target>
  <target name="create-jar" depends="compile"
  description="create the jar by including the domain and server">
    <jar destfile="classes/lib/SampleProfile.jar">
      <fileset dir="classes"
      excludes="**/client/** **/junit/** **/test/** **/lib/**" />
      <manifest>
        <section name="com/softwareag/centrasite/bui/profile/server">
          <attribute name="Implementation-Title"
          value="Rule for SampleProfile profile assertion" />
          <attribute name="Implementation-Version"
          value="${component.full.version}.${working.build.number}" />
          <attribute name="Implementation-Vendor" value="Software AG" />
        </section>
      </manifest>
    </jar>
  </target>
  <target name="create-zip" depends="compile,compile-to-javascript,create-jar"
  description="Creating the computed profile zip">
    <delete dir="html/SampleProfile" />
    <copydir src="${build.output.dir}/SampleProfile"
    dest="html/SampleProfile" />
    <zip update="yes" basedir="." includes="META-INF/**"
    destfile="${build.output.dir}/SampleProfile.zip" />
    <zip update="yes" basedir="." includes="html/**, css/**, js/**"
    destfile="${build.output.dir}/SampleProfile.zip" />
    <zip update="yes" basedir="classes" includes="lib/**"
    destfile="${build.output.dir}/SampleProfile.zip" />
  </target>
</project>
The classpath for the build step must refer to all JAR files contained in the redist folder of the CentraSite installation. Add these JAR files to the build path of your java project also.
This section does not explain all the details of the Java source file; its purpose is to indicate the code that must be modified to suit your environment.
public class SampleComputedProfileImpl implements BUIProfile {
	private static final String VIEW_PAGE_URL = "html/SampleProfile.html";
	private static final String EDIT_PAGE_URL = "html/EditSampleProfile.html";

	private CentraSiteRegistryObject csro;
	private CentraSiteSession session;
	private Locale locale;

	@Override
	public boolean canRenderUI() {
		return true;
	}

	@Override
	public Collection<ProfileAttribute> getProfileAttributes() {
		return null;
	}

	@Override
	public void init(Collection registryObjects, Locale locale) {
		this.locale = locale;
		if (registryObjects == null || registryObjects.isEmpty()) {
			return;
		}

		Iterator iterator = registryObjects.iterator();
		while (iterator.hasNext()) {
			Object element = iterator.next();
			if (element instanceof CentraSiteRegistryObject) {
				csro = (CentraSiteRegistryObject) element;
			} else if (element instanceof CentraSiteSession) {
				this.session = (CentraSiteSession) element;
			}
		}
	}

	@Override
	public Collection<CentraSiteRegistryObject> updateAsset() {
		return null;
	}

	@Override
	public Collection<CentraSiteRegistryObject> computeProfileData(String arg0)
			throws Exception {
		return null;
	}

	@Override
	public String getProfileDataAsJson() throws Exception {
		ArrayList<ComputedInfo> computedInfos = new ArrayList<ComputedInfo>(2);
		computedInfos.add(new ComputedInfo("one", "One"));
		computedInfos.add(new ComputedInfo("two", "Two"));

		Gson gson = new Gson();
		return gson.toJson(computedInfos);
	}

	@Override
	public String getViewPageURL() {
		return VIEW_PAGE_URL;
	}

	@Override
	public String getEditPageURL() {
		return EDIT_PAGE_URL;
	}
}
The SampleComputedProfileImpl class implements the
interface BUIProfile, which declares the basic rendering methods
specific to the CentraSite Business user interface.
| Implementations | Description |
|---|---|
boolean canRenderUI() |
Determines whether the rendering is based on the UI
( |
Collection<ProfileAttribute>
getProfileAttributes() |
Returns a collection of |
void init(Collection registryObjects,
Locale locale) |
With |
Collection<CentraSiteRegistryObject>
updateAsset() |
Returns a collection of
|
String getEditPageURL() |
Returns URL of the edit page of computed profile and would be
called only when |
String getViewPageURL() |
Returns URL of the view page of computed profile and would be
called only when |
String
getProfileDataAsJson() |
Returns a collection of profile data as JSON-formatted string. |
Collection computeProfileData(String
userInputsAsJSON) |
Sets a collection of profile data as JSON-formatted string. |
The following diagram describes the main methods on each of the two Java source files SampleComputedProfileImpl.java and computed.js and describes the type of functions that they serve.
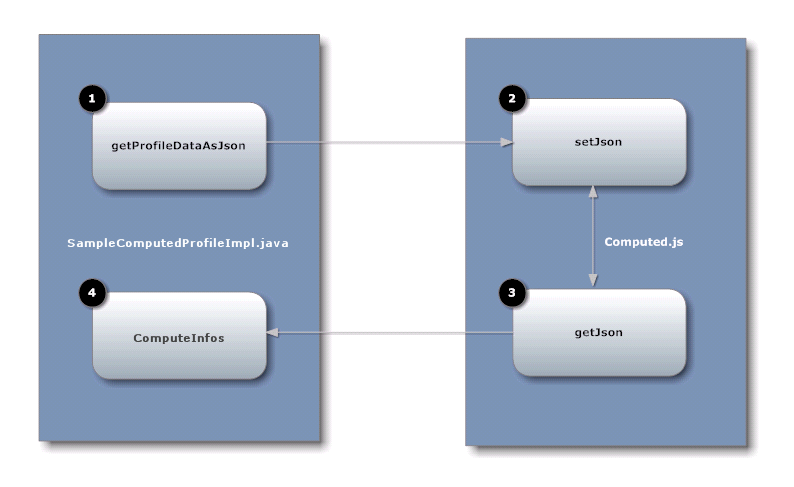
| # | Description |
|---|---|
|
|
The This method internally invokes the |
|
|
The This method is invoked when trying to view or edit the computed profile asset. |
|
|
The This method is invoked when trying to save the updated asset. |
|
|
The This method is internally invoked by the |
Here is the frame of the computed profile implementations:
/**
  Function to resize the current profile frame
**/
var resize = function() {
	parent.resizeFrame(profileId);
}

/**
  Function to validate the given input
**/
var validate = function() {
	return true;
}

/**
  Main function which will be triggered from the computed profile infrastructure
  Implementaion should be called from the function
**/
var setJson = function(profileId, json, isView) {
	window.jsonData = json;
	window.sampleProfileId = profileId;

	console.log("isView = " + isView)

	try {
		if (isView) {
			renderSampleProfile();
		} else {
			editSampleProfile();
		}
	} catch(err) {
	}
}

/**
  Function to to indicate whether the current profile is modified or not
  Custom implementation can be possible here
**/
var isModified = function() {
	return false;
}
As mentioned above, in order to present a user-defined computed profile in the asset details page, HTML files (viewSampleProfile.html and editSampleProfile.html) that describe the GUI (in view or edit mode) must be located in the html directory.
<head>
    <meta http-equiv="content-type" content="text/html; charset=UTF-8">

    <!--                                                               -->
    <!-- Consider inlining CSS to reduce the number of requested files -->
    <!--                                                               -->
    <!--<link type="text/css" rel="stylesheet" href="SampleProfile.css">-->

    <script type="text/javascript" language="javascript" src="SampleProfile/SampleProfile.nocache.js"></script>
	<script src="../js/computed.js"></script>
  </head>
The HTML file specifies the Java source files that are user-defined to render the asset details page in the appropriate view or edit mode.
<head>
    <meta http-equiv="content-type" content="text/html; charset=UTF-8">

    <!--                                                               -->
    <!-- Consider inlining CSS to reduce the number of requested files -->
    <!--                                                               -->
    <!--<link type="text/css" rel="stylesheet" href="SampleProfile.css">-->

    <script type="text/javascript" language="javascript" src="SampleProfile/SampleProfile.nocache.js"></script>
	<script src="../js/computed.js"></script>
  </head>
Assuming that you have set up all the Java files correctly in the directories, you should be able to build with the command:
ant -f build.xml jar all
This creates the profile specific JAR file in the subdirectory lib and archives the necessary profile files into the file SampleProfile.zip.
The archive file must contain the following folders and files:
Your CentraSite installation contains a sample computed profiles (which is contained in demos folder) that you can use to create an archive file for the computed profile specific to the CentraSite Business UI.
SampleProfile
After you have created an archive file that contains the profile definition, you need to load the archive file into the asset type definition. You do this by starting the Edit Asset Type wizard for the appropriate asset type and specifying in the wizard that you are defining a new computed profile.
For details on how to load the archive file of a computed profile into an asset type definition, refer to the section Creating a New Type in the document Object Type Management.
When you have loaded the archive file, the new profile is displayed in the detail page of all assets of the asset type.
This section describes how to view the information stored for assets in the CentraSite registry.
The content is organized under the following topics:
CentraSite provides a summary of details of the asset. The details rendered as attributes are grouped together as profiles including:
Basic Information
Advanced Information
Additionally, on the action bar you will find the list of operations (such as export, view report, download asset etc.) that can be performed on the asset.
When you view the details of an asset, keep the following points in mind:
When you move the mouse to an action on the action bar, the pop-up label will automatically display.
You can view a tooltip text for any attribute in a profile of the asset's details by moving the cursor to the attribute name. The tooltip text gives a summary of the attribute's purpose. The tooltip text shown is the content of the attribute's Description field, and is as defined for the asset in the asset type definition.
The actions listed in the asset details page vary depending on your current configuration settings and the type of asset.
You will only see profiles for which you have View permission.
If you have View permission on a profile, you can also view its nested profiles and associated attributes.
If no value has been assigned to an attribute, then it will not be available to view in its associated profile.
A profile will not be available to view if none of its associated attributes have an assigned value.
Use the following procedure to view the details for an asset.
![]() To view details for an asset
To view details for an asset
Locate the asset whose details you want to view.
Click the asset's hyperlinked name.
On the asset's detail page, examine the properties as necessary.
CentraSite will display the attributes for the selected asset. If you have Modify permission on the asset, you can edit the asset's attributes.
This section describes how to add assets to the CentraSite catalog.
The content is organized under the following topics:
To add assets to an organization's CentraSite catalog, you must belong to a role that has the "Create Assets" or "Manage Assets" permission for that organization. To see a list of the predefined roles that include the "Create Assets" or "Manage Assets" permission, see the CentraSite online documentation topic Predefined Roles in CentraSite in the section About Roles and Permissions in the document Users, Groups, Roles and Permissions.
By default, everyone in your organization is permitted to view the assets that you create in your organization's catalog. However, only you (as the asset owner) and users that belong to a role that has the "Manage Assets" permission for your organization can view, edit and delete the assets that you add to the catalog.
To enable other users to view, edit and/or delete an asset that you have created, you must modify the asset's instance-level permission settings. For more information about allowing other users to access an asset, see the CentraSite online documentation section Setting Permissions on an Asset in the document Using the Asset Catalog.
Some asset types, such as Application Servers, do not have importers. To add this type of asset to the catalog, you must define it from scratch, meaning that you must create the asset and set its attributes manually.
Note that CentraSite allows you to add any type of asset to the catalog manually, even those that you can create using importers. Be aware, however, that you might not be able to manually set all of the attributes for these types of assets. Certain attributes can only be set by an importer. For example, CentraSite allows you to add a webservice to the catalog from scratch, but attributes such as the list of operations and the service endpoints cannot be specified manually. To set these attributes, you must attach the WSDL file to the catalog entry using the command in the asset's actions menu. Similarly, CentraSite allows you to add a REST service or an XML service to the catalog from scratch, but attributes such as the HTTP methods, content type and service endpoints cannot be specified manually. To set these attributes, you must specify the HTTP methods, content type and schema files to the catalog entry using the Add resource command in the asset's Technical Details profile.
Generally speaking, you should ensure that the following conditions are satisfied before you create a virtualized service:
Ensure that the interface for the native service is completely implemented and that interface is reflected in the WSDL or schema file that is registered for the service in the CentraSite registry.
An instance of the service is deployed and running at a known point in network.
The metadata for the native service is valid and up-to-date. If the metadata for the native service has not been completely specified or is out-of-date, you should update it before you generate the virtual service so that you do not carry inaccurate/incomplete data into the virtualized service.
Use the following procedure to add an asset to the CentraSite catalog from scratch.
![]() To add an asset to the catalog
To add an asset to the catalog
In CentraSite Business user interface, click the activity. This opens the Create Asset wizard.
In Basic Information panel, specify the following attributes:
| In this field... | Do the following... |
|---|---|
| Name | Mandatory.
Enter a name for the asset. An asset name can contain any character (including spaces). An asset name does not need to be unique within the catalog. However, to reduce ambiguity, you should avoid giving multiple assets of the same type the same name. As a best practice, we recommend that you adopt appropriate naming conventions to ensure that assets are distinctly named within an organization. |
| Type |
Choose the type of asset that you want to add to the catalog. All top-level asset types are shown in the drop-down list. The asset types that are supported out-of-the-box are: Application, Web service, REST service, XML Service, BPEL Process, XML Schema, virtualized services etc.) CentraSite supports three types of virtualized services, all of which are predefined asset types that CentraSite supports out-of-the-box: Virtual Service, Virtual REST Service and Virtual XML Service. This document uses the term "virtualized service" when referring to the three types of virtualized services in general. (For information about virtualized services, see the document Working with Virtualized Services in the CentraSite online documentation.) |
| Organization |
Choose the organization to which the asset will be added. (The drop-down list will contain the list of organizations to which you are permitted to add assets.) If you select an organization other than your own organization, you will nevertheless be the owner of the asset. Note: |
| Initial Version | Optional.
Enter an identifier for the initial version of the asset. This is the user-defined version, as opposed to the automatically assigned system version. You can enter any string in this field, i.e. the version identifier does not need to be numeric. You can also leave the field blank. You can later create new versions of the asset (see Versioning an Asset). If the versioning feature is disabled for this asset type, the field is nevertheless displayed, thus allowing you to assign an identifier for this first version. If the import of the asset also causes other related objects to be imported (for example, if the WSDL definition for a webservice includes references to other WSDL or schema definition files), the initial version is only assigned to the main asset identified in this dialog, and the initial version of the other imported objects is not assigned. |
| Description | Optional.
Enter a comment or descriptive information about the new asset. |
Click .
If a name for the asset is not specified, the button will be disabled.
In Mandatory Information panel, specify the required attributes that make up the asset.
Important:
During creation of an asset, CentraSite will not allow you
to add the asset to the catalog unless you have specified all
"required" attributes in the asset's type definition. The value
for the "required" attribute must be specified in the asset's
profiles.
Note:
In the user interface, a "required" attribute is
displayed with an asterisk (*) next to its name.
After you specify the value for required attributes, click .
You will not be allowed to move to the next panel unless all of its required parameters have been set.
In the Preview panel, verify that you have the specified values for all of the required attributes.
If necessary, you can click to return to the Mandatory Information panel and change your specifications.
Click to add the new asset to the catalog.
Note:
If at any time you wish to abandon your unsaved asset and return
to your previous screen, just click the
button.
Note:
Configure the asset's extended attributes as described in the
section Editing the Properties
of an Asset below.
This section describes how to change an asset's attributes.
The content is organized under the following topics:
When editing attributes, keep the following general points in mind:
If you are not the owner of the asset, you cannot edit the asset unless you have Modify permission on the asset (granted though either a role-based permission or instance-level permission).
When you view the details for the asset, you will only see profiles for which you have View permission. You will only be able to edit the profiles on which you have Modify permission.
Some attributes accept only specific types of information. For example, if the asset type includes a URL type attribute, you must supply a URL when you edit that attribute. Other attribute types that require a specific type of value include Date attributes and Email attributes. For a list of the attributes types that an asset in the registry can include, see Attribute Data Types.
Some attributes are designed to be read-only and cannot be edited even if they appear in an asset on which you have Modify permission.
If you have Modify permission on a profile, you can also edit its nested profiles and associated attributes.
If no value has been assigned to an attribute, then it will not be available to edit in its associated profile.
A profile will not be available to edit if all of its associated attributes does not have an assigned value.
Use the following procedure to edit the attributes of an asset.
![]() To edit the attributes of an asset
To edit the attributes of an asset
In CentraSite Business UI, display the details page of the asset that you want to edit. If you need procedures for this step, see the section Viewing Details for an Asset.
On the asset's actions menu, click the
(![]() ) icon.
) icon.
To edit an asset's Basic Information profile that includes the generic attributes, namely: Name, Description, Organization or Owner, place the cursor in the appropriate field and modify the text as required.
To modify an asset's Advanced Information profile that includes extended attributes associated with the asset, do the following:
Select the profile that contains the attribute(s) that you want to modify.
CentraSite will display the attributes for the selected asset. If you have Modify permission on the asset, you can edit the asset's attributes.
Edit the attributes on the profile as necessary.
Certain assets contain one or more associated files. For example, the webservice includes a WSDL file and the XML service includes a schema file. You can upload a new file or update an existing file for the asset accordingly.
For an instance of a webservice or abstract service
only
Attach the WSDL file to the catalog entry using the
icon in the asset's actions menu.
If you are attaching a WSDL file to a service which already has a WSDL, the service name in the new WSDL must be identical to the service name in the existing one or the process will fail.
If you select the option Resolution, and the attached WSDL contains an Import or Include reference to a WSDL or schema that already exists in the registry, the dialog allows you to choose whether to retain the existing WSDL or schema, or to replace the existing WSDL or schema by a uploading a new one. If you choose to use upload a new WSDL or schema, you can specify whether the new WSDL or schema should overwrite the existing one, or whether a new version of the WSDL or schema should be created.
If you select the option Resolution, and the attached WSDL contains an Import or Include reference to a WSDL or schema that does not already exist in the registry, the dialog allows you to upload the WSDL or schema.
For an instance of an XML Schema only
Attach the schema file to the catalog entry using the
button in the asset's Technical
Details profile. For additional information about attaching a schema
file to an XML schema catalog entry, see the section
Attaching a Document to an
Asset.
For an instance of an XML service or REST service
only
Attach the schema file to the catalog entry using the
(resource) button in the asset's Technical
Details profile. For additional information about attaching a schema
file to an XML service or REST service, see the CentraSite online
documentation topic Resourcing an XML Service or REST
Service in the section Editing an Asset in the
Catalog in the document Using the Asset
Catalog.
Assets such as the REST services and webMethods IS REST services can contain one or more service endpoints. You can specify multiple endpoints or modify existing endpoints as required.
Repeat steps 4.a and 4.b for each profile that you want to edit.
Note:
If at any time you want to abandon all your changes, click
. CentraSite will ask you if you want to save
your edits. Click to abandon your edits and return
the asset's attributes to their previous settings.
When you have finished making your edits, click the
(![]() ) icon from the actions menu.
) icon from the actions menu.
When you are prompted to confirm the save operation, click .
Note:
An attribute can be a required attribute (i.e. you must supply a
value for it) and have a default value. If you do not supply a value for an
attribute that is required and has a default value, the default value is
automatically assigned to this attribute.
An instance of the XML service or REST service has the "Resource" object internally representing an "Operation" object in the CentraSite registry. When adding or importing an XML service or REST service, CentraSite by means of an invoke operation automatically sets the Resource:invoke entry in the Technical Details profile of the new service. Based upon the type of asset (that is, XML service or REST service), it populates the basic attributes, namely HTTP Method, Content Type, Query String and Schema Name fetched from the service's schema file. You can add or modify these attributes as required.
![]() To resource an XML service or REST service
To resource an XML service or REST service
In CentraSite Business UI, display the details page for the XML service or REST service to which you want to add a resource. If you need procedures for this step, see Viewing Details for an Asset.
On the asset's actions menu, click the
(![]() ) icon.
) icon.
Expand the Technical Details profile to associate a resource object to the service.
Expand the Resource node.
Specify the following attributes:
| In this field... | Do the following... |
|---|---|
| Resource | Mandatory. Enter a name for the resource. A resource name can contain any character (including spaces). |
| Description | Enter a comment or descriptive information about the resource. |
| Document Files | Specify the support documents that you want to attach to the service. For procedures, see the section Attaching a Supporting Document to an Asset. |
| Schema Files | Specify the schema input file you want to attach to the service. For procedures, see the section Attaching an Input File to an Asset. |
| Query String | Specify the search string as required. Any text you type in is case insensitive. |
| HTTP Method | Mandatory. Choose the HTTP request method(s) for bridging protocols (e.g., GET, POST, PUT, DELETE). |
| Content Type | Specify the MIME type of the data supported by the service. |
You can specify multiple resources or modify existing resources as required. Repeat steps 4 and 5 for each resource that you want to edit.
When you have finished making your changes, click the
(![]() ) icon from the asset's actions menu.
) icon from the asset's actions menu.
This section describes how to watch and unwatch information about an asset.
The content is organized under the following topics:
The watch feature enables you to watch information on an asset. When you watch an asset, you receive a notification when changes are made to that asset's information. You can also "unwatch" changes that you have been watching.
When there is a change in the asset's information, CentraSite will automatically send notification of the changes via Email and/or Inbox (depending on how notification is configured in the User Preferences page). For detailed information on the User Preferences, see the section Setting User Preferences.
Assets can be watched (added to your watch list) and unwatched (removed from your watch list). However, you can only add or remove assets to or from your own watch list.
This feature lets you request the right to be a watcher of the displayed asset.
You can watch or unwatch a single asset or a selected set of assets. The descriptions in this section give you details on how to do this.
When watching or unwatching an asset, keep the following points in mind:
If you are not the owner of the asset, you cannot use the or feature unless you have Modify permission on the asset (granted though either a role-based permission or an instance-level permission).
If you do not have the notification selected in the User Preferences page, the or icon will not be visible in the user interface (this functionality will be still be available via the API).
When you attempt to watch an asset for the first time, the icon will be displayed in the user interface. However, if you are already watching the asset, then the icon will be displayed.
Note:
This functionality is not available to guest users.
The following sections describe how to watch or unwatch assets.
Use the following procedure to watch or unwatch a single asset.
![]() To watch an asset
To watch an asset
In CentraSite Business UI, display the details page of the asset you want to watch. If you need procedures for this step, see the section Viewing Details for an Asset.
On the asset's actions menu, click the
(![]() ) icon.
) icon.
CentraSite automatically changes the watcher count in the asset's Basic Information profile
If you later decide that you do not want to watch this asset's information, proceed as follows:
![]() To unwatch an asset
To unwatch an asset
In CentraSite Business UI, display the details page of the asset you want to unwatch. If you need procedures for this step, see the section Viewing Details for an Asset.
On the asset's actions menu, click the
(![]() ) icon.
) icon.
CentraSite automatically changes the watcher count in the asset's Basic Information profile
Note:
If you see the icon on the
actions menu instead of the icon, it
indicates that you are not registered to receive notifications for the selected
asset.
You can watch or unwatch multiple assets in a single step. The rules described above for watching or unwatching a single asset apply also when watching or unwatching multiple assets.
Important:
If you have selected several assets where one or more of them
are already being watched, and if you choose to watch the selected set of
assets, CentraSite immediately initiates the Watch action on that set and
ignores the assets that are already watched. Similarly, If you have selected
several assets where one or more of them are not watched, and if you choose to
unwatch the selected set of assets, CentraSite immediately initiates the
Unwatch action on that set and ignores the assets that are already not
watched.
![]() To watch multiple assets in a single operation
To watch multiple assets in a single operation
In CentraSite Business UI, use either the Browse or the Search feature in the registry to select a list of the assets you want to watch. If you need information on how to browse or search the registry, refer to the section Browsing the CentraSite Catalog or Searching the CentraSite Catalog.
Mark the checkbox next to the name of each asset you want to watch.
On the asset's actions menu, click the
(![]() ) icon.
) icon.
If you do not want to watch the assets' information, proceed as follows:
![]() To unwatch multiple assets in a single operation
To unwatch multiple assets in a single operation
In CentraSite Business UI, use either the Browse or the Search feature in the registry to select a list of the assets you want to unwatch. If you need information on how to browse or search the registry, refer to the section Browsing the CentraSite Catalog or Searching the CentraSite Catalog.
Mark the checkbox next to the name of each asset you want to unwatch.
On the asset's actions menu, click the
(![]() ) icon.
) icon.
The watch list shows the number of users who are watching the asset.
The number of users who are watching the asset is displayed with icons (representing the Watchers) in the description area of the Basic Information profile in the asset details page, for example, "8 Watchers". When you are watching the asset, this is displayed as "You and 8 Watchers". If no users are watching the asset, this is displayed as "0 Watchers".
Clicking on this watch list displays the basic information about the watchers.
This section describes how to attach an input file or a supporting document to an asset.
The content is organized under the following topics:
Assets include attributes that allow you to associate documents such as a WSDL or schema, and related documents such as programming guides, sample code and project plan with the asset.
You can attach either of the following documents to an asset:
An input file that includes either a WSDL definition or an XML Schema definition for the asset as described in Attaching an Input File to an Asset.
External documents, such as Functional requirements, Error Messages etc., that provide additional information for the asset as described in Attaching a Supporting Document to an Asset.
When attaching a document to an asset, keep the following points in mind:
If you are not the owner of the asset, you cannot attach a document to the asset unless you have Modify permission on the asset (granted though either a role-based permission or an instance-level permission).
CentraSite relies on file extensions to determine a file's type. When you upload a file from your local machine to the asset, be sure the name of the file on your local machine includes a file extension so that CentraSite can determine the file's type and mark it correctly in the repository.
When you attach a document to the asset using a URL, CentraSite retrieves the document from the URL and place it in its document repository.
Make sure that you attach the appropriate type-specific files.
An input file is type-specific and depends on the type of asset to which it will be attached. The following table lists the asset types installed with CentraSite and identifies the types of files they require as input.
| For this asset... | You must supply this type of file... |
|---|---|
| Web Service (including Abstract Service) | Web Service Definition Language (WSDL) file. |
| XML Schema | XML Schema Definition (XSD) file. |
| Process | XML Process Definition Language (XPDL) file. |
You can also choose the option Resolution, which will allow you to specify how already existing imported/included files (further WSDL or schema) are handled. For each of the imported/included files you have one of these options:
Overwrite the file with new content.
Create a new version of the file with the new content (if, for example, you want to modify a schema but want to retain its previous version).
Reuse any version of the file (if, for example, an intermediate version of a schema is currently referred to by a WSDL, you can redirect it to the newest version).
You can attach an input file to an asset instance in the following ways:
You can attach a document from your file system.
You can attach any document on the network that is accessible via a URL.
Use the following procedure to attach an input file (WSDL/Schema/BPEL) to the asset.
![]() To attach an input file to the asset
To attach an input file to the asset
Before you begin, you must have the input file that you want to attach. This file can reside on the file system of the computer where your browser is running, or it can reside anywhere on the network, as long as its location is addressable via a URL.
In CentraSite Business UI, display the details page for the asset to which you want to attach an input file. If you need procedures for this step, see the section Viewing Details for an Asset.
On the asset's actions menu, click the
(![]() ) icon.
) icon.
In the Attach Document dialog, specify whether the input file will be read from a URL-addressable location on the network (the URL option) or from your local file system (the File option). Do one of the following as appropriate:
If the file you are attaching resides on the network, enable the URL option. Specify its URL.
— OR —
If the file resides in your local file system, enable the File option. Specify the file name. You can use the button to navigate to the required folder.
Note:
To ensure that CentraSite sets the file type correctly in the
repository, the name of the file should include an extension that indicates the
type of data it contains.
Expand Advanced Settings and complete the following steps as necessary.
If you have specified a URL, and the site you want to access via the URL requires user authentication, enter a username and password for authentication at the URL site.
You can also use the Resolution option, which will allow you to specify how an already existing imported/included file (further WSDL or schema) is handled. For each of the imported/included files you have one of these options:
| Options | Usage |
|---|---|
| Always ask |
Reuse the existing WSDL/schema files referred to in the main WSDL/schema file, or replace the existing WSDL/schema files by uploading new files. |
| Always overwrite |
Overwrite the existing WSDL/schema files in the registry with the new ones specified by the input file. |
| Always create new versions |
Create a new version of the file with the new content. |
If you choose the Always ask option, and there is more than one input file with the same name and namespace, you can choose between these. To allow you to select the required file, the dialog Reuse Existing Asset lists the available assets that match the given file name, and also their available versions. You can view the description of any asset in the list; this is useful if you want to check that you have selected the correct asset's file from the list.
Choose .
Note:
If at any time you wish to abandon your unsaved document and
return to your previous screen, just click the
button.
You can attach a WSDL file to the Service asset by using the button in the details page of the asset.
When you attach a WSDL file, the following situations are possible:
The Service asset has no WSDL already attached
In this case the WSDL will just be attached to the asset.
You have the choice between just reusing any existing version of the WSDL/schema file or uploading a new version.
Select an existing version
An existing version of the WSDL/schema file is attached to the
asset. The asset name will be changed to the WSDL's file name.
Upload a new version
A new version of the WSDL/schema file is attached and uploaded in
the repository. The asset name will be changed to the WSDL's file name.
The WSDL can only be attached if no WSDL with the same name and namespace already exists in the CentraSite repository.
The Service asset already has an attached WSDL file
In this case you can attach any WSDL file to it, even with a
different file name and/or different namespace.
Moreover you have the choice between just overwriting the Service asset or creating a new version.
Always overwrite
The WSDL content in the repository gets replaced by the new
content. The asset's name and the classifications Local-Name and namespace are
modified according to the new information.
Always create new versions
A new asset will be established with the information from the WSDL
file which will be a new version of the attached one. The original WSDL asset
will not be modified.
The following restrictions apply for attaching a WSDL file to a Service asset:
If a WSDL W1 is already referred to by another WSDL W2, WSDL W1 cannot be replaced by a new WSDL that has a modified file name or a modified namespace. This restriction does not apply if the create new version option is used.
When you use the button, you can only attach a WSDL file to the most recent version of a Service asset.
If you attach a WSDL with a different file name and/or a different namespace, then there must not be another existing WSDL with same name and namespace.
Consider the Service asset has a "Name Validate" Policy defined that enforces unique name. In this case; the WSDL file is attached only if the Service name in the WSDL is the same as the "Name" pattern defined in the validation policy.
Note:
Attaching XML Schema/XPDL files to XML Schema/Process asset are
similar to the information explained above.
Some assets include attributes that allow you to associate supporting documents such as programming guides, sample code, script files and project plan with the asset.
For example, Service assets include the Specification profile. This profile contains several file-related attributes representing external documents such as Functional Requirements, Error Messages, Release Notes and so forth.
You can attach a document to an asset instance in the following ways:
You can attach any document on the network that is accessible via a URL.
You can attach a document from the computer's file system.
You can attach a document from your organization's supporting document library. The supporting document library is a collection of shareable documents that members of your organization have uploaded to CentraSite's document repository. For more information about the supporting document library, see the CentraSite online documentation section Working with Supporting Documents in the document Using the Asset Catalog.
Use the following procedure to attach a document using a URL.
![]() To attach a document using a URL
To attach a document using a URL
In CentraSite Business UI, display the details pages for the asset to which you want to attach a document. If you need procedures for this step, see the section Viewing Details for an Asset.
Choose the profile that contains the attribute to which you want to attach the document.
Locate the attribute and click its button. (If the attribute has existing attachments, be sure to click the bottom-most button. If you click an button that belongs to an existing attachment, you will replace that attachment. If you do not see an available button, use the plus button to display one.)
The Attach to… dialog is displayed.
Enable the URL option and type the document's URL into the URL text box.
In the Display Name text box, specify a name that users will see when the document is attached to a File attribute.
Click .
Note that the button will be disabled until a URL is specified.
Note:
If at any time you wish to abandon the attach operation and
return to your previous screen, just click the
button.
Repeat steps 3 to 6 for each URL that you want to attach to the attribute.
When you have finished making your changes, click the
(![]() ) icon from the asset's actions menu.
) icon from the asset's actions menu.
If the document that you want to attach to the asset is not already in the supporting document library, use the following procedure to attach a document from the file system of the computer where your browser is running.
Note that this procedure uploads a document to the supporting document library and then creates a link to the asset's attribute.
![]() To attach a document using the file system
To attach a document using the file system
In CentraSite Business UI, display the details pages for the asset to which you want to attach a document. If you need procedures for this step, see the section Viewing Details for an Asset.
Choose the profile that contains the attribute to which you want to attach the document.
Locate the attribute and click its button. (If the attribute has existing attachments, be sure to click the bottom-most button. If you click an button that belongs to an existing attachment, you will replace that attachment. If you do not see an available button, use the plus button to display one.)
The Attach to… dialog is displayed.
Enable the Upload document option and type the document's URL into the URL text box.
In the Display Name text box, specify a name that users will see when the document is attached to a File attribute. This is also the name by which the document will be identified in the library.
In the File text box, specify the full pathname within your operating system environment of the file that you want to upload to the supporting document library. You can use the button to navigate to the required file.
To ensure that CentraSite sets the file type correctly in the supporting document library, the name of the file should include an extension that indicates the type of data it contains.
In the Select a Folder text box, specify a folder in the supporting document library where the new document will be stored. Note that a type-ahead feature is provided in this text box. You can use the button to select the required folder.
Click .
Note that the button will be disabled until a URL is specified.
Note:
If at any time you wish to abandon the attach operation and
return to your previous screen, just click the
button.
Repeat steps 3 to 8 for each document that you want to attach to the attribute.
When you have finished making your changes, click the
(![]() ) icon from the asset's actions menu.
) icon from the asset's actions menu.
Use the following procedure to attach a document from the supporting document library.
![]() To attach a document from the supporting document library
To attach a document from the supporting document library
In CentraSite Business UI, display the details pages for the asset to which you want to attach a document. If you need procedures for this step, see the section Viewing Details for an Asset.
Choose the profile that contains the attribute to which you want to attach the document.
Locate the attribute and click its button. (If the attribute has existing attachments, be sure to click the bottom-most button. If you click an button that belongs to an existing attachment, you will replace that attachment. If you do not see an available button, use the plus button to display one.)
The Attach to… dialog is displayed.
Enable the Reuse existing document option.
In the Select a File text box, specify the file that you want to attach to the asset from the supporting document library. You can use the button to navigate to the required file.
In the Display Name text box, specify a name that users will see when the document is attached to a File attribute.
Click .
Note that the button will be disabled until a URL is specified.
Note:
If at any time you wish to abandon the attach operation and
return to your previous screen, just click the
button.
Repeat steps 3 to 7 for each document that you want to attach to the attribute.
When you have finished making your changes, click the
(![]() ) icon from the asset's actions menu.
) icon from the asset's actions menu.
Use the following procedure to remove an attachment from a File attribute of an asset.
![]() To remove a supporting document from an asset
To remove a supporting document from an asset
In CentraSite Business UI, display the details pages for the asset from which you want to remove an attached document. If you need procedures for this step, see the section Viewing Details for an Asset.
Select the profile that contains the attribute to which the document is attached.
Locate the supporting document that you want to delete and click its minus button. Repeat for each document that you want to delete.
When you have finished making your changes, click the
(![]() ) icon from the asset's actions menu.
) icon from the asset's actions menu.
This section describes how to switch an asset to a different lifecycle state.
The content is organized under the following topics:
CentraSite provides the ability to define and track the lifecycle of an asset by using a state model. CentraSite allows the use of active policies to govern specific transitions in the lifecycle management process of an asset.
The lifecycle management (LCM) system for an asset helps to:
Assess change impact and manageability across all service consumers;
Ensure service quality through an integrated lifecycle approval process;
Enable a single viewpoint for service stages and their artifacts.
Typically, assets such as web services pass through different states (designing, implementation, testing) before they can be used in a production environment. As the number of objects in a registry grows, it is necessary to introduce stages (Development, Test, Production) to provide adequate operational environments for all parties involved in the lifecycle. Furthermore, an organization may want to add conditions and rules for passing an object through the lifecycle. Therefore the registry should allow administrators to define roles and permissions and connect these to lifecycle steps.
For more information on the lifecycle management process, refer to the CentraSite online documentation document Customizing Lifecycle Management.
For any given lifecycle model, a list of names of users and/or groups who are allowed to move assets to new states is maintained within the definition of the lifecycle model. For each user or group, the permission to move assets to new states can be restricted to a subset of the available states in the model. When the lifecycle model is assigned to an asset, and a state has users or groups defined for it, only a user who is one of the defined users or groups can make the transition of the asset into that state. If no users or groups are defined for a particular state, any user who has Modify permission on the asset can change the lifecycle state for that asset.
Several rules determine who can change the lifecycle state of an asset. These rules are summarized in the following diagram.
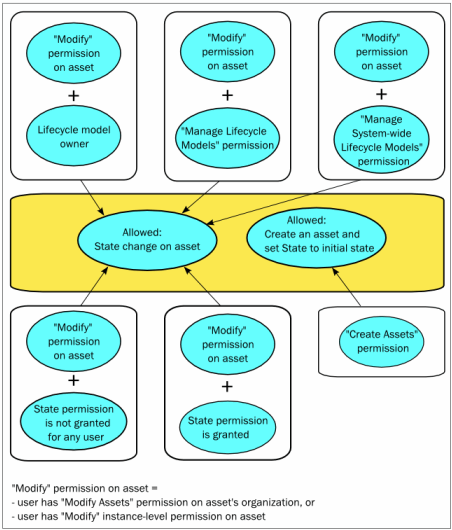
For example: If you are the owner of a lifecycle model, you can assign any lifecycle state of this lifecycle to an asset whose asset type has this lifecycle model assigned, as long as you have the "Modify Assets" permission for the asset.
Any user who has the "Create Assets" permission can create an asset whose asset type has a lifecycle model assigned. When the asset is created, CentraSite automatically sets the lifecycle state of this asset to the initial state. However, to change the state from the initial state to another lifecycle state, the user requires the appropriate permissions as described above.
Note that the "Manage Assets" permission does NOT include the rights to change lifecycle states.
For more information about permissions, see the CentraSite online documentation section About Roles and Permissions in the document Users, Groups, Roles and Permissions.
If an asset has an associated lifecycle model, you can use the following procedure to switch the asset's lifecycle state.
![]() To change the lifecycle state of an asset
To change the lifecycle state of an asset
In CentraSite Business UI, display the details page for the asset whose lifecycle state you want to change. If you need procedures for this step, see the section Viewing Details for an Asset.
On the assets's actions menu, click the
(![]() ) icon.
) icon.
In the Basic Information profile, locate the Lifecycle State attribute.
From the drop-down box, select the state to which you want to switch the asset. (The list will contain only the states that you are permitted to assign to the asset.)
When you have finished making your selection, click the
(![]() ) icon.
) icon.
When you are prompted to confirm the save operation, click .
If the state change requires approval, CentraSite Business UI will initiate an approval workflow and your request for a state change will be submitted to the appropriate approvers. While the request is awaiting approval, the asset will appear in the "pending" mode.
By default, everyone in your organization is permitted to view the assets that you create. However, only you (as the owner of the asset) and users who belong to a role with the "Manage Assets" permission for your organization are allowed to view, edit and delete these assets. To enable other users to view, edit and/or delete an asset that you have created, you must modify the asset's permission settings.
The following sections describe how to set permissions on an asset.
When setting permissions on assets, keep the following points in mind:
To set permissions on an asset, you must belong to a role that has the "Manage Assets" permission or have the Full instance-level permission on the asset itself.
You can assign permissions to any individual user or group defined in CentraSite.
The groups to which you can assign permissions include the following system-defined groups:
| Group Name | Description |
|---|---|
| Users | All users within a specified organization. |
| Members | All users within a specified organization and its child organizations. |
| Everyone | All users of CentraSite including guest users (if your CentraSite permits access by guests). |
If a user is affected by multiple permission assignments, the user receives the union of all the assignments. For example, if group ABC has Modify permission on an asset and group XYZ has Full permission on the same asset, users that belong to both groups will, in effect, receive Full permission on the asset.
The same principle applies to users who have both role-based permissions and instance-level permissions on the same asset. In this case, users receive the union of the role-based permission and the instance-level permission on the asset.
If you intend to give users in other organizations access to the asset, and the asset includes supporting documents that you want those users to be able to view, make sure you give those users permission to view the supporting documents as well as the asset itself.
CentraSite allows you to set permissions on individual profiles within an asset. This feature enables you to specify which of the available profiles can be viewed or edited by users when they display the asset in CentraSite Business UI. For any given asset, you can define different profile permissions for different users. For example, if an asset includes a profile called Source Control that displays links to your source control systems, you might want to restrict the visibility of that profile to authorized developers.
You define the user-specific or group-specific profile permissions of an asset via the asset's Permissions action. See the instructions in the section Assigning Permissions Using the CentraSite Business User Interface for details.
The profile permissions that can be set on a given asset for any user or group are:
| Permission | Description |
|---|---|
| View | Enables the specified user or group to see the profile when they view the asset. |
| Modify | Enables the specified user or group to modify the attribute settings in the profile when they view the asset. |
Note that the individual profiles do not include the Full permission because users cannot delete a profile from an individual asset.
You can set the permissions on an asset in two ways:
Using the Permissions action in the user
interface
You can use the Permissions action in the user
interface as described in Assigning Permissions Using
the CentraSite Business User Interface.
Using the "Set Instance and Profile
Permissions" policy action
You can use the "Set Instance and Profile
Permissions" policy action in a design/change-time policy to
automatically assign permissions to an asset during any of the following
events:
PostCreate
PreStateChange
PostStateChange
OnTrigger
For more information about creating policies, see the document Working with Design/Change Time Policies. For more information about using the "Set Instance and Profile Permissions" action, see the section Set Instance and Profile Permissions in the document Built-In Design/Change-Time Actions Reference.
Use the following procedure to set instance-level permissions on an asset using CentraSite Business UI.
![]() To assign permissions to an asset
To assign permissions to an asset
In CentraSite Business UI, display the details page for the asset whose permissions you want to edit. If you need procedures for this step, see the section Viewing Details for an Asset.
On the asset's actions menu, click the
(![]() ) icon.
) icon.
Note:
This icon is only available if you have the Modify permission on
the asset. See the sections Who Can Set Permissions on an
Asset? and Restricting Access to Specific
Profiles above for details.
In the Assign Permissions dialog box, select the users or groups to which you want to assign permissions.
If you want to select the users or groups using the typeahead option and you need procedures for this step, see Selecting Users or Groups Using Search Option.
If you want to select the users or groups using the browse option and you need procedures for this step, see Selecting Users or Groups Using Browse Option.
Use the View, Modify and Full check boxes to assign specific permissions to each user and/or group in the User/Group Permissions list as follows:
| Permission | Allows the selected user or group to... |
|---|---|
|
View the asset. |
|
|
View and edit the asset. |
|
|
View, edit and delete the asset. This permission also allows the selected user or group to assign instance-level permissions to the asset. |
When you assign instance-level permissions on an asset, the related objects (for example, bindings, operations, interfaces etc.,) receive the same permissions that are assigned on the asset.
If you want to ensure that the asset's dependent assets (for example, a WSDL or schema) receive the same permissions, expand the Advanced Settings section and mark the checkbox Propagate permissions. If you do not mark this checkbox, the permissions of the dependent assets will not be modified.
In addition, you can ensure that the dependent assets of the same object type receive the same profile permissions. To do this, mark the checkbox Propagate profile permissions. See the section Propagation of Permissions below for more information concerning propagation of permissions and propagation of profile permissions.
If at any time, you wish to remove one or more users' or groups'
permissions, click the (![]() ) icon next to
the user or group name.
) icon next to
the user or group name.
Click the button to save the permission settings.
When you have finished making your changes, click the
(![]() ) icon.
) icon.
The following procedure describes how to use CentraSite's typeahead search feature to search for users or groups in the user database.
Keep the following points in mind when performing a search:
You must type a search string to retrieve the desired list of users or groups.
CentraSite treats the text you enter as a partial string. For example, if you enter "ali", then "Alison", "Calient" and "Salie" all fit the search criteria.
The search starts with the specified number of offset characters counted from the beginning of the string.
Search strings are not case-sensitive. Example: A search for “alison” will return the same results as a search for “Alison” or “ALISON”.
Search strings are not accent-sensitive.
When you are searching the user list, CentraSite searches the user name attribute, not the user ID attribute. Thus, if a user has the name “John Smith” and the user ID “MyDomain\AdminUser01”, a search for will find the user “John”, whereas a search for “Admin” will not.
![]() To select users or groups by typeahead search
To select users or groups by typeahead search
In the Add User or Group text box, type a search string that specifies the characters contained in the user or group name.
As you enter the search string, CentraSite returns the top n assets that meet your search text.
By default, the result set is ordered alphabetically.
Press the Up Arrow and Down Arrow keys to scroll through one user or group at a time.
Locate the user or group to whom you wish to set permissions for the asset.
Click the Add (![]() ) icon.
) icon.
Repeat steps 1 to 5 until you have all the required users and/or groups.
Click the button to add the chosen users and/or groups to the User/Group Permissions.
Assign specific permissions to each user and/or group as mentioned above.
The following procedure describes how to use CentraSite's browse feature to search for users or groups in the user database.
Keep the following points in mind when performing a search:
The option opens to the Choose Users and Groups dialog. You must type a search string to retrieve the desired list of users or groups.
CentraSite treats the text you enter as a partial string. For example, if you enter "ali", then "Alison", "Calient" and "Salie" all fit the search criteria.
The search starts with the specified number of offset characters counted from the beginning of the string.
Searches are not case sensitive nor accent sensitive.
CentraSite performs a search based on the Name attribute.
![]() To select users or groups by browse option
To select users or groups by browse option
In the Add User or Group text box, type a search string that specifies the characters contained in the user or group name.
By default, the result set is ordered alphabetically.
Refine the search result set by choosing one of the options from the drop-down Sort (Name or Organization).
Select the checkbox next to the name of the users or groups whom you wish to set permissions for the asset.
Click the button.
Repeat steps 1 to 4 until you have all the required users and/or groups.
Click the button to add the chosen users and/or groups to the User/Group Permissions.
Assign specific permissions to each user and/or group as mentioned above.
Use the following procedure to set instance-level permissions on an asset's profiles.
![]() To assign instance-level permissions on an asset's profiles
To assign instance-level permissions on an asset's profiles
Choose the asset's Permissions (![]() ) action.
) action.
Locate the user or group for which you wish to set profile permissions. Then click the arrow icon beside the user or group name to open the profile permission list.
Use the checkboxes to indicate which profiles the user or group is permitted to view or modify.
Click to save the new permission settings.
When you have finished making your changes, click the
(![]() ) icon.
) icon.
An asset can have one or more dependent assets. For example, a Service asset can refer to a WSDL which in turn can refer to one or more XML Schema assets. You can optionally choose whether the permissions assigned to an asset instance should be automatically propagated to the asset instance's dependent assets.
In the context of CentraSite Control, propagation of permissions means that the new permissions completely replace the old permissions; the new permissions are not merged with the old permissions. As an alternative, you can use a change-time policy containing the action "Set Instance and Profile Permissions". With this action, you can choose whether the new permissions will be merged with the old permissions or will replace the old permissions. See the section Built-In Actions for Design/Change-Time Policies in the document Built-In Design/Change-Time Actions Reference for details.
By default, the access level permissions that are assigned on an asset are implicitly propagated to these dependent assets. This behavior is activated when you mark the checkbox Propagate asset permissions in the asset's Advanced Settings. For example, assigning Modify permission on a Service asset propagates the Modify permission to the asset's WSDL, schemas, etc.
If you do not have permission to assign instance-level permissions to a dependent object, the dependent object will not be modified and a warning message will be issued.
In addition to propagating permissions that control the access to an asset instance (as described above), it is also possible to propagate permissions that control the access to the asset instance's profiles. This means that the profile permissions that you define for an asset instance can be propagated to the asset's dependent assets. However, this is only possible if the dependent object is of the same asset type as the first object; this restriction arises because different asset types can have different sets of profiles.
This behavior is activated when you mark the checkbox Propagate profile permissions in the asset's Advanced Settings.
You can use the versioning feature in CentraSite to add an updated version of an asset to the registry. For example, if you make significant changes to a webservice (such as adding operations to the service or modifying the data types that it uses), you can use the versioning feature to add the new version of the service to the registry.
When you generate a new version of an asset, CentraSite adds a new asset of the same type to the registry. The new asset will have the same name and description as the one from which it was versioned. It will have an updated version number.
Note:
Depending on the type of asset you version, some of the attributes
are cloned from the original asset and others are not. For example, when you
version a webservice, the settings on the Classifications
profile are cloned, however, the attribute settings on many of the other
profiles, including the Permissions profile, are not.
After you version an asset, you should always examine the attribute settings
for the new version and set them appropriately.
The metrics and event information that was collected for the old version of the asset will remain unchanged in the registry/repository. The old version's metrics and event information will not be copied to the new version. CentraSite will begin collecting metrics and event information for the new version of the asset.
CentraSite maintains two sets of version numbers for an asset. One set is maintained for CentraSite's own internal use. CentraSite automatically assigns this version number when you create a new version of an asset. You cannot modify it. The version numbers assigned by CentraSite have the format <MajorVersion>.<Revision> and are always sequentially numbered starting from 1.0 (e.g., 1.0, 2.0, 3.0). If the revision feature is enabled, the revision number is incremented automatically each time you modify the current version of the asset.
Each version of an asset also has a separate user-defined version identifier. This is the "Public" version number that displays in the user interface. The user-defined version identifier does not need to be numeric. For example, you might use a value such as "V2.a (beta)" to identify a version.
This section describes how to use CentraSite's versioning feature for an asset.
You can create a new version of an asset or a new version of a selected set of assets. The descriptions in this section give you details on how to do this.
To create a new version of any given asset, you must belong to a role that has the "Manage Assets" permission for the organization in which the asset resides.
When you version an asset, you become the owner of the new version of the asset. Ownership is not carried forward from the previous version.
The new version of the asset will belong to the same organization as its previous version.
Note:
You cannot create a new version of a virtual asset.
The following sections describe how to create new asset versions.
Use the following procedure to create a new version of a single asset.
![]() To generate a new version of an asset
To generate a new version of an asset
In CentraSite Business UI, display the details page for the asset you want to generate a new version. If you need procedures for this step, see the section Viewing Details for an Asset.
On the asset's actions menu, click the (![]() ) icon.
) icon.
Complete the fields in the Add Version dialog box as follows:
| In this field... | Specify... |
|---|---|
| Namespace |
The namespace associated with this new version. This is of specific relevance for web service assets. The namespace given here reflects the target namespace defined in the associated WSDL file. A change of the namespace can be a differentiating factor between versions. Note that if you supply a new namespace here, you should ensure that the WSDL associated with this asset also reflects the new namespace. |
| New User Version |
An identifier for the new version. You can use any versioning scheme you choose. The version identifier does not need to be numeric. Examples:
0.0a 1.0.0 (beta) Pre-release 001 V1-2007.04.30 |
| Organization |
Specify the organization to which this new version will be added. Note: Important: |
| Change Log | Optional. A comment or other descriptive information about the new version. |
| Propagate versions to dependent objects | (CentraSite only processes this
checkbox for assets of type Service.)
Mark this checkbox if you wish to automatically create new versions of all of the service's dependent schemas. The schemas will only be updated if you have permissions to modify them. |
Click .
When you have finished making your selection, click the
(![]() ) icon.
) icon.
You can create a new version for a set of assets, as described in this section. The rules described above for versioning a single asset apply also when versioning multiple assets.
Use the following procedure to create a new version of a set of assets.
![]() To generate a new version of a set of assets
To generate a new version of a set of assets
In CentraSite Business UI, use either the Browse or the Search feature to select a set of assets for which you want to create a new version. If you need information on how to browse or search the CentraSite registry, refer to the section Browsing the CentraSite Catalog or Searching the CentraSite Catalog.
Mark the checkbox of each asset for which a new version will be created.
On the actions menu, click the (![]() ) icon.
) icon.
In the Add Version dialog, specify the attributes, in the same way as described previously for creating a new version of an individual asset.
Notes:
When you have finished making your selection, click the
(![]() ) icon.
) icon.
The Basic Information profile for an asset displays the list of all the asset's versions. To locate other versions of an asset, simply display the asset and examine its Basic Information profile as described below.
![]() To locate other versions of an asset
To locate other versions of an asset
In CentraSite Business UI, display the asset whose versions you want to examine. If you need procedures for this step, see the section Viewing Details for an Asset.
Open the Basic Information profile. This profile will list all versions of the asset.
If you want to display the details for one of the listed versions, choose the number of that version.
This section describes how to transfer ownership of an asset to another user or organization.
The content is organized under the following topics:
In CentraSite, there are two concepts of ownership. An asset belongs to a particular user (known as the asset's owner) and it also belongs to a particular organization. The owner of an asset has special access rights to the asset and serves as the asset's main point of contact. The asset's organization determines whose rules of governance apply to the asset.
After an asset is created, it is sometimes necessary to change its ownership. For example:
You might need to transfer an asset to another user if the original owner leaves the company, transfers to another position, or is otherwise unable to continue serving as the owner of an asset.
You might need to transfer ownership of an asset to another organization when the asset reaches a point in its lifecycle where it is managed by a different group of users. When a service moves into production, for example, you might want to transfer it to your operations organization.
The user who adds an asset to the catalog automatically becomes the
asset's owner. User ownership is specified by the asset's
Owner attribute, which appears on the details
page in CentraSite Business UI.
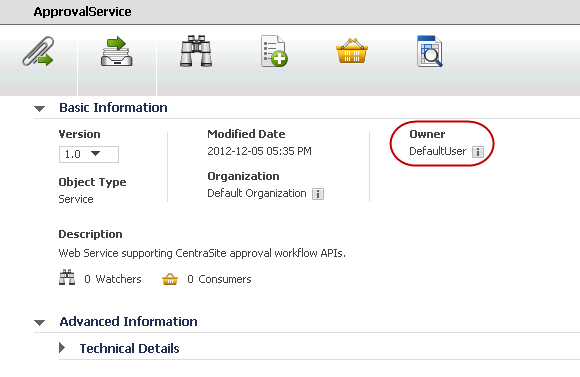
The owner of an asset automatically receives Full permission on the asset. The owner also participates in various processes and policies that affect the asset. For example, the owner of an asset is responsible for reviewing and approving all consumer-registration requests that users submit against the asset.
When you change ownership of an asset, you transfer all of the permissions and responsibilities associated with ownership of the asset to another user.
Note:
Certain predefined assets that are installed with CentraSite are
owned by an internal user known as the default user. You
cannot transfer assets to or from this user.
The organizational ownership for an asset is specified by the asset's Organization attribute. The organization to which an asset belongs determines which policies apply to the asset, which lifecycle model it follows, and which group of users have implicit permission to view the asset. In other words, it determines whose rules of governance apply to the asset. Consequently, when you change an asset's organizational ownership, you are in effect placing the asset under the governance of a different organization.
An asset's Organization attribute is specified when a user adds the asset to the catalog. Users can add assets to any organization for which they have "Create Assets" permission. (Most users only have permission to create assets in their own organization, so most assets in the registry belong to the same organization as their owner.)
The organization to which an asset belongs is shown in the Organization attribute on the asset's details page.
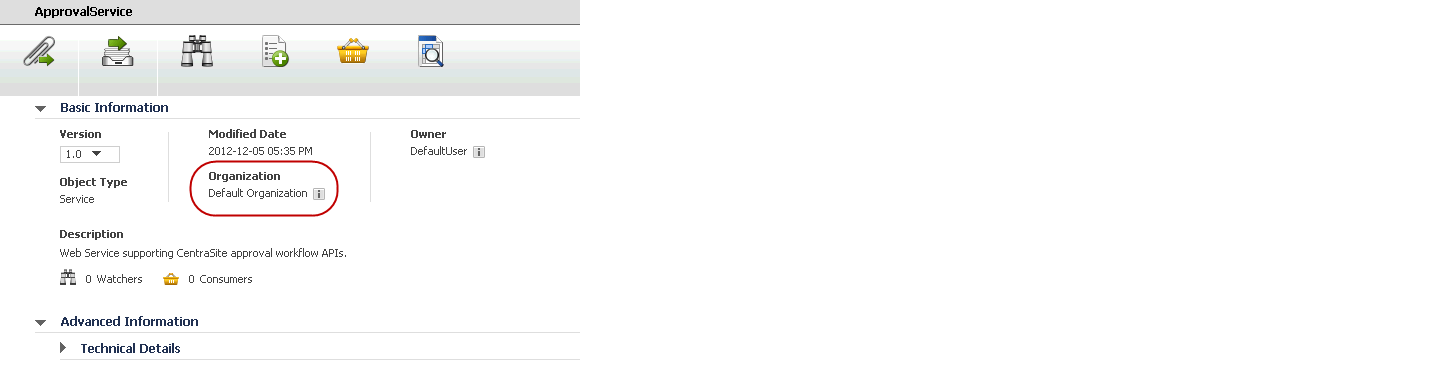
To change the ownership of an asset, you must belong to the CentraSite Administrator role.
To change the ownership of an asset, the following conditions must be met:
The asset that you are moving must not belong to the default user (nor can you move an asset to the default user).
The asset that you are moving must not be in a pending state (e.g., awaiting approval) or have a consumer registration request pending for it.
You cannot move the asset to an inactive user.
To assess the effect that an ownership change has on various aspects of an asset, see the CentraSite online documentation topic What Happens During a Change of Ownership? in the section Changing the Ownership of an Asset in the document Using the Asset Catalog. Before transferring an asset to another user and/or organization, review this information so you understand how the asset will be affected.
This section provides procedures for transferring an asset to a different user or a different organization.
Use the following procedure to transfer the ownership of an asset to a specified user.
![]() To change the ownership of an asset
To change the ownership of an asset
In CentraSite Business UI, display the details page for the asset whose ownership you want to change. If you need procedures for this step, see the section Viewing Details for an Asset.
On the asset's actions menu, click the
(![]() ) icon.
) icon.
In the Basic Information profile, locate the Owner attribute.
In the adjacent text box, type a partial string to search for the user. You can use one or more wildcards to specify the user.
Select the user to whom you want to transfer ownership of the asset.
When you have finished making your changes, click the
(![]() ) icon.
) icon.
When you are prompted to confirm the save operation, click .
Use the following procedure to transfer an asset to a specified organization.
![]() To change the organization of an asset
To change the organization of an asset
In CentraSite Business UI, display the details page for the asset whose ownership you want to change. If you need procedures for this step, see the section Viewing Details for an Asset.
On the asset's actions menu, click the
(![]() ) icon.
) icon.
In the Basic Information profile, locate the Organization attribute.
In the adjacent text box, type a partial string to search for the organization. You can use one or more wildcards to specify the organization.
Select the organization to which you want to transfer ownership of the asset.
When you have finished making your changes, click the
(![]() ) icon.
) icon.
When you are prompted to confirm the save operation, click .
This section describes how to provide consumers with access to assets, and how relationships between assets and their consumers are maintained.
The content is organized under the following topics:
The register as consumer feature provides the following important advantages to CentraSite registry:
A secure consumer provisioning that provides users with the ability to consume assets.
An effective consumer-provider relationship tracking that enables you to control and monitor who consumes assets.
A consumer is the user who is identified in an application asset. Typically, an application asset specifies the consumer applications that are authorized to consume a particular service, BPEL process or XML schema.
For information on how to create an application asset, refer to the CentraSite online documentation section Creating an Application Asset in the document Using the Asset Catalog.
To control and monitor which application assets consume assets, you:
Register application assets to consume assets.
CentraSite users with the proper permissions can register
application assets as consumers of specified assets. That is, users can request
permission to associate any consumer application with a specified asset in the
registry. The owners of the assets may approve or reject such requests.
Specify the registered consumers in the asset's Basic Information
profile.
After applications are approved to consume an asset, CentraSite
automatically updates those consumers in the asset's Basic Information
profile.
Because consumers are registered, CentraSite can easily track consumer-provider relationships. The purpose of tracking consumer-provider relationships is to identify:
The artifacts in the registry that will be affected if an asset is not available or must be changed.
The organizations that need to be informed in such situations.
If you have permissions to view an asset in the CentraSite registry, and you belong to a role that includes the "Register as Consumer" permission, the action is enabled in the asset details page. This feature opens a dialog that lets you request the right to be a consumer of the displayed asset. You can request the right for any consumer application owned by any organization.
The request must be subsequently approved or rejected for by at least the owner of the asset. This functionality is not available to guest users.
Note:
The asset that you want to consume must not be in a
"pending" state (e.g., awaiting approval).
In order to register as consumer for an asset, CentraSite requires
that you have a design-time policy named Consumer-Provider Relationship
Policy in CentraSite Control. This policy will process the consumer
registrations that are initiated using the
action.
CentraSite does not provide a Consumer-Provider Relationship policy out-of-the-box. You must create this policy for your instance of CentraSite. At a minimum, this policy must include the action, because this action performs the work of actually registering a consumer (that is, it establishes the actual relationship between the asset and the specified consumers) and execute the OnConsumerRegistration event. The OnConsumerRegistration event occurs when the owner of the asset approves the registration request, not when the user submits the registration request. If, in addition to the asset owner, you want designated individuals to review and approve the registration request, place an approval action before the action.
Note:
CentraSite will not enable the
action until you create this policy in CentraSite Control.
See the CentraSite online documentation section Consumer Provisioning and Consumer-Provider Relationship Tracking in the document Working with Consumer Applications.
The following section describes how to register a user to consume an asset.
Use the following procedure to register as consumer for an asset
![]() To register users to consume an asset
To register users to consume an asset
In CentraSite Business UI, display the details page for the asset you want to consume. If you need procedures for this step, see the section Viewing Details for an Asset.
On the asset's actions menu, click the
(![]() ) icon. This opens the Consume
Asset dialog.
) icon. This opens the Consume
Asset dialog.
In the Application textbox, type the keyword(s) to search for. CentraSite applies the filter to the application asset's name. Choose an application asset from the selection list.
If you want to specify additional application assets, use the plus button beside the Application field to create a new Application input field, and choose another application asset.
When you have specified all required applications, click . Requests to register the applications are sent to the owner(s) of the assets.
The owner of each asset can either accept or decline a "Register as Consumer" request as follows:
Go to the asset details page.
You will see the pending consumer registration requests
(![]() )
for an asset in the description area of the Basic
Information profile, for example, "
)
for an asset in the description area of the Basic
Information profile, for example, "N consumer
registration requests are pending”.
If there are no pending consumer registration requests for the
asset, this is displayed as “0".
Click the hyperlinked number (“N”)
to open the Pending Consumer Registration Requests dialog.
This dialog contains a list of all consumer registration requests that have
been submitted for the particular asset, including requests that were
auto-approved.
Choose the consumer registration request that you want to review and approve by clicking its hyperlinked name.
The details for the request will appear in the Consumer Registration Request dialog.
In the Comment text box, type a comment. (e.g., "Request rejected. Add required specifications to this asset and resubmit".)
Click the or button as appropriate to approve or reject the request.
After the applications are approved to consume an asset, CentraSite automatically changes the consumer count in the asset's Basic Information profile.
For details, see the section Monitoring Consumer Count for an Asset.
To view a summary of all "Register as Consumer" requests, go to the asset details page:
If you are the owner of an asset, and another user has made a request to register as a consumer of the asset, you can view the request here. As the asset owner, you can accept or decline the request.
If you have made a request to register as a consumer of an asset owned by another user, you can view the status of the request here.
Note:
Notes:
CentraSite Business UI has extensive support for consumer-provider tracking that allows you to monitor the number of consumers for an asset.
The number of users who consume an asset is displayed in brackets with icons (representing the Consumers) in the description area of the Basic Information profile in the asset details page, for example, "(5) Consumers". If no consumers are registered for the asset, this is displayed as "(0) Consumers".
Clicking on this consumer count displays the consumers' information.
You can use the Runtime Metrics and Runtime Events profiles to display run-time information for any virtualized asset (that is, a Virtual Service, Virtual REST Service or Virtual XML Service).
Virtualized assets contain these profiles by default.
You can view the runtime information of an asset if you have View permission on the Runtime Metrics and Runtime Events profiles of the asset.
The following sections describe how to view the runtime information of an asset.
You view the following types of Key Performance Indicator (KPI) metrics that webMethods Mediator creates in the Runtime Metrics profile of each virtualized service.
Note:
Ensure that Mediator is configured to collect and report runtime
metrics to CentraSite, as described in Configuring Communication
with CentraSite.
| Metric | Description |
|---|---|
| Availability | The percentage of time that a service was available during the current interval. A value of 100 indicates that the virtualized service was always available. If invocations fail due to policy violations, this parameter could still be as high as 100. |
| Success Count | The number of successful service invocations in the current interval. |
| Total Request Count | The total number of requests (successful and unsuccessful) in the current interval. |
| Fault Count | The number of failed invocations in the current interval. |
| Average Response Time | The average amount of time it took the service to complete all invocations in the current interval. This is measured from the moment Mediator receives the request until the moment it returns the response to the caller. |
| Minimum Response Time | The minimum amount of time it took the service to complete an invocation in the current interval. |
| Maximum Response Time | The maximum amount of time it took the service to complete an invocation in the current interval. |
Notes:
pg.PgMetricsFormatter.includeFaults parameter to true.
For details, see Advanced Settings in the document
Administering webMethods Mediator.
Use the following procedure to display runtime metrics for a virtualized asset.
When you view the runtime metrics, be aware that:
To view the runtime metrics of a virtualized service, it is necessary that the virtual type's definition includes the Runtime Metrics profile.
If you do not see the Runtime Metrics profile of a virtualized service, it is probably because you do not have “View” permission for the profile.
![]() To display runtime metrics for an asset
To display runtime metrics for an asset
In CentraSite Business UI, display the details page for the asset whose runtime metrics you want to view. If you need procedures for this step, see the section Viewing Details for an Asset.
Open the Runtime Metrics profile.
Expand the Filters node.
Use the following fields to filter the metrics list you want to view:
| In this field... | Specify... |
|---|---|
| Target |
A target of the asset, or select All to view the metrics of all targets to which the virtual service is deployed. CentraSite displays None by default. |
| Date Range |
A range of dates from which to view the metrics (e.g., Last 1 hour, Last 12 hours, Last 1 day, Last 5 days, Last 10 days, Last 20 days, Custom, etc.). CentraSite displays Last 10 days by default. |
| Start Date/End Date |
If chosen Custom in the previous field, then the time period for which to view the metrics. Start Date: Click the calendar and select a starting date and time. End Date: Click the calendar and select a ending date and time. |
| Display Interval |
A running count metrics of the service displayed at regular time intervals. The interval is specified in the format 3m 2d 6h; wherein m indicates the month, d indicates the day and h indicates the hour. |
Click .
CentraSite displays a graphical view of the metrics for all performance categories as shown below:
The chart shows the Minimum Response Time, Maximum Response Time and Average Response Time of the virtualized service.
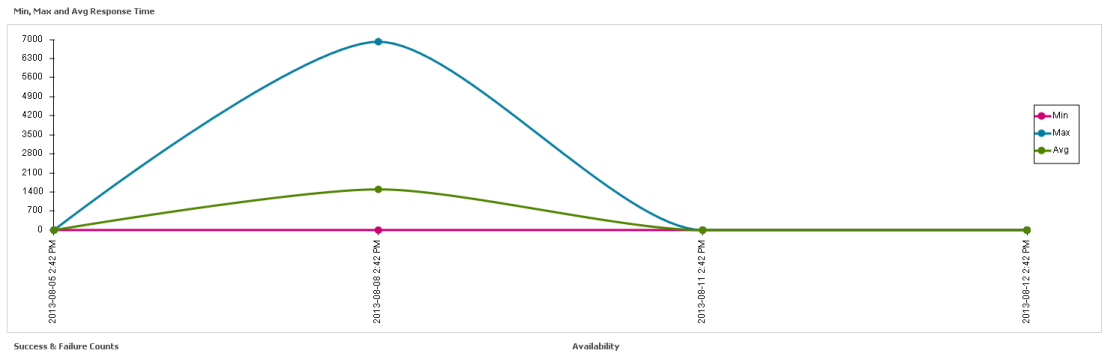
The chart shows the Success Request Counts, Total Request Counts and Fault Counts of the virtualized service.
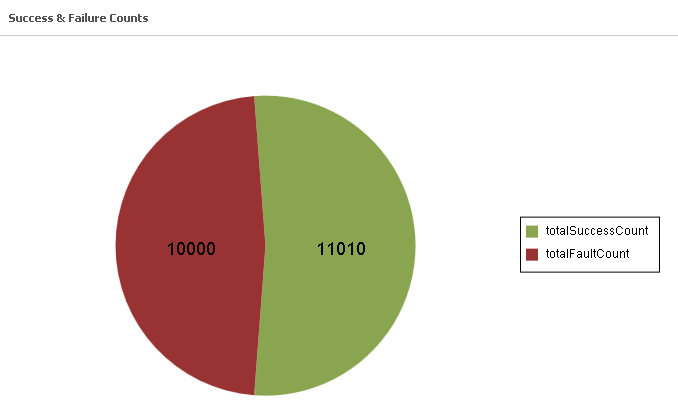
The chart shows the availability of the virtualized service.
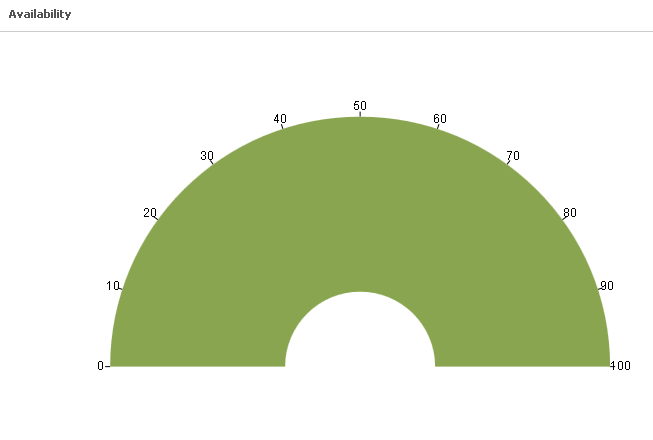
CentraSite can receive the following predefined runtime event types.
Notes:
| Event Type | Description |
|---|---|
| Lifecycle | A Lifecycle event occurs each time Mediator is started or shut down. |
| Error | An Error event occurs each time an invocation of a virtualized service results in an error. |
| Policy Violation | A Policy Violation event occurs each time an invocation of a virtualized service violates a run-time policy that was set for the virtualized service. |
| Transaction | A Transaction event occurs each time a virtualized service is invoked (successfully or unsuccessfully). |
| Monitoring | Mediator publishes key performance indicator (KPI) metrics, such as the average response time, fault count, and availability of all virtualized services (described below). |
Notes:
Use the following procedure to display runtime events for a virtualized asset.
When you view the runtime events, be aware that:
To view the runtime events of a virtualized service, it is necessary that the virtual type's definition includes the Runtime Events profile.
If you do not see the Runtime Events profile of a virtualized service, it is probably because you do not have “View” permission for the profile.
![]() To display event information for an asset
To display event information for an asset
In CentraSite Business UI, display the details page for the asset whose runtime events you want to view. If you need procedures for this step, see the section Viewing Details for an Asset.
Open the Runtime Events profile.
Use the following fields to filter the event list you want to view:
| In this field... | Specify... |
|---|---|
| Target |
A target of the asset, or select All to view the event information of all targets to which the virtualized service is deployed. CentraSite displays None by default. |
| Consumer |
A consumer of the asset, or select All to view the runtime event information of all consumers of the asset. CentraSite displays All by default. However, if you do not have at least one consumer registered in the registry, CentraSite displays None by default. |
| Event Type |
A particular event type, or select All to view all event types. For a list of the supported event types, see the above section The Runtime Events. CentraSite displays All by default. |
| Date Range |
A range of dates from which to view the events (e.g., Last 1 hour, Last 12 hours, Last 1 day, Last 5 days, Last 10 days, Last 20 days, Last 1 month, Custom, etc.). CentraSite displays Last 1 month by default. |
| Start Date/End Date |
If chosen Custom in the previous field, then the time period for which to view the metrics. Start Date: Click the calendar and select a starting date and time. End Date: Click the calendar and select a ending date and time. |
| Display Interval |
A running count events of the service displayed at regular time intervals. The interval is specified in the format 3m 2d 6h; wherein m indicates the month, d indicates the day and h indicates the hour. |
Click the button.
Expand the Graphical node to display a graphical view of the event information as shown below:
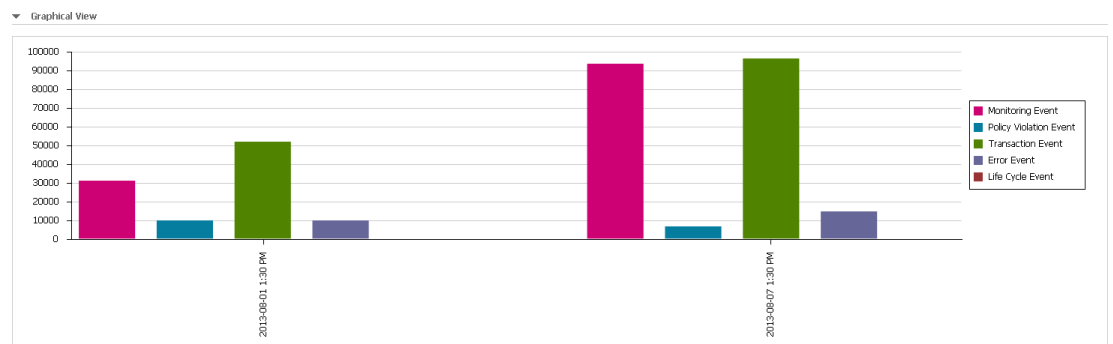
Expand the Tabular node.
CentraSite displays a tabular view of the event information in the left pane as shown below:
| Field | Description |
|---|---|
| Date/Time | The date/time that the event occurred. Click this hyperlinked value to view the Event Detail page, which will contain the event's SOAP request or response name in the Attribute column. Click the hyperlinked request or response name to display the full SOAP request or response. |
| Event Type | (Read-only.) The type of event (e.g., Monitoring, Policy Violation, Error, etc.). |
| Target | (Read only.) The target on which the event occurred. |
To access the details of an event, click on the link for the event.
The Event Details dialog in the right pane shows a detailed information about the event that you select in the left pane.
This section describes how to delete an asset permanently from the registry.
The content is organized under the following topics:
Deleting an asset permanently removes the asset from the CentraSite registry.
When you delete an asset, CentraSite removes the registry entry for the asset (that is, it removes the instance of the asset from CentraSite's object database). Also note that:
You cannot delete the predefined assets (not even if you have the default permissions associated with the CentraSite Administrator role).
If you are not the owner of the asset, you cannot delete the asset unless you have "Manage Assets" permission (granted though a role-based permission) or at least Full permission on the asset (granted through an instance-level permission).
You cannot delete an asset that is in pending state (e.g., awaiting approval) or has a consumer registration request pending for it.
You cannot delete an asset that has one or more associated objects. For example, if an asset "Web Service" relates to another asset "XML Schema", an internal association "Related To" exists between the assets. CentraSite does not let you delete an asset with incoming associations. Therefore, to delete an asset you must first delete all of its associated objects.
When you delete an XML Schema that refers to other XML Schemas, the referenced XML Schemas are also deleted automatically, provided that you have permission to delete them. If you do not have permission to delete a referenced XML Schema, the referenced XML Schema will not be deleted and a warning message will be issued.
You cannot delete an asset if any user in your CentraSite registry is currently modifying the asset.
Deleting an asset will not remove:
Other assets to which the asset refers (unless the reference is to an asset that is a nonshared component of the asset you are deleting). For example, if the asset that you are deleting is a Service asset with a "Consumes" or "Consumed By" relationship with other services in the registry, the related services will not be deleted.
Supporting documents that are attached to the asset.
You can delete a single asset or a selected set of assets. The descriptions in this section give you details on how to do this.
To delete any given asset, you must belong to a role that has the "Manage Assets" permission for the organization in which the asset resides.
The following sections describe how to delete assets.
Use the following procedure to delete a single asset.
![]() To delete an asset
To delete an asset
In CentraSite Business UI, display the details page for the asset that you want to delete. If you need procedures for this step, see the section Viewing Details for an Asset.
On the asset's actions menu, click the
(![]() ) icon.
) icon.
When you are prompted to confirm the delete operation, click .
The asset is permanently removed from the CentraSite registry.
You can delete multiple assets in a single step. The rules described above for deleting a single asset apply also when deleting multiple assets.
Important:
If you have selected several assets where one or more of them
are predefined assets, you can use the Delete icon to
delete the assets. However, as you are not allowed to delete predefined assets,
only assets you have permission for will be deleted. The same applies to any
other assets for which you do not have the required permission.
Use the following procedure to delete a set of assets.
![]() To delete multiple assets in a single operation
To delete multiple assets in a single operation
In CentraSite Business UI, use either the Browse or the Search feature to select a set of assets you want to delete. If you need information on how to browse or search the CentraSite registry, refer to the section Browsing the CentraSite Catalog or Searching the CentraSite Catalog.
Mark the checkbox next to the name of each asset you want to delete
In the actions menu, click the
(![]() )
icon.
)
icon.
Note:
If one or more or the selected assets is in pending state (e.g.,
awaiting approval) or has a consumer registration request pending for it, an
error message will appear and no assets will be deleted.
This section describes how to download the source files of an asset from the CentraSite registry to the file system.
The content is organized under the following topics:
CentraSite Business UI offers two methods of retrieving the source files of CentraSite assets, namely exporting and downloading. The source file is the file that was imported into CentraSite in order to create the registry entry for the asset. For example, the source file for a web service asset is the service's WSDL file. The source file for an XML schema asset is its schema file. The difference between exporting and downloading is as follows:
The export feature creates a zip file containing one or more assets from the repository, as well as all associated registry objects. The export feature is described in the document Exporting Assets.
The download feature creates a zip file containing just the source file of a single asset from the repository, without any of the associated registry objects. If the source file refers to other source files in the repository (for example, a WSDL file can reference XML schema files), the referenced files will also be included in the zip file. If the asset refers to files in the Supporting Document Library, these can optionally be included in the zip file.
If an asset was not created by an importer, but was instead created from scratch without using a source file, the download feature can still be activated. In this case, however, the downloaded zip file does not contain an asset source file but instead only contains files from the Supporting Document Library that are attached to the asset.
If you use the download feature to create a zip file, it contains only the files that you have permission to view.
You can download a single asset and its associated files, or a selected set of assets and their associated files. The descriptions in this section give you details on how to do this.
The asset that you want to download must belong to an asset type for which there is an importer. The importer can be either one of the predefined importers or a user-defined importer. For a list of the available importers, see the CentraSite online documentation topic Adding an Asset to the Catalog Using an Importer in the section Creating a New Asset into the Catalog in the document Using the Asset Catalog.
To download any given asset, you must belong to a role that has the "Manage Assets" permission for the organization in which the asset resides.
The following sections describe how to download assets.
Use the following procedure to download a single asset and its associated files.
![]() To download an asset and its associated files
To download an asset and its associated files
In CentraSite Business UI, display the details page for the asset you want to download. If you need procedures for this step, see the section Viewing Details for an Asset.
On the asset's actions menu, click the (![]() ) icon.
) icon.
In the Download Documents dialog, check the box Include all Supporting Documents if you want to include attached documents from the Supporting Document Library.
Click . This starts the creation of the zip file.
Note:
The default location to which the zip file is downloaded is
My Documents\Downloads.
You can download a set of assets, as described in this section. The rules described above for downloading a single asset apply also when downloading multiple assets.
Use the following procedure to download a set of assets.
![]() To download a set of assets and their associated files
To download a set of assets and their associated files
In CentraSite Business UI, use either the Browse or the Search feature to select a set of assets that you want to download. If you need information on how to browse or search the CentraSite registry, refer to the section Browsing the CentraSite Catalog or Searching the CentraSite Catalog.
Mark the checkbox of each asset you want to download.
In the actions menu, click the (![]() ) icon.
) icon.
In the dialog, specify the attributes, in the same way as described previously for downloading an individual asset.
Click . This starts the creation of the zip file.
The zip file is organized as a directory that holds a collection of downloaded files. If any of the names of the downloaded files are not unique; then such files are stored with consecutive numbers (for example: SchemaA_1.xsd, SchemaA.xsd_2, etc.).
If a downloaded file refers to one or more other downloaded files, for example if a WSDL file refers to a schema, the reference within the file is adjusted so that it points relatively to the file in the zip file.
Example: The WSDL file Service.wsdl refers to SchemaA.xsd, to another SchemaA.xsd with a different namespace, and to SchemaB.xsd. The resulting .zip file expands into a folder with the following files:
Service.wsdl
SchemaA_1.xsd
SchemaA_2.xsd
SchemaB.xsd
You can download a document from the Supporting Document Library or from an asset, as usual text file. To do this, proceed as follows:
![]() To download an attached document from the Supporting Document
Library
To download an attached document from the Supporting Document
Library
Open the details page of the asset to which the supporting document is attached.
Access the Advanced Information -> Specification or the Advanced Information -> Technical Details profile, as appropriate for the asset type.
This shows the files that are attached to the asset.
Locate the supporting document that you want to download. Click the button for this entry.
Specify the location in the file system where you want to store the supporting document, and then click .
![]() To download a WSDL document from a Service or an XSD document from a
Schema
To download a WSDL document from a Service or an XSD document from a
Schema
Open the details page of the asset to which the document is attached.
Access the Advanced Information -> Technical Details profile of the asset.
Click on the WSDL/URL hyperlink.
Click the button.
Specify the location in the file system where you want to store the supporting document, and then click .
If the WSDL or schema file includes a reference to another file (usually a relative address) in the repository, then this reference will be changed to an absolute repository address.
![]() To download schemas from REST services or XML services
To download schemas from REST services or XML services
Open the details page of the asset to which the document is attached.
Access the Advanced Information -> Technical Details profile of the asset.
Click the button adjacent to the attribute Schema Name.
This section describes how to export and import assets from one CentraSite registry to another.
The content is organized under the following topics:
You can use the export and import features to export an asset from one instance of CentraSite and import it into another.
The following sections provide specific information about exporting and importing assets. Before you use the import and export features with asset instances, review the general information provided in CentraSite online documentation section Exporting and Importing Objects Using CentraSite Control in the document Importing/Exporting Registry Objects.
To export any given asset, you must belong to a role that has the "Manage Assets" permission for the organization in which the asset resides.
When exporting an asset, keep the following points in mind:
The export process does not export the asset's instance-level permissions. When an administrator imports the asset on the target instance, the import process assigns instance-level permissions as described in Importing Assets.
The export process will export the values assigned to the attributes in the asset.
The following sections describe how to export assets.
Use the following procedure to export a single asset.
![]() To export an asset
To export an asset
In CentraSite Business UI, display the asset that you want to export. If you need procedures for this step, see Viewing Details for an Asset.
On the asset details page, click the
(![]() ) icon. The Export dialog shows
the selected asset.
) icon. The Export dialog shows
the selected asset.
Expand the Advanced Settings to display a list of the additional export options.
Specify the options as described in the section Exporting Objects Using CentraSite Business UI of the document Exporting and Importing Registry Objects.
After you have selected the export options, click . The Export Preview page is displayed.
The Export Preview page displays the list of selected objects and its dependent objects.
The checkbox beside each object indicates whether or not the object should be included in the export set. By default, all displayed objects are included in the export set.
If you wish to remove an object from the export set, unmark its checkbox. This removes the object and all of its dependent objects (if any) from the export set.
Click to start the export operation.
If none of the object is selected for export, the button is disabled.
Note:
If at any time you wish to abandon all your changes and return
to your previous screen, just click the
button.
An Export Progress popup will display the export progress bar.
Click if you wish to download the export archive file. This starts the creation of the archive file.
Note that the button will be disabled until the entire export operation is completed.
The default location to which the archive file is downloaded is My Documents\Downloads.
Note:
If at any time you wish to abandon the export operation and
return to your previous screen, just click the
button.
You can export multiple assets in a single step. The rules described above for exporting a single asset apply also when exporting multiple assets.
Use the following procedure to export of a set of assets.
![]() To export a set of assets
To export a set of assets
In CentraSite Business UI, use either the Browse or the Search feature to select a set of assets that you want to export. If you need information on how to browse or search the CentraSite registry, refer to the section Browsing the CentraSite Catalog or Searching the CentraSite Catalog.
Mark the checkbox of each asset you want to export.
In the actions menu, click the
(![]() ) icon. The
Export dialog shows the selected set of assets.
) icon. The
Export dialog shows the selected set of assets.
In the Export dialog, specify the export options, in the same way as described previously for exporting an individual asset.
You import an asset by importing the archive file to which it was previously exported. You can import an asset into the same CentraSite registry from which it was originally exported or to a different CentraSite registry.
The import dialog displays the contents of the archive to be imported, and you can select either the entire archive or just a subset of the assets to import.
Note:
If the archive contains an asset with references which cannot be
satisfied during import, the import process will continue but this asset is not
imported.
For more information about the import process, see the CentraSite online documentation section Importing Objects from an Archive Using CentraSite Control in the document Importing/Exporting Registry Objects.