Note: | Instead of using a ContentProvider, you can programmatically populate the ListView. For more information, see Programmatically Populating a
ListView. |
Tip: | If your ListViews requires displaying more than one Template instance, it is recommend to use the ContentAdapter. |
Property | Description |
List Data Source | Required. Specifies the data source. |
No Rows Template | Optional. A template that is to be shown when the data source of the ContentProvider contains no elements. |
Reload On Transition To | Select this if the ContentProvider is to be reloaded each time this view is accessed. |
Row Template | Required. A template used to show the contents of the ListView. |
Property | Description |
Control | Required. Select a control that is contained in the RowTemplate of the ContentProvider. |
Data Source | Select the data source to populate the data for this control. |
Expression | Enter an expression value to identify the data. |
Property | Description |
Max Number Per Page | The maximum number of cells displayed per page. |
Next Page Template | A triggerable object (such as a Button) which needs to be triggered in order to load the next page. |
Previous Page Template | A triggerable object (such as a Button) which needs to be triggered in order to load the previous page. |

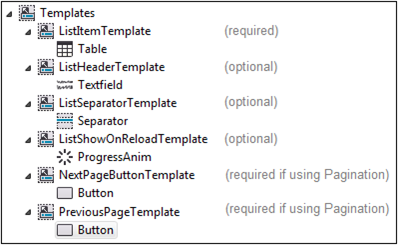
Template for... | Description |
List item | Required. You must create a template that defines how to display a single item from the data source. Typically, you create a template for a Table or TableButton object. You reference this template in the ContentProvider object’s Template property. |
List header | Optional. You can create a template to provide a header for the ListView. For example, you might create a template for an object like a Textfield or an Image. If you want to provide a header for the ListView, specify the template in the ListView object’s List View Header property. |
List separator | Optional. You can create a template for an object that you want to display between each list item in the ListView. For example, you might create a template for an object like a Separator, Spacer, or Image object. If you want to provide a separator for the list of data, specify the template in the ListView object’s Separator property. |
Control to show when reloading data | Optional. You can create a template for an object that the application will display when the application is accessing the data source to refresh the data. For example, you might create a template for an object like a ProgressAnim, Image, or Textfield object. If you want the application to display an object when refreshing the data, specify the template in the ListView object’s Show On Reload property. |
Control to display the next page of results | Conditionally required. Create a template for an object, for example, a Button object, that a user selects at run time to display the next page of results. This template is required if you are using the Pagination object. You specify this template in the Pagination object’s Next Page Template property. |
Control to display the previous page of results | Conditionally required. Create a template for an object, for example, a Button object, that a user selects at run time to display the previous page of results. This template is required if you are using the Pagination object. You specify this template in the Pagination object’s Previous Page Template property. |