Installing the Android SDK on Windows
If you use a Windows personal computer, use this procedure to install the SDK so that you can use it with Mobile Designer.
Note: | Before starting, ensure that a standalone JDK is installed on the target machine. |
To install the Android SDK on Windows
2. On the Android website, locate the system requirements and review them to ensure that your Windows environment meets the requirements for the Android Studio IDE.
3. Download the installer.
Note: | For best performance on Windows, the Android Studio should have access to a 64-bit JVM and JDK. |
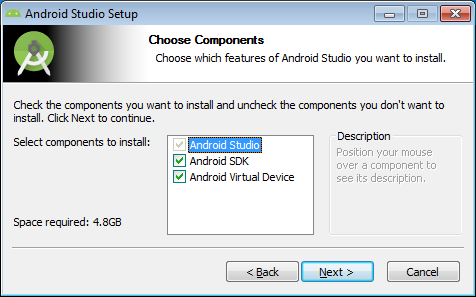
4. Run the Android Studio installer for Windows. Ensure that the Android SDK and the Android Virtual Device options are selected.
5. When prompted for the install location, the default location of C:\Program Files\Android\Android Studio may be used, or another location may be set if required. Make a note of this location.
6. When prompted for the SDK Location, the default location inside C:\Users\<your username>\ may be used, or another location may be set if required. Make a note of this location.
7. Review the license agreement and start the installation.
8. When the installation completes, start Android Studio (there will be an option to do this from the installer).