The following topics are covered below.
When you specify a query in the XQuery window, you must always provide server, database, collection and the query itself.
Only queries that reference XML doctypes are possible. For queries on non-XML doctypes, use X-Query. See Performing X-Queries with the Tamino X-Plorer.
![]() To specify an XQuery
To specify an XQuery
In the Server text box, specify the name of the server on which you want to execute your query.
You can use the selection icon ( ) to open a dialog that lets you navigate to the
required server and database. You can also use the option from the main menu to navigate to the
required server and database.
) to open a dialog that lets you navigate to the
required server and database. You can also use the option from the main menu to navigate to the
required server and database.
In the Database text box, specify the name of a database of the above server in which you want to execute your query.
In the Collection text box, specify the name of a collection in the above database in which you want to execute your query.
In the query editor below the above text boxes, specify the query. See XQuery 4 User Guide and XQuery 4 Reference Guide in the Tamino XML Server documentation for detailed information.
You can specify the sorting sequence in your query, for example, with
the sort by clause (the sorting sequence specified in the Tamino
X-Plorer (instance descriptor) is not applied).
You can now execute the query as described below. See Executing an XQuery.
It is also possible to retrieve information about query execution, without executing the query. See Explaining an XQuery.
When you create a new query, any information in the query area is deleted.
Note:
The result of the previous query is not overwritten until you issue
the or command for the new query.
![]() To create a new XQuery
To create a new XQuery
From the menu, choose .
Or:
Press CTRL+N.
Or:
Choose the following toolbar button:
![]()
A dialog box appears asking whether you want to save the currently displayed query.
Choose either the or button.
When you choose the button and the current query has not yet been saved in a file, the Save As dialog box appears. See Saving an XQuery below.
The query area is now empty.
Specify a query and choose the or command
You can use pre-defined XQuery templates and the auto-complete feature to complete your XQuery statements, without much typing effort. Type in the first one or two letters of the word that you want to insert and press CTRL+SPACE. Also notice that the query statement aligns itself automatically.
When you have specified a query, you can use the command (which corresponds to ino:explain) to
retrieve information about query execution for analysis and optimization. For
detailed information on ino:explain, see the
X-Query Reference Guide in the Tamino XML Server
documentation.
The command works in the same way as the command. The only difference is that the query is not executed, it is just analyzed.
When the query is sent to the Tamino server, two additional lines,
{?explain?} and {?explain preprocessor?}, are
inserted at the top of the query. Therefore, all line numbers in the
explanation text of the query (in the Result
pane and Response pane) are greater by two
than in the query editor.
When you request the explanation of a query for a database which has not yet been connected, the Connect dialog box appears and you have to specify all required logon information. See Connecting to a Tamino Database.
![]() To explain an XQuery
To explain an XQuery
From the menu, choose .
Or:
Or press CTRL+E.
Or:
Choose the following toolbar button:
![]()
The explanation is now shown on the Result pane and on the Response pane.
When you have specified a query and want to display the result, you have to execute the query.
When you execute a query for a database which has not yet been connected, the Connect dialog box appears and you have to specify all required logon information. See Connecting to a Tamino Database.
Each new query that is executed overwrites the previous result pack. If you want to save your result pack, see Saving the Current Result Pack.
Note:
Before you execute a query, it is recommended that you retrieve
information about query execution using the command. See Explaining an
XQuery.
![]() To execute an XQuery
To execute an XQuery
From the menu, choose .
Or:
Or press CTRL+Q.
Or:
Choose the following toolbar button:
![]()
The result is now shown on the Result pane.
XQuery execution is based on a transaction. Therefore, the access to a query result is only possible during the transaction. See the description for maximum transaction duration in the in the Tamino XML Server documentation (to be found under Create a Database in the Tamino Manager section). Hints:
Execute the query once again if the transaction has timed out.
Increase the number of instances per pack to get a bigger portion of the query result set.
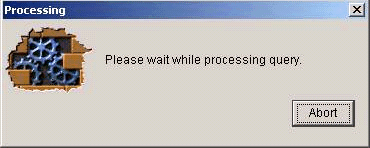
If you execute a query that takes a considerable amount of time, a processing dialog box is displayed, which lets you cancel the query. You just need to choose the button and the query is cancelled.
In addition to using the Explain Query and Execute Query features as described above, you can select a section of XQuery code from the display and activate the Explain or Execute feature for this selected code section.
![]() To execute or explain a section of code from the text input field
To execute or explain a section of code from the text input field
Ensure that the text input field contains valid XQuery code.
Select the required section of the displayed XQuery code in the text input field, by moving the cursor to the required first character, then dragging the cursor to the required last character.
From the menu, select either
![]() to execute the selected query code, or
to execute the selected query code, or
![]() to examine the selected query
code.
to examine the selected query
code.
The results are then displayed in the Result window.
You can save a query in a file in your file system.
As long as a query has not yet been saved, the name "NewXQuery" is shown in the title bar of the XQuery window. When you save this query for the first time, the Save As dialog box appears in which you have to specify the name of the file in which the query is to be saved in your file system.
![]() To save an XQuery under a new name
To save an XQuery under a new name
From the menu, choose .
The Save As dialog box appears. File name and extension (.xquery) are automatically provided.
Optionally: specify another file name. Do not change the extension.
Select the path in which you want to save the file.
Choose the button.
![]() To save a named XQuery
To save a named XQuery
From the menu, choose .
Or:
Or press CTRL+S.
Or:
Choose the following toolbar button:
![]()
The existing query in your file system is updated.
You can open a query which you have previously saved in your file system.
![]() To open a saved XQuery
To open a saved XQuery
From the menu, choose .
Or:
Press CTRL+O.
Or:
Choose the following toolbar button:
![]()
A dialog box appears asking whether you want to save the currently displayed query.
Choose either the or button.
When you choose the button and the current query has not yet been saved in a file, the Save As dialog box appears. See Saving an XQuery above.
The Open dialog box appears.
Select the file containing the desired query.
Choose the button.
The previously saved query is now shown in the application window.
You can insert the contents of a text file at the insertion point. This is helpful, for example, if you have received an XQuery expression from another user.
Note:
Do not use this feature to insert a saved XQuery with the extension
"xquery". Use the
command instead (see Opening a Saved
XQuery).
![]() To insert an XQuery from a file
To insert an XQuery from a file
In the query area, move the insertion point to the position at which you want to insert the contents of the file.
From the menu, choose .
A dialog box appears.
Select the desired file.
Choose the button.
The content of the selected file is now inserted at the insertion point.
You can save XQuery code as a module in a database and retrieve it at a later time.
If you wish to work with modules, you must activate the module management mode. If this mode is not active, the menu entries and buttons for saving and retrieving modules are greyed out.
![]() To activate module management mode
To activate module management mode
Choose from the main menu, then select the Module tab in the dialog, then mark the checkbox for Module management mode
Or:
Choose the corresponding entry under the
menu
Or:
Choose the appropriate button from the toolbar.
![]() To save a module to the database
To save a module to the database
Choose
Or:
Choose the appropriate button from the toolbar.
![]() To retrieve a module from the database
To retrieve a module from the database
Choose
Or:
Choose the appropriate button from the toolbar.
When you save a module, it is stored in the doctype ino:module in the collection ino:source of your database.
The Tamino XQuery tool cannot be used to delete XQuery modules in a database. If you wish to delete an XQuery module in a database, use the Tamino X-Plorer instead.
If you wish to deactivate module management mode and return to query mode, proceed as follows:
![]() To deactivate module management mode
To deactivate module management mode
Choose again the appropriate menu entry under or , so that the tick mark beside the menu entry is no longer displayed.
Or:
Choose the appropriate button from the toolbar. This toggles the
current setting from "module management mode" back
to "query mode".
In order to cut, copy or delete text, you have to select it. To do so, use the standard techniques for the platform on which you are currently working.
You can also select all text at once (see below). In this case, the selection depends on the area which has previously been selected in the query window.
You can select text in the following areas:
in the query area (including the text boxes for server, database, and collection),
in the result contents of the Result pane (plain view only).
![]() To select all text
To select all text
Select the required area in the query window.
From the menu, choose .
Or:
Press CTRL+A.
You can cut, copy and paste any text in the query area. You can also copy from the result contents of the Result pane (plain view only), or from the query contents at the bottom of the History pane.
This feature uses the Windows clipboard which may also contain information from another application. Thus, it is also possible to copy an entire query from or to another source.
![]() To cut the selection and transfer it to the clipboard
To cut the selection and transfer it to the clipboard
From the menu, choose .
Or:
Press CTRL+X.
Or:
Choose the following toolbar button:
![]()
The selection is deleted at its original position and is copied to the clipboard.
![]() To copy the selection to the clipboard
To copy the selection to the clipboard
From the menu, choose .
Or:
Press CTRL+C.
Or:
Choose the following toolbar button:
![]()
The selection remains at its original position and is copied to the clipboard.
![]() To paste the content of the clipboard
To paste the content of the clipboard
Place the insertion point at the position at which you want to paste the cut or copied information.
From the menu, choose .
Or:
Press CTRL+V.
Or:
Choose the following toolbar button:
![]()
The previously cut or copied text is inserted at the insertion point.
You can find the occurrences of a text in the plain views of XQuery result and response panes.
![]() To find occurrences of text
To find occurrences of text
Activate the plain view of the result or response pane.
Choose the Find icon in the toolbar.
Or:
Choose from the
menu.
Or:
Press CTRL+F.
You can delete any text in the query area.
![]() To delete the selection
To delete the selection
From the menu, choose .
Or:
Press DEL.
The selection is deleted immediately. You are not asked to confirm the deletion.
You can undo and redo your previous changes in the query area.
![]() To undo the previous change
To undo the previous change
From the menu, choose .
Or:
Press CTRL+Z.
![]() To redo the previous undo action
To redo the previous undo action
From the menu, choose .
Or:
Press CTRL+Y.