An important part of database administration is to make regular backups of your database. Database Backup and Restore functions are available from the Tamino Manager. The Backup function makes a copy of the database. The Restore function restores the database to the state it was in when you made the backup. Restore is generally executed together with a Recover process, in which all changes that were made to the database after the backup are re-applied. For this process, log files (log spaces) are used as input files. In this way, all data up to the most recently completed transaction can be restored.
The Backup function is used to make a backup copy of a database. You can make either Tamino (internal) backups to disk or tape, or back up the database to an external backup system.
| Warning: If more than one backup is written to a tape, the existing backup will be overwritten. The savepoint of each backup will be offered in the Restore menu, but only the latest backup will be available. No warning will be issued. You should, therefore, not put more than one backup on one tape. |
You can make incremental backups of a database. The first incremental backup after a full backup stores the database changes that were made since the full backup. If there are several incremental backups since the most recent full backup, each incremental backup after the first one stores the changes since the preceding incremental backup. Since in general an incremental backup is much smaller than a full backup, the time required to make an incremental backup can be considerably less than the time required to make a full backup.
Incremental backups provide a useful extension to Tamino's backup capabilities. If you decide to include incremental backups in your backup strategy, you should keep a sensible balance between incremental backups and full backups. Regular full backups should still be the central part of your strategy, and the incremental backups can be considered as a quick and safe way of protecting against data loss in the intervals between the full backups.
The following general restrictions apply for backups:
While the Tamino Data Loader utility is running, it is not possible to do a backup.
Data that has been mapped via Server Extensions will not be backed up, unless it is mapped to the same database (that is being backed up).
For further information about backup and restore policies, please refer to the Backup Guide.
This section describes how to back up a database internally, i.e. to disk or tape.
![]() To back up a database to disk or tape
To back up a database to disk or tape
Expand the database object that you want to back up.
Ensure that the database you want to back up is started. Refer to the section Start a Database for details.
Select the object and choose from the context menu.
The dialog you now see depends on whether you have defined an external backup method.
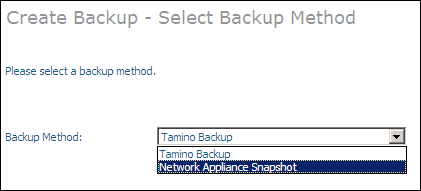
If you have defined an external backup method, the dialog Select Backup Method appears:

In the drop-down box Backup Method, choose the menu entry to perform a standard backup, or choose one of the available external methods. If you choose an external method, see the section Backing up a Database using an External Backup Environment for a description of how to proceed.
If you have not defined an external backup method, proceed to the next step directly.
The Backup page appears.

The checkbox for Incremental Backup is visible if you have activated this option for the database (see the section Considerations for Incremental Backup).
Select one or more locations where the backup will be stored. If you define more than one location, they will be used in the same order as in the list. Select an available database location and choose to add it to the list of backup locations, or choose to add all available database locations to the list of backup locations. If you add a database location to the list of backup locations by mistake, you can remove it from the list by selecting it and choosing , or choose to remove all backup locations from the list (locations that are deleted from the list are returned to the list of available locations). You can change the order of the locations in the list by selecting a location and using the and buttons.
Note:
Although not recommended, it is possible to select combined file
system/tape locations. The file system should be added first. If the file
system is full, the backup continues to the tape. However, you should avoid
specifying a file system location after a tape location because once the tape
is full, you will be prompted to enter another tape.
If you select more than one backup location (which is most effective if the locations are on physically different hard disks), they will be normally filled/written to sequentially. If the associated backup devices are relatively slow (tape drives, for example) you can speed up the backup process by performing parallel I/Os to the specified backup spaces.
Notes:
Choose to back up the database.
The backup process is started. The page Job Monitor appears, informing you of the progress of the operation. The database is backed up when you see the message like this:
Backup of database 'my-database' successfully completed.
If you now expand the Option in the upper left window, the backup is listed with time and date information.
The incremental backup feature is selectable for each database individually, i.e. you can activate it for one database and deactivate it for another. When you use the Tamino Manager to activate or deactivate the feature for a particular database, the change takes effect the next time the database server is restarted.
To specify that a database can be used for making incremental backups, do the following:
![]() To specify that a database can be used for making incremental
backups
To specify that a database can be used for making incremental
backups
In the Tamino Manager, select the node of the database.
Expand the tree of the node.
Expand the Properties node.
In the context menu of the Server node, select .
Set the value of the property incremental
backup to "yes" and choose
.
The following restrictions apply for incremental backups:
Incremental backup is not available for external backup environments (see the section Backing up a Database using an External Backup Environment for a description of external backup environments).
The parallel backup feature is not available for incremental backups.
Incremental backups are not available for read-only databases.
This section describes how to back up a database to an external environment. The external environment must first be defined, as described in the section Define an External Backup Method.
![]() To back up a database using an external backup
environment
To back up a database using an external backup
environment
Expand the database object that you want to back up.
Select the object and choose from the context menu. The Create Backup - Select Backup Method page appears.

Select a backup method from the Backup Method drop-down list box and choose .
If you select the method Tamino Backup, the Backup page appears, and you continue as described in the section To back up a database with no external backup environment defined.
If you select an external backup method (Network Appliance Filer Snapshot, Network Appliance Filer Mirror or EMC TimeFinder), then choose , the Create Backup - Select Backup Configuration page appears.
Select an appropriate configuration from the Backup Configuration drop-down list box and choose to start the backup (in the case of Network Appliance Snapshot, you have to enter a descriptive backup configuration name for the backup in a corresponding text box before you start the backup procedure).
Make sure to develop a backup strategy that gives you maximum protection for your data. If you have many update operations per day, it is recommended that you also back up the database at least daily. The number of backup generations to be retained can be defined using the backup parameter Number of Backup Generations. If you maintain for example seven backup generations, you have one backup for each day of the week. When you create the 8th backup, the first one will be deleted.
Note:
Backup generations apply to full backups only, not to incremental
backups.
![]() To define the number of backup generations:
To define the number of backup generations:
Expand the database object, expand and choose .
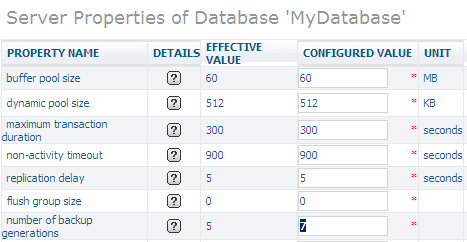
A page with information about the database appears. One of the items is Number of backup generations.
Choose from the context menu of the object.
The modifiable properties are displayed. You can change the value of Number of backup generations by overwriting the existing value with a new value and clicking on .

Refer also to the section Internal Backup and Restore in Tamino in the Backup Guide for more issues concerning backup generations.