
The first thing you need to do when working with Tamino is to create a database. To do so, you use the Tamino Manager. The Tamino Manager is a graphical user interface with which you can perform administration functions like starting, stopping, renaming, deleting, and restoring databases. When you create a database, you define a database name, a database location, and database specifics like size and properties. You can either accept the defaults or enter your own preferences according to your specific database needs. The Tamino Manager guides you through the process of database creation.
To start the Tamino Manager on Windows, use the shortcut in the Tamino program group that is available from the button.
On UNIX, use the shell script
inoadmin.sh, which is located in a directory that is
included in the search path after the Tamino installation.
When you start the Tamino Manager, you are asked for your login information. To log on to the Tamino Manager, you should use the same User ID/password combination that was specified for the Tamino administrator during installation. Your User ID can take the format domain\UserID (Windows-specific), where domain is the domain name within your local network and UserID your user identification. To check for the domain name on Windows, choose the from the menu on your desktop, available from the button. Choose System and look in the Computer Name tab. The domain is listed in the Domain field.
When you have entered the login information, you get a screen like this:
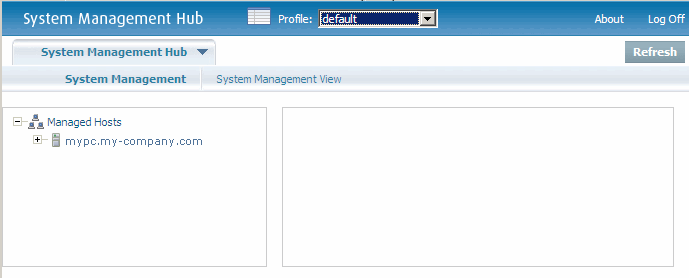
The line below Managed Hosts shows the list of known hosts and domain names. In the example, the host name is mypc and the domain name is my-company.com. Expand the + sign to the left of the host/domain name. The items can be further expanded to access the respective facilities. Now expand the + sign to the left of the Tamino field. You get a screen like this:

Now select (the background color of the field changes to blue). Possible actions for the item selected can be displayed with the context menu (normally by clicking the right mouse-button on the selected item). One of the actions is . Choose the action, and the wizard for creating a new database opens. If you have several Tamino versions installed, the first window that appears is the one for selecting the version of the new database. Choose the current version from the drop-down list, then choose the button.
In the next window, you define a database name:
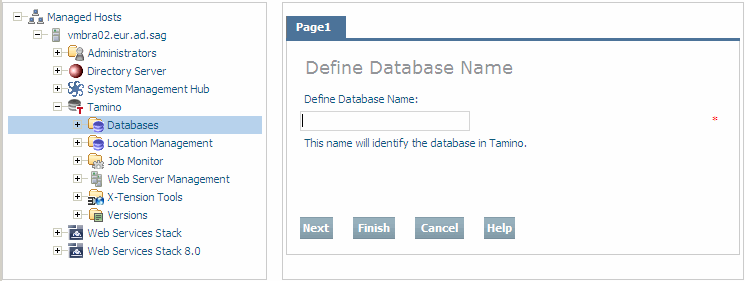
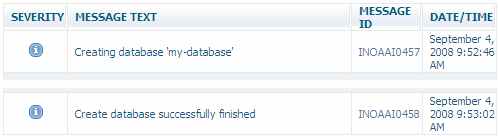
There are many parameters that you can specify for creating a database, but to make it simple, you can accept the default settings for new databases. Specify a name for the database in the field Define Database Name (in this example, we will use the database name "my-database"), then from the context menu. An information window appears to describe the progress of the database creation. If everything runs successfully, you should get several messages, including the following:
If you now expand the Databases node in the navigation pane, you will see that there is now an entry for the database that you just created.
If there is a red traffic light item next to the database name, this means that the database is currently stopped. To start the database, select the database name and then choose the button from the context menu. Again, the information box on the right describes the progress of starting the database.
That's all there is to creating a database. If you want to learn more about creating databases, refer to the documentation for the Tamino Manager.