
Once your database is up and running, the next step is to work with your XML objects. To do so, you will first need to know how to work with schemas.
A Tamino schema is an XML document that conforms to the W3C's XML Schema standard, with Tamino-specific information written in annotations to XML Schema constructs. Experienced Tamino users may well write a schema from scratch, using an editor. Because of the relative complexity of a schema, though, this method is quite error-prone. Another method to write a schema is using Tamino's Schema Editor. The Schema Editor shields you from having to type in schema language syntax, thus making schema creation much faster and less error-prone. A third method, which we will use in the following, is to convert an existing DTD into a Tamino Schema, with the help of Tamino's Schema Editor. This is the easiest method. Then, a schema is generated automatically by Tamino's Schema Editor, based on the sample DTD. The Schema Editor provides default indexing, which can be modified according to your retrieval needs.
The following example uses the example DTD patient.dtd that is supplied with the Tamino product documentation. The examples are located in several subdirectories of <TaminoDocRootDir>/examples, where <TaminoDocRootDir> is the starting directory of the product documentation. First, we will import the sample DTD into the Tamino Schema Editor.
 To import a DTD into the Tamino Schema
Editor:
To import a DTD into the Tamino Schema
Editor:
On Windows, choose the shortcut in the Tamino program group that is available from the button.
On UNIX, start inoschema.sh.
A blank Tamino Schema Editor appears, showing a schema
New_Schema_1 in the upper left-hand part of the window:
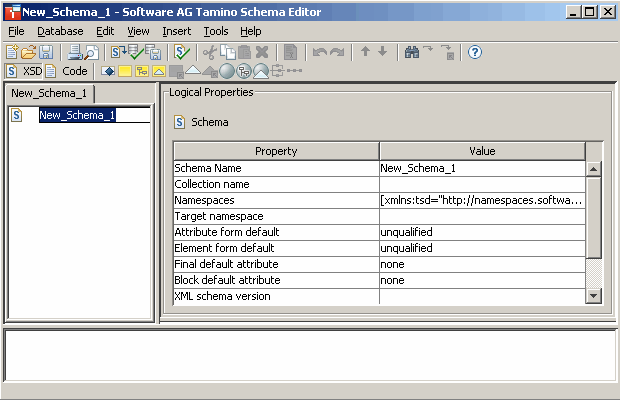
Specify a name for your schema to be generated, for
example Patientschema. To do so, either overwrite the selected
text New_Schema_1, or select New_Schema_1 in the
Value column of the Logical Properties display and type in
the new name Patientschema.
Specify a collection to which the schema is to belong, for example
Hospital. To do so, place the cursor in the empty field to the
right of Collection name and type in the new collection name
Hospital.
From the menu, choose.
In the tree view, the node NEW_doctype appears under
Patientschema:
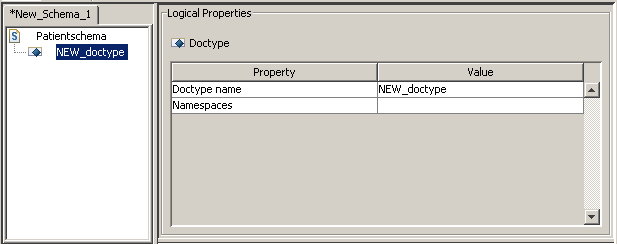
Name the doctype patient. To do so, select
NEW_doctype in the right-hand part of the window (below
Value) and enter the new name.
The right-hand part of the editor is called the property sheet. It consists of two parts, the logical properties and the physical properties. The properties are explained in the documentation about the Tamino Schema language.
Now we will import a DTD into the schema.
First, select the node Patientschema in the the view.
From the menu, choose
The dialog box Import DTD opens.
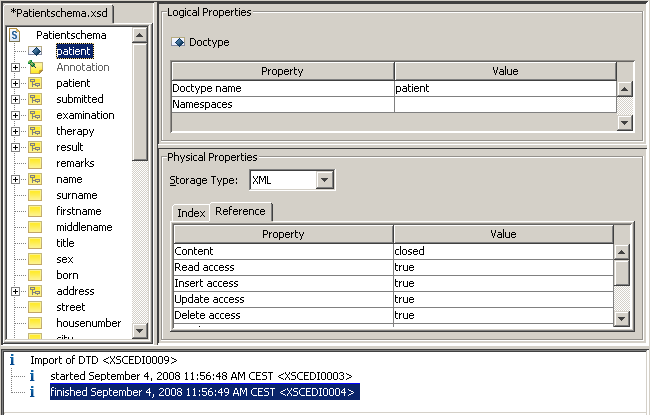
Browse to the DTD file you want to load and define a schema for. The examples are located in several subdirectories of <TaminoDocRootDir>/examples, where <TaminoDocRootDir> is the starting directory of the product documentation. In this example, browse to <TaminoDocRootDir>/examples/patient/patient.dtd. Choose the button to import the DTD.
The DTD is automatically converted to XML Schema format and loaded into the Schema Editor. On the left, the editor displays a tree view of the newly generated schema. The right part shows the logical and physical properties. In the bottom frame, certain status messages are displayed.
Tip:
If you wish, you may save the schema file locally (use
in the menu) and
inspect it with your favorite text editor. It should contain a doctype
declaration and a "skeleton" schema with logical properties (XSD
constructs), but without physical properties (TSD constructs). A sample schema
file can also be found in
<TaminoDocRootDir>/examples/patient/HospitalSchema.tsd.
The final step is to define physical properties for some of the elements.
For this example, we will define properties for the elements
surname and born. Later in this document, they will
be used for queries.
To define physical properties:
Choose the node for which you want to define properties. In this
example, choose surname in the tree view on the left-hand side of
the Schema Editor window.
On the right-hand side, the logical and physical properties for this node are displayed:
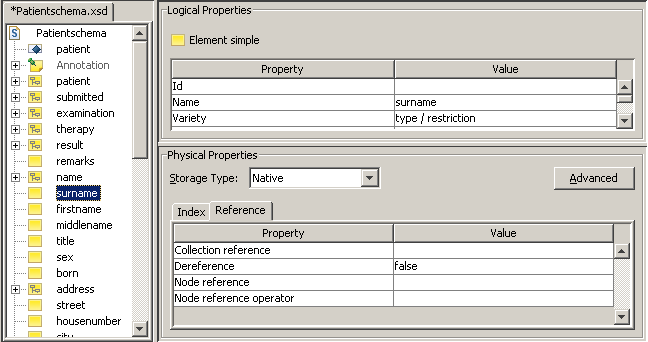
Under Physical
Properties, choose the Index tab. Choose the
icon (![]() ), to create a new index. By default, an index of type
"standard" is displayed. Open the drop-down list for
this field and choose
), to create a new index. By default, an index of type
"standard" is displayed. Open the drop-down list for
this field and choose text:
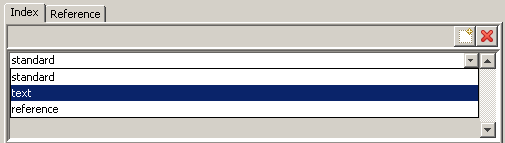
This will create a text index on the element
surname.
Next, choose the element born. Again, the
properties of this element are displayed in the right hand window of the Schema
Editor. For this element, choose the value standard for the index.
Also, change the logical property Data type to the value
xs:integer by scrolling through the list of values in the
Logical Properties window.
You now have loaded a DTD into the Tamino Schema Editor, generated a schema based on the DTD, and defined some properties for some of the elements. Later, this is important for a quick retrieval of your data. In the next step, you will learn how to define the schema as such to Tamino. But first, save the schema as an XML file:
To save a schema as XML:
Choose .
The dialog box Save As appears.
In the dialog box, browse to the directory you want the schema to be saved in, for example C:\temp on Windows or /tmp on UNIX, and enter a name for the schema. Use the file extension .tsd, for example Patientschema.tsd. Choose .
More details about the Schema Editor are available in the documentation for Tamino Schema Definition and the Tamino Schema Editor.