
Tamino server extensions can be administrated from the Tamino Manager. The administration tasks related to a server extension are performed on a running database. This means that a database must have been created and started (see Database Handling) before you can perform the following tasks:
| Warning: Tamino version 10.1 does not provide a graphical tool for Tamino management anymore. For configuration aspects discussed in the following sections, please use the command line tool inoadmin accordingly. |
To install a Tamino server extension, you need a package file of type SXP. This file must have been created using one of the following:
Tamino X-Tension Builder (deprecated)
Any number of Tamino server extensions can be installed in a given Tamino database. One Tamino server extension can be installed in several Tamino databases.
During the installation process, entries are made in the Tamino file system and the Tamino database system.
If you want to install a Java-based server extension that calls classes from one or more external JAR or ZIP files, you must modify the public or private Java classpath to include the respective JAR or ZIP files. The public classpath can be set for all Java-based server extensions of all databases on the file system, whereas the private classpath applies to a single Java-based server extension installed in a database only. For more information about administration and the calling hierarchy, see the section Dialog for Setting the Private Classpath.
Note:
Mapping, trigger and shadow functions can only be executed if you
associate them with schemas after installing the server extension package. For
a detailed description of schema definition, see the documentation of the
Tamino Schema Editor.
 To install a Tamino Server extension
Start the Tamino Manager.
Expand the Databases object under the Tamino node.
Start and expand the database into which you want to install the server extension package.
Select the Server Extensions object.
From the context menu, choose .
The Install Server Extension on Database page appears:

Enter your name in the Installation User text box.
Enter the full path name (including the file name) of the server extension package (your-file.sxp) to be installed in the Package file text field; alternatively, browse to the directory that contains the server extension package to be installed and select the package.
Choose to install the server extension.
The Job Monitor page appears, informing you about the success or failure of the installation.
After installation, the name of the server extension is included under the expanded Server Extensions object in the Tamino Manager. Select the server extension to display a summary of information, or expand it and select individual functions for more details. You can also expand individual functions to view details of the associated parameters.
If you try to install a server extension object that is already installed in the database, you will receive an error message.
If you are installing a Java server extension that needs a private classpath, a page appears, which allows you to define the private classpath. The private classpath can be set for a single server extension in a database. The value initially supplied in this field is the configured classpath, if this value exists.
You can either enter the private classpath directly in the Private Classpath field, or choose the button to enter a dialog for constructing the private classpath. This is described in the section Dialog for Setting the Private Classpath below.
Then choose .
The public classpath can be set for all Java server extensions of all
databases on the file system, whereas the private classpath relates to a single
Java server extension installed in a database only. During execution of a Java
server extension the private classpath precedes the public classpath, which
overrules the standard classpath setting of the environment variable
CLASSPATH. Using the private Java classpath, the
public Java classpath and the environment variable
CLASSPATH leads to the search path of the
mentioned hierarchy. As the X-Tension class loader is derived from the standard
class loader, classes, JAR files and ZIP files are recognized. The following
abbreviation allows you to avoid lengthy path expressions for JAR files
contained in the same directory in private or public Java classpaths: to add
all JAR files in a directory (e.g. D:\X\Y) to the private or public classpath,
you can enter either the directory name alone or the directory name followed by
*.jar into the classpath (e.g. D:\X\Y\*.jar). Other expressions with wildcard
characters are not supported. Please observe that the search hierarchy is not
defined when using the "*.jar" expression. Different
classes with the same fully qualified class name should therefore be
avoided.
Several dialogs contain an button that opens a subdialog that allows you to construct the private classpath. When you choose this button, the following dialog appears (the example assumes that the currently-defined classpath is "C:\Program Files\;C:\MyFiles"):
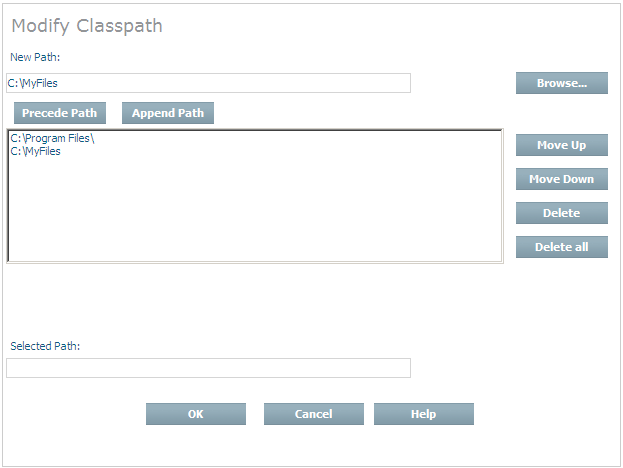
When the classpath comprises several paths, as in this example, each path is displayed on a separate line. This makes it easier to add and remove paths and to change the order of the existing paths. A path can point to a directory or to a JAR file within a directory.
The existing classpath can be extended by adding one or more paths to the beginning or end of the existing classpath definition.
To add a new path to the existing classpath definition
Enter a new path in the New Path field. You can either enter the path value directly or use the button to search for the required path;
Choose the button to add the new path to the start of the classpath, or the button to add the new path to the end of the classpath.
The order in which the paths appear in the classpath can be changed as follows:
To change the position of a path within the classpath
Select the path to be moved in the list of paths displayed;
Choose the button to move the path one position towards the start of the classpath, or choose the button to move the path one position towards the end of the classpath.
The classpath can be shortened by removing paths from the classpath.
To remove a path from the existing classpath definition
Select the path to be removed from the list of paths displayed;
Choose the button.
You can use the button to clear the classpath. If you use this button, it is not necessary to select the paths before deleting them.
The path names in the list of paths are not scrollable, so long path names are truncated in the display. When you select a path in the list of paths, it is also displayed in the Selected Path field. This field is horizontally scrollable, so if a path name is long, you can scroll in this field to see its full value.
When starting Tamino with Java X-Tension usage switched on, options can be specified to influence the behavior of the JVM. These user-specified options can be used, for example, to configure the size of the JVM or to debug Java server extensions.
The options are specified as a character string, the first character of which serves as a delimiter for the options that follow. For example, entering the string
$-Xms64m$-Xmx64m
would result in the two parameters -Xms64m and
-Xmx64m being passed to the JVM at startup.
To modify the Java options
Start the Tamino Manager.
Select the database for which you want to add Java options;
Select the Properties object, then select the X-Tension properties group;
Choose Modify. This opens the dialog for setting or modifying the X-Tension properties;
Enter a new value for the X-Tension Java options in the Configured Value column. Placing the cursor over the question-mark icon in the Details column displays a tool tip that includes a brief description of the property. If you choose the button , all of the properties are reset to their default values/settings;
Choose OK to apply the changes;
The new value(s) will take effect when the server is started or restarted.
The user options that have been specified are displayed in the job log when the Tamino server is started. If they are invalid, a warning message displaying the options is issued and the Tamino server starts with the internal default options.
| Warning: Certain JVM parameter settings may have an adverse effect on the performance of the Tamino Server and/or Java server extensions. |
Setting the Java classpath using this property may not work or may have unexpected side-effects. Please use the appropriate methods documented in the sections X-Tension Tools – Modifying the Public Java Classpath and Administrating Tamino Server Extensions – Dialog for Setting the Private Classpath to set the appropriate global or private classpath.
If you choose the button, the Modify Server Extension page appears, in which you can modify the execution mode of a Direct-based server extension as well as the external names of functions.
To modify the properties of a server extension object
Start the Tamino Manager.
Expand the Databases object.
Start and expand the database containing the server extension you want to modify;
Expand the Server Extensions object;
Select the server extension that you want to modify;
From the context menu choose ;
The Modify Server Extension page appears;
Some of the fields are read-only, others such as External Name can be modified. Make your changes as required.
For Java server extensions, the field Private Classpath is offered, which allows you to modify the value of the private classpath. See the section Dialog for Setting the Private Classpath above for details;
Choose to modify the server extension.
You can change the external name of a server extension query function in the Modify Function View.
To modify the server extension function
Start the Tamino Manager.
Expand the Databases object.
Start and expand the database which contains the server extension with the function you want to modify;
Expand the Server Extensions object;
Expand the server extension which contains the function you want to modify;
Select the server extension function you want to modify;
From the context menu, choose ;
The Modify Function page appears.
Enter the new name for the function in the External Name text box.
Choose to modify the name.
The Job Monitor page appears, informing you about the success or failure of the modification.
A server extension is upgraded when the
server extension version
information is increased (in Java this is the
sxsVersion variable), and then the server
extension is installed using the normal installation procedure.
The following rules should be taken into account when modifying an existing server extension:
All changes made to existing interfaces should be done with care, since for example applications or schemas may have dependencies on these interfaces .
Changing things such as default values should be done using the administration interface and not by creating a new version of a server extension.
Creating new interface methods or functions is the most appropriate form of modifying a server extension package.
If a server extension is installed in multiple Tamino databases of differing versions, the use of new functionality or callbacks is not allowed, because the older versions of Tamino do not understand these callbacks.
Upgrading a server extension that is shared by multiple databases means implicitly upgrading the extension for all databases. Databases that are not active at that time will be upgraded the next time they are started.
Upgrading may only take place if a server extension is not currently in use (across all databases that share this extension).
Hint: When upgrading a server extension, we strongly advise you not to change the Install.xml, class, JAR, DLL or shared library files in the server extension install directory, since the next server restart or recovery from backup may overwrite them. Instead, you should install new versions.
Uninstalling a Tamino server extension means deleting the database entries and file system entries, including any associated files.
When you start the uninstallation of a server extension, the server extension is locked for all Tamino sessions started thereafter. A server extension that is in use cannot be uninstalled, therefore the installation process waits until all sessions that are using the corresponding server extension have terminated; then the uninstallation is performed. If the sessions have not terminated within 150 seconds, the uninstallation is aborted with an error message.
A server extension containing server extension functions that are referenced by schemas should only be uninstalled after all schema references to these functions have been removed. If this server extension function is not available but there are still references in the schema, a runtime error occurs.
To uninstall a Tamino server extension
Close any applications (e.g. Microsoft Windows Explorer) that are accessing server extension files or their directories, because otherwise inconsistent data may remain;
Start the Tamino Manager.
Expand the Databases object.
Start and expand the database from which you want to uninstall a server extension;
Expand the Server Extensions object;
Select the server extension that you want to uninstall;
From the context menu, choose ;
The Uninstall Server Extension from Database page appears, showing related schemas if they exist. If you choose to uninstall a server extension with related schemas, the schemas will become invalid;
Choose to uninstall the server extension.
The Job Monitor page appears, informing you about the success or failure of the uninstallation.
To activate or deactivate server extension tracing
Start the Tamino Manager.
Start and select the database;
Select the Server Extensions object;
From the context menu, choose the button;
The Specify X-Tension Settings page appears;
To activate tracing, check the box; to deactivate tracing, remove the check mark. Choose to activate or deactivate tracing. It is deactivated by default whenever the Server is restarted, to prevent unintended tracing. Trace output is written to the collection ino:SXS-Trace and can be queried or deleted there. For detailed information, see the section Tracing Tamino Server Extensions.