This documentation covers the following topics:
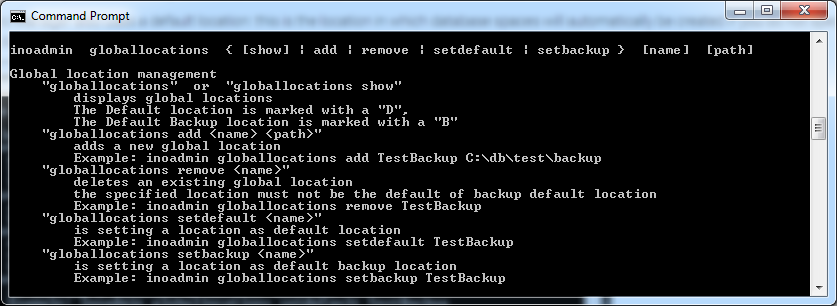
In order to specify physical storage on a node, the Tamino Manager uses the concept of database locations. Database locations define where the Tamino database spaces are stored. The Tamino Manager maps these database locations (which can also be thought of as logical names) to physical location paths.
Let us suppose that a database administrator has a directory called C:\Tamino Database Locations\Backups\mydbbackup, in which he plans to store backup copies of his database mydb. Using the Locations object, he can assign the database location name of mydbBackup to this directory. Once this has been done, he can administrate the files via the location name without having to remember where they are physically located.
The Tamino Manager also uses a default location: this is the location in which database spaces will automatically be created if you do not specify other locations when creating a new database. The initial setting uses a location as default location which is created during installation.


The setlocation command defines locations specified by their path as locations for specific purposes to be used by the specified database. Possible location usages are temporary, backup, log, archive, and reserved.

When specifying log locations, multiple selections are interpreted as follows: The locations will be used in the same order as in the list. Tamino will use the log locations alternately within a session when a log space switch occurs. When a new session is started, the first available location is used. In contrast, for other location types the second location will only be used when the first location cannot be written to,
Further commands are available to handle database space issues.


The adddbspace command adds new space of the types index, data and journal to an existing database in order to allow for database growth. The database to which the new database space is to be added can be either active (running) or inactive (stopped). The command can be used to create a new, separate, space of a specific kind to a database, as well as to expand an already existing space.
Note:
If the property autoexpand is enabled, Tamino allocates the
needed database spaces by itself.

The movedbspace command is used to move a database space (data, index, journal or journal overflow) to a new physical location. The database that contains the space to be moved must be inactive (stopped).
For Journal Overflow Space, this is the only command that is available. Journal overflow is automatically created or extended if it is necessary, and it will also be automatically removed or decreased during server shutdown.

The removedbspace command is used to delete the most recently-added index, data or journal space from a database. The database that contains the space to be deleted must be inactive (stopped).

For further information about database spaces, please refer to the page about Administration Considerations.
inoadmin provides commands for starting and stopping a database identified by name, as well as a command to ask a database for its state. Furthermore, databases can be created, deleted, and renamed.
Databases are created using . can be used to create a new, empty, database as well as to provide an exact copy (at a given status) of an existing database, for example on another machine or when performing a database restore operation.
Note:
A database can only be created from a backup on the hardware architecture/operating
system on which the backup was made.

The database name can be up to a maximum of 32 characters in length. The following characters may not be used: SPACE , ; ! \ = # . [ ] " % ' / ^ ` ? *
When you create a database using the Create Database From Backup command, Tamino creates the database in such a way that any fragmentation that might have been present in the original database is removed. The defragmentation can improve the efficiency of the database's internal indexing mechanism and also reduce the overall physical disk requirements of the database spaces.
The command starts a dabase server identified by its name.

In general, you can only start a Tamino database on the platform on which it was created; for example, you cannot start a Tamino database on Solaris if the database was created with Tamino on Windows. This is because the format of data generally differs from one operating system to another.
The command stops a dabase server identified by its name.

For stopping a database server there are three different options.
The 'normal' option (default) will wait for all open transactions to be committed and thus can take a while. The 'rollback' option is ususally faster but rolls back all open transactions. In both cases, 'normal' as well as 'rollback', the database is afterwards in a consistent state concerning transactions.
This does not hold for the 'abort' option. This option is only recommended in cases where the database doesn't react to more friendly commands. The database process ends, but a memory dump is written to the server's reserved location. Also, information concerning open transactions gets logged to enable the server to reestablish a consistent state during the next server start's autorepair phase.
The command shows the state of a dabase server identified by its name.

The command deletes a dabase identified by its name.

Deleting a database consists of deleting the data, any server extensions that are installed, and the settings associated with the database. A database can only be deleted if it is inactive (stopped).
Note:
Deleting a database does not delete any database
locations.
The command renames a dabase.

Note:
When you rename a database, the default group for security (which
is usually the same as the database name) is not renamed.
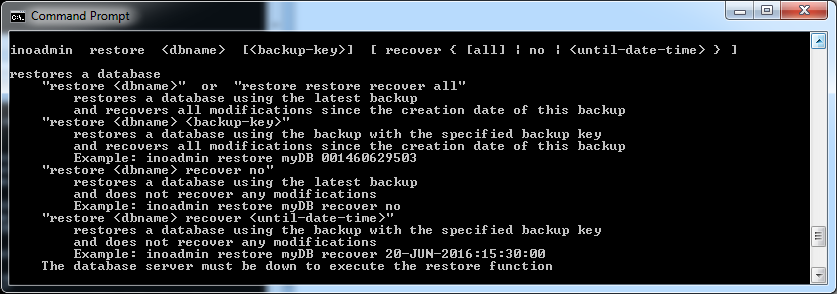
An important part of database administration is to make regular backups of your database. Database Backup and Restore functions are available from the Tamino Manager. The Backup function makes a copy of the database. The Restore function restores the database to the state it was in when you made the backup. Restore is generally executed together with a Recover process, in which all changes that were made to the database after the backup are re-applied. For this process, log files (log spaces) are used as input files. In this way, all data up to the most recently completed transaction can be restored.
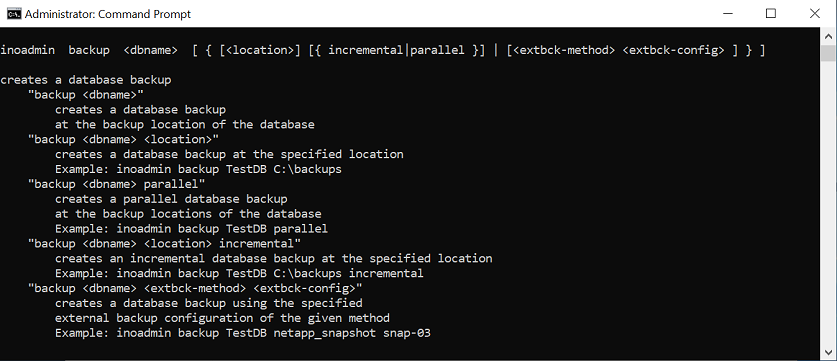
The Backup function is used to make a backup copy of a database. You can make Tamino (internal) backups to disk or tape. Backing up the database to an external backup system is also available. Please consult you product support if this is considered.
| Warning: If more than one backup is written to a tape, the existing backup will be overwritten. The savepoint of each backup will be offered in the Restore menu, but only the latest backup will be available. No warning will be issued. You should, therefore, not put more than one backup on one tape. |
You can make incremental backups of a database. The first incremental backup after a full backup stores the database changes that were made since the full backup. If there are several incremental backups since the most recent full backup, each incremental backup after the first one stores the changes since the preceding incremental backup. Since in general an incremental backup is much smaller than a full backup, the time required to make an incremental backup can be considerably less than the time required to make a full backup.
Incremental backups provide a useful extension to Tamino's backup capabilities. If you decide to include incremental backups in your backup strategy, you should keep a sensible balance between incremental backups and full backups. Regular full backups should still be the central part of your strategy, and the incremental backups can be considered as a quick and safe way of protecting against data loss in the intervals between the full backups.
The following general restrictions apply for backups:
While the Tamino Data Loader utility is running, it is not possible to do a backup.
Data that has been mapped via Server Extensions will not be backed up, unless it is mapped to the same database (that is being backed up).
Parallel backup may be used when DB spaces are spread upon more than one location in which case DB parts can be backed up simultaneously.
The tool offers commands to create backups, restore databases from backups, see which backups exist for a certain database, and delete backups.


Note:
During the Restore/Recover step the database is in
standby mode, which means that it is not possible to work with it. Hence before
and after changing large amounts of data at one point in time, it is
recommended to back up the database. Otherwise, the Restore/Recover step might
take very long, and the database is not available for that period of
time.
Note:
If you restore a database from a backup that is not the most recent
backup, all of the more recent backups are set to the INVALID state. This means
that they cannot be used for subsequent restore operations.

In addition to the automatic deletion of backups via Tamino's backup generation feature (defined by the property number of backup generations in the server properties), you can also delete single backups that are no longer required with the command. Deleting a backup removes all of the backup spaces that are associated with it, but the associated log information is not removed, since it may subsequently be required if the database has to be recovered.
For the deletion of backups the following restrictions apply when using incremental backups:
If you delete a full backup, Tamino automatically also deletes all subsequent incremental backups that are based on this full backup.
You cannot select an incremental backup for deletion.

For further information about backup and restore policies, please refer to the Backup Guide.
You can use to display information about and modify database properties. These properties are divided into 4 groups:
Server properties
XML properties
Port properties
X-Tension
The following sections provide information about the properties in each group and give instructions on how to display and modify.
Note:
The word "yes" in the column "Dynamic" in
the following tables indicates that changes to the property value become
effective immediately, even if the Tamino server is active. The word
"no" indicates a non-dynamic property, which means that the
changes only become effective if you stop and restart the database.
| Name | Dynamic | Allowed Values | Default Value | Description | Additional Information |
|---|---|---|---|---|---|
| XQuery document cache size | yes | 20 | Specifies the capacity of the document cache that is used for XQuery processing. | Document caching improves the performance of certain queries like join queries where the sorting is done via an index. Also certain XQuery update statements can benefit from a big document cache. The capacity of the XQuery document cache is specified in MB. | |
| word fragment index | no | yes, no | no | If this is set to yes, a word fragment index is maintained. |
Maintaining a word fragment index can be very time- and resource-intensive, but will increase performance for certain query types. For read-only databases (e.g. replication databases), the word fragment index parameter is displayed, but cannot be modified. |
| XML maximum sessions | no | 0 - 100000 | 100 | The maximum number of XML sessions that can be open at the same time. | A sessionless request counts as a session for the execution time. |
| XML max simultaneous requests | no | 150 - 10000 | 0 | Specifies the size of the queue of free XML request entries and therefore limits the maximum numbers of simultaneous requests that can be accepted by the Tamino Server. | The default value (0) means that the actual value of the property is computed by Tamino at startup time. The value for a database with default settings is 157 (100 + XML work threads + XML dynamic work threads + 2). |
| XML work threads | no | 1 - 1024 | 5 | The number of threads used to process XML commands. | Requests are queued if there are no XML work threads available. |
| X-Node default encoding | no | supported encoding | ISO-8859-1 | The encoding that external data sources which are accessed by Tamino use for their data. | Can be overwritten within the schema definition where the mapping is specified. |
| X-Node default password | no | Character string (max. 128 characters) | guest | The password used for ODBC connections if no other password is specified. | Can be overwritten within the schema definition where the mapping is specified. |
| X-Node default user | no | Character string (max. 128 characters) | guest | The user-ID used for ODBC connections if no other user ID is specified. | Can be overwritten within the schema definition where the mapping is specified. |
| default tokenizer | no | white space-separated, Japanese | white space-separated | Specifies the component that is used to break strings into words. | |
| default encoding | no | Encoding names (see list box)specified in the IANA registry | ISO-8859-1 | Specifies the encoding used for responses from Tamino if no explicit encoding is requested. | |
| XML document default encoding | no | UTF-8 and ISO-8859-1 | UTF-8 | Specifies the encoding that is assumed for a received document if the encoding is not specified otherwise. | |
| stemming index | no | yes, no | no | Specifies whether or not a stemming index is maintained. A stemming index speeds up text retrieval operations that use stemming functionality. | For read-only databases, the stemming index parameter is displayed, but cannot be modified. |
| markup as delimiter | no | yes, no, mixed | no | Specifies how markup is treated. If set to "yes", markup is treated as a delimiter for text (i.e. markup is handled like white space). If set to "mixed", markup is not treated as a delimiter in mixed-content elements. | If you change this property, it is necessary to recreate all text indexes. |
| authentication | no | web server, tamino, none | web server | Specifies whether authentication is performed by the web server, by Tamino, or not at all. | Please refer to the section Tamino Authentication for further information about this property. |
| internal authentication file | no | Character string (max. 128 characters) | Points to the file containing users and passwords if file-based authentication is utilitzed. | Please refer to the section Tamino Authentication for further information about this property. | |
| XML maximum request duration | yes | 20 - 2592000 | 300 | The maximum duration of each request is limited to the specified number of seconds. | After this period, the request terminates with an error, but the transaction is not rolled back. |
| queue next request | yes | yes, no | yes | Specifies whether a subsequent request in a session is allowed even if the result of the previous request has not been completely processed. If set to "yes", a subsequent request in a session is allowed while the previous request is still active. If set to "no", a subsequent request in a session is not allowed if the previous request is still active. | |
| reject xsi:type | no | yes, no | yes | Rejects xsi:type attribute in element validation. | |
| text index word length | no | 32-250 | 64 | Specifies the maximum length for text index entries. | |
| XML text index type | no | single word, double word | double word | Specifies if a text query may contain one or two words (single-word index or double-word index). | Usage of three or more word queries cannot be an indexed search, thus resulting in low performance. |
| request log folder | no | - | - | This is the folder/directory where XML request log files are stored. | The default folder for the request log is the reserved location, if no request log folder is specified. |
| request log | yes | off, full, requests | off | This property specifies whether requests to Tamino are logged to a file. Logging can be restricted to the pure request (requests), or the requests with all data sent to Tamino (full). The default is that no logging is performed (off). | |
| request log file count | no | 0 - 999 | 2 | This is the maximum number of XML request log files written. If 0 is specified, XML request logging is turned off. | |
| request log file maximum size | no | 0 - 2997152 | 1 | This is the maximum size of an XML request log file (in MB). If this size is reached, Tamino switches to a new request log file. If the last log file is full, Tamino switches to the first one. |
Port numbers should only be changed if there is a special reason to do so. Otherwise, it is recommended to take the default, as Tamino handles port allocation dynamically.


You can use to create and manage replication databases.
The first step in creating a replication database is to create an exact copy (slave) of the database to be replicated (master) from the most recent backup of that database. To do so, you first have to create a database from a (non-initial) backup of your current database. For further information about creating a database from a backup, please refer to the section Database Backups.
| Warning: Do not start a replication database before you have performed "inoadmin setreplication". |
Once the database has been created from backup, its name has to be added to the list of permitted replication databases for the master database. A master database can have one or more replication databases. The database to which the replication database name is to be added must be active (running).
The command adds a replication database to a master database.

It is possible to enter the name of a replication database that has not yet been created from backup, but will be in the future. Thus, you can create a "pool" of replication database names to be used at a later point in time, so that you do not have to repeat this step each time a new replication database is to be created.
Note:
The first time you add an entry to the list it is not necessary
to restart the master database.
Once the name of the replication database has been added to the master database, the replication database must be set as a replication database. This is done with the command.

The replication database must be inactive (stopped).
Further commands are provided to obtain information about the current status of a database w.r.t. replication, to switch a replication database back again to a non-replication database, and to drop a database from a list of a master's possible replication databases.

If, for any reason, the master database is lost, you can reset the replication database to a normal database, which can then be used as a substitute for the lost master. The replication database to be reset must be inactive (stopped).

Note:
Once you have reset a replication database, replication cannot be continued.

For further information about database replication and when to use it, please refer to the section Replication Guide.
You can use to administer Tamino Server Extensions. Commands are provided for obtaining information upon currently installed server extensions and installing and uninstalling extensions.


For further information about server extensions and how to use them, please refer to the section X-Tension: Tamino Server Extensions.

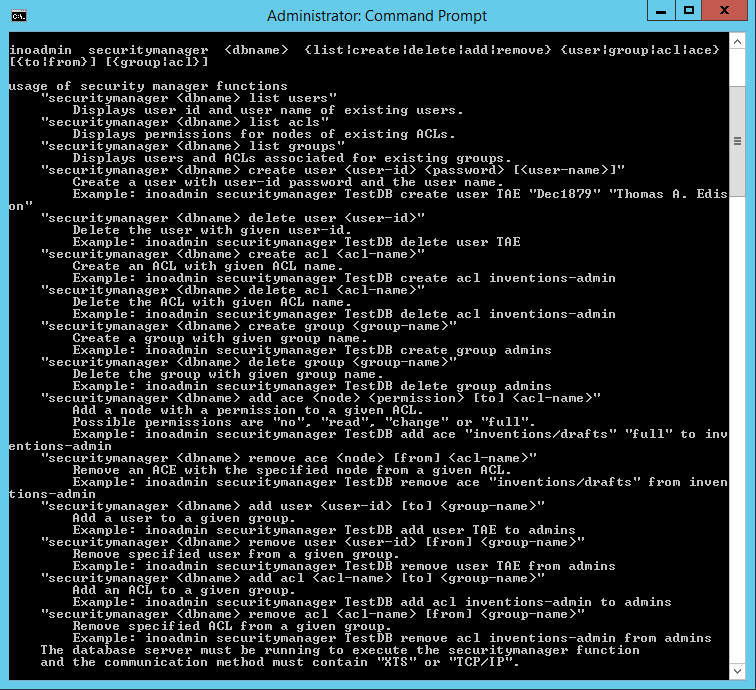
The command allows to create and maintain the objects that rule the Tamino security settings like groups, users, and ACLs. For further information about Tamino security, please refer to the section Tamino Security.

The commands concerning database requests allow to show the requests that are currently running against Tamino, and to stop a specific requests.


You can use the command to change the version of a database when you upgrade/downgrade from one version of Tamino to another. This means that databases created with earlier versions of Tamino can still be used with subsequent versions.

It is highly recommended only to use the command when the database is stopped and no other administration actions are in progress (for example, recovery). The database should generally be started immediately after , so that standard automatic re-initialization steps can be carried out. It is also recommended to back up a database after a successful downgrade, otherwise a complete restore/repair will no longer be possible.
Note:
The authentication mode of the database needs to be set to
"none" before a database can be upgraded via
setversion. For more information see section
Authentication
Modes.