
This document contains information about Tamino authentication and the Tamino authorization concept. The following topics are covered:
Tamino supports an authentication mechanism that uses an external web server or information that is stored in the database. When a web server is used to perform authentication, other mechanisms (in addition to the HTTP basic authentication mechanism) that are supported by that web server can also be used. When Tamino is used to perform the authentication, only the basic authentication mechanism is supported.
There are 3 possible authentication modes. The authentication mode is
defined per database with the XML property
Authentication. Please refer to
Database
Properties for further information about how to set and modify the
authentication mode.
The following authentication modes are available:
- web server
In this mode, Tamino receives the userid from the web server module and relies on the web server to authenticate the user. If this mode is set and the web server is not configured to perform authentication, a blank userid will be used in Tamino which will be assigned to the permissions of the default group. If a request is authenticated successfully and passed to Tamino, the userid (and the domain) specified in the HTTP basic authentication scheme is used.
This is the default mode that is set when a new database is created. If this method is used, the web servers that are allowed to communicate with Tamino should be carefully restricted.
- tamino
This mode specifies that authentication is performed directly by Tamino. All requests sent to Tamino are authenticated against the users known to Tamino. These users are either stored directly in Tamino in the collection ino:security or are stored in an external authentication service which Tamino can query (see section External Authentication in this chapter). Each request sent to Tamino must include a userid and a password; if these are not provided or if authentication fails, Tamino will return an HTTP response code 401.
- none
In this mode, Tamino will use the userid provided for authorization, but it will not be authenticated. The userid can be sent in either the HTTP basic authentication header field or in the special header field X-INO-Authorization.
Note:
There is an additional mode "tamino no
challenge". This mode is equivalent to "tamino", but
provides some additional internal functionality which is used by certain
Software AG products. If your installation of Tamino is preset to "tamino
no challenge", do not change that mode.
If a user is to be authenticated by Tamino, there must be a password
stored inside Tamino for that user. Passwords are not stored as plain text, but
rather as hash values that are computed using a one-way hash function. In order
to store a password, the plaintext password has to be put into the attribute
ino:unencryptedpassword. The value in this
attribute is then hashed, and the resulting value is stored in the attribute
ino:password. If the password was retrieved as a
hash value, it can be stored back into Tamino directly using the attribute
ino:password.
A user can change his own password with the special administration function ino:ChangeUserPassword. This function changes the password of the user that issues the command, and will only work when the authentication mode is set to Tamino. The function has only one parameter, which is the new password in plaintext:
_admin=ino:ChangeUserPassword("new_password")
The current request will be executed using the old password, but the next request for the user in question will have to be executed using the new password. Executing this function also sets the attribute ino:passwordlastchanged to the current system time.
Note:
In order to avoid plaintext passwords from being stored in web
server access logs, this admin command should always be sent using an HTTP POST
request.
When using the authentication mode tamino,
it is possible to have Tamino check the user credentials against a local
operating system or against an LDAP Server. In order to use this feature, users
must be grouped into domains, where each domain is associated with an
authentication service.
Domains are defined in the doctype ino:domain of the collection ino:security. A domain defines a unique name and the type of authentication service and possibly some additional parameters to describe the authentication service. The following example shows the definition of a domain mydomain, which uses the local operating system to authenticate the users:
<ino:domain ino:domainid="mydomain" ino:domaintype="os"
xmlns:ino="http://namespaces.softwareag.com/tamino/response2" />
The following attributes can be set for a domain:
- ino:domainid (required)
Specifies the unique name of the domain - this unique name must be specified as part of the user names in order to uniquely assign a user to a domain.
- ino:domaintype (optional - default=tamino)
Specifies the type of authentication service. Possible values are:
tamino: authenticate against users whose passwords are defined in Tamino
os: authenticate against the local operating system
- ino:expire (optional - default = 0)
The number of seconds that a user should be cached in Tamino before being reauthenticated against the external service. A value of 0 means that the user is reauthenticated with every request sent to Tamino. When using a local operating system, this value should be set fairly low and when using an external service which is connected via a network, this value should be set higher, in order to avoid unnecessary network accesses.
- ino:acceptusers (optional - default = defined)
This option specifies whether to allow access of any user that is correctly authenticated by the authentication service (value
all) or whether to only allow access by users that are explicitly defined in the ino:user doctype (valuedefined).- ino:usegroups (optional - default = false)
This option specifies whether to use the external group information from domains – for example the groups in an Active Directory Server or in an LDAP server. When this attribute is set to true, the external groups will be visible and will be preceded by the domain name and a backslash. Note that this option can only be set by directly storing the XML configuration files into Tamino.
- ino:default (optional - default = false)
This option specifies whether the domain should be used as default authentication domain. Setting this option will result in users being authenticated against this domain, even when no domain name is given with the userid. If a user exists which is defined locally in Tamino and also in the default domain, the local user will be used for authentication.
When specifying the domain type ldap, some additional parameters need to be set, to describe the location and configuration of the LDAP server. For this purpose, key-value-pairs can be specified as contents of the ino:domain element in the following format:
<ino:param ino:name=".." ino:content=".." />
The following parameters need to be specified for an LDAP:
host |
IP number of the host where the LDAP server is running |
port |
Port on which the LDAP server is listening |
ldap_person_dn |
The distinguished name of the person entries |
ldap_person_object |
The class hierarchy for person entries from the top to the bottom, separated by colon (e.g. top,person) |
ldap_group_dn |
The distinguished name of the group entries |
ldap_group_object |
The class hierarchy for group entries from the top to the bottom, separated by colon |
ldap_password_field |
The attribute names containing the password (separated by colon) |
ldap_user_field |
(optional - default=cn) The prefix for the unique userid |
For more information about these parameters, see section LDAP Configuration
Once a domain is defined in Tamino, any user accessing Tamino that has a username starting with the domain ID, followed by a backslash, will be authenticated against the authentication service specified by the domain. For example, if we have the following defined in ino:security:
<ino:domain xmlns:ino="http://namespaces.softwareag.com/tamino/response2"
ino:domainid="mydomain" ino:domaintype="os" />
<ino:user xmlns:ino="http://namespaces.softwareag.com/tamino/response2"
ino:userid="mydomain\user">OS-User</ino:user>
<ino:user xmlns:ino="http://namespaces.softwareag.com/tamino/response2"
ino:userid="user" ino:unencryptedpassword="xx">Tamino-User</ino:user>
We can now access Tamino by specifying the username
user without a domain, in which case the user
will be authenticated against the password xx,
which is stored directly in Tamino, or by specifying the username
user and the domain
mydomain, in which case the user will be
authenticated against the local operating system.
Since the Tamino architecture requires the authentication information to be passed to the server in the HTTP header field for authentication, and since this field is restricted to a userid and password, the domain is represented as part of the userid separated by a backslash (“\”). Any userid which does not contain any domain information is automatically assigned to the default domain, which is the local Tamino authentication service, relying only on user information stored in ino:user.
To configure an external LDAP service, some special parameters need to be set, depending on the type of LDAP being used. This section gives a short description for some common LDAP configurations.
The iPlanet Directory Server is preconfigured to store users in a
special way. When using this preconfigured mechanism, the following parameters
should be used (besides the host and
port parameters):
<ino:param ino:name="ldap_person_dn"
  ino:content="ou=People,dc=my,dc=server,dc=com" />
<ino:param ino:name="ldap_person_object"
  ino:content="top,person,organizationalPerson,inetorgperson" />
where the value "ou=People,dc=my,dc=server,dc=com" needs
to be replaced by your specific DN.
If you have added users with the uid field filled, the users will not
be uniquely identified using the cn prefix, but rather the
uid prefix, which will require that the following parameter is
also added:
<ino:param ino:name="ldap_user_field" ino:content="uid" />
When using an MS Active Directory Service, the following parameters
need to be set (besides the host and
port parameters):
<ino:param ino:name="ldap_person_dn"
  ino:content="CN=Users,DC=my,DC=server,DC=com" />
<ino:param ino:name="ldap_person_object"
  ino:content="top,person,organizationalPerson,user" />
where the value "CN=Users,DC=my,DC=server,DC=com" needs
to be replaced by your specific DN.
An OpenLDAP server can be configured in various ways - the
administrator of the LDAP will know which fields contain the user information,
and should be able to provide the correct values for the fields
ldap_person_dn, ldap_person_object,
ldap_password_field, and possibly also the
ldap_user_field.
Tamino provides an authorization check to grant or deny access to XML nodes (elements and attributes) and functions.
Access control is currently available on the structural level, that is, each node can be protected individually, or based on its position in a subtree, rather than based on the content or value of a node.
This section describes how authorization checking is implemented in Tamino under the following headings:
Tamino is delivered with a Collection ino:security that contains Doctypes ino:user, ino:group and ino:acl (acl=Access Control List).
Note:
The Collection ino:timeframe is intended for
future use and does not have special functions in the current version.
You can implement access control by defining instances of Tamino Doctypes ino:user, ino:group and ino:acl to the Tamino Collection ino:security as illustrated in the following figure:
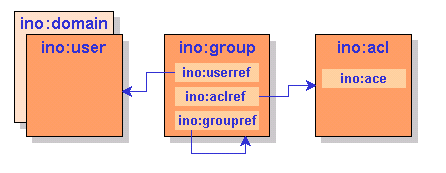
An Access Control List (ACL) contains Access Control Elements (ACEs) which identify nodes and function names. The access level is specified in an attribute of the ACE. A group refers to users and ACLs, thus authorizing those users for the ACEs contained in the ACLs.
The authorization concept for nodes is based on the following principles:
Each node to be protected must be XML content stored in Tamino. Nodes that are implicitly created due to mappings to external sources cannot be protected.
Each node and its descendants can be protected individually, but if a given node cannot be accessed as a result of its access restrictions, then none of the descendants of that node can be accessed either, even if access permissions are defined for these descendants.
If a node is not defined in an ACE, there is no access control, that is, it is generally accessible, unless there are restrictions defined for one of the node's ancestors.
The authorization concept for functions is based on the following principle:
An absolute function name that is not preceded by any path names must be specified. The function name must finish with the characters ().
The attribute ino:access for functions may only contain the values
no (function may not be executed) or
full (function may be executed).
The following general principles also apply:
All undefined users are automatically members of the default group that has the same name as the database.
Each instance of user, group, and ACL must be unique within a Tamino database.
The authorization feature does not guarantee referential integrity. That is, if a node is deleted, the authorization information is retained, and restrictions can be defined for nodes before they exist.
During document composition, protected nodes are not returned to an unauthorized user.
During document processing, if the construct to be updated in Tamino contains protected nodes, the update is rejected for the whole document.
During delete operations, if the construct to be deleted in Tamino contains protected nodes, the delete operation is rejected for the whole document, and also for multiple documents if more than one document is to be deleted.
The order of precedence in which access restrictions are processed is such that less restrictive permissions override more restrictive ones if more than one restriction is explicitly defined for one node.
The authorization level is specified in an attribute of the ACE. Authorization levels are:
| Level | Meaning | |
|---|---|---|
|
|
||
| no | Access to this node or function is denied. | |
| read | Read access is granted. | |
| change | Update access is granted. | |
| full | Define and undefine access is granted. Function may be executed. | |
Note:
The access attributes are case-sensitive and must all be written
in lower-case letters.
The following authorization levels are required on the Node for X-Machine commands:
| Command | Minimum authorization level | |
|---|---|---|
|
|
||
| _xql | read, change or full for node, and full for function | |
| _process | change or full | |
| _delete | change or full | |
| _define | full | |
| _undefine | full | |
| _admin | full for function | |
| _xquery (reading) | read, change or full | |
| _xquery (updating) | change or full | |
All authorization information in Tamino is stored in the Collection ino:security. When Tamino is initially installed, no access restrictions are set for this Collection, which means that any user authenticated by the web server to access Tamino can modify the data in ino:security and hence grant and revoke access rights to any part of the database. When implementing security on Tamino, you should first define a user that has access to ino:security, and define ino:security as being inaccessible to all other users.
The following XML document is an example of how to set up security for the Tamino database mydb, with only the user secadmin having access to ino:security.
<?xml version="1.0" encoding="ISO-8859-1"?>

<ino:user ino:userid="secadmin"
   xmlns:ino="http://namespaces.softwareag.com/tamino/response2">Security Administrator</ino:user>

<ino:group ino:groupname="secgroup" xmlns:ino="http://namespaces.softwareag.com/tamino/response2">
  <ino:userref>secadmin</ino:userref>
  <ino:aclref>secacl</ino:aclref>
</ino:group>

<ino:acl ino:aclname="secacl" xmlns:ino="http://namespaces.softwareag.com/tamino/response2">
  <ino:ace ino:access="full">ino:security</ino:ace>
</ino:acl>

<ino:group ino:groupname="mydb" xmlns:ino="http://namespaces.softwareag.com/tamino/response2">
  <ino:aclref>defaultacl</ino:aclref>
</ino:group>

<ino:acl ino:aclname="defaultacl" xmlns:ino="http://namespaces.softwareag.com/tamino/response2">
  <ino:ace ino:access="no">ino:security</ino:ace>
</ino:acl>
Note:
Please be aware that the user who is used who is to be used to administer the security
configuration, needs to be a valid user in the Tamino Server with
the required privileges – otherwise it will not be possible to modify the user
definitions.
All security objects are stored in the Collection ino:security. Security objects are instances of Doctypes ino:user, ino:group , ino:acl or ino:domain. Please refer to the collection ino:collection, for the complete schemas.
The attribute ino:userid is checked for uniqueness during insertion of an instance of Doctype ino:user. The contents of the ino:user element is freely definable and has no relevance to the operation of Tamino security.
The following examples illustrate an instance of a general user:
<ino:user ino:userid="saguser1" ino:password="xxx" xmlns:ino="http://namespaces.softwareag.com/tamino/response2">
User name, general user</ino:user>
The Doctype ino:group has only one attribute: ino:groupname. The group name is checked for uniqueness during insertion of an instance of Doctype ino:group.
The child element ino:userref establishes the relation between an instance of ino:group and an instance of ino:user by using the value of the user ID as content.
On the other hand, there is no referential integrity between ino:user and ino:group based on the contents of the ino:userref element.
The child element ino:aclref establishes the relation between an instance of ino:group and an instance of ino:acl by using the name of the ACL as content. All users referenced in the group have access to all ACLs referenced by the same group. Again, there is no referential integrity between ino:group and ino:acl based on the contents of the ino:aclref element.
Using the ino:groupref element, it is possible
to reference other groups. The references are resolved similar to an
include statement.
The following example demonstrates how the ino:groupref can be used to separate the groups of users and groups of privileges (roles). The adminusers group is used to group some users together and the group adminprivileges groups some ACLs. Via the ino:groupref from adminusers to adminprivileges, the users in group adminusers are assigned the ACLs from adminprivileges.
<ino:group ino:groupname="adminusers"
  xmlns:ino="http://namespaces.softwareag.com/tamino/response2">
  <ino:userref>saguser1</ino:userref>
  <ino:userref>saguser2</ino:userref>
  <ino:groupref>adminprivilege</ino:groupref>
</ino:group>

<ino:group ino:groupname="adminprivilege"
  xmlns:ino="http://namespaces.softwareag.com/tamino/response2">
  <ino:aclref>acldbadmin</ino:aclref>
  <ino:aclref>aclsecadmin</ino:aclref>
</ino:group>
If there is a group defined to the system, which has a group name identical to the name of the Tamino database in question, all defined and undefined users are regarded as members of this group.
Besides the default group, there is also a predefined administrator group with the name ino:admin. Any user assigned to this group has full access to all nodes and to all functions.
The following example instances illustrate a group for general users:
<ino:group ino:groupname="general" xmlns:ino="http://namespaces.softwareag.com/tamino/response2">
  <ino:userref>saguser1</ino:userref>
  <ino:aclref>aclgeneral</ino:aclref>
</ino:group>
The following example instances illustrate a group for administrators:
<ino:group ino:groupname="admin" xmlns:ino="http://namespaces.softwareag.com/tamino/response2">
  <ino:userref>sagdba</ino:userref>
  <ino:aclref>acladmin</ino:aclref>
</ino:group>
The following example instances illustrate a default group for a database that is called mydb:
<ino:group ino:groupname="mydb" xmlns:ino="http://namespaces.softwareag.com/tamino/response2">
  <ino:aclref>aclall</ino:aclref>
</ino:group>
The group definition mydb will automatically incorporate all users of the Tamino database, because it carries the name of the Tamino server itself (in this example mydb), thus granting the access rights contained in the ACLs referenced in ino:aclref to all users.
Note:
This group has to be created to act as default to prevent any user
getting full database access.
The ino:acl element has only one attribute: ino:aclname. The ACL name is checked for uniqueness during the insertion of an instance of Doctype ino:acl. The child elements ino:ace contain the access authorization definitions for each node and function in the Tamino repository as values of the attribute ino:access.
The content of an ino:ace element is the absolute path to the node or the absolute function name for which access rights are to be defined. The path must be explicitly defined, it must not contain any generic definitions such as // or *. Also, the names between the slashes may only consist of characters that are valid for XML element and attribute names.
There are currently four possible values for the attribute ino:access: no, read, change, full. Any other value supplied will be rejected by the validation. Note that these values are case-sensitive.
This example grants read access to instances of
doctype1 in collection
coll1.
<ino:acl ino:aclname="aclall" xmlns:ino="http://namespaces.softwareag.com/tamino/response2">
  <ino:ace ino:access="read">coll1/doctype1</ino:ace>
</ino:acl>
This example grants full access to instances of "doctype1" in Collection "coll1"
<ino:acl ino:aclname="acluser" xmlns:ino="http://namespaces.softwareag.com/tamino/response2">
  <ino:ace ino:access="full">coll1/doctype1</ino:ace>
</ino:acl>
This example grants full access to the Collection ino:security (for administrators):
<ino:acl ino:aclname="acladmin" xmlns:ino="http://namespaces.softwareag.com/tamino/response2">
  <ino:ace ino:access="full">ino:security</ino:ace>
</ino:acl>
This example grants execution access to the function ino:Info:
<ino:acl ino:aclname="acladmin" xmlns:ino="http://namespaces.softwareag.com/tamino/response2">
<ino:ace ino:access="full">
ino:Info()</ino:ace>
</ino:acl>
This example defines a domain mydomain, for which all users will be authenticated against the local operating system:
<ino:domain xmlns:ino="http://namespaces.softwareag.com/tamino/response2"
ino:domainid="mydomain" ino:domaintype="os"/>
This section describes the behavior of Tamino Security in some special situations.
In order to insert data using the _process command, the
permissions full or change are required for all nodes
into which data will be inserted. If data is to be stored in a Collection in
which a restriction of no or read has been defined on
a required node for a user, the store process will fail even if no data is to
be stored in the node that is non-accessible. This is because of the
validation, which will not accept the document as it doesn't conform to the
schema definition.
In order to delete a document, a user must have at least change permission on all of the nodes that are to be deleted. If more than one document is to be deleted in a single request and at least one document cannot be deleted because of access restrictions, then the entire delete request will fail.
When setting access restrictions on nodes, care should be taken when restrictions are set on nodes that are not optional. When data is read from such documents, the inaccessible nodes are not returned in the result set. However, it is not possible to load new data into these Doctypes because the validation will not accept data that does not conform to the schema definition, and data conforming to the schema definition will be rejected by security because inaccessible nodes are involved.
Tamino does not issue error messages that provide detailed insight into the exact cause of access violations. This is done with the intention of providing potential hackers with as little information as possible. When a user attempts to read data to which she/he has no access, security normally returns the same information that it would as if the protected data did not exist. When attempts are made to delete or modify protected data, Tamino issues a general access violation message in most cases, but does not provide any information about the exact cause of the violation.
If you mass load data into the collection
ino:security, it is strongly recommended that you use the
option concurrentWrite. If this option is not
used, the collection ino:security will be exclusively
locked by the mass loader, and no other incoming requests will be authenticated
or authorized until the mass load process is finished.
Note that with the introduction of WebDAV as a built-in component of the Tamino XML Server, a new type of security is also available in the WebDAV perspective. While the Tamino Security mainly addresses the security of parts of XML documents based on their structure, the WebDAV ACL Specification (RFC 3744) addresses protecting operations on whole documents only. For details, refer to the WebDAV documentation.
| Warning: Since the Tamino Manager, of which the Security Manager was but a part, is not contained in the Tamino 10.1 release anymore, the functionality described in this section is not available. Thus security settings must be established by modifying database properties and handling the security relevant objects (users, groups, etc.) to the database by other means, for example XQuery. The chapter is however retained in here, because it still describes the sequence in which the security objects are to be added properly. |
You can use the Security Manager to create, display, delete and update users, domains, user groups and access control lists for the selected database. The database selected must be running. The following Security Manager functions are available:
Notes:
The Create User command is used to create (define) an instance of the Doctype ino:user. If groups already exist, the new user can be added to a group either in the Create User dialog, or at a later stage by using the command. A user can be a member of one or more groups.
![]() To create a user
To create a user
Expand the object from the database that you want to work with and select .
Choose from the context menu. The Create User page is displayed.
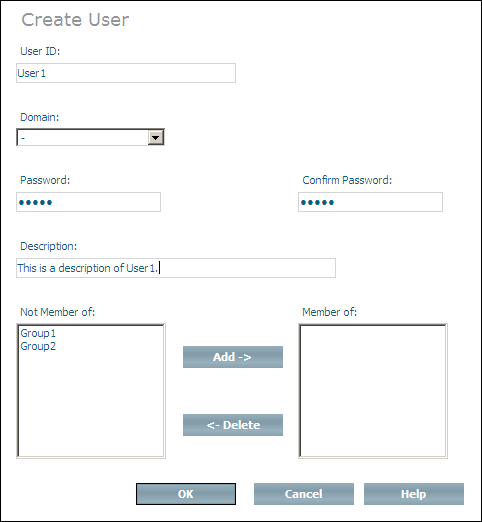
Enter the user ID and a description of the user to be created in the UserId and Description text fields. The description could, for example, be the full name of the user.
Choose a domain for the user to be created from the drop-down list.
For information about domains, see the section Create Domain.
Enter and confirm the password for the user to be created. If you only enter the password once, or if the two passwords are not identical, you will receive an error message when you try to create the user.
Choose to create the user.
Or:
You can add a new user to existing user groups when the user is
created. The user groups that are available are listed in the
Not member of list box. Select a group and
choose to add it to the Member of list. If you add a group to the
Member of list by mistake, you can remove it
by selecting it and choosing (groups that are
deleted from the Member of list box are
returned to the Not member of list box). Once
you have finished adding the user to groups, choose
to create the user and add it to the groups you selected.
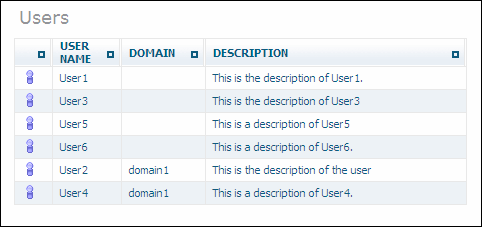
Once you have created a new user, it is listed in the tree view of the Security Manager. To display a list of users, choose the object in the Security Manager. A list of users is displayed, showing the User ID, domain and description:
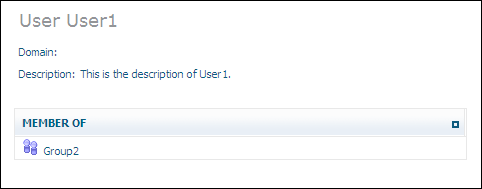
If you select one of the users from the list in the tree view, information about this user is displayed:
The Modify User command is used to update the definition of a user (instance of Doctype ino:user). The user ID, password and the user description can be updated. The user can also be added to and deleted from user groups.
![]() To modify a user
To modify a user
Select the user to be modified from the expanded object and choose from the context menu. The Modify User page is displayed.
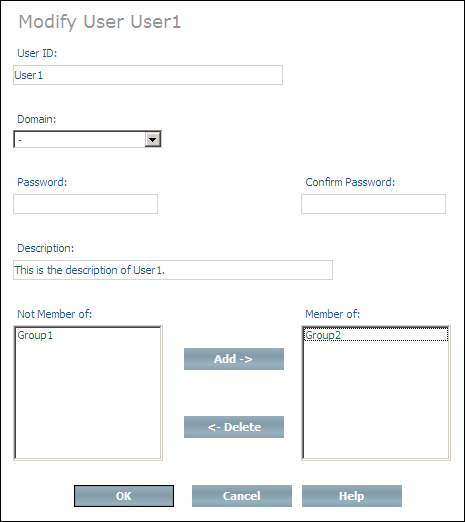
Change the user ID, domain, password and description as desired - if you change the password, you must enter the identical password twice, otherwise you will receive an error message. Add the user to new user groups by selecting the groups from the Not member of list box and then choosing . Delete the user from user groups by selecting the groups from the Member of list box and choosing .
When you have made all of the changes you want, choose to modify the user.
The Delete User command removes a selected user (instance of Doctype ino:user) from all of the groups in which it is a member. If you only want to remove a user from specified groups, you should use the Modify User or Modify Group commands.
![]() To delete a user
To delete a user
Select the user to be deleted from the expanded object and choose from the context menu. The Delete User page is displayed.

Choose to delete the user.
The Create Domain command is used to create a new domain (a new instance of the Doctype ino:domain). For information about domains in Tamino, see section External Authentication.
![]() To create a domain
To create a domain
Expand the object from the database you want to work with and select .
Choose from the context menu. The page Create Domain - General Parameters (Page 1 of 2) is displayed:
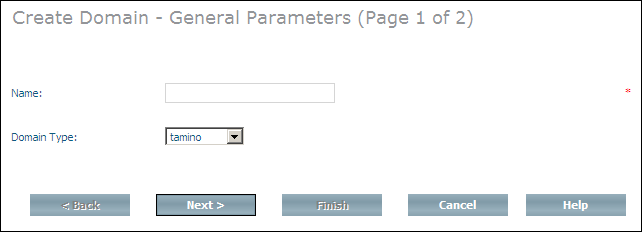
Enter a name for the new domain, for example domain1 and choose a domain type from the Domain Type list box.
Choose to display the page Create Domain - Specific Parameters (Page 2 of 2):
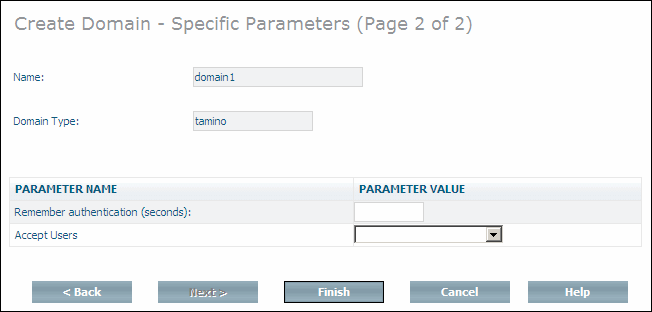
Note that depending on which domain type you have chosen, other parameter values may be displayed. The domain type "ldap", for example, requires authentication against an external LDAP server, which needs additional parameter specifications (see External Authentication parameter ino:domaintype for detailed information).
Enter values for Remember
authentication and Accept Users. For
information about the possible values for these fields, see the description of
the domain attributes ino:expire and
ino:acceptusers in the section
External
Authentication).
Choose .
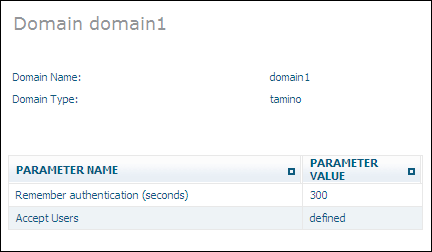
A message is displayed, stating that the domain is created. After successful completion, a new page is displayed, listing the available domain(s) with the domain type.
Once you have created domains, they are listed in the tree view of the Security Manager. To display this list of domains, expand the object in the Security Manager. If you select one of the domains from the list, information about the domain is displayed, for example:
The Modify Domain command is used to update the definition of a domain. All parameters can be changed, with the exception of the domain type.
![]() To modify a domain
To modify a domain
Select the domain to be modified from the expanded object and choose from the context menu. The Modify Domain page is displayed (note that the display of parameters depends on the domain type):
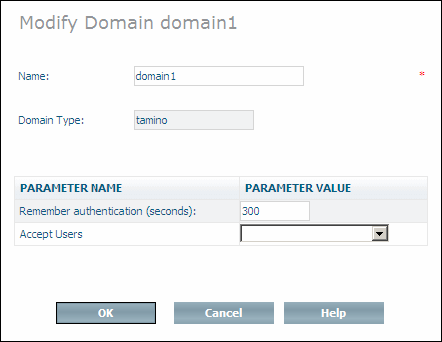
Change the domain name and parameters as desired.
When you have made all of the changes, choose to modify the domain.
The Delete Domain command deletes a domain (instance of Doctype ino:domain).
![]() To delete a domain
To delete a domain
Select the domain to be deleted from the expanded object and choose from the context menu. The Delete Domain page is displayed:
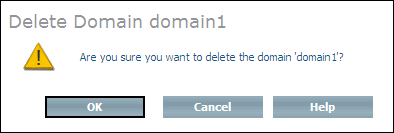
Choose to delete the domain. A message confirms successful deletion of the domain.
The Create Group command is used to create a new user group (instance of Doctype ino:group). If users and access control lists already exist, they can be added to the new group either in the Create Group dialog, or at a later stage by using the Modify Group command.
![]() To create a group
To create a group
Expand the object from the database that you want to work with and select .
Choose from the context menu. The Create User Group page is displayed.
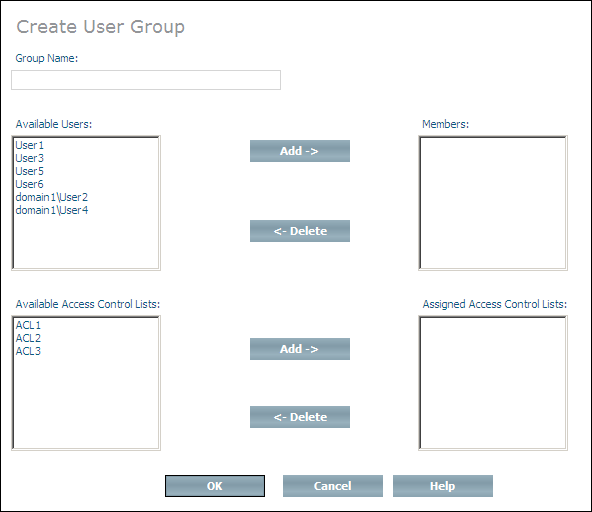
Enter the name of the group in the Group Name text field.
Choose to create the group.
Or:
You can add users and access control lists to the new group when it
is created. The users that can be added to the group are listed in the
Available Users list box. Select a user and
choose the first button to add it to the
Members list box. If you add a user to the
Members list box by mistake, you can remove
it by selecting it and choosing the first button
(users that are deleted from the Members list
box are returned to the Available Members
list box). The ACLs that can be added are listed in the Available Access Control Lists list box. Select an ACL
and choose the second button to add it to the
Assigned Access Control Lists list box. If
you add an ACL to the Assigned Access Control
Lists list box by mistake, you can remove it by selecting it and
choosing the second button (ACLs that are deleted
from the Assigned Access Control Lists list
box are returned to the Available Access Control
Lists list box). Once you have finished adding users and ACLs to the
group, choose to create the group and add the users
and ACLs you selected.
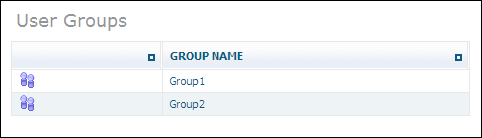
Once you have created a new user group, it is listed in the tree view of the Security Manager. To display a list of users groups, choose the object in the Security Manager. A list of available user groups is displayed:
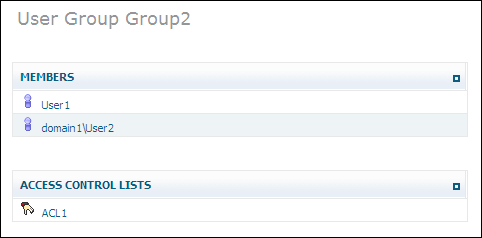
If you select one of the user groups from the list in the tree view, information about this user group is displayed, showing members and the Access Control Lists:
The Modify Group command is used to update the definition of a user group (instance of Doctype ino:group). The name of the group can be changed, and users and access control lists can be added to and deleted from the group.
![]() To modify a group
To modify a group
Select the group to be modified from the expanded object and choose from the context menu. The Modify User Group page is displayed.
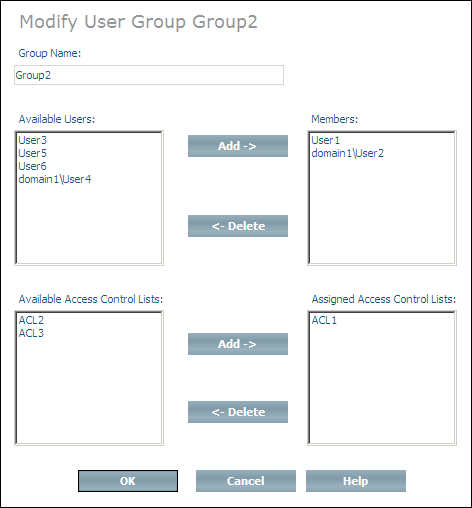
Change the name of the group as desired. Add users to the group by selecting them from the Available Users list box and then choosing the first button. Delete users from the group by selecting them from the Members list box and choosing the first button. Add ACLs to the group by selecting them from the Available Access Control Lists list box and then choosing the second button. Delete ACLs from the group by selecting them from the Assigned Access Control Lists list box and choosing the second button.
When you have made all of the changes you want, choose to modify the group.
The Delete User Group command deletes a user group (instance of Doctype ino:group). However, the users and ACLs that are members of that group are not deleted.
![]() To delete a group
To delete a group
Select the group to be deleted from the expanded object and choose from the context menu. The Delete User Group page is displayed.
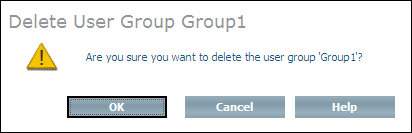
Choose to delete the group.
The Create Access Control List command is used to create an instance of the Doctype ino:acl. If groups already exist, the new ACL can be added to a group either in the Create Access Control List dialog, or at a later stage by using the Modify ACL command. An ACL can be a member of one or more groups.
![]() To create an access control list
To create an access control list
Expand the object from the database that you want to work with and select Access Control Lists.
Choose from the context menu. The Create Access Control List page is displayed.
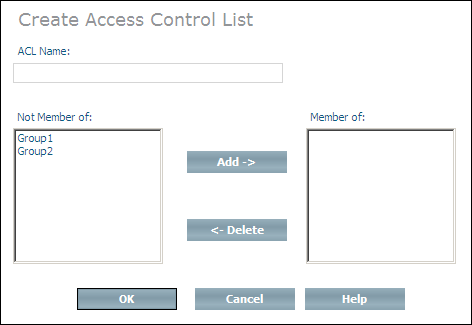
Enter the name of the ACL to be created in the ACL Name text field.
Choose to create the ACL.
Or:
You can add a new ACL to existing user groups when the ACL is
created. The user groups that are available are listed in the
Not member of list box. Select a group and
choose to add it to the Member of list box. If you add a group to the
Member of list box by mistake, you can remove
it by selecting it and choosing (groups that are
deleted from the Member of list box are
returned to the Not member of list box). Once
you have finished adding the ACL to groups, choose to
create the ACL and add it to the groups you selected.
Once you have created a new access control list, it is listed in the tree view of the Security Manager. To display the available access control lists, choose the object in the :
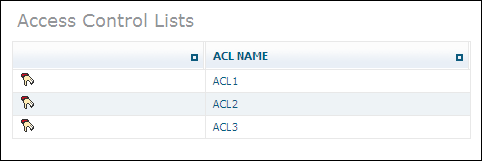
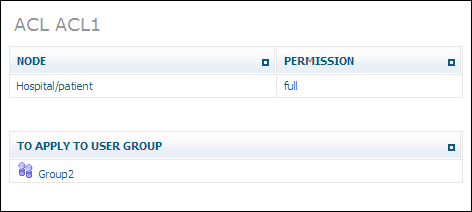
If you select one of the lists in the tree view, information about this list is displayed, showing the node, permission and the user group to which it applies:
The Modify Access Control List is used to update the definition of an access control list (instance of Doctype ino:acl). The name of the ACL can be changed, the ACL can be added to and deleted from groups, and access control elements can be deleted or have the associated authorization level modified.
![]() To modify an access control list
To modify an access control list
Select the access control list to be modified from the expanded object and choose from the context menu. The page is displayed.
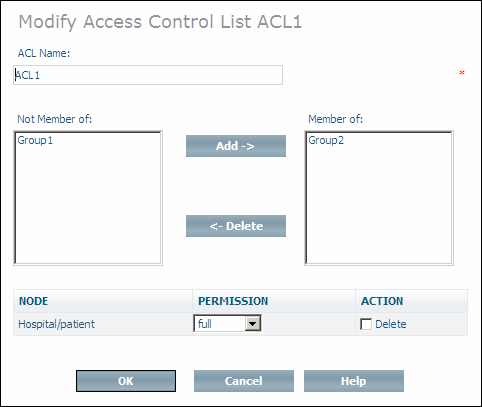
Change the name of the ACL as desired. Add the ACL to new groups by selecting them from the Not member of list box and then choosing . Delete the ACL from groups by selecting them from the Member of list box and choosing . Modify the authorization level of an access control elements by opening the drop-down list boxes next to their names and selecting the new permissions. Delete access control elements by checking the Delete check boxes next to their names.
When you have made all of the changes you want, choose to modify the access control list.
The Delete Access Control List command deletes a selected access control list and removes references to it from the groups in which it was contained. If you only want to remove an ACL from specified groups, you should use the Modify Group command.
![]() To delete an access control list
To delete an access control list
Select the access control list to be deleted from the expanded object and choose from the context menu. The Delete Access Control List page is displayed.
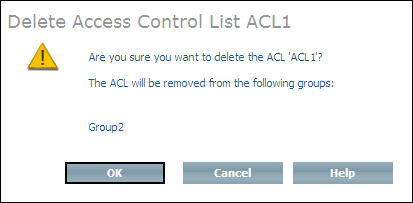
Choose to delete the access control list.
The Add Access Control Element command is used to define the access rights to nodes in the Tamino repository. The definitions are stored in the child elements ino:ace of the Doctype ino:acl. The access control element is added to the access control list that is to be given access rights to the node specified.
![]() To add an access control element
To add an access control element
Select the access control list to which you want to add the access control element from the expanded object and choose from the context menu. Page 1 of the Add Access Control Element page is displayed.
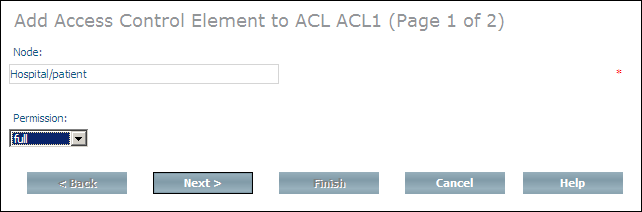
Enter the repository path (collection/doctype etc.) to the node for which access rights are to be defined in the Node text box.
Select the authorization level to be assigned from the Permission drop-down list box. The following levels are available:
| Level | Meaning | |
|---|---|---|
|
|
||
| no | Access to this node is denied. | |
| read | Read access is granted. | |
| change | Update access is granted. | |
| full | Define and undefine access is granted. | |
Choose to continue to page 2 of the Add Access Control Element dialog.
If no namespace declarations are required, choose to add the ACE, otherwise you must enter the URL of the namespace in the Namespace URL text field before you can choose .
Notes:
tamino.
Tamino provides not only type-based access control but also instance-based acceee control . With instance-based access control, it is also possible to define access control for each document, thereby enabling Tamino as a directly accessible document repository in a multi-user environment.
The following description gives an overview of the privileges defined for the instance-based access control and shows how the ACLs are defined and read.
Since WebDAV ACL defines an XML structure for access control lists and since Tamino also supports WebDAV ACL for the WebDAV resources stored in Tamino, this ACL structure was also chosen for regular Tamino documents.
An access control list consists of one or more ACEs (access control elements) which each define a set of privileges to be granted or denied to a certain principal. Per ACE there can be multiple privileges defined, but they must be either all granted or all denied.
The following gives an example of an ACL granting the user tamino read access to a document:
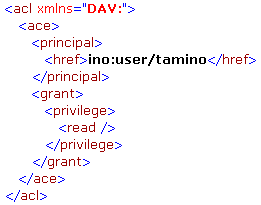
Principals can be basically any users and groups known to the Tamino database. When addressing a certain user or group the href element needs to be specified and the content of that element denotes the principal by specifying the name preceded by the string "ino:user/" for users and "ino:group/" for groups.
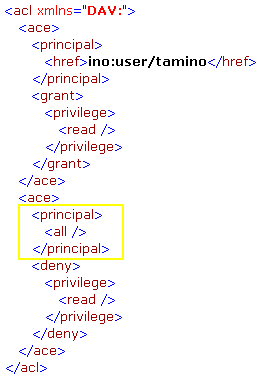
Besides the explicit definition of users and groups there is also the possibility to use the special principal all to apply to all users. The following ACL gives an example which would grant the user tamino read access to a document and deny the read access to all other users:
The WebDAV ACL standard defines a set of privileges to control the access to certain operations on the content and properties of documents. The most commonly used are:
write-content
Controls whether a user is allowed to modify the content of a
document.
read
Controls whether a user is allowed to read a document.
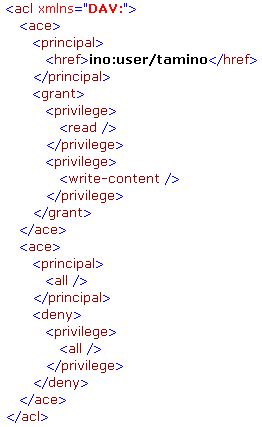
According to the WebDAV ACL standard the privileges can also be aggregated. One predefined aggregation is the privilege all which contains all other privileges. The following ACL grants read and write-content access to the user tamino and denies everything for all other users:
Besides the predefined privileges, an ACL may also contain user-defined privileges which don’t have any semantics for Tamino but might be used by external applications to control access to certain operations on the documents.
The ordering of the ACEs in an ACL is important, since the ACLs are evaluated from top to bottom. When the access level to a document is determined, the Tamino server will search for an ACE entry which matches the current request principal (either the user itself or a group to which the user belongs) and which also matches the required privilege. So if a user wishes to read a document, the ACL is scanned for an ACE which matches the principal and contains the privilege read. If that privilege is granted, the operation will be executed. If the privilege is denied, the execution of the operation will be rejected. If the whole ACL does not contain any ACE matching the principal and the required privilege, a grant of the privilege will be applied and the operation will be executed – this means that a good ACL will typically end in a deny all for everyone.
An ACL is provided as an XML document and can be applied to a Tamino document in two ways: either via a PROCESS where the ACL is wrapped with a special element defining the document to apply this ACL to or via XQuery when creating a new document.
To apply an ACL to a document, this document has to be uniquely
identified. An ACL can be wrapped by an ino:request
and ino:object element and a reference to the
document to which this ACL should apply can be set via the special attribute
ino:aclref. The reference is a path of the
following structure:
collection name + '/' + doctype name + '/@' + ino:id
So to define an ACL for the document with
ino:id 1 in the collection ino:etc and in the
doctype with name unbind, the following document would be stored via a PROCESS
command:
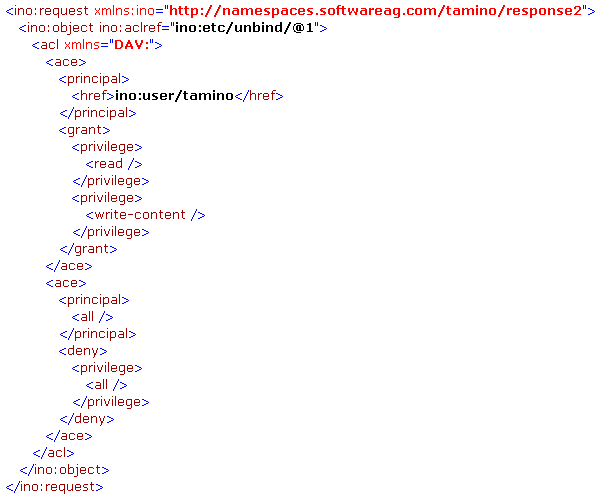
The document needs to be sent to the collection ino:security. The ACL will not be physically stored in the collection ino:security, but will rather be attached directly to the document to which the ACL applies.
Another mechanism for setting an ACL for a document is to directly
attach the ACL to a newly created document via XQuery. The XQuery function
tf:document allows you to create a new document and append an ACL to the
document. When this document is then stored to Tamino via the fn:put function,
the ACL will be directly applied to the document. The following example shows
how a document with root element Person is created
and saved into the collection addresses while being assigned an ACL that denies
the read privilege to everyone:

When both instance-based and structure-based access control are defined for documents, the privileges for both types of access control need to be granted in order for the operation to be allowed. The combination of the two types of control can be quite useful – for example it allows you to set the access level for a certain group of users to read permissions for a whole collection via structure-level access control and restrict the access even more to make some of the objects not readable at all for this group of users.
The special group ino:admin, which allows full access to all data, also applies to the instance-based access control. So if a certain privilege is denied for everyone in an instance-based ACL, the members of the ino:admin group will still get full access to the document.