Adding a New Dimension

To add a new dimension
1. In My webMethods: Navigate > Applications > Administration > Analytics > KPIs > Dimensions.
Optimize displays the Dimensions page.
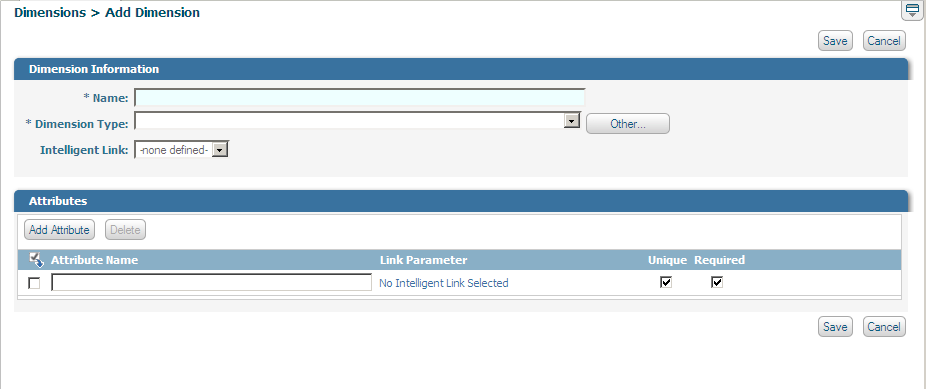
2. Click Add Dimension.
Optimize displays the Add Dimension page.
3. In the Name field, type a name for the dimension (maximum 25 alphanumeric characters).
4. Do one of the following:

If data has already come into the system for any dimension type, then dimension types will already exist. From the
Dimension Type list, select an existing dimension type. If the dimension type you need is absent from the
Dimension Type list, click the
Other button next to the
Dimension Type list and enter a new dimension-type name in the
Other value field (in the dialog box).
When you select an existing dimension type, any attributes defined for that dimension type will appear in the Attributes panel.
If no dimension-type data exists yet in the system, then you must create a new dimension type. Simply enter the new dimension-type name in the
Dimension Type text box.
5. To associate an intelligent link with this dimension, select an option from the Intelligent Link list box.
For more information about intelligent links, see
Defining Intelligent Links. The
Intelligent Link list box appears here only if intelligent links already have been configured. Once configured, intelligent links appear on the following
My webMethods pages:
Problems page
KPI Instance Detail page, on the data version of the page (as opposed to the graph/detail version of the page)
Process Instance Detail page
Step Instance Detail page
6. To add attributes in the Attributes panel, refer to the following procedure:
Note:
Attributes that are automatically imported with a dimension type cannot be renamed.
a. In the Attribute Name field, type a name for the attribute (maximum 25 alphanumeric characters). Each dimension attribute must have a unique name, and case is not a differentiator. In other words, the database sees Attribute1 and attribute1 as the same name.
CAUTION:Optimize databases do not distinguish between upper- and lowercase alphabetic characters, which means Attribute1 and attribute1 are the same name to the databases.
b. If you selected an intelligent link to associate with the dimension, you can optionally associate an intelligent-link parameter with this attribute by selecting from the Link Parameter drop-down menu. Position the mouse pointer over a parameter name to display the description of that parameter. If you did not select an intelligent link, the text Intelligent Link has no Parameters is displayed.
c. If you want to indicate that the attribute is a unique identifier for the dimension, select the Unique check box. Because unique attributes are by definition required, the Required check box is automatically selected when you select the Unique check box. Clear the Unique check box to indicate that the attribute is not a unique identifier for the dimension. For example, a Customer Number attribute might be unique but a Region attribute might not. You must identify at least one unique attribute for the dimension.
d. If the attribute is required, select the Required check box. Clear the check box to indicate that the attribute is not required for the dimension.
Keep in mind that if you set an attribute to Required, a new record for that dimension will be rejected if that attribute is not available. A dimension can have more than one Required attribute. For example, assume you have a Customer dimension that has the attributes Customer ID and Customer Name. Customer ID is set to both Unique and Required, and Customer Name is set only to Required. Whenever you create a new record for the Customer dimension, the record will be rejected unless both Customer ID and Customer Name are supplied. However, only the Customer ID attribute must be unique.
e. To add more attributes, click Add Attributeto add a new row at the bottom of the Attributes list and repeat the preceding steps.
8. If you are ready for Optimize to create a database table and begin collecting dimension data, click Save.
When you click Save, Optimize allocates database tables to store the dimension attributes in the database and also begins to process incoming data for the dimension. When you save a dimension, any changes to dimension attributes will cause previously collected data to be discarded.
9. If you have not previously mapped dimensions to a business process or system component, continue to
Mapping Events.