Listeners are used for inbound connections to the Integration Server. They are needed for RPC Listener connections, Reliable RPC Listener connections, and Direct RPC Listener connections.
Adapter notifications monitor an EntireX RPC service and notify the Integration Server when a message arrives on the EntireX RPC service for Reliable RPC.
Important:
Use the Integration Server Wrapper of the EntireX Workbench to
create RPC Listener connections with listeners and Reliable RPC Listener
connections with listeners, notifications, triggers, and document types. This
document describes steps to manually configure these objects. This is needed
for advanced configurations, for example triggers with filters.
The following topics are covered:
A generated trigger object needs a trigger service that it can call. The
input signature for a trigger service needs to have a document reference to the
generated publishable document type. While an Integration Server
service normally does not have such an input signature, we have to use a
workaround to enable the Integration Server service to retrieve the
input data from the publishable document. Therefore you can use the service
com.softwareag.entirex.wmadapter.Deployment:putDocDataToPipeline,
which retrieves all input data from the incoming document and puts it in the
pipeline where the Integration Server service is able to retrieve the
data. The following section provides a detailed description on how to use the
putDocDataToPipeline service.
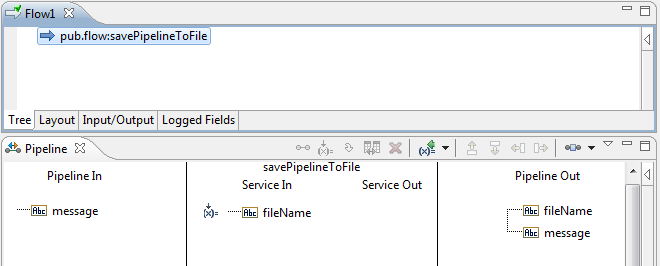
Suppose you have a flow service
Service:Flow1 which simply dumps the pipeline to a
file:

The Software AG IDL Extractor for webMethods Integration Server extracts the following IDL:

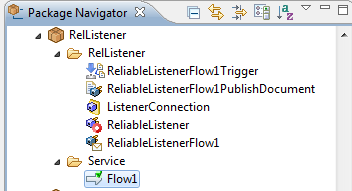
Generating a Reliable RPC Listener connection, a listener, a notification, a trigger, and a publishable document results in:

For the original Service:Flow1, the pipeline looks as
follows:

As a result, all parameters of the IDL program are inside the record for the document.
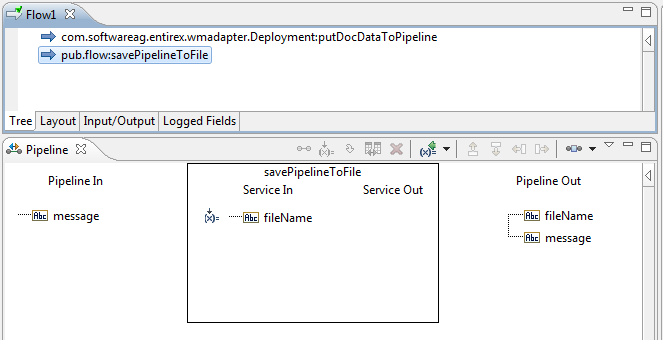
Now add the invoke node for
com.softwareag.entirex.wmadapter.Deployment:putDocDataToPipeline
to Flow1:

With the
com.softwareag.entirex.wmadapter.Deployment:putDocDataToPipeline
service the pipeline looks as follows:

The parameters of the IDL program (here message) are on
the top level of the pipeline. Also the record _env is on the top
level of the pipeline. This enables the service to use the parameters
directly.
Start the Integration Server and the IS Administration Console if they are not already running.
Make sure that you have webMethods administrator privileges so that you can access the EntireX Adapter's administrative screens.
Note:
For information on setting user privileges, see
IS Administration Console's Guide.
Using the IS Administration Console, make sure that the WmEntireX package is enabled. To verify the status of the WmEntireX package, see Enabling and Disabling Packages.
Using the IS Administration Console, configure a valid connection, for instance by copying a generated connection. For more information on configuring connections, see EntireX Adapter Connections (main section).
Start the Designer if it is not already running.
Make sure you are viewing the Designer in the Service Development perspective, as described in Switching Perspectives in the Designer online help.
Using the Designer, create a user-defined package to contain the listener, if you have not already done so. For more information on managing packages, see Package Management.
When you configure listeners of the EntireX Adapter, you specify information that the Integration Server uses to listen for, and get messages on, a specified EntireX broker. The broker is specified in the connection associated with the listener. You configure EntireX Adapter Listeners using the IS Administration Console.
![]() To configure a new listener
To configure a new listener
In the menu in the IS Administration Console's navigation area, click .
In the menu, click .
On the Listeners screen, click .
On the Listener Types screen, select EntireX Listener.
On the Configure Listener Type screen, in the EntireX Adapter section, use the following fields:
| Field | Description |
|---|---|
| Package | The package in which to create the listener. |
| Folder Name | The folder in which to create the listener. |
| Listener Name | The name of the listener. |
| Connection Name | The connection to associate with the listener. From the list of connections, select an appropriate connection that you created on the Configure Connections Type screen. Use separate connections for the adapter services and the adapter listeners. |
| Retry Limit | The number of times the adapter tries to
reconnect if the adapter fails to connect, or loses connection with the
EntireX broker. Default: 5.
|
| Retry Backoff Timeout | The number of seconds that elapse between each
of the retries specified in the retry limit. Default: 10.
|
| EntireX Subprogram Names | A list of subprogram names, separated by blanks. This list and the following list of service names is usually generated by the EntireX Workbench. |
| Service Names | A list of Integration Server services, separated by blanks. Each service corresponds to a subprogram name. For the subprogram the service at the same position in the list is called. The lists must have the same number of names. |
| Minimum Listener Threads | The number of worker threads for this listener
that should be started when the listener is enabled. If set to 0,
worker threads are started on demand. Default: 1.
|
| Maximum Listener Threads | The maximum number of listener threads to
start. Default: 1.
|
| Entry Handler Service | The name of an Integration Server
service which will be called in addition before the listener calls a service
listed in Service Names. The specification
pub.wmentirex.listener:entryExitHandlerSpecification describes the
interface of the handler service.
|
| Exit Handler Service | The name of an
Integration Serverservice which will be called in addition after the
listener has called a service listed in Service Names. The
specification
pub.wmentirex.listener:entryExitHandlerSpecificationdescribes the
interface of the handler service.
|
| Execute Service with Client Credentials | If enabled, the RPC client has to provide RPC
user ID and RPC password. These credentials are then used to execute the
Integration Server service. Note that currently the RPC user ID and password
are limited to 8 characters. Default: false.
|
| Null Value Suppression | See Configuring Null Value Suppression. |
Save the listener.
You can test listeners to ensure that you have configured them correctly.
![]() To test a listener
To test a listener
Configure a listener using the IS Administration Console. For instructions on how to configure a listener, see Configuring New Listeners.
For Reliable RPC Listener Connections only (asynchronous calls): Configure a listener notification using the Designer. See webMethods Service Development Help for more information.
For Reliable RPC Listener Connections only (asynchronous calls): Enable the listener notification using the IS Administration Console. For instructions on how to enable a listener notification, see Managing EntireX Adapter Notifications.
Enable the listener using the IS Administration Console.
Important:
The broker configured in the connection associated with the
listener must be running while the listener is enabled.
Use an RPC client to call the RPC server specified in the connection associated with the listener.
As a result, the listener receives the call, uses the parameters to call the flow service or the Java service, and returns the results to the RPC client.
Notes:
You can view a listener's parameters using the IS Administration Console or the Designer. You can also view the notification order of a listener.
![]() To view a listener's parameters using the
IS Administration Console
To view a listener's parameters using the
IS Administration Console
In the menu in the navigation area of the IS Administration Console, click .
In the menu, click .
On the listeners page, click the View icon for the listener that you want to see.
As a result, the View Listener screen displays the parameters for the listener. For descriptions of the listener parameters, see Configuring New Listeners.
Click to return to the main listeners screen.
Note:
Alternatively, you can use the Designer. See
webMethods Service Development Help for more information.
![]() To prepare to configure or manage EntireX Adapter
notifications
To prepare to configure or manage EntireX Adapter
notifications
Start your Integration Server and the IS Administration Console, if they are not already running.
Make sure you have webMethods administrator privileges so that you can access the EntireX Adapter's administrative screens. See Administering webMethods Integration Server for information on setting user privileges.
Using the IS Administration Console, make sure the WmEntireX package is enabled. See Enabling and Disabling Packages for instructions.
Using the IS Administration Console, configure an adapter connection to use with the notification. See Configuring Adapter Connections.
Start the Designer if it is not already running.
Make sure you are viewing the Designer in the Service Development perspective, as described in Switching Perspectives in the Designer online help.
Using the Designer, create a user-defined package to contain the notification, if you have not already done so.
Important:
When you configure notifications, you should always define
them in user-defined packages rather than in the WmEntireX package. For more
information on managing packages for the adapter, see
Package
Management.
Important:
You must enable a notification before you can use it. See
Managing
EntireX Adapter Notifications for
instructions.
When you configure EntireX Adapter notifications, you specify information that the Integration Server uses to read data from an EntireX broker and call a specified flow service or Java service. For more information on notifications, see Listeners and Adapter Notifications (separate sections). Be sure to review the section Before Configuring or Managing Notifications before you configure EntireX Adapter notifications.
Adapter notifications are only used for Reliable RPC Listener Connections.
![]() To configure an EntireX Adapter notification
To configure an EntireX Adapter notification
From the Designer menu, choose New...
Select from the list of elements and click .
Select as the adapter type and click .
Select the appropriate and click .
Select the Asynchronous Listener Notification template and click .
Select an and click .
Type a unique name for the notification and select the appropriate folder. Click .
Select a service to be called when an RPC call arrives at the listener. Click .
The names of the request and reply documents are displayed. Click .
As a result, the editor for the adapter notification appears.
Note:
You can select the Adapter Settings tab at
any time to confirm adapter service properties such as the Adapter
Name, Adapter Connection Name, and
Adapter Notification Template, as
necessary.
Select the Listener Notification tab and choose
the EntireX Subprogram Name. You may select Map Data Types to
String to map all IDL parameters to
java.lang.String. Otherwise, the IDL data types are
mapped to Java primitive data types.
As a result, the tables of output parameters and input parameters display the names, the IDL data types and the Java data types in the pipeline.
Note:
For information on using the Permissions tab
to assign an access control list (ACL) to an element, see
From the menu, choose (or ).
Note:
You must schedule and enable the notification using the
IS Administration Console before you can use it. See
Managing
EntireX Adapter Notifications for details.
You must enable an EntireX Adapter notification before you can use it to monitor EntireX brokers for messages. Use the IS Administration Console along with the following procedure to do so.
Note:
You must have webMethods administrator privileges to access the
EntireX Adapter's administrative screens. See the
Administering webMethods Integration Server for information on
setting user privileges.
![]() To enable (or disable) an EntireX Adapter notification
To enable (or disable) an EntireX Adapter notification
Start the IS Administration Console.
From the menu in the navigation area of the IS Administration Console, choose .
From the navigation area, select Listener Notifications.
In the Listener Notifications table, you can enable and disable the notification.
Important:
You cannot enable a notification if the adapter connection
that the notification is using is disabled.
As a result, the name of the package is displayed.
Use the Designer to view a notification. Make sure you are using the Designer in the Service Development perspective, as described in Switching Perspectives in the Designer online help.
![]() To view a notification
To view a notification
In the Designer Package Navigator view, expand the package and folder that contain the notification you want to view.
Select the notification you want to view.
The Designer displays the notification in the Adapter Notification Editor.
Use the Designer to edit notifications. Make sure you are using the Designer in the Service Development perspective, as described in Switching Perspectives in the Designer online help. You can change which connection an adapter notification uses.
![]() To edit a notification
To edit a notification
In the Designer Package Navigator view, expand the package and folder that contain the notification you want to view.
Select the notification you want to edit.
The Designer displays the notification in the Adapter Notification Editor.
Modify the values for notification's parameters as needed. For detailed descriptions of the notification's parameters, see the section on configuring a notification.
Use the Designer to delete adapter notifications. Make sure you are viewing the Designer in the Service Development perspective, as described in Switching Perspectives in the Designer online help.
![]() To delete a notification
To delete a notification
In the Designer Package Navigator view, expand the package and folder that contain the notification you want to delete.
Right-click the notification and then click .