
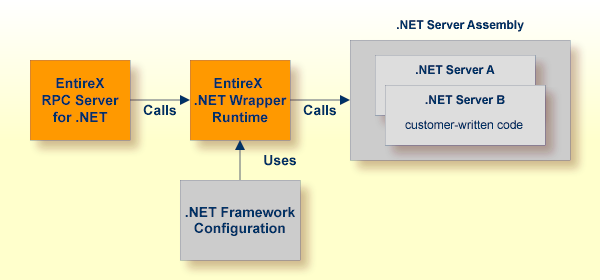
The EntireX RPC Server for .NET allows standard RPC clients to communicate with .NET server assemblies. It works together with the .NET Wrapper.
This document describes how to administer the RPC Server for .NET with local scripts as in earlier versions of EntireX. It covers the following topics:
See also Administering the RPC Server for .NET with the Command Central GUI | Command Line.
The following elements are used for setting up the RPC Server for .NET:
The name of the delivered example configuration file is dotNetServer.cfg provided in the config folder. The configuration file contains the configuration for the RPC Server for .NET. The following settings are important:
connection information such as broker ID, server address (class, name, service)
scalability parameters
trace settings
etc.
For more information see Configuring the RPC Server.
Technically the RPC Server for .NET consists of the rpcserver.exe and dotNetServer.dll provided in the bin folder. The modules must always be kept together in the same folder.
The .NET Wrapper Runtime is required by the RPC Server for .NET. It is implemented in the assembly SoftwareAG.EntireX.NETWrapper.Runtime.dll provided in the bin folder. It contains, for example, marshalling code for .NET data types to Software AG IDL data types and unmarshalling code for the opposite direction.
For complex installations and if the .NET Server assemblies are deployed in different folders(1), a .NET Framework Configuration file called rpcserver.exe.config is required. It defines in XML format several parameters of the RPC Server for .NET, such as the dependent assemblies, version and location and others. The file rpcserver.exe.config must be located in the same folder as the RPC Server for .NET itself, which by default is the bin folder of the EntireX installation. If there are multiple .NET servers assemblies, each deployed in different folders which need to be called by the RPC Server for .NET, they all must be defined in the rpcserver.exe.config file.
<configSections>
  <!-- EntireX Configuration Section Group Definition -->
  <sectionGroup name="EntireX">
    <section name="Assemblies" type="System.Configuration.NameValueSectionHandler, System, Version=2.0.0.0, Culture=neutral, PublicKeyToken=b77a5c561934e089, Custom=null" />
  </sectionGroup>
</configSections>
<EntireX>
  <!-- EntireX Assembly Configuration -->
  <Assemblies>
    <add key="SoftwareAG.EntireX.NETWrapper.Runtime" value="C:\SoftwareAG\EntireX\bin\SoftwareAG.EntireX.NETWrapper.Runtime.dll" />
  </Assemblies>
</EntireX>
where the location of the .NET Wrapper Runtime is replaced by the location used in your EntireX installation. Add an entry in the Assemblies section for each of your called .NET Server assemblies:
<add key="MyAssembly", value="MyLocation"/>
where MyAssembly and
MyLocation represent the
name and location of your .NET server assembly. In this context, the.NET server assembly must have a strong name. Refer
to the Microsoft documentation for the .NET Framework.
If versioning is required for your assemblies, follow the rules under Assembly Versioning in the .NET Wrapper documentation.
Notes:
configSections part of file rpcserver.exe.config is required.
The start script for the RPC Server for .NET is called dotNetServer.bat and is provided in the bin folder of the installation directory. You may customize this file. The start script contains the following:
paths to the called .NET server
the configuration file used; see Configuration File
etc.
The following rules apply:
In the configuration file:
Comments must be on a separate line.
Comment lines can begin with '*', '/' and ';'.
Empty lines are ignored.
Headings in square brackets [<topic>] are ignored.
Keywords are not case-sensitive.
Underscored letters in a parameter indicate the minimum number of letters that can be used for an abbreviated command.
For example, in brokerid=localhost,
brok is the minimum number of letters that
can be used as an abbreviation, that is, the commands/parameters broker=localhost
and brok=localhost are equivalents.
| Parameter | Default | Values | Req/ Opt |
|||||||||||||||||||||
|---|---|---|---|---|---|---|---|---|---|---|---|---|---|---|---|---|---|---|---|---|---|---|---|---|
brokerid |
localhost |
Broker ID used by the server. See Using the Broker ID in Applications.
Example: |
R | |||||||||||||||||||||
callexit |
dotNetServer |
Do not change! | R | |||||||||||||||||||||
class |
RPC |
Server class part of the server address used by the
server. The server address must be defined as a service in the broker attribute file (see Service-specific Attributes).
Case-sensitive, up to 32 characters. Corresponds to CLASS.
Example: |
R | |||||||||||||||||||||
codepage |
The codepage tells the broker the encoding of the data. The application must ensure the encoding of the data matches the codepage. The RPC server itself does not convert your application data. The application's data is shipped and received as given. Often, the codepage must also match the encoding used in the RPC server environment for file and terminal IO, otherwise unpredictable results may occur. Under the Windows operating system:
codepage=windows-1256 Enable character conversion in the broker by setting the service-specific attribute |
O | ||||||||||||||||||||||
compresslevel |
N |
Enforce compression when data is transferred between
broker and server. See Data Compression in EntireX Broker.
Example: |
O | |||||||||||||||||||||
endworkers |
timeout |
Example: |
O | |||||||||||||||||||||
library |
library =PREFIX(D) - PREFIX() |
library = search_logic [-
Example |
O | |||||||||||||||||||||
logon |
YES |
Execute broker functions LOGON/LOGOFF in worker
threads. Must match the setting of the broker attribute
AUTOLOGON. Reliable RPC requires logon set to YES. See Reliable RPC.
Example: |
O | |||||||||||||||||||||
minworkers |
1 |
Minimum limit of worker threads.
See also Example: |
O | |||||||||||||||||||||
maxworkers |
10 |
Upper limit of all tasks concurrently. Do not set a value higher than 256. See also Example: |
O | |||||||||||||||||||||
password |
no default | The password for secured access to the broker. If possible (write access) the password is encrypted and written to parameter
password.e.
The parameter password is removed.
To change the password, add the parameter password with the new password as value.
Example: |
O | |||||||||||||||||||||
restartcycles |
15 | Number of restart attempts if the broker is not available.
This can be used to keep the RPC Server for .NET running while the broker is down for a short time.
A restart cycle will be repeated every 60 seconds.
Note: When the number of specified cycles is reached and a connection to the broker is not possible, the RPC Server for .NET stops. Example: The server waits up to 30 minutes (30*6*10 seconds) before it terminates due to a missing broker connection. |
O | |||||||||||||||||||||
runoption |
Reset |
Do not change! Do not add other run options | R | |||||||||||||||||||||
servername |
SRV1 |
Server name part of the server address used by the server.
The server address must be defined as a service in the broker attribute file.
See Service-specific Attributes.
Case-sensitive, up to 32 characters.
Corresponds to SERVER of the broker attribute file.
Example: |
R | |||||||||||||||||||||
service |
CALLNAT |
Service part of the server address used by the server.
The server address must be defined as a service in the broker attribute file.
See Service-specific Attributes.
Case-sensitive, up to 32 characters.
Corresponds to SERVICE attribute of the broker attribute file.
Example: |
R | |||||||||||||||||||||
ssl_file |
no default | Set the SSL parameters. See Using SSL/TLS with the RPC Server for examples and more information. | O | |||||||||||||||||||||
timeout |
60 | Timeout in seconds,
used by the server to wait for broker requests. See broker ACI control block field
WAIT for more information.
Also influences restartcycles and worker model DYNAMIC.
Example: |
O | |||||||||||||||||||||
tracedestination |
ERXTrace.nnn.log |
The name of the destination file for trace output. By default the main trace file name is
If the default is not used and a
See also Activating Tracing for the RPC Server. Example: |
O | |||||||||||||||||||||
tracelevel |
None |
Trace level for the server. See also Activating Tracing for the RPC Server.
tracelevel = None | Standard | Advanced | Support
Example: |
O | |||||||||||||||||||||
traceoption |
None |
Additional trace option if trace is active. See also Activating Tracing for the RPC Server.
Example: |
O | |||||||||||||||||||||
userid |
ERX-SRV |
The user ID for access to the broker. The default ERX-SRV will be used if this parameter is omitted or specified without a value: "userid=".
Example: |
O |
The approach depends on whether the called .NET Server assemblies are in the same folder as the RPC Server for .NET and .NET Wrapper Runtime or in a different folder:
Assemblies in same folder
Having your .NET Server assemblies in the same folder as the RPC Server for .NET and .NET Wrapper Runtime
makes sense for test and development purposes, and also for small applications.
The .NET Server assemblies are loaded from the respective folder. No extra .NET Framework configuration is required.
See also Deploying the RPC Server.
Assemblies in different folder
If your .NET Server assemblies are not in the same folder as the RPC Server for .NET and .NET Wrapper Runtime, you need to
configure your .NET Framework.
See .NET Framework Configuration.
RPC servers can use Secure Sockets Layer/Transport Layer Security (SSL/TLS) as the transport medium. The term "SSL" in this section refers to both SSL and TLS. RPC-based servers are always SSL clients. The SSL server can be either the EntireX Broker, Broker SSL Agent, or Direct RPC in webMethods Integration Server (IS inbound). For an introduction see SSL/TLS and Certificates with EntireX in the Platform-independent Administration documentation.
 To use SSL
To operate with SSL, certificates need to be provided and maintained. Depending on the platform, Software AG provides default certificates, but we strongly recommend that you create your own. See SSL/TLS Sample Certificates Delivered with EntireX in the EntireX Security documentation.
Specify the Broker ID, using one of the following styles:
URL Style, for example:
ssl://localhost:2010
Transport-method Style, for example:
ETB024:1609:SSL
If no port number is specified, port 1958 is used as default.
Specify SSL parameters, using one of the methods below:
As part of the Broker ID
The simplest way to specify short SSL parameter is to add them to the Broker ID.
Example with URL-style Broker ID:
ssl://localhost:2010?VERIFY_SERVER=N&TRUST_STORE=c:\\certs\\CaCert.pem
Example with transport-method-style Broker ID:
ETB024:1609:SSL?VERIFY_SERVER=N&TRUST_STORE=c:\\certs\\CaCert.pem
In the SSL file
Complex SSL parameters can be specified in a so-called SSL file, a text file containing the parameters.
Define the SSL file with the SSL parameters, for example file mySSLParms.txt with the following contents:
VERIFY_SERVER=N
TRUST_STORE=c:\\certs\\CaCert.pem
Define the SSL file in the configuration file of the RPC Server for .NET. See parameter ssl_file under Configuring the RPC Server. Example:
brokerid=ssl://localhost:2010
.
.
ssl_file=C:\mySSLdirectory\mySSLParms.txt
If the SSL client checks the validity of the SSL server only, this is known as one-way SSL. The mandatory trust_store parameter
specifies the file name of a keystore that must contain the list of trusted certificate authorities for the certificate of
the SSL server.
By default a check is made that the certificate of the SSL server is issued for the hostname specified in the Broker ID.
The common name of the subject entry in the server's certificate is checked against the hostname. If they do not match, the
connection will be refused.
You can disable this check with SSL parameter verify_server=no.
If the SSL server additionally checks the identity of the SSL client, this is known as two-way SSL. In this case the SSL server requests a client certificate
(the parameter verify_client=yes is defined in the configuration of the SSL server).
Two additional SSL parameters must be specified on the SSL client side: key_store and key_passwd.
This keystore must contain the private key of the SSL client. The password that protects the private key is specified with
key_passwd.
The ampersand (&) character cannot appear in the password.
SSL parameters are separated by ampersand (&). See also SSL/TLS Parameters for SSL Clients.
Make sure the SSL server to which the RPC Server for .NET connects is prepared for SSL connections as well. The SSL server can be EntireX Broker, Broker SSL Agent, or Direct RPC in webMethods Integration Server (IS inbound). See:
Before starting, make sure all your .NET server assemblies are accessible through the standard Windows DLL load mechanism. See also Locating and Calling the Target Server.
To start the RPC Server for .NET
Use the Start Script.
Or:
Use the following format:
rpcserver CFG=name [-option] [brokerid] [class] [servername] [service]
Here are some sample options. See Configuring the RPC Server for full list.
-serverlog |
Defines an alternative log file. Under Windows, this is typically used by Windows Services. See Running an EntireX RPC Server as a Windows Service. |
-s[ilent] |
Run the RPC server in silent mode, that is, no terminal input will be required (for example to acknowledge error messages). The batch scripts will terminate automatically. |
-TraceDestination |
Set the trace destination parameter. |
-TraceLevel None|Standard|Advanced |
Set the trace level parameter. |
Note:
The server input arguments are resolved from left to right. Parameters defined in the configuration file may be overridden
by parameters applied on the command line and vice versa. See Configuring the RPC Server for full list of options.
Or:
You can use the RPC Server for .NET as a Windows Service. See Running an EntireX RPC Server as a Windows Service.
To stop the RPC Server for .NET
Use the command stopService. See Stop Running Services in Command Central's Command-line Interface.
Or:
Stop the service using Command Central's Graphical User Interface. See Stopping a Service.
Or:
Use the command-line utility etbcmd. See etbcmd under
z/OS |
UNIX |
Windows |
z/VSE |
BS2000.
Or:
Use CTRL-C in the session where you started the RPC server instance.
See also Component Return Codes in EntireX.
To ping the RPC Server for .NET
Enter the following command:
java -classpath "$EXXDIR/classes/entirex.jar" com.softwareag.entirex.rpcping.RPCServerPing -p <admin_port>
| where | admin_port |
is the number of the administration port. |
The ping command returns "0" if the server is reachable, and "1" if the server cannot be accessed.
The easiest way to deploy and run an RPC Server for .NET with its .NET server assemblies is the so-called XCOPY-deployment(1). This means that all relevant files of the RPC Server for .NET are installed in a single folder. The only prerequisite is that the EntireX Mini Runtime Considerations is installed. The following files are typically required:
.NET Wrapper Runtime SoftwareAG.EntireX.NETWrapper.Runtime.dll
RPC Server for .NET rpcserver.exe and dotNetServer.dll
Configuration File dotNetServer.cfg
.NET Server assemblies (containing customer-written code), see Writing a .NET Server Assembly in the .NET Wrapper documentation
Notes:
For general information see Running an EntireX RPC Server as a Windows Service.
To run the RPC Server for .NET as a Windows Service
Customize the Start Script according to your system installation.
Note:
The script file must pass external parameters to the RPC server and use the option –silent:
rpcserver CFG=..\config\dotNetServer.cfg -s %*
See also Starting the RPC Server.
Test your RPC server to see whether it will start if you run your script file.
Use the EntireX RPC Service Tool and install the RPCService with some meaningful extension, for example MyServer. If your Start Script is dotNetServer.bat, the command will be
RPCService -install -ext MyServer -script install_path\EntireX\bin\dotNetServer.bat
The log file will be called RPCservice_MyServer.log.
In Windows Services menu (Control Panel > Administrative Tools > Services) select the service: Software AG EntireX RPC Service [MyServer] and change the property Startup Type from "Manual" to "Automatic".
To switch on tracing for the RPC Server for .NET
Set the parameters
tracelevel,
traceoption and
tracedestination. See Configuring the RPC Server.
Start the RPC Server for .NET. See Starting the RPC Server.
To evaluate the return codes, see Component Return Codes in EntireX.
To switch off tracing
Set the tracelevel parameter to None.