Creating a Flat File Schema From a Sample File
When you create a flat file schema, keep the following points in mind:

You must have Write access to the folder in which you want to store the flat file schema.
Ensure that you have a valid sample file.
If you want to edit the schema after the schema is generated, you can do so. To see the details, refer
Editing a Flat File Schema.

To create a flat file schema from a sample file
1. In the Package Navigator view of Designer, click File > New > Flat File Schema.
2. In the New Flat File Schema wizard, select the folder in which you want to save the flat file schema.
3. In the Element name field, type a name for the flat file schema using any combination of letters, numbers, and/or the underscore character. For information about restricted characters, see
About Element Names. 4. Click Next.
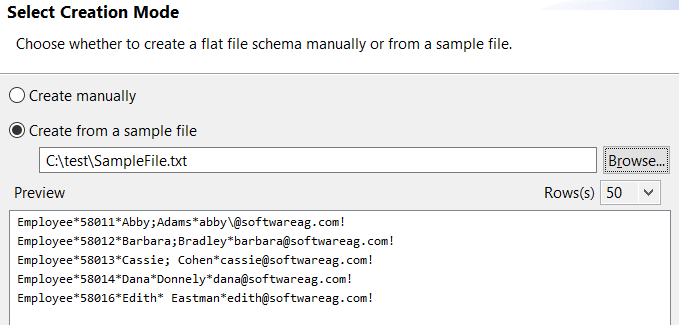
5. In the Select Creation Mode panel, select Create from a sample file.
6. Click Browse to navigate to and select the sample file from your computer.
The Preview pane displays the contents of the sample file. You can select the number of rows to be displayed in the Preview pane using the Rows(s) drop down box.
7. Click Next.
8. In the Select Record Identifier panel, select any one of the following:
a. Yes if the record has a tag identifier.
b. No if the record does not have a tag identifier. In this case,
Designer considers the flat file schema name that you have set in Step 3 as the record identifier. You can modify the record identifier while specifying the properties of the schema in
Define the Schema panel in Step 13(e). For more details on specifying a record identifier, see
Specifying a Record Identifier.
If you select
No and
Create flat file schema with dictionary check box (selected by default),
Designer creates a flat file dictionary corresponding to the new flat file schema under the same package with name as
<SchemaName>_dictionary. For more information on flat file dictionary, see
Creating Flat File Dictionaries.
Note:
Clear Create flat file schema with dictionary check box if you want to create the flat file schema without a flat file dictionary.
9. Click Next.
10. In the Choose Record Parser Type panel, select one of the following to indicate how the data in the sample file is formatted:
Record Parser Type | Description |
Delimited | Use this parser when each record is separated by a delimiter. See
Step13. Note:
If each record is separated by a record delimiter and fields are of type fixed length, select Delimited with fixed length fields. You can format the data using the record delimiter and the fixed length parser. See
Step14. |
Fixed length | Use a fixed length record parser when each record is of a fixed length (for example, mainframe punch or print records). This parser splits a file into records of the same pre-specified length. See
Step15. |
Variable length | This parser expects each record to be preceded by two bytes that indicate the length of the record. Each record may be of different length. See
Step 16. |
11. In Start import at row, set the row number so that Designer discards the previous rows and displays the records from that row under the Preview pane.
12. Click Next.
13. If you selected Delimited as the parser type, specify the parser properties in the Delimited Record Parser panel. Designer updates the Preview contents based on your selections.
a. Use the following table to specify the delimiters used in the sample file.
Property | Description |
Record | Character that separates records in a flat file document. Note:
If a new line character (\n) exists at the end of each record and the Record delimiter is not ending with \n, then Designer cannot render the records properly under the Preview pane. |
Field | Character that separates fields in a flat file document. |
Subfield | Character that separates subfields in a flat file document. |
Quoted release character | Character used to enable a section of text within a field to be represented as its literal value. Any delimiter characters that appear within this section will not be treated as delimiters. For example, your field delimiter is (,) and your quoted release character is “. When you want to use (,) within a field as text, you must prefix it with your quoted release character. When using the convertToValues service to create the strings Doe, John and Doe, Jane, the record would appear as “Doe, John”,“Doe, Jane”. When using the convertToString service to create “Doe, John”,“Doe, Jane”, the value of the record would be Doe, John and Doe, Jane. When using the convertToString service, if you have specified both the Release Character and the Quoted Release Character, the Quoted Release Character will be used. |
Release character | Character used to enable a delimiter to be used for its intended, original meaning. The character following the release character will not be treated as a delimiter. For example, your field delimiter is + and your release character is \. When using + within a field as text, you must prefix it with your release character. When using the convertToValues service to create the strings a+b+c and d+e+f, the record would appear as a\+b\+c+d\+e\+f. When using the convertToString service to create a\+b\+c+d\+e\+f, the value of the record would be a+b+c and d+e+f. |
b. Select Show unique rows by record identifier to filter out records based on a common identifier.
c. Select Set first row as column name to choose the records on the first row as the column name of each record.
d. Click Next.
e. In the Define the Schema panel, specify the properties of the schema:
Use the buttons (

,

) to change the position of a record. To collapse a record and all its fields, select it and click

. To delete a field from the record, select the field and click

. To undo the operation, click

and to redo click

.
f. Click Finish to create the flat file schema.
Integration Server generates a flat file schema and Designer displays it in the Package Navigator view.
14. If you selected Delimited with fixed length fields as the parser type, specify the parser properties. Designer updates the Preview contents based on your selections.
a. To create fields and subfields for the record, choose Fields or Subfields and use the indentation ruler under the Preview pane. Indentation ruler appears on a mouse hover. You can click on the Preview pane and select the location of each field.
Field Positions panel displays the position of every field and subfield on the
Preview pane.
Use the buttons (

,

,

,

,

) and the editor to add or edit the fields and subfields.
To collapse a field and its subfields, select the field and click
.
b. Set a character as the Record delimiter to adjust the record so that it appears correctly under Preview pane.
Note:
If a new line character (\n) exists at the end of each record and the Record delimiter is not ending with \n, then Designer cannot render the records properly under the Preview pane.
c. Select Show unique rows by record identifier to filter out records based on a common identifier.
d. Select Set first row as column name to choose the records on the first row as the column name of each record.
e. Click Next.
f. In the Define the Schema panel, specify the properties of the schema:
Use the buttons (
,
) to change the position of a record. To collapse a record and all its fields, select it and click
. To delete a field from the record, select the field and click
.
g. Click Finish to create the flat file schema.
Integration Server generates a flat file schema and Designer displays it in the Package Navigator view.
15. If you selected Fixed length as the parser type, specify the parser properties. Designer updates the Preview contents based on your selections.
a. To create fields and subfields for the record, choose Fields or Subfields and use the indentation ruler under the Preview pane. Indentation ruler appears on a mouse hover. You can click on the Preview pane and select the location of each field.
Field Positions panel displays the position of every field and subfield on the
Preview pane.
Use the buttons (
,
,
,
,
) and the editor to add or edit the fields and subfields.
To collapse a field and its subfields, select the field and click
.
b. Set a value in Record length to adjust the record so that it appears correctly under Preview pane. Record length only supports positive integer values between one and total number of characters in the file.
Note:
Record length cannot be empty.
c. Select Show unique rows by record identifier to filter out records based on a common identifier.
d. Select Set first row as column name to choose the records on the first row as the column name of each record.
e. Click Next.
f. In the Define the Schema panel, specify the properties of the schema:
Use the buttons (
,
) to change the position of a record. To collapse a record and all its fields, select it and click
. To delete a field from the record, select the field and click
.
g. Click Finish to create the flat file schema.
Integration Server generates a flat file schema and Designer displays it in the Package Navigator view.
16. If you selected Variable length as the parser type, specify the parser properties in the Delimited Record Parser panel. Designer updates the Preview contents based on your selections.
a. Use the following table to specify the delimiters used in the sample file.
Property | Description |
Field | Character that separates fields in a flat file document. |
Subfield | Character that separates subfields in a flat file document. |
Quoted release character | Character used to enable a section of text within a field to be represented as its literal value. Any delimiter characters that appear within this section will not be treated as delimiters. For example, your field delimiter is (,) and your quoted release character is “. When you want to use (,) within a field as text, you must prefix it with your quoted release character. When using the convertToValues service to create the strings Doe, John and Doe, Jane, the record would appear as “Doe, John”,“Doe, Jane”. When using the convertToString service to create “Doe, John”,“Doe, Jane”, the value of the record would be Doe, John and Doe, Jane. When using the convertToString service, if you have specified both the Release Character and the Quoted Release Character, the Quoted Release Character will be used. |
Release character | Character used to enable a delimiter to be used for its intended, original meaning. The character following the release character will not be treated as a delimiter. For example, your field delimiter is + and your release character is \. When using + within a field as text, you must prefix it with your release character. When using the convertToValues service to create the strings a+b+c and d+e+f, the record would appear as a\+b\+c+d\+e\+f. When using the convertToString service to create a\+b\+c+d\+e\+f, the value of the record would be a+b+c and d+e+f. |
b. Select Show unique rows by record identifier to filter out records based on a common identifier.
c. Select Set first row as column name to choose the records on the first row as the column name of each record.
d. Click Next.
e. In the Define the Schema panel, specify the properties of the schema:
Use the buttons (
,
) to change the position of a record. To collapse a record and all its fields, select it and click
. To delete a field from the record, select the field and click
.
f. Click Finish to create the flat file schema.
Integration Server generates a flat file schema and Designer displays it in the Package Navigator view.