
This document describes how to record and run a simple unit test and covers the following topics:
Note:
The functionality described here was formerly delivered with the Software AG product Natural Screen Tester.
This product has now been integrated into ApplinX.
Make sure you have the following:
License for ApplinX
Software AG Designer
Local or remote Natural application to test
See Prerequisites for complete list of system prerequisites.
- Assertion
An assertion encapsulates some testable logic specified about a target under test. This can be an attribute-value pair, for example
"firstName":"John", or a true-false statment inserted in a program where the developer always expects a certain condition, for example"endOfList":"true". Assertions are stored in the generated JSON file.- Configuration File
Each test project has a configuration file in JSON format. This contains default values for the packages contained in the test project, for example
"hostApplication":"my_Mainframe".- Host
The host containing the application you want to test.
- Input
Field identified as input field when the path procedure is recorded, for example User ID. Inputs are stored in the generated JSON file.
- JSON File
In ApplinX, a JSON file (JavaScript Object Notation) is generated by the Generate Unit Test wizard from the test project. It contains inputs and assertions for the unit test as attribute-value pairs. You can copy a generated JSON file and change the inputs and assertions. The unit test is then run multiple times, once for each JSON file.
- Path Procedure
A path procedure corresponds to an individual function, for example LoginFlow or GetUserById. It is the result of the recorded screen flow. From a recorded path procedure you can generate a unit test.
- Unit Test
A unit test is generated from a recorded screen flow, for example LoginFlow. A unit test is generated as a path procedure to a new test project or added to an existing test project. The unit test is run from the Java file that is generated in the test project.
This section covers the following topics:
 To create a new ApplinX application
From the Software AG Designer, open the ApplinX development environment.
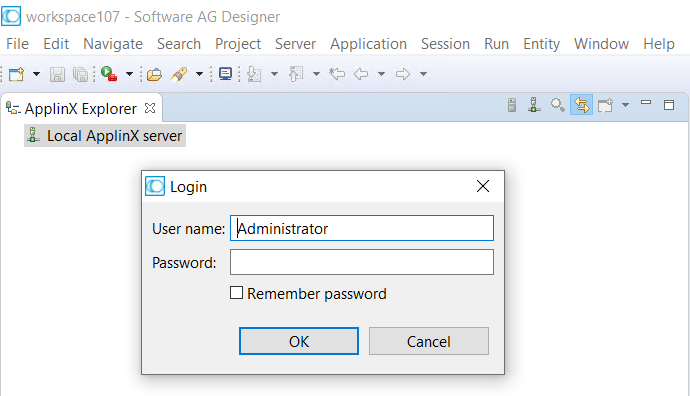
Connect to the ApplinX server by double clicking the server icon. A new dialog for credentials is opened.
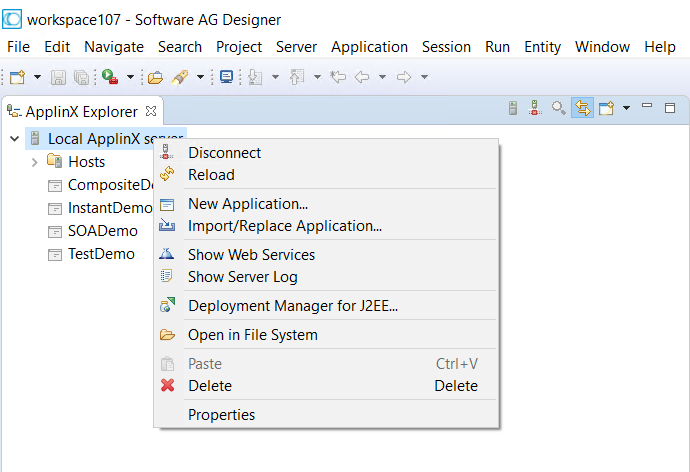
In the ApplinX perspective, create a new ApplinX application. Select Local ApplinX server, and from the context menu choose New Application.
Enter a name for your new project, a description and specify the initialization mode. Press Next. See Application Configuration Parameters in the ApplinX Reference Guide.
Under General ApplinX Application Information, specify your Natural host.
To identify screens and fields
See Screens in the Designing and Developing a Test Case documentation.
To record your path procedure
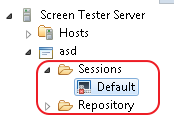
Under the Sessions folder, double-click the Default session to start the green screen host session of the ApplinX application. During this session you record the screen flow of the path procedure.
Record the screen flow that covers the path procedure. ![]()
During recording, mark the fields you want to include as inputs for your path procedure. ![]()
During recording, mark the fields you want to include as assertions for your path procedure. ![]()
Stop the recording. ![]()
In the Define Path Procedure Name screen, enter a name, description and folder where the path procedure will be stored.
To generate a unit test
Review the path procedure to make sure the inputs and outputs were recorded correctly. You can also edit or add logic to the recorded path procedure to make it more general or specific to suit your needs.
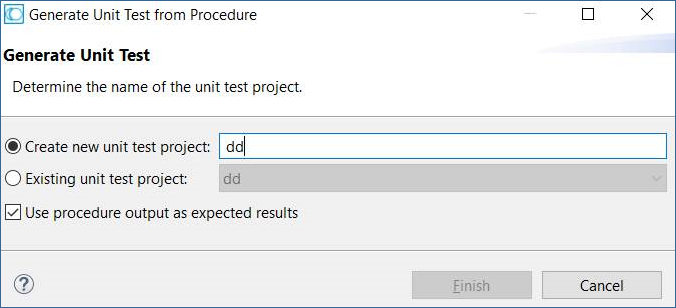
Select the path procedure and choose Generate Unit Test.
The following artifacts are generated:
Java project that includes a Java file containing the executable path procedure
JSON configuration file
JSON file containing inputs and assertions
required binary files that are included in the Java project
See Working with JSON Files and Managing Test Data under Designing and Developing an Application.
To run the unit test
From the Java perspective, select the generated Java file. From the context menu choose Run as > JUnit Test.