Pagination Using the MashZone NextGen DataTable API
The MashZone NextGen DataTable API allows you to easily send requests and handle responses that require pagination. This API also provides a simple client data model for responses.
Unpack the template Zip file under the web applications home for the application server hosting your MashZone NextGen Server. If you are using the default Tomcat server for MashZone NextGen, this would be the /MashZone NextGenversion/appserver/apache-tomcat-6.0.29/webapps folder.
Add Pagination Buttons in the App HTML
Open SampleDataTblPagination/html/app.html in the editor of your choice and update the HTML tags.
<div
>
<div
>
<button id="firstItem"><<</button>
<button id="prevItem"><</button>
<button id="nextItem">></button>
<button id="lastItem">>></button>
</div>
<div>
<table
>
<thead>
<tr>
<th>Title</th>
<th>Address</th>
<th>City</th>
<th>Phone</th>
<th>Distance</th>
<th>URL</th>
</tr>
</thead>
<tbody
></tbody>
</table>
</div>
</div>
Add CSS Styles for the Pagination Buttons
Open the SampleDataTblPagination/css/app.css stylesheet and add the appropriate styles for the table and buttons:
div.sampleTbl { font-family: Arial, Verdana, sans-serif; font-size: 9pt;
display: block;}
table.myTable {border: 1px solid #c9c9c9; border-collapse: collapse;
margin-top: 10px;}
table.myTable thead {background-color: #ededed;}
table.myTable th, table.myTable td {padding: 5px; border: 1px solid #c9c9c9;}
.buttons {padding: 5px; display:block; }
.buttons button{ margin:0 4px 0 0; padding: 4px; background-color:#ededed;
border:1px solid #c9c9c9; border-top:1px solid #cbcbcb;
border-left:1px solid #cbcbcb; color: #666; font-size:100%; line-height:130%;
text-decoration:none; font-weight:bold; cursor:pointer; width:auto;
overflow:visible; }
Add the DataTable Library to the App Specification
Next, we must update the App Specification to add the JavaScript libraries it needs and use the correct constructor for the app.
Open SampleDataTblPagination/app.xml in the editor of your choice. The initial App Specification is based on the sample Hello World app shipped with MashZone NextGen. First, let’s update the basic information about the app such as the <title> and <description>:
<app id="SampleDataTblPagination" name="SampleDataTblPagination"
jsclass="Sample.HelloWorld" height="200" width="200"
draggable="false" minimizable="false">
<title>SampleDataTblPagination</title>
<description>Sample to invoke one mashable using the DataTable API
to enable server pagination and render results in a simple table
with a pagination bar. </description>
...
Next, we update the jsclass attribute on <app> to match the name of the JavaScript class we will write for this custom app. Change this to Sample.DataTablePagination.
<app id="SampleDataTblPagination" name="SampleDataTblPagination"
jsclass="Sample.DataTablePagination" height="200" width="200"
draggable="false" minimizable="false">
<title>SampleDataTblPagination</title>
...
Last, the app needs to work with both the MashZone NextGen DataTable API and the JQuery Templating API. To make sure these JavaScript libraries are loaded, add two <require> elements to the <requires> section, like this:
<app id="SampleDataTblPagination" name="SampleDataTblPagination"
jsclass="Sample.DataTablePagination" height="200" width="200"
draggable="false" minimizable="false">
<title>SampleDataTbl</title>
...
<requires>
<require name="presto-data" type="library" version="1.0"/>
<require name="jquery-tmpl" type="library" version="1.0"/>
<require src="js/app.js" type="script"/>
<require src="css/app.css" type="css"/>
<require src="html/app.html" type="html"/>
</requires>
</app>
Start a Constructor for the Custom App
The behavior for the custom app is defined in the app.js library, in this case in SampleDataTblPagination/js/app.js.
Open app.js in the editor of your choice to create the constructor for the app. Then declare a namespace for the app and start the constructor function:
Presto.namespace("Sample");
Sample.DataTablePagination = function( app ) {
};
App constructors should always get a reference to the root node for the app. Apps that invoke MashZone NextGen mashables or mashups should also get a reference to the default connection to the MashZone NextGen Server:
Presto.namespace("Sample");
Sample.DataTablePagination = function( app ) {
var rootDiv = jQuery(app.getRootElement);
var connection = app.getConnection();
};
For this app, we also need to define a JQuery template to use to generate the rows of the table once the app receives a response. This typically involves adding HTML tags and templating syntax to map fields in the response:
Presto.namespace("Sample");
Sample.DataTablePagination = function( app ) {
var rootDiv = jQuery(app.getRootElement);
var connection = app.getConnection();
var rowMarkup = "<tr><td>${Title}</td><td>${Address}</td><td>${City}</td>
<td>${Phone}</td><td>${Distance}</td><td>${BusinessUrl}</td></tr>"
jQuery.template("rowTemplate", rowMarkup);
};
Create the App DataTable
This example app will use a DataTable to send a request to the MashZone NextGen Server to invoke the Yahoo local Search mashable, and once the result is cached, to request other pages from cache. The DataTable acts as a client data model, providing some utility methods and simplifying the process of working with the paginated results.
To create a DataTable, we need:

Some variables to track pagination status
Configuration information for the request to send to the
MashZone NextGen ServerA connection to the
MashZone NextGen ServerThe variables we need to track include:
Presto.namespace("Sample");
Sample.DataTablePagination = function( app ) {
var rootDiv = jQuery(app.getRootElement);
var connection = app.getConnection();
var rowMarkup = "<tr><td>${Title}</td><td>${Address}</td><td>${City}</td>
<td>${Phone}</td><td>${Distance}</td><td>${BusinessUrl}</td></tr>"
jQuery.template("rowTemplate", rowMarkup);
var cursor = 1; //first item in current page
var total = 0; //total number of items cached in server
var totalPages = 0; // number of pages availables
var pageSize = 5; // number of rows per page
};
The configuration information needed to send requests includes the URL to invoke the mashable, the HTTP method to use, the content type, and for POST requests, the body of the request.
Presto.namespace("Sample");
Sample.DataTablePagination = function( app ) {
...
var cursor = 1; //first item in current page
var total = 0; //total number of items cached in server
var totalPages = 0; // number of pages availables
var pageSize = 5; // number of rows per page
requestBody = '';
var reqConfig = { uri: "/mashzone/edge/api/rest/YahooLocalSearchREST/getData?x-presto-resultFormat=json&appid=
.kcC72DV34FYTpAGuwwbV8YGI.DsMBQ0RB9eZARS621ecnHq33c.g1XJV93a64hrdaM3&query=banks&zip=94102&results=20",
type: "get",
contentType: "application/x-www-form-urlencoded",
data: requestBody
};
};
You can get this information from the Technical Specs tab in the artifact page for any mashable or mashup. If needed, see
Use Mashable/Mashup Technical Specs for more information.
Last, we must define the "record" to be paginated. This is defined with an XPath expression that identifies the repeating item in the results. Once we have the record defined, we create a new DataTable for the app:
Presto.namespace("Sample");
Sample.DataTablePagination = function( app ) {
...
var cursor = 1; //first item in current page
var total = 0; //total number of items cached in server
var totalPages = 0; // number of pages availables
var pageSize = 5; // number of rows per page
requestBody = '';
var reqConfig = { uri: "/mashzone/edge/api/rest/YahooLocalSearchREST/getData?x-presto-resultFormat=
json&appid=.kcC72DV34FYTpAGuwwbV8YGI.DsMBQ0RB9eZARS621ecnHq33c.g1XJV93a64hrdaM3&query=banks&zip=94102&results=20",
type: "get",
contentType: "application/x-www-form-urlencoded",
data: requestBody
};
var record = "/ResultSet/Result";
var dataTable = new Presto.DataTable( {
request: reqConfig,
connection: connection,
record: record
});
};
Add Configuration and Callbacks for the DataTable
You use the load(params,options,callbacks) method in DataTable to send requests to the MashZone NextGen Server and populate the DataTable. In this case, the parameters to invoke the mashable are already defined when the DataTable was instantiated. You can use this to override default parameters, however:
...
var dataTable = new Presto.DataTable( {
request: reqConfig,
connection: connection,
record: record
});
var params = {};
};
The options parameter is a configuration object that typically contains pagination configuration. Pagination configuration must define the record to be paginated, the starting record to return and how many records to return, like this:
...
var dataTable = new Presto.DataTable( {
request: reqConfig,
connection: connection,
record: record
});
var params = {};
options.record = record;
options.start = cursor;
options.count = pageSize;
};
The last parameter is an object that must contain two callback functions: onSuccess and onFailure, such as this:
...
var dataTable = new Presto.DataTable( {
request: reqConfig,
connection: connection,
record: record
});
var params = {};
options.record = record;
options.start = cursor;
options.count = pageSize;
var cb = { onSuccess: function(rows, response, headers, options) {},
onFailure: function(e) {}
};
};
The DataTable is populated by successful results, so onSuccess must render the rows of the table with the set of records returned in the response. If the response has the appropriate results, the cursor variable must be updated to point to the first record in this page set.
...
var dataTable = new Presto.DataTable( {
request: reqConfig,
connection: connection,
record: record
});
var params = {};
options.record = record;
options.start = cursor;
options.count = pageSize;
var cb = { onSuccess: function(rows, response, headers, options) {
if (response.ResultSet.Result) {
cursor = options.start;
var locations = rows;
jQuery('.tblBdy').empty();
jQuery.tmpl("rowTemplate", locations).appendTo(".tblBdy");
} else {
rootDiv.html("no results found");
}
},
onFailure: function(e) {}
};
};
The rows object contains an array of objects, each with properties for the fields in that record. We use this, with the JQuery template to render the rows of the table for the app and append them to the table body.
Last, we add some simple error handling to onFailure:
...
var dataTable = new Presto.DataTable( {
request: reqConfig,
connection: connection,
record: record
});
var params = {};
options.record = record;
options.start = cursor;
options.count = pageSize;
var cb = { onSuccess: function(rows, response, headers, options) {
if (response.ResultSet.Result) {
cursor = options.start;
var locations = rows;
jQuery('.tblBdy').empty();
jQuery.tmpl("rowTemplate", locations).appendTo(".tblBdy");
} else {
rootDiv.html("no results found");
}
},
onFailure: function(e) {
rootDiv.html(e.message);
}
};
};
Invoke the Mashable, Load the DataTable and Render the App
Once the pagination configuration and callbacks are defined, you invoke the mashable, populate the DataTable and render the app using the load method, as shown here:
...
var dataTable = new Presto.DataTable( {
request: reqConfig,
connection: connection,
record: record
});
var params = {};
options.record = record;
options.start = cursor;
options.count = pageSize;
var cb = { onSuccess: function(rows, response, headers, options) {
if (response.ResultSet.Result) {
cursor = options.start;
var locations = rows;
jQuery('.tblBdy').empty();
jQuery.tmpl("rowTemplate", locations).appendTo(".tblBdy");
} else {
rootDiv.html("no results found");
}
},
onFailure: function(e) {
rootDiv.html(e.message);
}
};
dataTable.load(params, options, cb);
};
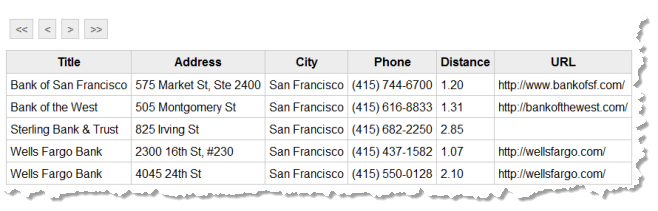
If you save your changes to the custom app JavaScript library, you can test the app, at this point. Login to MashZone NextGen in the browser you want to test with. Then open another tab and open http://app-server:port/SampleDataTblPagination/index.html for your application server. You should see something like this:
Only the first five results display in the table. We need to fix the pager bar to allow users to see any remaining results.
Add a Listener to the Load Event
To allow the pager buttons to function properly, the app needs to know the total number of records that are cached. To keep track of this, we edit SampleDataTblPagination/js/app.js and add a listener to the DataTable for the load event. DataTable fires three events, beforeload, load and loaderror, that apps can use.
Note: | DataTable extends Presto.Observable which provides methods to listen to and fire events. |
Once the DataTable is populated, we can use the getTotalCount() method to determine how many records are cached in the MashZone NextGen Server for this invocation and to calculate the total number of pages to support:
...
var cb = { onSuccess: function(rows, response, headers, options) {
if (response.ResultSet.Result) {
cursor = options.start;
var locations = rows;
jQuery('.tblBdy').empty();
jQuery.tmpl("rowTemplate", locations).appendTo(".tblBdy");
} else {
rootDiv.html("no results found");
}
},
onFailure: function(e) {
rootDiv.html(e.message);
}
};
dataTable.addListener("load", function(rows) {
total = dataTable.getTotalCount();
totalPages = parseInt(total / pageSize,10);
});
dataTable.load(params, options, cb);
};
Add Handlers for the Pagination Buttons
Now that the full page state is known, we are ready to add handler functions for the pagination buttons. These use the page(options, callback) method for the DataTable to request the appropriate page set.
The options parameter contains the start and count properties to request the specific set of records for a given page. The callback parameter can use the same callbacks as the load() method.
To do this, we use JQuery to attach event handlers to the appropriate buttons:
...
dataTable.addListener("load", function(rows) {
total = dataTable.getTotalCount();
totalPages = parseInt(total / pageSize,10);
});
jQuery('#firstItem').click( function(){
options.start = 1;
options.count = 5;
dataTable.page(options, cb);
});
jQuery('#prevItem').click( function(){
cursor = options.start;
if (cursor > 5) {
options.start = cursor - 5;
} else {
options.start = 1;
}
dataTable.page(options, cb);
});
jQuery('#nextItem').click( function(){
cursor = options.start;
if (total > 0 && cursor + 5 < total ) {
options.start = cursor + 5
}
dataTable.page(options, cb);
});
jQuery('#lastItem').click( function(){
options.start = (totalPages-1)*pageSize + 1;
dataTable.page(options, cb);
});
dataTable.load(params, options, cb);
};
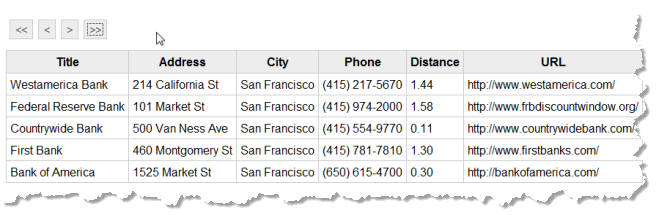
If you save these changes and test the app once more, you should now be able to use the pager buttons to page through the entire set of results:
The complete class for this custom app is:
Presto.namespace("Sample");
Sample.DataTablePagination = function( app ) {
var rootDiv = jQuery(app.getRootElement);
var connection = app.getConnection();
var rowMarkup = "<tr><td>${Title}</td><td>${Address}</td><td>${City}</td>
<td>${Phone}</td><td>${Distance}</td><td>${BusinessUrl}</td></tr>"
jQuery.template("rowTemplate", rowMarkup);
var cursor = 1; //first item in current page
var total = 0; //total number of items cached in server
var totalPages = 0; // number of pages availables
var pageSize = 5; // number of rows per page
requestBody = '';
var reqConfig = { uri: "/mashzone/edge/api/rest/YahooLocalSearchREST/getData?x-presto-resultFormat=
json&appid=.kcC72DV34FYTpAGuwwbV8YGI.DsMBQ0RB9eZARS621ecnHq33c.g1XJV93a64hrdaM3&query=banks&zip=94102&results=20",
type: "get",
contentType: "application/x-www-form-urlencoded",
data: requestBody
};
var record = "/ResultSet/Result";
var dataTable = new Presto.DataTable( {
request: reqConfig,
connection: connection,
record: record
});
var params = {};
options.record = record;
options.start = cursor;
options.count = pageSize;
var cb = { onSuccess: function(rows, response, headers, options) {
if (response.ResultSet.Result) {
cursor = options.start;
var locations = rows;
jQuery('.tblBdy').empty();
jQuery.tmpl("rowTemplate", locations).appendTo(".tblBdy");
} else {
rootDiv.html("no results found");
}
},
onFailure: function(e) {
rootDiv.html(e.message);
}
};
dataTable.addListener("load", function(rows) {
total = dataTable.getTotalCount();
totalPages = parseInt(total / pageSize,10);
});
jQuery('#firstItem').click( function(){
options.start = 1;
options.count = 5;
dataTable.page(options, cb);
});
jQuery('#prevItem').click( function(){
cursor = options.start;
if (cursor > 5) {
options.start = cursor - 5;
} else {
options.start = 1;
}
dataTable.page(options, cb);
});
jQuery('#nextItem').click( function(){
cursor = options.start;
if (total > 0 && cursor + 5 < total ) {
options.start = cursor + 5
}
dataTable.page(options, cb);
});
jQuery('#lastItem').click( function(){
options.start = (totalPages-1)*pageSize + 1;
dataTable.page(options, cb);
});
dataTable.load(params, options, cb);
};