Handle Resize Events
Resize events affect both the app root node and the app content node (shown previously). If you need to explicitly handle desktop browser resize events for your custom app, you can either:

Implement the
onResize(newWidth,newHeight) method from the MashZone NextGenApp API in the JavaScript class for the app. This method allows you to handle resizing both the app content and the app title bar from the App Framework.
For an example see:
Note: | For links to other app examples, click  More... More... above. |
Add a listener for the resize event on the app content element and handle them there. This technique allows you to handle resizing for just the app content.
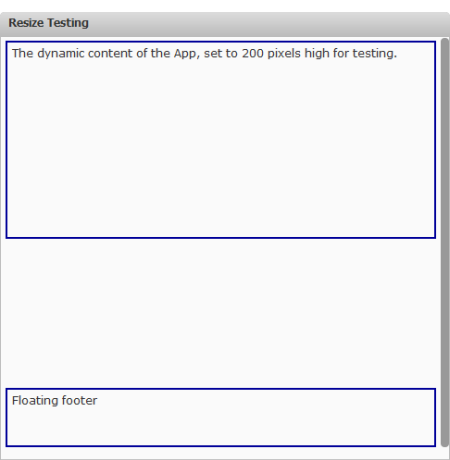
Example App for Custom Resizing
This example uses a mockup of an app, shown below, with two content areas: one for dynamic content and a second area for a footer that floats to the bottom of the app. The two content areas are mocked up with <div> elements, literal text content and border styles to help visualize the impact of changes to the app’s dimensions.
When resizing events happen, this example app must recalculate the top coordinate for the floating footer. The actual requirements and logic you need to handle resizing for your custom app will depend on its specific content and visual requirements.
App Specification for Custom Resizing Example
The App Specification for this example uses the base specification when you download an app package in the App Editor. It updates only those properties shown in bold:
<app id="resizeTest" name="Resize Test" jsclass="Sample.ResizeTest"
draggable="false" minimizable="false" height="auto" width="auto">
<title>Resize Testing</title>
<description>Sample App to test resizing events from the container.</description>
<properties/>
<presto-meta name="presto.desktopCompatible" type="text">true</presto-meta>
<presto-meta name="presto.phoneCompatible" type="text">false</presto-meta>
<presto-meta name="presto.tabletCompatible" type="text">false</presto-meta>
<requires>
<require name="jquery" type="library"/>
<require src="js/app.js" type="script"/>
<require src="html/app.html" type="html"/>
<require src="css/app.css" type="css"/>
</requires>
</app>
Other than the basic updates to ID, name and class, this updates the width and height attributes. Note also that this app does not support mobile destinations.
HTML for Custom Resizing Example
The HTML for this example app is shown below:
<div
>
<div
>
The dynamic content of the App, set to 200 pixels high for testing.
</div>
<div
>Floating footer</div>
</div>
The content for each area is mocked up with simple text.
CSS for Custom Resizing Example
The CSS for this example app is shown below:
div.resizeContent {font-family: Verdana; overflow:auto; padding:5px;
height:95%; }
div.appContent {border: solid #000099 2px; padding:5px; height:200px; }
.floatingFooter {position:relative; left:0; border:2px solid #000099;
padding:5px; height:50px; margin-top:5px;}
The height for the dynamic content area in this example is set to a specific size in the CSS for demonstration purposes. Once the app has been updated to retrieve dynamic content, the height property can be removed or reset to auto.
Relative positioning is used for the floating footer content. The left coordinate is set, but the top coordinate will be set in the onResize method within the app’s class.
Also note the overflow and height properties for the resizeContent class which are applied to the root node for the app’s content.
Example onResize Method
We start with the basics for the app class: defining a namespace and starting the constructor function for the app.
Presto.namespace('Sample');
Sample.ResizeTest = function( app ) {
this.rootDiv = jQuery( app.getRootElement() );
this.app = app;
//minimum dimension to a minimum height for content and no footer overlap
this.minH = 300;
};
The constructor defines two properties for the:
Root node of the app (framework plus app content)
Minimum height for the app (framework plus app content)
The minimum height property will be used to ensure a minimum height for the dynamic content area in the app. If the container height for the app is less than this minimum, the position of the floating footer is set based on this minimum height causing a vertical scroll bar to be added based on the overflow property assigned to the app’s root content node.
Next we implement the onResize method. To ensure a minimum height for the app’s dynamic content, we first must determine whether the position for the footer should be based on the current or minimum height:
Presto.namespace('Sample');
Sample.ResizeTest = function( app ) {
this.rootDiv = jQuery( app.getRootElement() );
this.app = app;
//minimum dimension to a minimum height for content and no footer overlap
this.minH = 300;
this.onResize = function(curWidth, curHeight) {
console.log('current height ' + curHeight );
var footerTop;
//choose current height or minimum height
if (curHeight > this.minH) {
footerTop = curHeight - this.minH;
} else {
footerTop = 0;
}
//set footer top position
console.log('footer top ' + footerTop );
this.rootDiv.find('.floatingFooter').css('top',footerTop);
};
};
The final step in onResize is to set the footer top position.
Once onResize is implemented, the last step in the app’s class is to handle the floating footer’s position when the app is first rendered:
Presto.namespace('Sample');
Sample.ResizeTest = function( app ) {
this.rootDiv = jQuery( app.getRootElement() );
this.app = app;
//minimum dimension to a minimum height for content and no footer overlap
this.minH = 300;
this.onResize = function(curWidth, curHeight) {
console.log('current height ' + curHeight );
var footerTop;
//choose current height or minimum height
if (curHeight > this.minH) {
footerTop = curHeight - this.minH;
} else {
footerTop = 0;
}
//set footer top position
console.log('footer top ' + footerTop );
this.rootDiv.find('.floatingFooter').css('top',footerTop);
};
//set initial footer position
var initWidth = this.app.getWidth();
var initHeight = this.app.getHeight();
this.onResize(initWidth, initHeight);
};
This uses the
getWidth and
getHeight methods from the
MashZone NextGen API to get the initial dimensions and then calls
onResize to set the footer position.
Example Resize Listener
This example uses the same App Specification, HTML and CSS as the previous example. See the following sections for details:
The app class for this example handles resize events by registering a listener for the resize event, rather than implementing the onResize method. The app class first gets a reference to the root node for the app and a minimum height for the app.
Sample.ResizeTest = function( app ) {
this.app = app;
var self = this;
this.rootDiv = jQuery( app.getRootElement() );
this.minH = 300;
var setFooter = function(event) {
console.log('current height ' + self.app.getHeight() );
var footerTop, curHeight = self.app.getHeight();
if (curHeight > self.minH) {
footerTop = curHeight - self.minH;
} else {
footerTop = 0;
}
console.log('footer top ' + footerTop );
self.rootDiv.find('.floatingFooter').css('top',footerTop);
};
//register listener on framework content root
jQuery(app.getContentEl()).resize(setFooter);
//set initial footer positions
setFooter();
};
The setFooter method in this class is a handler for the resize event. It determines the current height and then uses either the minimum height or the current height to set the top position for the floating footer in this example.
Next the app class registers a listener for the resize event passing
setFooter as the handler function. This listener is registered on the app content element retrieved with the
getContentEl method in the
MashZone NextGen API.
The final step is to call setFooter to set the position for the floating footer when the app is initially rendered.