Radar graph: Trace group
Properties in this group control the appearance of trace lines and trace markers (but see also
Radar graph: Marker group), including color, style, and line width.
Trace group properties
This group includes the following properties:
traceFillStyle
Set traceFillStyle to one of the following fill styles for the area under the trace:
 Solid
Solid Transparent
 Gradient
 Transparent Gradient
 None
NoneNone is the default.
This property is in the Trace property group.
traceProperties
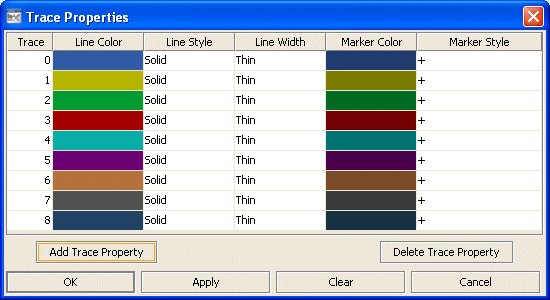
Specify the line color, line style, line width, marker color and marker style of all traces.
In the Object Properties window, double-click on traceProperties in the Property Name field to bring up the Trace Properties dialog. In the Trace Properties dialog, you can assign attributes to each plotting trace in your graph.
The dialog has six columns of fields:
 Trace
Trace: One field for each trace that is currently in the graph. Current settings for each trace are shown.
 Line Color
: Select the ellipsis button in the
Color column and choose a color from the palette. Close the
Color Chooser window.
 Line Style
: Select the ellipsis button in the
Line Style column and choose a style from the drop down menu. Choose either
No Line,
Solid,
Dotted,
Dashed, or
Dot Dashed.
 Line Width
: Select the ellipsis button in the
Line Width column and choose a size from the drop down menu. Choose either
Thin,
Medium or
Thick.
 Marker Color
: Select the ellipsis button in the
Marker Color column and choose a color from the palette. Close the
Color Chooser window.
 Marker Style
: Select the ellipsis button in the
Marker Style column and choose a style from the drop down menu. Choose either
No Marker,
Dot,
+,
*,
o,
x,
Filled Circle,
Filled Diamond,
Filled Triangle,
Filled Square, or
Filled Star.
The dialog contains the following buttons:
 Add Trace Property
: Click to add a trace property field. The data for the trace does not have to be available yet. You may consider adding and assigning attributes to more traces than your data currently needs for when you have more data to show. It is not necessary to set properties for each trace you currently or subsequently have. This is optional and can be done after additional data is displayed in a subsequent new trace.
 Delete Trace Property
: Removes the last trace property field from the
Trace Properties dialog.
 OK
OK: Applies values and closes the dialog.
 Apply
Apply: Applies values without closing the dialog.
 Reset
Reset: Resets all fields to last values applied. Specify the line color, line style, line width, marker color and marker style of all traces.
This property is in the Trace property group.
