TMS Security
TMS security is configured using the tmc.properties file.
Setting the security root directory
If you need to set the security root directory to use for connections between a browser and the TMS, then you should set the tms.security.root.directory property to the path for the security root directory.
Windows platforms
Note that Windows paths often contain backslashes. The Java properties format requires backslashes to be escaped, so C:\tcdb\security-root-directory would be configured using:
tms.security.root.directory=C:\\tcdb\\security-root-directory
Alternatively, you can use forward slashes:
tms.security.root.directory=C:/tcdb/security-root-directory
Encrypted connections between the browser and the TMS
You can enable HTTPS by setting:
tms.security.https.enabled=true
When HTTPS is enabled, you must also set the
tms.security.root.directory property to the path for the security root directory. See
Setting the security root directory.
When HTTPS is configured, the specified security root directory must contain a valid truststore in the trusted-authority subdirectory and a valid keystore in the identity subdirectory.
When HTTPS is configured, the TMS is only accessible over HTTPS. Thus, any URL used to access the TMS must start with https:// .
Browser warnings
If you are using self-signed certificates, you may see a security warning in your browser when connecting to the TMS. This is because the certificate was not signed by a certificate authority registered with the browser as a trusted certificate authority. We suggest that you check the certificate and verify its authenticity.
Furthermore, you should add the certificate to your browser's list of trusted root certificate authorities.
Note: Each cookie entry is associated with a certain domain (not including port), and some browsers may remember the protocol under which the cookie has been set. So if you switch between http and https, or between localhost and 127.0.0.1, you should clear related cookies before reloading TMC in the browser.
Authentication
To configure TMS to require users to log in, you should set the tms.security.authentication.scheme property. There are two options: file and ldap, for file-based authentication and LDAP-based authentication respectively.
When authentication is configured, you must also set the following properties:
File-based authentication requires a
users.xml file to be added to the security root directory; LDAP-based authentication requires an
ldap.properties file. See
Cluster Authentication for more details.
Authorization
To control which access to TMS operations, you should set the tms.security.authorization.scheme property. There are three options: authenticated, file and ldap. The authenticated option allows access to all operations to all authenticated users. The file and ldap options correspond to file-based authorization and LDAP-based authorization respectively.
When authorization is configured, you must also set the following properties:
TMS supports one role: admin. Users with no role can use most of the TMS functionality, but some operations, such as shutting down a server, require the admin role.
File-based authorization
File-based authorization requires a
users.xml file to be added to the security root directory. See
Cluster Authentication for more details.
For file-based authorization, the users.xml file must contain role information.
Example of a users.xml file for authorization:
<users>
<user>
<username>alex</username>
<roles/>
</user>
<user>
<username>beth</username>
<roles>
<role>admin</role>
</roles>
</user>
</users>
In this example users.xml file, beth has the admin role whereas alex does not.
Note that you can use a mixture of authentication and authorization schemes. For example, you could use LDAP-based authentication with file-based authorization. As in the example above, the users.xml file need not contain password hash information, if it is not being used for authentication. However, if you use specify file for both the authentication and authorization schemes, then you must specify both password hashes and role information.
Example of a users.xml file for both authentication and authorization:
<users>
<user>
<username>alex</username>
<password>
<algorithm>bcrypt</algorithm>
<hash>$2a$10$UoM85/5I4SnIbrOQuFZ43ekffuQKSxZmL93bR9VMcdr2URmPyjyX2</hash>
</password>
<roles/>
</user>
<user>
<username>beth</username>
<password>
<algorithm>bcrypt</algorithm>
<hash>$2a$10$6D6c79lE0k/0SxrEtnfhGe2Yr.ygG0rFP1QzeyD9qshIMRrpUMOAS</hash>
</password>
<roles>
<role>admin</role>
</roles>
</user>
</users>
LDAP-based authorization
LDAP-based authorization requires an
ldap.properties file. See
Cluster Authentication for more details.
The properties in the
ldap.properties file are the same properties that are used to configure LDAP integration in other Software AG products. See
LDAP Properties for a full list of supported properties.
Example of an ldap.properties file for authorization:
url=ldap://ldapserver.example.com:389
userrootdn=ou=People,dc=example,dc=com
uidprop=uid
personobjclass=person
memberinfoingroups=true
mattr=uniqueMember
grouprootdn=ou=Group,dc=example,dc=com
gidprop=gid
groupobjclass=group
You may wish to map the role defined in the LDAP server to the TMS admin role, in which case, you can add the tcdb.roleMap property to the ldap.properties file. For example:
tcdb.roleMap=terracottaTmsAdmin=admin
would map the terracottaTmsAdmin group defined in the LDAP server onto the TMS admin role.
Auditing
To configure auditing for the TMS, set the tms.security.audit.directory property to the audit directory.
Connecting the TMS to secured clusters
To allow the TMS to connect to a secure cluster, you should set the tms.security.root.directory.connection.default property to the path for the security root directory containing, for example, credentials to connect to the secured cluster.
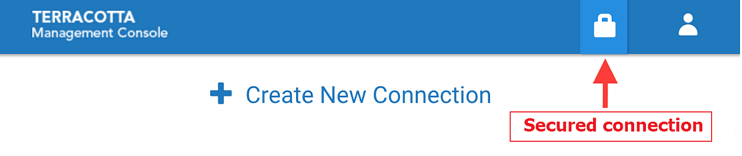
After configuring a secured cluster and setting up the TMS client security root directory, you should see a padlock icon in TMC:
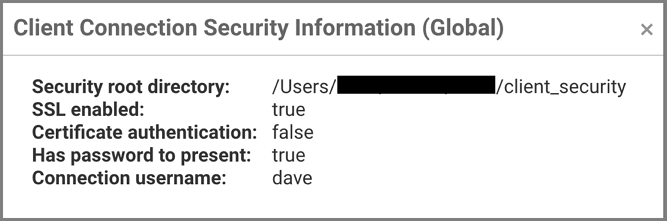
When you click on the padlock, a pop-up window shows some security related information:
Note: This security root directory and its configuration relates to the connection between the TMS server and the secured cluster. It is independent of the connection security between browser and TMS server.
SSL enabled | Connection is SSL enabled - i.e. the security root directory has a trusted authority certificate. |
Certificate authentication | Connection is 2-way SSL enabled - i.e. the security root directory has an identity certificate. |
Has password to present | The TMS/TMC client has a credentials.properties file. |
Windows platforms
Note that Windows paths often contain backslashes. The Java properties format requires backslashes to be escaped, so C:\tcdb\audit-directory would be configured using:
tms.security.audit.directory=C:\\tcdb\\audit-directory
Alternatively, you can use forward slashes:
tms.security.audit.directory=C:/tcdb/audit-directory