This document covers the following topics:
Ajax Developer follows the commonly accepted paradigm of separating the layout (view) as much as possible from the application logic (model). You design the layout using the WYSIWYG Layout Painter. The result is kept in an XML page layout file. When you save the XML page layout, an HTML page is generated.
On the one hand, the XML layout contains the used controls of a page; on the other hand, it keeps information about how these controls are bound to the application code.
If you implement your application in Natural, the controls are bound to a Natural adapter. The Natural adapter is generated as soon as you save the page layout. The Natural adapter becomes part of the Natural application and forms the interface between the Natural application code and the user interface.
If you implement in Java, the controls are bound to the properties and methods of a Java adapter. This is a Java class that you can generate with the Code Assistant (which is part of the Layout Painter).
In addition, the XML layout may optionally contain so called "literals". Literals are text identifiers (text IDs) that are replaced at runtime with language-specific texts. For each language you want to support, there must be a comma-separated value (CSV) file that contains the language-specific text per literal. You maintain these translation files using the Literal Assistant (which is part of the Layout Painter).
The layouts that you create as described below are stored in the xml folder of the user interface component.
 To create a layout
In the ProjectExplorer view or in the Natural Navigator view, select the user interface component or the xml folder.
From the menu or context menu, choose .
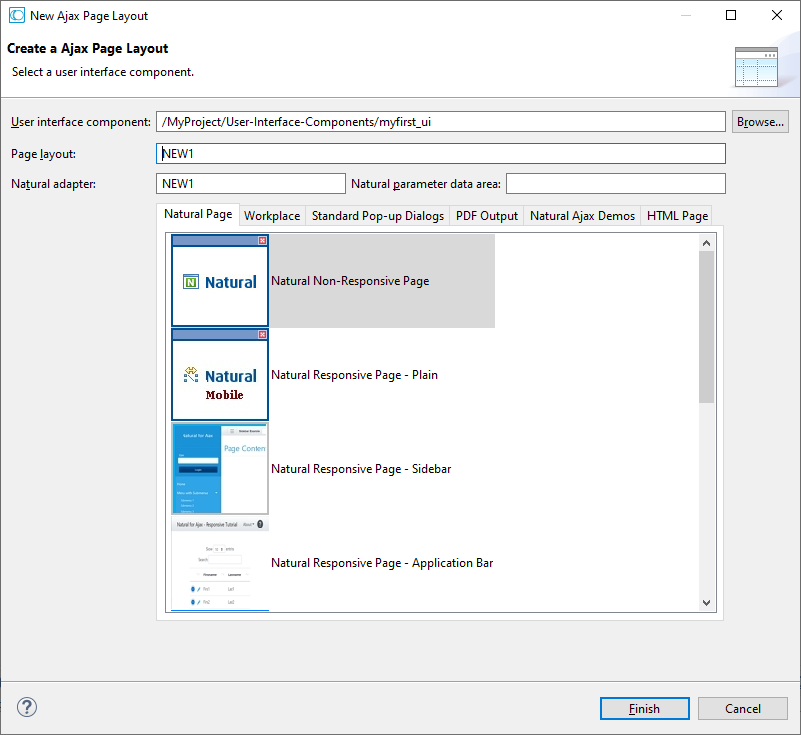
The New Ajax Page Layout dialog box appears, providing several tabs from which you can select a layout template.

In the Layout page text box, enter the name of the file that is to contain your layout definition. Do not specify an extension; the extension ".xml" will automatically be added.
The Natural adapter text box is only visible when the Natural Page tab is currently selected. Here, you enter the name of the Natural adapter that will be generated when you save the page layout. This name must match the naming conventions for Natural objects.
Select the layout template for your page. See also Layout Templates.
Choose the button.
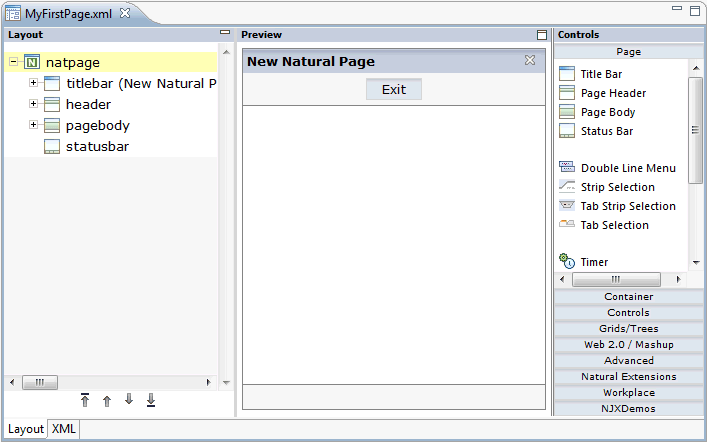
The Layout Painter appears (see below).
When you create a layout, you have to select a layout template in the New Ajax Page Layout dialog box. The following tabs, which contain different types of layout templates, are offered by default:
Natural Page
The templates on this tab are used to create pages for Natural for Ajax. They have
the NATPAGE control as the top node.
Workplace
The templates on this tab are used for arranging Application Designer pages in a frameset. They
have the MFPAGE control as the top node. See
Multi Frame Pages for
further information.
Standard Pop-up Dialogs
Several standard pop-up dialogs are supported. See in
Working with Pages for further information.
These standard pop-up dialogs are also used within the workplace framework. Sometimes, you would like to slightly modify these standard pop-up dialogs, for example, when writing a workplace application. The templates on this tab are used to create a copy of the corresponding standard pop-up dialog in your project and adapt the appearance to your needs. Be sure not to change the names of the layouts, the corresponding adapter classes or the properties/methods. See also Using Your Own Standard Pop-up Dialogs and Messages
PDF Output
The templates on this tab are used for integrating a PDF document into an Application Designer
page. They have the CISFO:FOPPAGE2 control as the top node. See
Working with PDF Documents for further information.
HTML Page
The templates on this tab have the PAGE control as the top node. See PAGE for further information.
If you have created your own custom layout templates, they are also offered for selection. For further information, see Creating Custom Layout Templates.
Layouts are stored in the xml folder of the user interface component. They have the extension .xml.
 To open a layout
In the ProjectExplorer view or in the Natural Navigator view, double-click the layout that you want to open.
Or:
Invoke the context menu for the layout and choose
The Layout Painter appears (see below).
The Layout Painter appears when you create a new layout or when you open an existing layout.

The Layout Painter is divided into several areas:
Layout Area (left side)
This area shows the layout tree which contains the controls
that represent the XML layout definition. You drag these controls from the
controls palette into the layout tree. Each node in the layout tree represents
an XML tag.
Using the button which is located to the right of the title bar, you can hide the layout area. This enlarges the preview area. To redisplay the layout tree, choose the small arrow which is shown in the left of the preview area's title bar.
Preview Area (middle)
The preview area shows the page which is created using the
controls in the layout area. This page is refreshed each time, you choose the
command (see below).
Using the toggle button which is located to the right of the preview area's title bar, you can enlarge the preview area so that it takes up the space of the layout area and controls palette, and reduce the enlarged preview area so that the layout area and controls palette are shown again.
Controls Palette (right side)
Each control is represented by an icon. A tool tip is provided
which appears when you move the mouse pointer over the control. This tool tip
also displays the XML tag which will be used in the XML layout.
The controls palette is structured into sections (for example, and ), where each section represents certain types of controls.
Note
The sections that are shown in the controls palette and the
content of a section depend on the layout template that is used for the current
layout.
When you select a control in the layout tree or in the preview area, the properties for this control are shown in the Properties view. You can modify the properties as required.
When the Layout Painter is active, the additional menu is shown in the menu bar. Using this menu, you can invoke additional tools which are helpful for the creation of layouts:
Code Assistant
Only used for developing page layouts in Java. Helps you to
generate code for all properties and methods which are explicitly referenced in
the page layout. See Code
Assistant for further information.
Literal Assistant
Helps you to prepare your layout for multiple languages. You
can maintain texts of different languages for the literals that are referenced
within the XML layout. See Literal Assistant
for further information.
Validation Rules Editor
You can define that the value that is entered in a field must
meet certain conditions. See Using the Validation Rules
Editor for further information.
Formula Editor
You can define a formula for a field (for example, the sum of
the fields A and B is to be shown in field C). See
Using the Formula
Editor for further information.
Some commands of the menu (such as ) are also available as buttons in a toolbar.
![]()
You can create your own custom layout templates. When you create a layout, your custom layout templates are offered for selection together with the default layout templates in the New Ajax Page Layout dialog box.
You can create your custom layout templates in any Natural project. Your custom layout templates can always be used from all other Natural projects in the current workspace.
Tip
It is helpful to create a single project which contains all of
your custom layout templates. Other developers can then import this project
into their own workspaces. Thus, they can also use your custom layout
templates.
 To create a custom layout template
In the user interface component of your project, create a folder with the name "cisconfig".
In the cisconfig folder, create one or more layout template files. Or copy your template files into this folder.
The layout template files have the same XML format as the page layout files (for an example, see Viewing the XML Code). Therefore, you can also copy an existing layout file into the cisconfig folder and rename it to, for example, "editorTemplateNATPage1.xml".
In the cisconfig folder, create an XML configuration file with the name "editortemplates.xml". This file defines all custom layout templates that are to be used. Example:
<?xml version="1.0" encoding="UTF-8"?>
<editortemplates>
    <group name="Natural Page">
         <xmltemplate filename="editorTemplateNATPage1.xml"
         image="templatenatural.jpg"
         info="My Natural Page Template"/>
    </group>
</editortemplates>
The XML configuration file uses the following tags:
<editortemplates>Each XML configuration file must have exactly one
<editortemplates>tag.<group>You can define one or more
<group>tags inside the<editortemplates>tag.Each
<group>tag has a mandatorynameattribute which defines the tab in the New Ajax Page Layout dialog box on which the custom layout template is to be shown (see Creating a Layout).You can also add a new tab to the New Ajax Page Layout dialog box by specifying a new group name (for example, "My Templates"). However, keep in mind that such a new tab is not suited for Natural pages because the text box in which you specify the adapter name will not be shown for the templates on your new tab.
<xmltemplate>You can define one or more
<xmltemplate>tags inside a<group>tag.Each
<xmltemplate>tag has the following mandatory attributes:
filenameThe name of an existing custom layout file in the cisconfig folder.
Tip
If you want to create a custom layout template for a Natural page (that is, a page which has the NATPAGE control as the top node), it is recommended that the name of your layout file starts with either "editorTemplateNAT" or "editorTemplateNJX". Otherwise, if you define a different file name, the text box Natural adapter, in which you specify the name of the adapter that is to be generated, will not be shown for your custom layout template in the New Ajax Page Layout dialog box.
imageThe name of an image file. This image will be shown in the New Ajax Page Layout dialog box. If the image file is not stored in the root of the cisconfig folder, you have to specify a relative path with the file name.
If you want, you can copy the standard image file for Natural pages. Its name is templatenatural.jpg and you can find it in your Eclipse workspace, under .naturalone\apache-tomcat\webapps\cisnatural\HTMLBasedGUI\images. You can copy it, for example, to your cisconfig folder.
You can also add subfolders to your cisconfig folder. For example, you can add a templates folder which is to contain all of your custom layout templates, and an images folder which is to contain all of your images. It is important that the editortemplates.xml configuration file can always be found in the root of the cisconfig folder - you must not move this file to a subfolder.
infoA brief text describing the custom layout template. For example, "My Natural Page Template". This info text will be shown in the New Ajax Page Layout dialog box, next to the image.
To check whether your custom layout template is shown in the New Ajax Page Layout dialog box, create a new layout.
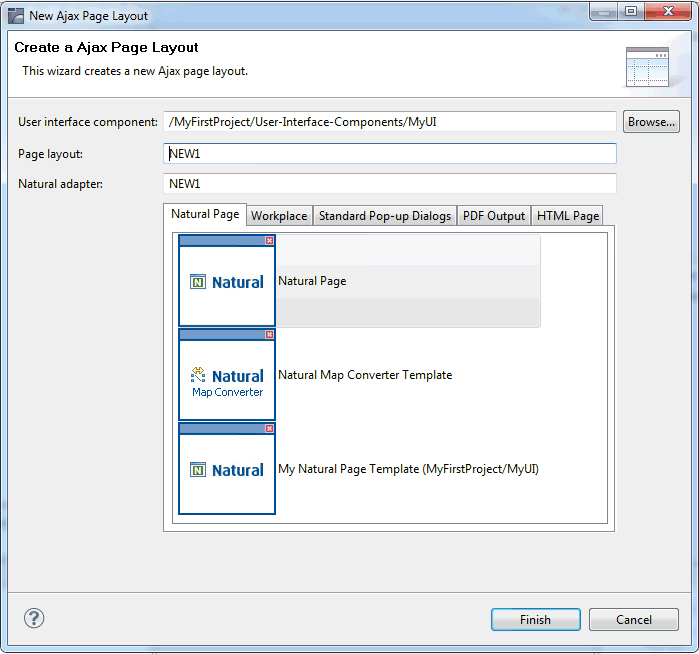
The following example shows a custom layout template with the info text "My Natural Page Template". This template has been defined with the above editortemplates.xml file.

The information in parentheses behind the info text indicates the location of the template (project name and user interface component).
Your custom templates are always shown below the default layout templates. They are shown in the same sequence as defined in the editortemplates.xml file.