
This section describes common functions of the Entire Operations Web Client that perform the same operations for different objects.
In addition, it describes the functions of the General metanode that perform global operations on all objects in your Entire Operations environment.
In Entire Operations Web Client ,, a long reading process can be cancelled by pressing ESC.
 To cancel reading
Press ESC.
To view a list of objects
In the object workspace, select a metanode.
Open the context
menu and choose
( )
.
)
.
All objects of the selected metanode are listed.
To refresh objects listed in the object workspace
In the object
workspace, select a metanode and choose
( ) from the context menu.
The list of objects of the selected metanode is updated immediately.
To refresh objects from an open list window
Open a window that contains a list of objects and choose the () button if
available.
The list is updated immediately.
Or:
Open a window that contains a list of objects and choose
( ) , if available.
In the Automatic Refresh window that opens, select the check box. If required, change the time interval (the default is 30 seconds) in which you want to update the list.
Choose OK.
The list is updated automatically in the time interval specified.
This section describes the options provided to specify name ranges to be used as selection criteria for Entire Operations functions or drop-down list boxes.
In the following table,
value is any combination of one or more
characters.
| Input | Names Selected |
|---|---|
* |
All names. |
value* |
All names that start with
value.
Example: |
value> |
All names greater than or equal to
value.
Example: |
value< |
All names less than or equal to
value.
Example: |
value?
|
All names that start with
value and end with any single character
for each question mark (?) entered.
Example: |
value?value |
All names that match and
value combined with a question mark (?)
in any order.
Example: |
??? |
All names with an exact length of three characters.
Example: |
The context menu in a
List window provides the Save View as
File ( )
function to save the content of a List
window as a report file containing columns and column headings and filter
information. For detailed information, see
Report Output
Options in the section Reporting.
)
function to save the content of a List
window as a report file containing columns and column headings and filter
information. For detailed information, see
Report Output
Options in the section Reporting.
With function Quick Access you can maintain an object directly without having to search the tree structure of the object workspace.
To open the Quick Access dialog box:
In the title bar of the current screen, click
( ).
).
The Quick Access dialog box is displayed as in the following example:
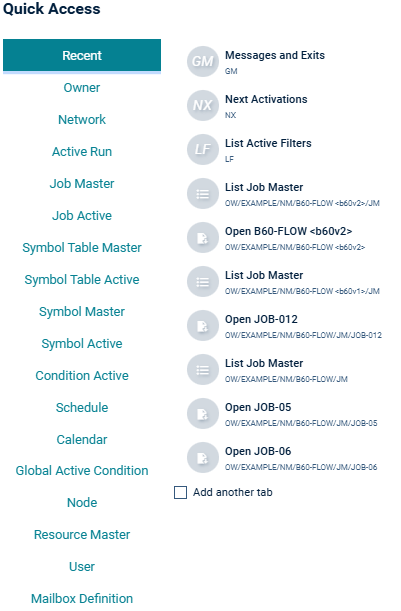
The button is selected by default in the left-hand column.
The center column therefore lists the functions you have used recently.
The right column displays the date and time they were used., z.B. Just now, xm x minutes ago, xd x days ago.
Use the vertical scroll bar in the dialog box to display additional entries in the list.
You can select the Add another tab check box so that subsequent actions are displayed on additional tabs, allowing you to continue using the Quick Access dialog box in the foreground.
To access and use functions using Quick Access:
In the left-hand column of the Quick Access dialog box, select the button corresponding to the object type you want to manage, for example, .
The middle column displays selection fields where you can enter the information required to determine the new active job such as:
name of owner, name of network definition and number of the active run.
When creating a new job, the Job field is left empty.
Select the button that corresponds to the action to be performed, for example, .
A tab with the Create New Object - Active Jobs dialog opens behind the Quick Access dialog box, such as in the following example:
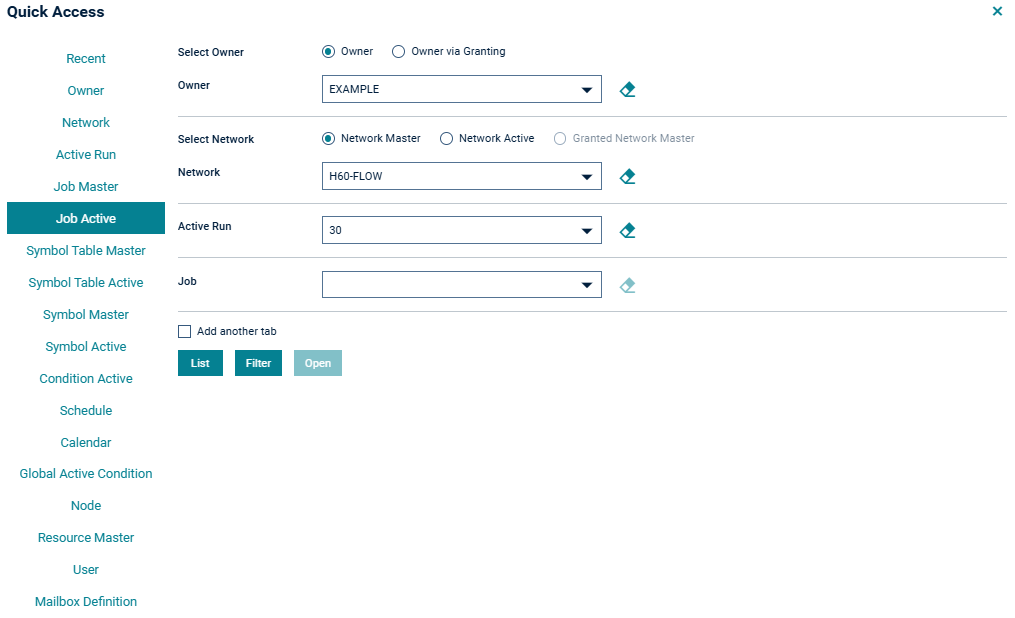
You can now close the dialog window or continue using it to define selection criteria for additional functions. These functions will then be available on their respective tabs in the background.
To close a Quick Access dialog
Note: If the Add Another Tab check box was not selected, the dialog window will close automatically as soon as the tab for the desired function is displayed.
If the check box is selected, the dialog window does not close. It remains open in the foreground, covering the tab(s) that contain the selected function(s).
Choose to close the dialog.
The function opens a window that displays information for the currently selected item. You can only view the information, not edit it. If you want to edit the item, you have to use the function.
To display an object
In the object workspace, select the object.
Open the context menu and choose .
Or:
Press CTRL+D.
A dialog appears that displays all available information for the selected object.
Note
For a detailed description of the displayed fields, see the
description of the function for the respective
object.
Important
Copying an object always means that the complete underlying
structure is also copied into the target destination.
To copy single or multiple objects
In the object workspace, select a node instance or an entire node.
Open the context
menu and choose ( ).
).
Or:
In the object
workspace, select a node for which you can choose
List from the context menu. A
Master
List window opens.
From the list table in the Master List
window, select single or multiple objects and choose ()
.
The object data is copied to the clipboard and ready to paste at the required location within the object workspace.
A screen is opening. Enter Target Object Namespace and select .
The function opens a dialog to confirm the selection for this operation.
To delete an object
In the object workspace, select the object.
Open the context
menu and choose ( ) .
) .
A dialog appears where you have to confirm the deletion.
Complex networks can have many components with diverse interconnections that make it difficult to monitor and maintain the networks.
For this purpose, Entire Operations provides the option to represent networks (master and active) as diagrams containing jobs (master and active), conditons and resources. Diagrams can be used to monitor all objects that belong to a network, see whether they are connected, maintain, add and delete definitions and check network execution.
To monitor and maintain a network using a network diagram
In the object workspace, select a Network
Master or Job Master instance and choose
() from the
context menu.
Or:
In the object workspace, select an Active
Run or Job Active instance and choose
or Network Diagram from the
context menu.
A Diagram Network window like the following opens.:
All maintenance functions available to monitor and maintain a network from a diagram are described in Viewing and Maintaining a Job Network Diagram in the section Network Maintenance.
You can import and export objects using the Import/Export function of the General metanode or the Export function of a selected node or node instance.
For detailed information on using the functions, see Importing Objects and Exporting Objects in the Import/Export Functions documentation.
The General metanode provides menu functions that are performed on all objects available in your current Entire Operations environment.
To list all available functions for the menu
"General":
Select menu General in the main menu.
The following table explains the available Commands and functions:
| Function | Meaning | Described in Section |
|---|---|---|
| Next Activations | Display a list of future activations. |
See Viewing and Modifying Next Network Activations in the section Schedule Maintenance. |
| List Active Jobs | List and manage all active jobs of the selected job network. | See Listing Active Jobs in the section Maintaining Active Jobs. |
| Activity Log | Start or cancel the display of current activities. | See Monitoring Entire Operations Activities in the section Log Information. |
| Browse Log | Display logged system events. | See Displaying Logged Information - Browse Log Function in the section Log Information. |
| Monitor Status | Open Entire Operations Monitor status window. | See Monitor Status. |
| Determination Date | Display the determination date for an evaluation function. | See Determination Date for Report Data in the section Reporting. |
| Reporting | Entire Operations reporting functions. | See Report Types in the section Reporting. |
| Cross-References |
Cross-check the use of individual Entire Operations objects and produce a report from the data found. |
See Types of Cross-References in the section Cross-References. |
| Import/Export | Entire Operations import/export functions. | Importing Objects and Exporting Objects in the Import/Export Functions documentation. |
| Show Messages | Show the contents of all mailboxes to which you are connected. | See Show Messages. |
| Show Workplan | Open the workplan or bring it to the foreground. | See Show Workplan. |
| Show all Owners | List all owners (SYSDBA access). | See Show all Owners |
| Show linked Owners | List owners assigned to the current user. | See Show linked Owners. |
| Set Drag And Drop Function | Drag a node from the tree view and drop it in the empty workspace. As a result of this action, a specific function is then executed. | See Drag & Drop. |
The Monitor is the heart of Entire Operations. The Monitor is a complex program that wakes up periodically and checks the definitions stored in the master database for any work to do. It activates and processes networks and jobs according to their prerequisites and controls running job networks, even if they reside on the nodes of different computers.
The Monitor Status function of the General metanode is used, for example, to start and stop the Monitor.
Before you can monitor Entire Operations activities, you may have to log on a node.
To monitor Entire Operations
In the Title Bar choose .
Choose .
For an inactive node, a Logon Node dialog opens first.
The fields contained in this dialog are explained in Fields: Logon Node.
Enter your user ID and password and choose to log on to the specified node.
A Monitor Status window opens displaying all Monitor tasks.
Here you can:
Start and stop the Monitor.
Hold or release a certain Monitor task.
If you want to display the Monitor tasks before the dialog is automatically refreshed, you can refresh it manually by selecting the button.
Select .
For detailed information, see Status of the Entire Operations Monitor in the Administration documentation.
The function of the General is used to list mailbox messages and requests as shown in the following example:
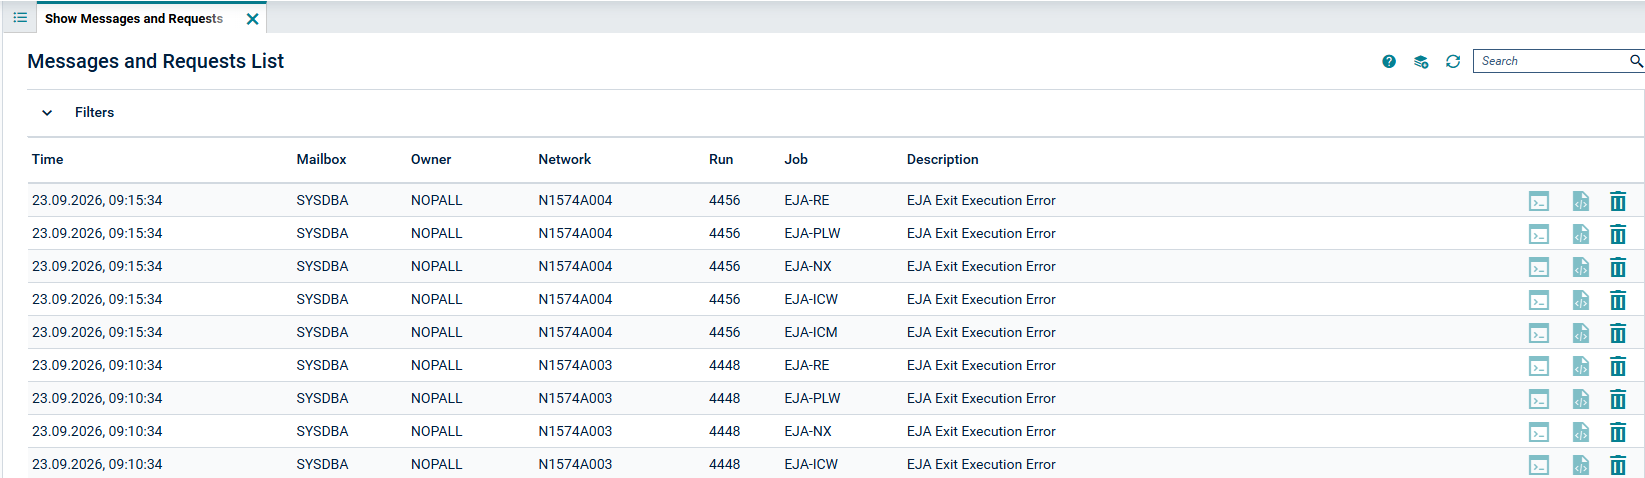
For explanations of this window, see Handling Messages and Requests in the section Working with Mailboxes.