
In more complex applications, you often have to cope with situations in which you have to go through a sequence of pages. For example, for entering a purchase order, you have to specify first some header information (like customer, address, etc.), go to a list of items you want to order, open detail information page(s) on a selected item, etc.
The navigation can be quite complex on its own - there are several frameworks available which deal with this topic.
What Application Designer offers is a way to navigate between different pages. How you find out when and where to navigate to (server-side business logic) - is not of interest for Application Designer. As soon as you know where to go to, tell Application Designer your decision.
The information provided in this part is organized under the following headings:
Page navigation is triggered by the adapter class. Typically, it is a method call which
is triggered by a button click. The Adapter class from which you
derive your adapter class, offers some methods which make page navigation very simple.
This section covers the following topics:
The most simple way of navigating can be seen in the following code example:
public void showNextPage()
{
    // check if navigation is possible
    if (... any check is wrong...)
    {
        ...
        this.outputMessage("E","Please first input all fields");
        return;
    }
    // open new page
    this.switchToPage("pageName.html");
}
In this method, first there is a check whether navigation is "appropriate"
in the current situation. If not, an error message is shown in the status bar.
Otherwise, navigation is done by the inherited method
switchToPage(pageName).
In our example, the next screen is - as usual - linked with a specific adapter class. An instance of this adapter class is generated by the session management.
If you want to prepare the adapter of the next screen in a certain way, you proceed as follows.
Before navigating to the next page, you can ask for the adapter which is linked to the next page:
public void showNextPage()
{
    // check if navigation is possible
    if (... any check is wrong...)
    {
       ...
        this.outputMessage("E","Please first input all fields");
        return;
    }
    // prepare adapter object which corresponds to next page
    XYZModel m = (XYZModel)this.findAdapter(XYZModel.class);
    m.setParam1(...);
    m.setParam2(...);
    ...
    ...
    // open new page
    this.switchToPage("pageName.html");
}
The method findAdapter returns the adapter object which is
assigned to the next page. Therefore, you are able to prepare the adapter by setting any
information you want to show in the next screen.
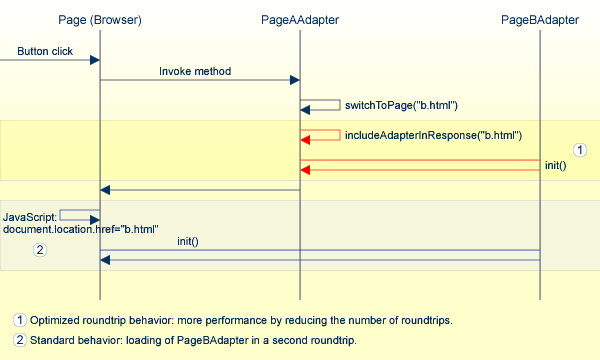
The following example shows how to increase performance for page navigation using the
method includeAdapterInResponse. It is typically used with:
switchToPage();
openPopup();
openCISPageInTarget()
Example:
public void showNextPage()
{
    // open new page
    switchToPage("pageName.html");
    // initialize the corresponding Adapter of pageName.html
    includeAdapterInResponse("pageName.html", true);
}
The method includeAdapterInResponse includes the adapter of
the second page (page B) into the response processing of the first page (page A). The
adapter is processed in the same way as it is processed when being called by an explicit
HTTP request coming from the browser. This is an effective mechanism for reducing the
number of roundtrips between the browser and the server (it reduces the number of
roundtrips from two to one). This is illustrated by the following diagram:
Note
In a local area network (LAN) environment, the gain in performance will not be
significant. However, in a slow wide area network (WAN) environment, the performance
will be improved significantly.
You might ask: who controls the life cycle of the adapter classes? If I navigate from page "A" to page "B" and go back to page "A": do I come back to the adapter object I was already using, or do I get a new adapter instance?
This section covers the following topics:
The management of the adapters inside the server is done by the session management of Application Designer. Typically you do not have to take care of it - it is done automatically in front of your adapters.
Every browser instance connected to Application Designer creates a session and is assigned to it at the server side. If you start another browser instance, a second session is created internally which is completely decoupled from all other sessions. And so on.
A session is divided into subsessions. A subsession is a logical separation of independent activities which run parallel within the context of one session. Example: in the workplace, you can run various applications in parallel. You can switch from one application to the other. Each running application is represented by an instance of a subsession at the server side. The subsessions are also completely isolated from each other.
Within a subsession, the adapter instances are held. The basic rules for managing these instances inside one subsession are:
For each adapter class one instance is kept. This means: if a page requests an adapter, it is first determined whether this adapter instance is already created within the subsession. If yes, the existing instance is used, otherwise a new adapter instance is created and registered.
The adapter instance is held for the whole life cycle of the subsession - as long as not explicitly removed by the adapter logic.
All variant and page navigation is done inside a subsession as described in this section.
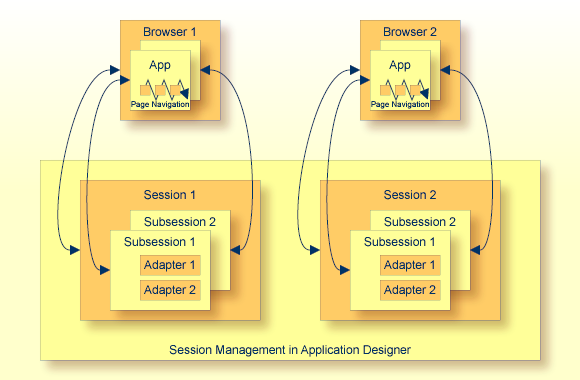
Page navigation within the browser is a navigation between adapter instances of the same subsession.
The final garbage collection of adapter instances is done by removing a subsession - if
not explicitly controlled in a different way by the adapter logic. The adapter class
offers the method endProcess() which removes the subsession you
are just working with:
public void exit()
{
	    // check if you really want to exit
	    if ( ... )
	    {
	        ...
	        this.outputMessage("E","Cannot exit due to...");
	        return;
	    }
	    // exit
	    this.endProcess();
}
Whenever a user logs off, the session - including all subsessions and its assigned adapter instances - is removed from the session management and released for garbage collection.
Pop-up dialogs are just normal Application Designer pages (except for a small difference) which are opened in modal pop-up mode. The pop-up management does not start a new browser instance - everything is done in the same instance in which you are working.
Invoking a pop-up dialog follows the same rules as navigating between pages. The Java source of the adapter looks as follows:
public void showPopup()
{
    // check if navigation is possible
    if (... any check is wrong...)
    {
        ...
        this.outputMessage("E","Opening pop-up is not possible...");
        return;
    }
    // open new page
    this.openPopup("pageName.html");
}
The adapter - which is used as a server-side counterpart of the pop-up dialog - is managed like navigating between pages. Therefore, you can access the adapter before opening the pop-up dialog and prepare some content:
public void showPopup()
{
    // check if navigation is possible
    if (... any check is wrong...)
    {
        ...
        this.outputMessage("E","Opening pop-up is not possible...");
        return;
    }
    // prepare adapter object which corresponds to next page
    XYZModel m = (XYZModel)this.findAdapter(XYZModel.class);
    m.setParam1(...);
    m.setParam2(...);
    ...
    ...
    // open new page
    this.openPopup("pageName.html");
}
This section covers the following topics:
Any Application Designer page can be opened as a pop-up dialog. Inside the PAGE tag of the page, you can define how to open the pop-up dialog. There are a couple of properties which can be used for this purpose:
popupwidth
popupheight
popupfeature
For further information, see the PAGE property definition in the Java Page Layout > Typical Page Layout documentation.
The pop-up parameters (width, height, features) can also be passed before calling a
pop-up. The Adapter class offers corresponding interfaces. The
following code shows how to open a pop-up with a certain title and with a certain size
and position:
/** */
public void onOpenPopup()
{
    setPopupFeatures(100, // x-position
                     100, // y-position
                     300, // width
                     200, // height
                     ""   // additional features as string (see PAGE-POPUPFEATURES docu)
                    );
    setPopupTitle("This is the title of the pop-up");
    openPopup("25_PositionedPopup1.html");
}
The parameters you pass override the parameters that may be defined in the pop-up page's layout definition.
A pop-up dialog can be closed by its corresponding adapter by the
closePage() method which is inherited from the
Adapter class:
/** This method is bound to the exit button of the pop-up page. */
public void exitPopup()
{
    // check if can be closed
    ...
    ...
    // close pop-up
    this.closePage();
}
In addition, a user can always close a dialog by pressing ALT+F4 or by choosing the close icon at the top right corner of the window title. The adapter - both adapters, the pop-up adapter and the adapter of the page from which the pop-up dialog was called - are not informed about this action and so it always has to be taken into consideration that a pop-up dialog might be closed by the user.
Sometimes you need to resize the pop-up in which the user is currently working. For example, you want to show additional information and therefore have to increase the height of the pop-up.
The following code is inside the adapter object that belongs to the opened pop-up page:
public void onXxxxxx()
{
    findFunctionsLivingPopup().setPopupSize(m_newWidth,m_newHeight);
}
By the switchToPage(...) and the
openPopup(...) methods, a URL is passed as a string parameter
to Application Designer for navigation. How can the URL be defined?
You can use relative links as long as the page to which you navigate is in the same directory as the page from which you navigate. This is especially important when navigating between pages which belong to the same application project. See also Application Project Management in First Steps Java Pages > Some Background Information.
If you want to navigate outside your project, you have to specify a link starting with the document root of your HTTP server. For each application project, a new context path is set up with the name of the project. Navigating from one project's file to another can be done by specifying the full URL like /<project>/<projectfile.html>.
Pages created without the project management (such as the Hello World example) are accessible by the default context /HTMLBasedGUI/.
In case you want to provide help in form of a pop-up dialog - based on a certain field - Application Designer offers a technique for implementing a value selection help:
The FIELD control offers the property popupmethod. With
this property, a method of the adapter class is called whenever the user requests a
value help inside the field - by pressing F4 or F7 in the field
or by double-clicking on the field.
A pop-up dialog opens displaying possible data selections.
The value help pop-up dialogs are just normal pop-up dialogs which just have a dedicated purpose.
This section covers the following topics:
Inherited from the Adapter class, there is a very simple way to
provide a value help pop-up dialog. The method openIdValueHelp
is implemented in a generic way and can be used as follows:
In your adapter, implement a method
findValidValuesForXxx(). Replace
"Xxx" with the name of the property field.
This method must return an array of
com.softwareag.cis.server.util.ValidValueLine objects. This
array contains pairs of IDs and values which are valid data options for the
Xxx property.
When requesting a value help for the corresponding field, a pop-up dialog displays
the ValidValueLine objects which are passed back from your
method. If the user selects an item in the pop-up dialog, the value is placed in the
setXXX method of the property.
The following Java source shows an example:
// property >department<
String m_department;
public String getDepartment() { return m_department; }
public void setDepartment(String value) { m_department = value; }
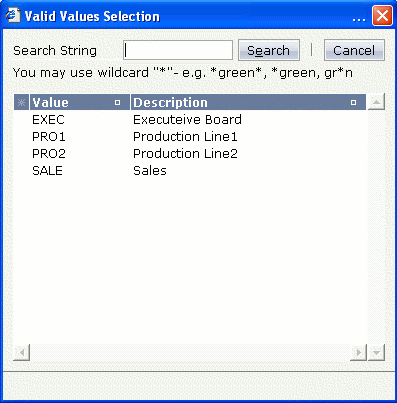
public ValidValueLine[] findValidValuesForDepartment()
{
Vector v = new Vector();
v.addElement(new ValidValueLine("EXEC","Executive Board"));
v.addElement(new ValidValueLine("PRO1","Production Line1"));
v.addElement(new ValidValueLine("PRO2","Production Line2"));
v.addElement(new ValidValueLine("SALE","Sales"));
ValidValueLine[] result = new ValidValueLine[v.size()];
v.copyInto(result);
return result;
}
The XML layout looks as follows:
<rowarea name="Field with Value Help">
    <itr>
        <label name="Department" width="100">
        </label>
        <field valueprop="department" width="150" popupmethod="openIdValueHelp">
        </field>
    </itr>
</rowarea>
The result is a field which automatically opens a pop-up dialog when the user presses F4 or F7, or double-clicks on the field.


An additional feature available: instead of displaying pairs of ID and name, the dialog
can display a list of IDs only. There is a constructor of the
ValidValueLine class with only passing an ID to it:
public ValidValueLine[] findValidValuesForDepartment_02()
    {
        Vector v = new Vector();
        v.addElement(new ValidValueLine("EXEC"));
        v.addElement(new ValidValueLine("PRO1"));
        v.addElement(new ValidValueLine("PRO2"));
        v.addElement(new ValidValueLine("SALE"));
        ValidValueLine[] result = new ValidValueLine[v.size()];
        v.copyInto(result);
        return result;
    }
Now the pop-up dialog contains only a column containing the IDs:
See the description of the FIELD control for information on how to implement a valid value help with
the openIdValueCombo method. This method does not open a pop-up
but it open a combo-like selection.
The interface on the server side is exactly the same as for
openIdValueHelp - just the rendering result is different:
Further information is provided in the description of the FIELD control.
There are standard pop-up dialogs available for general usage which you do not have to code yourself.
This section covers the following topics:
The OK pop-up is used for displaying a text with an button.
The following is an example of an OK pop-up:
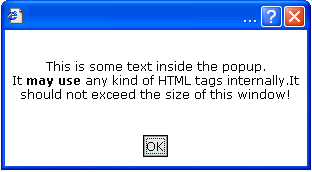
The code of the adapter is:
public void showOKPopup()
{
    PopupOKModel pok = (PopupOKModel)findAdapter(PopupOKModel.class);
    pok.init("This is some text inside the pop-up.<br>"+
             "It <b>may use</b> any kind of HTML tags internally." +
             "It should not exceed the size of this window!");
    this.openPopup("/HTMLBasedGUI/popupok.html");
}
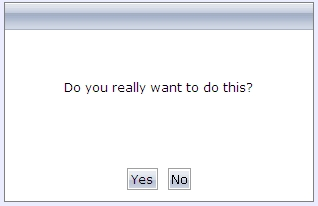
The Yes/No pop-up is used for asking the user a question. Depending on user’s decision, activities are started inside the adapter.
The following is an example of a Yes/No pop-up:
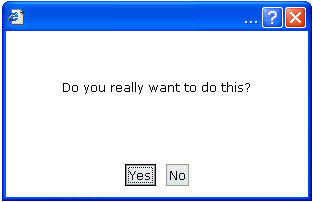
The code of the adapter is:
public class YESCommand implements com.softwareag.cis.server.util.ICommand
{
    public void execute()
    { outputMessage("S","Yes command was called"); }
}
public class NOCommand implements com.softwareag.cis.server.util.ICommand
{
    public void execute()
    { outputMessage("S","No command was called"); }
}
public void showYESNOPopup()
{
    PopupYesNoModel pyn = (PopupYesNoModel)findAdapter(PopupYesNoModel.class);
    pyn.init("Do you really want to do this?",
              new YESCommand(),
              new NOCommand());
    this.openPopup("/HTMLBasedGUI/popupyesno.html");
}
The pop-up dialog is initialised by passing the question and two "reaction objects" to it. One "reaction object" is called when choosing the button, the other is called when choosing the button.
The "reaction objects" have to implement the interface
com.softwareag.cis.server.util.Icommand which just needs a
simple execute() method. In our example, the "reaction
objects" are implemented as inner classes of the adapter class.
The Log pop-up is used for displaying a log text.
The following is an example of a Log pop-up:

The code inside the adapter is:
public void showLOGPopup()
{
    PopupLogModel plm = (PopupLogModel)findAdapter(PopupLogModel.class);
    plm.init("You can put any kind of log into this pop-up.\n\n"+
             "The log is scrollable and you can do cut & paste from "+
             "the log into any other program. You cannot use HTML "+
             "to format the log.");
    this.openPopup("/HTMLBasedGUI/popuplog.html");
}
This is a typical example: the user works on a page of your application for a while and then choose the close icon in the right top corner of the page. Check whether the user has changed something and ask using a pop-up dialog if the user really wants to close the page.
The following Java source shows an implementation in the adapter class:
/** */
public void endProcess()
{
    if (m_changed == true)
    {
        PopupYesNoModel pyn = (PopupYesNoModel)findAdapter(PopupYesNoModel.class);
        pyn.init("You modified some data. Do you really want to exit?",
                 new ICommand() { public void execute() { executeEndProcess(); }},
                 null);
        this.openPopup("/HTMLBasedGUI/popupyesno.html");
    }
    else
    {
        executeEndProcess();
    }
}

/** */
public void executeEndProcess()
{
    super.endProcess();
}
The endProcess() method is called by the closing function of
the page. It is provided by the Adapter class from which the
adapter is inherited. The endProcess() method does already
everything which is required for removing the subsession.
Overwrite the endProcess() method and embed the code which
opens a Yes/No pop-up to ask whether the user really wants to quit the application. The
original closing function is shifted to the method
executeEndProcess(). The Yes/No pop-up got for the
"Yes" method an inner class pointing to the
executeEndProcess() method. The "No" method is
null and means that nothing should be done.
Page-based pop-up dialogs look and behave different from the standard pop-up dialogs. The content of a page-based pop-up dialog is not opened within a modal browser window. This has the following advantages:
Page-based pop-up dialogs are faster than the standard pop-up dialogs.
There are no browser window drawbacks. A page-based pop-up dialog does not have a close icon; the user must always choose a command button before the page-based pop-up dialog is closed. There is no status bar in which an URL can be shown.
Page-based pop-up dialogs are not affected by pop-up blockers.
Page-based pop-up dialogs are page-modal only. This means that they do not block the whole browser window. Other pages can be opened in a subpage or in an other frame.
To open standard pop-up dialogs and page-based pop-up dialogs, you have to use the following API calls:
Open a standard pop-up dialog in a browser window:
openPopup(page)
Open a page-based pop-up dialog:
openPagePopup(page)
