
This document covers the following topics:
After creating business services locally or downloading them from an existing server installation, you can generate Java clients and web services for the business services using the Generate Java Client wizard.
Using this wizard, you can
Generate Java clients
You can develop Java client applications that access Natural
Business Services server components via dynamic RPC. The wizard creates Java
clients from the business service files in a NaturalONE project and then
generates the Java client interface objects used by the Java client to access
the server components.
Generate web services
You can generate web services from the business service files in
a NaturalONE project. The generated objects are web service archives (files
with the extension .aar). They can be deployed in a Web
Services Stack runtime environment and registered in CentraSite. Web service
client applications can then access these web services and expose business
logic implemented by the Natural server components.
Note:
See also the Web Services Stack documentation, which is
available separately. When working with the Software AG Designer, you can find
it in the online help under Software AG Designer Guides.
 To use the Generate Java Client
In the Project Explorer view, select the business service file (that is, a file with the extension .bsrv) from which you want to generate a Java client or web service.
Invoke the context menu and choose one of the following commands: or .
The Generate Java Client wizard is shown for both commands. The only difference is that specific options are already preselected depending on the chosen command.
Specify all required information as described in the topics below. Some options require additional information. In such a case, you have to use the button repeatedly to proceed from the first page of the wizard to the last page.
When all required information has been provided, choose the button.
The different pages of the deployment wizard are described in the following topics:
On the first page of the wizard, you define the general settings for the generation.
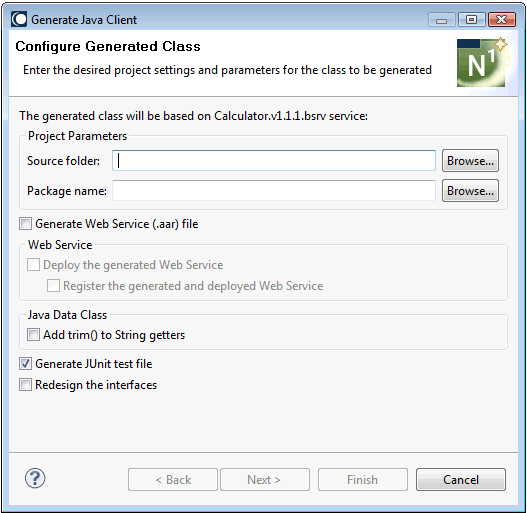
- Source folder
The source folder in which to generate the Java class. This folder must already exist. This can be the folder for any type of project (for example, a Java project), or a folder within a project. You can choose the button to select the folder from a dialog box.
If you select a project as the source folder, the wizard will automatically create and use <project-name>/Java/src as the source folder. In addition, the wizard will set the output/compilation folder to the bin folder corresponding to the source. For example, if the source folder is set to Java/src, then the output/compilation folder will be set to Java/bin.
- Package name
The name of the Java package. The package does not have to currently exist. You can either type the name for a new Java package, or you can choose the button to select an existing package from a dialog box.
- Generate Web Service (.aar) file
This option is preselected if you have invoked the wizard using the command.
If selected, the web service file (that is, a file with the extension .aar) will be created when the class is generated.
- Deploy the generate Web Service
Only enabled when Generate Web Service (.aar) file is selected.
This option is preselected if you have invoked the wizard using the command.
If selected, the wizard will display an additional page on which you have to specify the desired destination. See also Deploy NaturalONE Web Service.
If deselected, you can configure the web service to use WS-Security. See also Configuring the Web Service to Use WS-Security.
- Register the generated and deployed Web Service
This option is only shown when the CentraSite plug-in is installed. Only enabled when Deploy the generated Web Service is selected.
If selected, you can register the generated and deployed web service with CentraSite. The wizard will display an additional page on which you have to specify the required information for connecting to CentraSite. See also Connect to CentraSite.
- Add trim() to String getters
If selected, a Java trim statement (for example,
string_variable.trim()) will be added to each String property getter method in the generated Java Data class (<name>Data.java). The trim statement will return a copy of the String property with leading and trailing whitespace omitted.- Generate JUnit test file
If selected, a JUnit test file is generated which contains test functions that correspond to each method in the business service. For more information on the generated JUnit test file, see Testing the Java Class.
- Redesign the interfaces
If selected, the wizard will display an additional page on which you can redesign the interface for Natural subprograms. For example, you can change the default IDL directions or you can select which portions of a redefined field are to be used. See also Design Interface for Natural Subprogram.
Note:
When an exception occurs as the result of one of your actions
in the wizard, this may happen because required resources cannot be found.
Check whether all required resources are located in your workspace and that
your steplib chain file lists the required library.
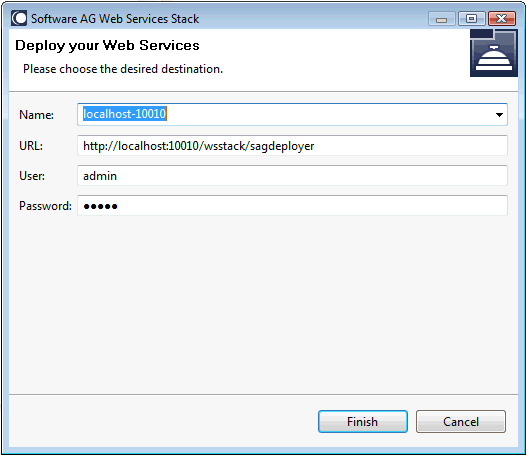
This page is shown when the option Deploy the generated Web Service has been selected in the wizard. It displays the default parameters for the WS-Stack runtime environment running in the default Tomcat servlet engine. The default user credentials are shown. They can be changed at the first logon.
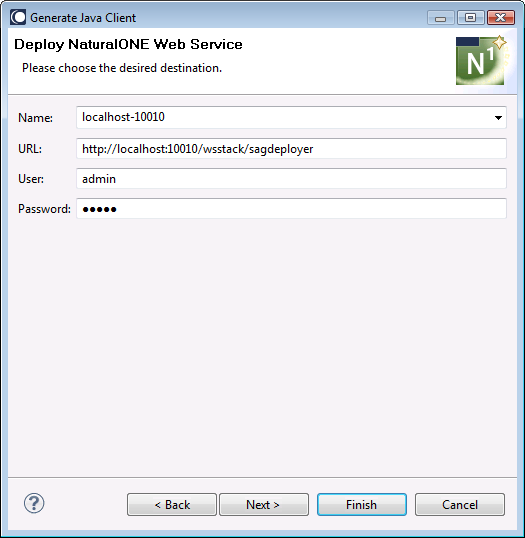
Confirm the name and location of the WS-Stack runtime environment, and confirm the user credentials.
Note:
As password, you must use the specified Administrator password
from the NaturalONE installation. You may save this password in the Eclipse
secure storage (under Window > Preferences > Software AG > Web
Services Stack > Deployment).
For more information on deploying a Web service or changing logon credentials, refer to the Web Services Stack documentation.
This page is shown when the option Register the generated and deployed Web Service has been selected in the wizard. You can then register the generated and deployed web service with CentraSite.
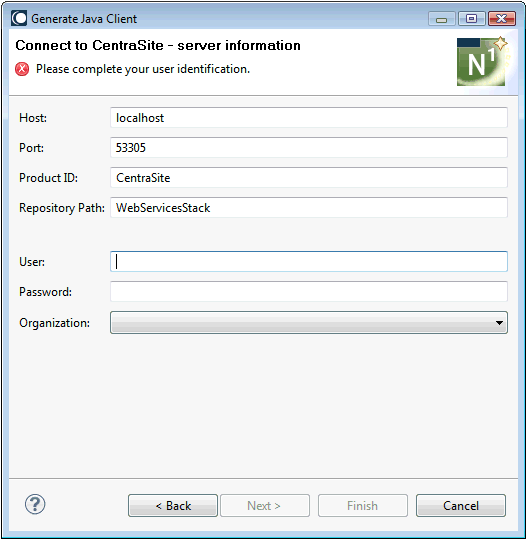
Enter your CentraSite user ID and password, and select the organization. For more information on CentraSite, see the CentraSite documentation.
Note:
Default values for this page are defined in the Business
Service preferences. See CentraSite in
Setting the Preferences for Business Services.
This page is shown when the option Redesign the interfaces has been selected in the wizard. You can then redesign the interface generated for a Java client.
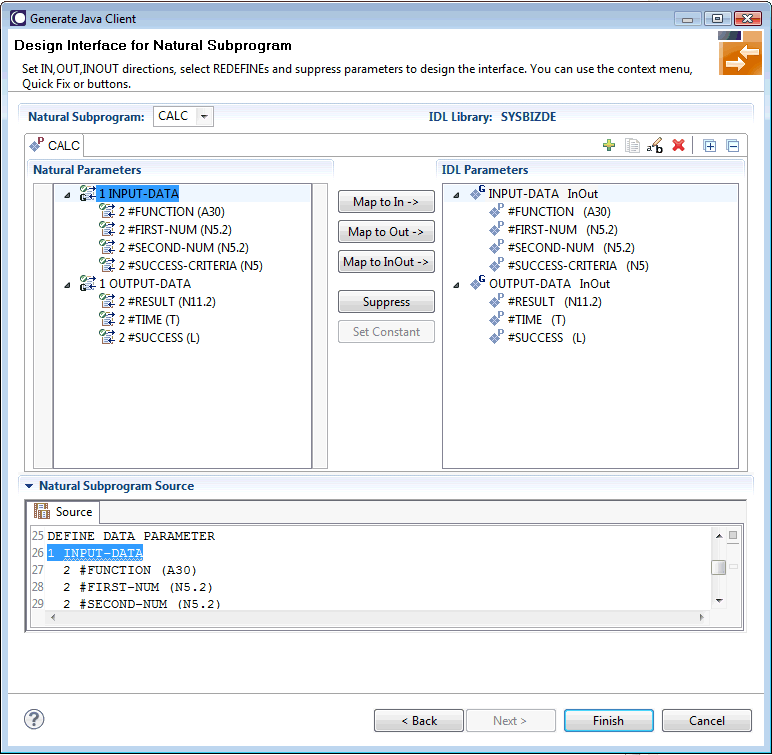
The upper left pane on this page shows the parameters of the Natural subprogram to extract from. For each Natural subprogram parameter, you can choose an operation as described in the following table.
| Task | Procedure |
|---|---|
| Change the default IDL directions for the generated Java client |
In the upper left pane, select the level 1 parameter that you want to change and choose Map to In, Map to Out or Map to InOut. The operation is reflected in the right pane. Continue to define level 1 parameters as required. Natural parameters that are mapped in the interface are displayed with a green tick. |
| Define which parameters redefined in the Natural PDA are part of the extracted interface |
In the upper left pane, select the |
| Suppress unnecessary parameters, which creates a less cluttered IDL client interface and minimizes the amount of data transferred at runtime |
In the upper left pane, select the parameter and choose . Natural parameters suppressed in the interface are displayed in italic type. |
The upper right pane displays the extracted interface (IDL). The IDL directions will be inserted as top-level parameters (level 1) in the interface definition for the Natural subprogram.
The bottom pane is used for reference purposes. It displays the Natural subprogram source and, if available, its PDA sources, each in a separate tab. To reserve more space for viewing the upper panes, you can collapse the bottom pane when it is not needed.
For more information on this page, refer to the EntireX documentation.
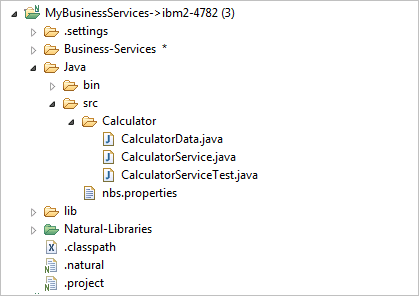
The folders and files that have been generated by the wizard are shown in the Project Explorer view. The following example shows a package with the name "Calculator" which is stored in the Java/src folder of the project - a web service has not been generated:
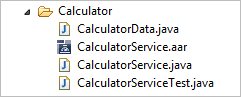
If you have also selected to generate a web service, the package contains an additional .aar file as shown in the following example:
The following files are generated into the Java/src folder:
Data Class
Java class containing the PDA for the business service, which is
mapped to Java. The class has the same name as the business service followed by
the string "Data". For example,
CalculatorData.java.
Business Service Class
Java class containing the code that communicates with the
business service, as well as the Add method. The class has the same name as the
business service followed by the string "Service".
For example, CalculatorService.java.
JUnit Class
This class is only generated when the option Generate
JUnit test file has been selected in the wizard. The class has the
same name as the business service followed by the string
"ServiceTest". For example,
CalculatorServiceTest.java. See also
Testing the Java
Class.
Web Service Archive File
This file is only generated when the option Generate
Web Service (.aar) file has been selected in the wizard. The file
has the same name as the business service followed by the string
"Service". For example,
CalculatorService.aar. See also
Configuring the Web
Service to Use WS-Security.
Properties File for the Business Service
The name of this file is always
nbs.properties. This file is used by the
NBSSettings class to load Broker RPC connection
settings. See also Setting
the nbs.properties File to Run a Dynamic RPC Java
Class.
Note:
Some of the above files are automatically opened in the
corresponding editors.
Library files with the following names are generated into the Java/lib folder:
wrappercore.jar
Library containing the helper classes and functionality for the
generated Java class.
You can set the nbs.properties file to run a dynamic RPC Java class. This file is used to load Broker RPC connection settings.
The NBSSettings class will attempt to find
the nbs.properties file using the following search
order:
Java system property nbs_properties pointing to
the file.
Environment variable nbs_properties pointing to
the file.
Class loader NBSSettings.
Context class loader.
The properties in the nbs.properties file are:
| Property | Description | ||
|---|---|---|---|
broker.id |
Broker connection ID. | ||
broker.service
|
Broker service endpoint. | ||
broker.waitTime
|
Broker wait time. | ||
user.id |
User ID to use with Broker. | ||
password |
Password to use with Broker.
|
For example:
broker.id=localhost:1971
broker.service=RPC/SRV1/CALLNAT
broker.waitTime=60S
user.id=PWRUSR
password=
Notes:
broker.waitTime) may be increased. To use another wait time, add
the following property in the nbs.properties file:
broker.waitTime=<nnn>S (e.g.
broker.waitTime=999S).
Both the user.id and password properties
can use a Java class suffix (for example, package.MyService),
which allows the client to use different user IDs and passwords for different
services and/or groups of services. For example:
user.id.package.name.MyService=USERIDA
password.package.name.MyService-PWDA
user.id.package.name=USERIDB
password.package.name=PWDB
user.id=PWRUSR
password=
When the web service MyService in the Java package
package.name is invoked, the user ID USERIDA and the
password PWDA will be used.
When any other service within the Java package
package.name is invoked, the user ID USERIDB and the
password PWDB will be used.
All other services will use the user ID PWRUSR and no
password.
When the Generate JUnit test file option is selected in the wizard, a JUnit class is generated. This class contains test functions that correspond to each method in the business service. For example:
@Test
 public void add() throws Exception {
  CalculatorService service = new CalculatorService();
  CalculatorData.CalcClass.InputDataClass inputdataclass = new CalculatorData.CalcClass.InputDataClass();
  CalculatorData.CalcClass.OutputDataClass outputdataclass = new CalculatorData.CalcClass.OutputDataClass();
  // TODO initialize data
  CalculatorData.CalcClass.CalcClassResult result = service.add(inputdataclass, outputdataclass);
  Assert.assertNotNull("Result is null", result);
  // TODO Add data verification here
 }
//TODO comments have been added in the source to
indicate where additional information is added for the test. By default, the
test succeeds if no errors occur during the call to the business service and if
data is returned.
Data can be added before the service method is invoked. For example:
// TODO initialize data
inputdataclass.setFirstNum(BigDecimal.valueOf(2));
inputdataclass.setSecondNum(BigDecimal.valueOf(2));
In addition, an assert clause can be included to verify that the result is correct. For example:
// TODO Add data verification here
Assert.assertEquals(BigInteger.valueOf(4), result.getOutputData().getResult().toBigInteger());
Tests can be invoked using standard Eclipse JUnit functionality (that is, run as JUnit test). The environment for the test is contained in this function in the test file. For example:
private Broker createBroker() throws BrokerException {
	String userID = "GUEST";
	String password = "";
	Broker broker =
new Broker(Demotest.DEFAULT_BROKERID, userID,
		Demotest.DEFAULT_SERVER);
	broker.logon(password);
	return broker;
}
After generating a Java class, you can write an application that uses the class to invoke a business service. Use the following code as a template for writing the application. Read the comments for additional information.
// Create the EntireX Broker object
Broker broker = new Broker("localhost:1971","GUEST");

// Create the service class.
CalculatorService calcservice = new CalculatorService(broker, "RPC/SRV1/CALLNAT");

// Create the service data classes
CalculatorData.CalcClass.InputDataClass input = new CalculatorData.CalcClass.InputDataClass();
CalculatorData.CalcClass.OutputDataClass output = new CalculatorData.CalcClass.OutputDataClass();

// Set input values for the call
input.setFirstNum(BigDecimal.valueOf(2));
input.setSecondNum(BigDecimal.valueOf(2));
input.setFunction("Add");

// Invoke a service method, passing in the data classes
// make sure to catch any errors that might happen.
CalculatorData.CalcClass.CalcClassResult calcresult = null;
try {
	calcresult = calcservice.add(input, output);
} catch (Exception e) {
	e.printStackTrace();
}
// Examine the result
System.out.println("Result is: " + calcresult.getOutputData().getResult());
All generated services extend
com.softwareag.naturalone.gen.dynamicrpc.core.AbstractService.
The default constructor for the generated service determines which Broker
credentials to use based on the following rules:
When WS-Security is turned on and the credentials are passed in the SOAP header, they will be used in the call to Broker.
In all other cases, the settings in the nbs.properties file will be used. See also Setting the nbs.properties File to Run a Dynamic RPC Java Class.
If you want to configure the web service to use WS-Security, do not select the Deploy the generated Web Service in the wizard. Generate the web service (.aar) file without this option and then proceed as described below.
To configure the web service to use WS-Security
Go to the Java/src folder and expand the package into which the .aar file has been generated.
Open the generated .aar file.
In the resulting editor, go to the Services tab (shown at the bottom of the editor page).
In the Modules section, select the Enable WS-Security check box.
In the Security section, select the following options:
no Binding
User Name Token (in the Token Assertions group)

Save the changes to the .aar file.
In the Project Explorer view, invoke context menu for the .aar file and choose .
The Software AG Web Services Stack dialog box appears. It shows the same information as the Deploy NaturalONE Web Service page of the Generate Java Client wizard. For a description of this page, see Deploy NaturalONE Web Service.
Confirm the information and choose the button.
On the client, you have to include the following SOAP header with the correct credentials in the XML file. You can then test the generated web service using a SOAP engine.
<soapenv12:Envelope xmlns:soapenv12="http://www.w3.org/2003/05/soap-envelope">
      <soapenv12:Header>
            <wsse:Security xmlns:soapenc12="http://www.w3.org/2003/05/soap-encoding"
                  xmlns:xsd="http://www.w3.org/2001/XMLSchema" xmlns:xsi="http://www.w3.org/2001/XMLSchema-instance"
                  xmlns:wsse="http://docs.oasis-open.org/wss/2004/01/oasis-200401-wss-wssecurity-secext-1.0.xsd"
            >
                  <wsse:UsernameToken>
                        <wsse:Username>MyUser</wsse:Username>
                        <wsse:Password>MyPassword</wsse:Password>
                  </wsse:UsernameToken>
            </wsse:Security>
      </soapenv12:Header>
      <soapenv12:Body>
For example, you can use SoapUI to test the web service. You deploy the web service into the WS-Stack, open the WS-Stack and display the web service in the browser. You can then use the URL of the web service in SoapUI where you also specify the credentials.
Note:
Since user credentials will be included in the SOAP header, it is
highly recommended that you use HTTPS. For instructions on how to configure
AXIS2 to use HTTPS, refer to the AXIS2 documentation.