
This document covers the following topics:
The Map Converter analyses the code of a Natural map and creates a so-called "map extract file" for each map. The map extract file contains information about the map. Normally, the map extract file is automatically deleted when the conversion process is completed. However, you also have the option to keep this file. The map extract files have the extension .njx and are not human-readable. They are only intended as input for the map conversion.
The conversion process can also be started on an
existing map extract file which has been created for the INPUT
statements in your source code.
The conversion process creates a Natural for Ajax page layout from each map extract file. Controls on the map are converted to controls on the page. Many features of the original map are converted to features of the page.
Note:
It is only possible to process character maps. GUI
elements contained in maps are not extracted.
By default, the Map Converter uses a predefined set of page templates and conversion rules that control the conversion process. The templates and the conversion rules can be modified or extended to adapt the converter to the requirements of a specific conversion project. With the advanced option to program own conversion handlers, the Map Converter provides additional flexibility and extensibility.
The following tools are available for the conversion of maps:
Map Converter
This tool is used for mass generation of layouts and also for generating single layouts.
See
Using the Map
Converter for further information.
Conversion Rules
You can use this tool to copy the conversion rules from other
user interface
components to the current user interface
component. See Using the Conversion Rules
Tool for further information.
Conversion Logs
You can use this tool to view or delete the log files that
have been created during the conversion. See
Using the Conversion Logs
Tool for further information.
The Map Converter is used for mass generation of layouts and also for generating single layouts.
 To convert maps
In the Project Explorer view or in the Natural Navigator view, select the Natural project which contains the maps that are to be converted.
Or:
If you want to convert just a couple of maps or already
existing map extract files, select them in the Project
Explorer view or in the Natural Navigator
view.
From the menu, choose . In the resulting New dialog box, expand the Natural node, select Map Conversion and then choose the button.
Or:
If you have selected single maps or map extract files,
invoke the context menu and choose .
The following dialog box appears.
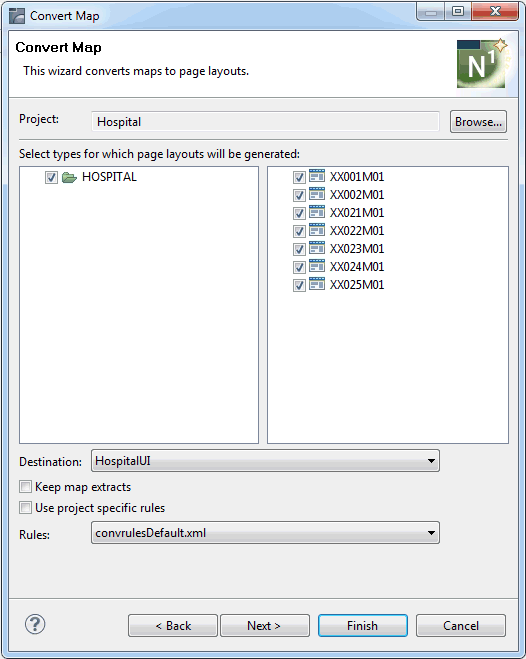
The left side of the dialog box shows the libraries in the selected project.
The right side of the dialog box shows the maps in the library which is currently selected on the left. If available, map extract files are also shown.
Select all maps and map extract files for which you want to generate a layout.
From the Destination drop-down list box, select the user interface component in the current project into which the layouts are to be generated.
If the map extract files which are generated for the selected maps are to be deleted after the generation, leave the Keep map extracts check box blank. If you want to keep the map extract files, select this check box.
If you want to use the default conversion rules and related templates, leave the Use project-specific rules check box empty. In this case, the Rules drop-down list box provides for selection the default conversion rules.
If you want to use your own project-specific conversion rules, select this check box. In this case, the Rules drop-down list box provides for selection the project-specific conversion rules that can be found in the convrules subfolder of your user interface component. See also Using the Conversion Rules Tool.
From the Rules drop-down list box, select the conversion rules that you want to use.
Choose the button to display the optional preview pages of the wizard (see below).
Or:
Choose the button to perform
all selected actions and to close the wizard.
The preview pages for the following actions are provided in the wizard when you choose the button repeatedly:
The second page of the wizard lists all maps and map extract files that you have selected on the first page. When you select one of these entries, information such as the following is shown at the bottom of the page.
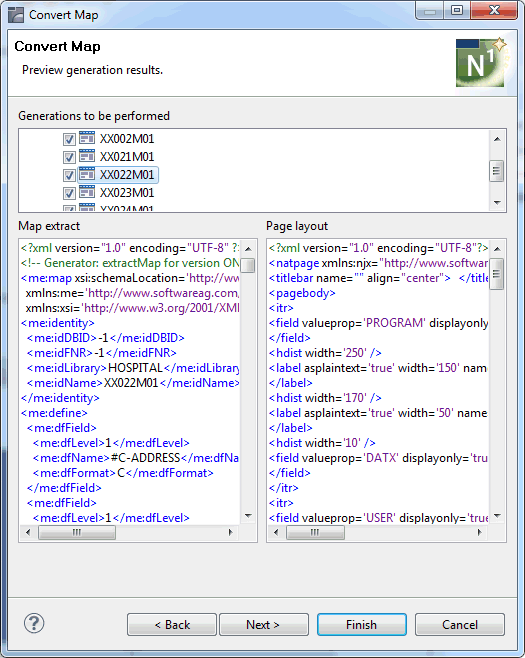
The left side of the page shows the XML code of the map extract file (either of the map extract file that will be generated for a selected map, or of an existing map extract file).
The right side shows the XML code that will be generated for the page layout.
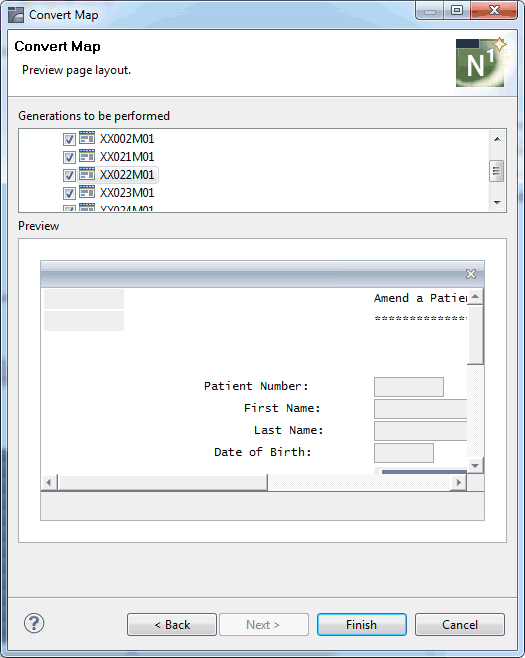
The third (and last) page of the wizard lists all maps and map extract files that you have selected on the first page. When you select one of these entries, the preview area at the bottom of this page shows the layout that will be generated for this entry. This is the page layout as it will appear in the browser.
The following table explains where the different types of files can be found.
| These files ... | ... are stored in this folder |
|---|---|
| Adapters, maps | SRC subfolder of the library. |
| Conversion rules | convrules subfolder of the user interface component. |
| Map extract files | RES subfolder of the library which also contains the corresponding map (only if the Keep map extracts option was specified). |
| Page layouts | xml subfolder of the user interface component. |
The conversion process creates a page layout in the user interface component that you specified as the destination in the Map Converter. When you save the page layout, a Natural adapter is generated into the folder that you specified when creating a user interface component.
You will notice that the parameter data area is the same as in the original map. This is the case even though the map uses system variables and variables with special characters. The necessary translation is done inside the generated adapter code and does not influence the application code. In more complex cases, the parameter data area of the adapter will contain more fields or partly different fields than the parameter data area of the map. This depends also on the applied conversion rules.
After the conversion, you create a main program for the adapter and run it in the browser.
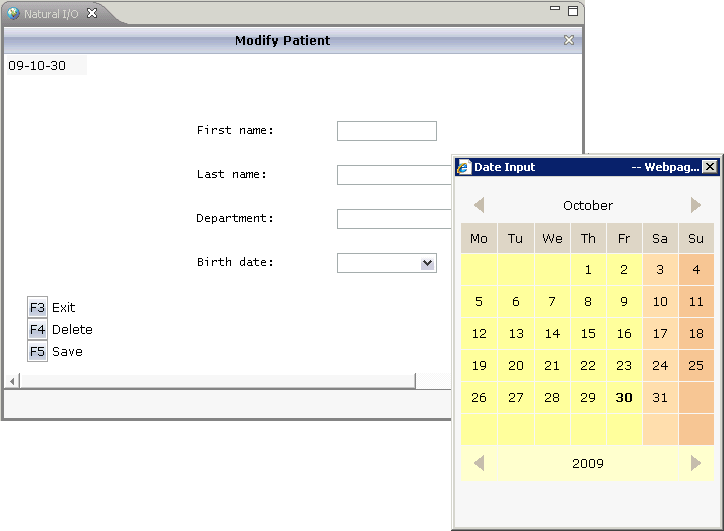
You may notice the following effects of the applied conversion rules:
The title in the first row of the map has been placed into the caption of the page and the asterisks have been stripped off. Your application will quite surely have a different layout of the map titles. The conversion rules can therefore be adapted to accommodate the needs of your application, and the rule that identifies the title and places it into the caption is just a simple application of customizing the conversion rules.
The literals such as "F4 Delete" on the map have each been turned into a button control and a label. This is also due to a sample conversion rule contained in the default conversion rules.
The date field has been converted to a field control with the data type "date". This enables the user to select the date with the Date Input dialog box.
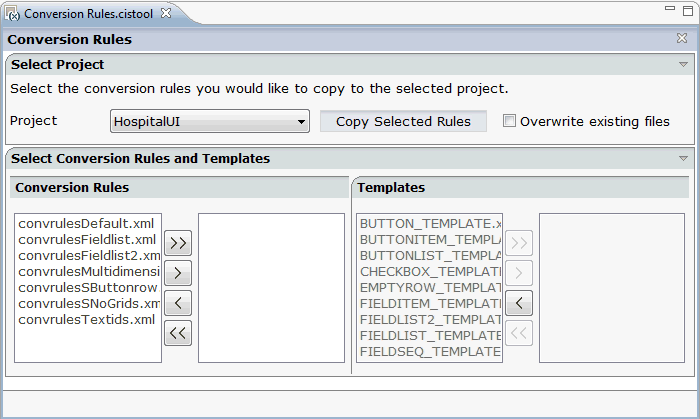
Using this tool you can copy the default conversion rules and templates to a selected user interface component for modification.
To invoke the Conversion Rules tool
In the Project Explorer view, select the Natural project for which you want to invoke the Conversion Rules tool.
Invoke the context menu and from the menu, choose .
To copy the conversion rules
From the Project drop-down list box, select the user interface component into which you want to copy the conversion rules.
In the Conversion Rules box, select the rules file(s) that you want to copy and choose the button.
Or:
If you want to copy all files, choose the
button.
The selected files are shown on the right side of the Conversion Rules box.
To deselect one or more files, you can use the or button.
For each selected rules file, the templates that are used in the rules file are automatically selected in the Templates box, so that always a consistent set of rules and templates is selected for copying.
Optional. If you want to overwrite any existing rules and templates files with the same names in the selected project, activate the Overwrite existing files check box.
Choose the button to copy the rules and templates files to the selected project.
For the most common conversions the following sample conversion rules files exists:
| File | Description |
|---|---|
| convrulesDefault.xml | Basic conversion rules for FIELD, TEXTGRIDSSS2 and ROWTABLEAREA2 controls. |
| convrulesFieldlist.xml | Example rules for NJX:FIELDLIST and NJX:FIELDVALUE controls. |
| convrulesFieldlist2.xml | Example rules for NJX:FIELDLIST and NJX:FIELDITEM controls. |
| convrulesMultidimensionalArrays.xml | Example rules for ROWTABLEAREA3. |
| convrulesSButtonrow.xml | Example rules for arranging all identified functions as buttons in a row at the bottom of the page layout. |
| convrulesSNoGrids.xml | Arrays are also mapped to simple FIELD controls. No grid controls are generated. |
| convrulesTextids.xml | Example rules for using a conversion listener to generate TEXTIDs (= multilanguage support). |
| convrulesCVVariables.xml | Example rules to generate the corresponding attributes and data controls for CV variables in the page layout. |
See also the comments on top of each conversion rules file for further details.
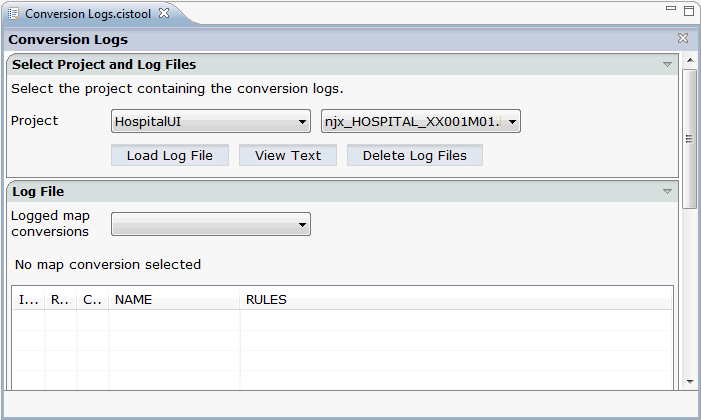
Using this tool you can view the log files that have been created during the conversion of Natural maps to Natural for Ajax layouts. You can also delete these log files.
To invoke the Conversion Logs tool
In the Project Explorer view, select the Natural project for which you want to invoke the Conversion Logs tool.
Invoke the context menu and from the menu, choose .
To view a log file
From the Project drop-down list box, select the user interface component for which you want to view a log file.
The log files contained in this user interface component are shown in the drop-down list box to the right.
Select the log file that you want to view.
Choose the button.
Log lines for the selected log file are now shown at the bottom of the tool. Each log file contains the conversion results of one or several maps. The log lines that are shown belong to an individual map; this is the map that is selected in the Logged map conversions drop-down list box.
Optional. Select a different map from the Logged map conversions drop-down list box.
The conversion result of the newly selected map is immediately shown at the bottom of the tool.
Optional. Choose the button to display the content of the selected log file as a CSV file in a dialog. This shows the conversion results for all maps.
To delete log files
Select the project for which you want to delete the log files.
Choose the button.
A dialog appears asking to confirm the deletion.
Choose the button to delete all log files in the selected project.